Replacing the front crankshaft oil seal
We replace the front crankshaft oil seal when traces of engine oil leakage appear on the wall of the engine crankcase pan, under the generator drive pulley.
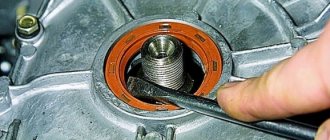
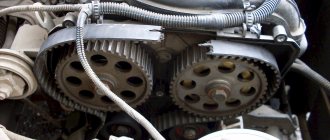
Remove the timing belt (see “Checking the condition and replacing the timing belt”). After removing the timing belt, the crankshaft and camshafts must not be rotated to avoid disruption of the engine valve timing and sticking of the timing valves into the pistons. On both sides, we insert the blades of slotted screwdrivers between the oil pump cover and the rear end of the crankshaft timing pulley.
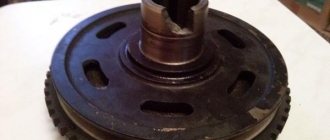
Carefully, so as not to damage the toothed pulley, pry it evenly with screwdrivers...
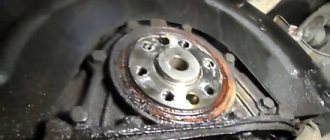
...and remove the pulley from the crankshaft toe.
...remove it from the oil pump cover. In contrast to the front crankshaft oil seal of the previous generation VAZ-2108, -21114 engines, to increase the service life...
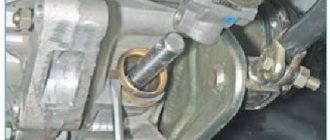
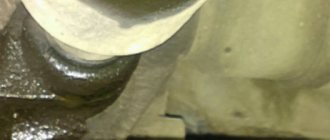
...the manufacturer installs an imported oil seal (with dimensions 28×42×6 mm), made of less elastic material and without a bracelet spring. In the absence of a new imported oil seal, you can install the front oil seal (with dimensions 28×42×7 mm) of the crankshaft of the previous generation VAZ-2108, -21114 engines. Before installing the new oil seal, apply a thin layer of engine oil to its working edge...
...and press in the oil seal using a tool head or a piece of pipe of a suitable size. We perform assembly in reverse order. In this case, it is imperative to replace the timing belt.
Source
Replacing the front crankshaft oil seal of the Lada Granta engine (VAZ 11183, 21116)
We replace the front crankshaft oil seal when traces of engine oil leakage appear on the wall of the engine crankcase pan, under the generator drive pulley.
Remove the timing belt (see “Checking the condition and replacing the timing belt”).
After removing the timing belt, the crankshaft and camshafts must not be rotated to avoid disruption of the engine valve timing and sticking of the timing valves into the pistons. On both sides, we insert the blades of slotted screwdrivers between the oil pump cover and the rear end of the crankshaft timing pulley.
Carefully, so as not to damage the toothed pulley, pry it evenly with screwdrivers...
...and remove the pulley from the crankshaft toe.
...remove it from the oil pump cover. Unlike the front crankshaft oil seal of the previous generation VAZ-2108, -21114 engines to increase the service life...
...the manufacturer installs an imported oil seal (with dimensions 28×42×6 mm), made of less elastic material and without a bracelet spring. In the absence of a new imported oil seal, you can install the front oil seal (with dimensions 28×42×7 mm) of the crankshaft of the previous generation VAZ-2108, -21114 engines. Before installing the new oil seal, apply a thin layer of engine oil to its working edge...
...and press in the oil seal using a tool head or a piece of pipe of a suitable size. We perform assembly in reverse order. In this case, it is imperative to replace the timing belt.
Video on the topic “Lada Granta. Replacing the front engine crankshaft oil seal"
replacing the crankshaft oil seal on a VAZ 8kl Oil leaking from under the front crankshaft oil seal on a VAZ 2114, how to change the oil seal!
Lada Kalina. Replacement of oil seals, timing belt, crankshaft. Source
Step-by-step replacement of the camshaft oil seal VAZ 2109
- Loosen the camshaft bolt.
- Release the tension roller.
- Remove the belt.
- Remove the bolt.
- Remove the gear. Do this carefully so as not to lose the key.
- Remove the key using small wire cutters.
- Remove the oil seal using an awl.
- Before installing the new oil seal, lubricate it with oil for ease of installation. You need to lubricate the inner and outer parts.
- Press in the new oil seal using a screwdriver (deeper).
- Take a rag and wipe away any oil leaks from the old seal. Also wipe the camshaft to see if oil is leaking.
- Reinstall the key in place.
- Install the pulley with the protrusion facing the engine.
- Tighten the camshaft mounting bolt.
- Install the timing belt.
- Tighten the nut on the tension pulley to ensure there is no looseness.
- Turn the camshaft. This is necessary in order to tighten the slack of the belt between the covalent and the camshaft. It's difficult to do this by hand. To complete this part of the work, we were helped by the means at hand, in particular the mandrel from a spark plug wrench.
- Pull the tension roller.
- Reinstall the candles.
It is difficult to do the work using text instructions. Therefore, I advise you to watch the video lesson and understand all the nuances of completing this task.
I noticed that the camshaft oil seal was leaking a long time ago - the entire left side of the engine was covered in oil. But it didn’t leak that much, so I wasn’t in a hurry to replace it. I started thinking about this only with the approach of cold weather - it was necessary to prepare the car for winter, so that later I would not have to freeze my hands and butt once again.
I bought a new oil seal on the market - its dimensions are 28x42x7, catalog number 2108-1005034. As you can see from the number, it will fit on the VAZ 2108, as well as on 2110, 2114, 2115, Kalina. In general, for all cars with 8-valve engines, analogues of the 9-valve engine.
I will tell you how to replace the camshaft oil seal using the Kalina car as an example. The essence of the work is absolutely no different.
Replacing the front crankshaft oil seal Lada Granta
Tools (for 8 valve engines):
- 5 mm hex key
- Screw jack
- Wheel key
- Medium flat screwdriver - 2 pcs.
- Driver for socket attachment
- 10mm wrench attachment
- 17mm wrench attachment
- 15 mm straight box spanner
- 8mm curved box spanner
- Large hammer
- Tool head (for pressing the oil seal)
- Special wrench for tension roller or circlip pliers
Tools (for 16 valve engines):
- Open-end wrench 10 mm
- Open-end wrench 13 mm
- Open-end wrench 19 mm
- 15 mm straight box spanner
- 17mm curved box spanner
- Screw jack
- Wheel key
- Large flat screwdriver
- Medium flat screwdriver
- Medium Phillips screwdriver
- 5 mm hex key
- Ratchet wrench
- 8 mm head
- Large hammer
- Tool head (for pressing the oil seal)
- Special wrench for turning the tension roller (or circlip remover)
Parts and consumables:
- Front crankshaft oil seal
- Timing belt
- Shoe - 2 pcs.
- White spirit degreaser
- Engine oil
- Rags
Replace the front crankshaft oil seal when traces of engine oil leakage appear on the wall of the engine crankcase pan, under the generator drive pulley.
1. Disconnect the wire from the negative terminal of the battery.
2. Set the piston of the 1st cylinder to the TDC position of the compression stroke, as written here (for 8-valve engines) or here (for the VAZ-21126 engine).
3. Remove the timing belt (for 8-valve engines or for 16-valve engines).
After removing the timing belt, the crankshaft and camshafts must not be rotated to avoid disruption of the engine valve timing and sticking of the timing valves into the pistons.
4. On both sides, insert the blades of the slotted screwdrivers between the oil pump cover and the rear end of the crankshaft timing pulley and carefully pry it evenly so as not to damage the timing pulley.
5. Remove the pulley from the crankshaft toe.
6. Using a screwdriver, pry up the oil seal and remove it from the oil pump cover.
Characteristics of Lada Granta timing belt
The Lada Granta gas distribution mechanism is driven by a belt. This type of device has been familiar to car enthusiasts for a long time. After all, the timing belt design migrated from the VAZ 2108 engine, which became the basis for all subsequent modifications of VAZ power plants. The Grant is equipped with two types of engines: an 8-valve engine and a 16-valve engine. The gas distribution system of the 16-valve power unit has a complex structure and increased dimensions compared to the 8-valve one. Accordingly, replacing the Granta timing belt becomes more complicated.
The main feature of the 16-valve device is the presence of two camshafts operating synchronously, in parallel with the crankshaft. The structure is located in the cylinder head. All three shafts are synchronized via a toothed belt. The main disadvantage of a timing belt drive is the unreliability of the belt itself. When it breaks or jumps, the valves meet the pistons and bend. The structure of the 16-valve timing belt is clearly shown in the photo.
- Installation mark on the drive cover.
- Lid.
- Intake camshaft pulley.
- Phase disk (sensor).
- TDC mark on the camshaft.
- Exhaust camshaft pulley.
- Support roller.
- Tensioner roller.
- Drive belt.
- Pump pulley (coolant pump).
- Installation mark on the oil pump.
- Crankshaft alignment mark.
- Crankshaft pulley.
You can change the timing belt kit yourself. The main thing is to know about the presence and correct placement of installation marks. By the way, most foreign cars do not have such marks, so in this case VAZ cars have the advantage.
The eight-valve timing drive of the Lada Granta, compared to previous modifications of the car, looks simpler. The scheme is simple, because there is no idler roller and there is only one camshaft. The 8-valve timing device can be seen clearly in the photo.
If you have doubts about your own abilities, you should not try to replace the timing belt yourself, as you can cause even more damage. In addition, in a car service center such a procedure, performed on an 8-valve engine, is inexpensive. But in the case of a 16-valve engine, the price tag is usually much higher.
Replacing the timing belt on a 16-valve Granta engine
Access to the gas distribution device drive is covered with a plastic casing. To remove the cover, you need to unscrew five screws with a 5mm hex key. Pay special attention to the location of these screws. In the photo, number 1 shows the fastening screws of the top cover, and number 2 shows the fastening screws of the bottom cover. After unscrewing the five screws, the top cover must be lifted and removed from the engine.
If the car has a manual transmission, you need to engage fifth gear, lift the right front wheel and turn it clockwise. At the same time, it is necessary to inspect the belt for cracks, abrasions, delamination, etc. If the car is equipped with an automatic transmission, you need to remove the right front wheel and the boot (protective shield) on the right. Using a 17mm head, rotate the bolt securing the drive pulley for additional equipment (air conditioning, generator) and inspect the belt. If various defects and damage to the belt are diagnosed, it must be urgently replaced. Replacement will also be required if oil leaks, a malfunction of the water pump or tensioner roller are detected.
On a 16-valve engine, a broken belt drive will lead to a discrepancy in the angular position of the crankshaft and camshafts. As a result, the piston group will come into contact with the valves. As a result, repair work will be required.
Yesterday one of our regular customers came to us with a recently purchased second-generation Kalina to replace the timing belt, roller and pump, plus all the fluids, but more on that in another article. This engine was also installed on the Grant, so this article will be relevant for it as well. The speedometer shows 60,000 and I believe that for this engine this is the optimal replacement interval, even though all reference books say about 75,000.
Let’s make a reservation right away that when the timing belt breaks on this car, the valves bend. It is recommended to check the condition of the belt every 15,000 kilometers.
To work, we will need a set of keys and sockets, as well as a 5-point hex and a key for the tension roller. The entire procedure takes approximately one and a half hours.
The engine is similar to the eighth.
First, remove the protection, drain the antifreeze, and for convenience you can remove the right front wheel. Next, loosen the locknut of the generator belt tensioning mechanism. Using a 10mm socket, unscrew the tensioner pin and remove the belt.
We unscrew the four bolts with a 5mm hexagon and remove the upper protective cover of the timing belt.
Set top dead center (TDC). We turn the crankshaft by the pulley mounting bolt clockwise until the mark on the camshaft sprocket and the timing belt protective casing coincide.
Unscrew the crankshaft pulley bolt. We block the wheels with stops, tighten the handbrake, engage fifth gear and, with a slight movement of the wrench and a one and a half meter pipe extension, unscrew this bolt.
Crankshaft oil seal leaking: causes of wear, breakdown
Symptoms of the problem: oil leak in the engine compartment, increased oil consumption. You can often see grease flowing onto the ground under a stationary machine. Of course, constantly topping it up does not solve the problem - you need to change the seals themselves.
There are several reasons why a leak forms:
- improper installation of gaskets, resulting in the formation of cracks on their working surfaces;
- oil flows when the engine overheats frequently, with high pressure in the crankcase (in winter, when ice plugs form);
- natural, physical wear and tear of the material;
- mechanical damage, resulting in leakage;
- low-quality material (typical for domestic products).
High-quality crankshaft seals are made of fluorine rubber FPM or silicone. Regular nitrile butadiene rubber quickly burns out, falls apart and leaks.
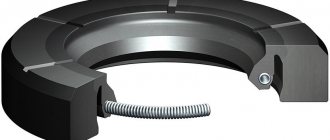
Features of oil seals
Some crankshaft gaskets have inclined grooves to allow oil to escape. They need to be placed correctly, according to the arrow on the ring body. It indicates in which direction the shaft rotates.
If it is not possible to select imported products, you have to use domestic ones.
They choose red-brown ones - they are made of fluorine rubber and are of the highest quality; such a crankshaft oil seal leaks less often.
This is interesting: Transmissions switch off spontaneously Lada Granta
Replacing the front crankshaft oil seal
The front crankshaft seal is located on the engine cover or oil pump housing. Most often it is he who leaks. There are motors whose cover is integral with the oil pump.
On foreign car engines, the crankshaft gasket is covered by timing and generator pulleys. They need to be removed. Old Zhiguli engines are simpler; the timing chain is located inside the crankcase; only the generator pulley and belt need to be removed.
To eliminate oil leaks and replace the seal on engines with a timing belt with a gear drive, it is necessary to remove the gear wheels (pulleys): generator, belt. The belt itself is also removed.
Before this, they are set according to the marks corresponding to the location of the first cylinder at TDC (top dead center) in a compressed state. The marks - pulley and crankcase - must match. On other units, the mark on the camshaft wheel should be placed opposite the block connector and the engine head. This adjustment is necessary for the valve timing cycles to work correctly. It is enough to align only the camshaft roller according to the mark.
Next, you need to loosen the tension wheel and remove the belt. Then the gear is removed from the front section of the crankshaft. Use a special puller or two screwdrivers. In units with a chain, only the generator pulley needs to be removed.
After this, remove the old ring through which the oil flows using a special device. If it is not there, then you can dismantle the oil seal cover (or oil pump) on the engine block. This is where the seal is located. It is easier to remove it from the dismantled cover.
To remove the wheel drive belt, you may also need a jack, in which case the front right wheel is removed. The front cover on the motor is secured with 4-6 bolts. After unscrewing, you need to carefully peel it off and change the gasket located there. Place the cover with the seal on a flat surface, and, using a screwdriver, remove the seal.
Replacement is in progress. A new crankshaft oil seal, lubricated with sealant, is pressed into place using a mandrel. It can be played by a piece of pipe, a tool socket head 1-2 mm smaller than the circumference of the gasket, a “27” head (nozzle) or an old oil seal will work well. After this, you need to lubricate the edge of the seal and install the cover. The oil seal is carefully placed with a cover onto the lubricated crankshaft and tightened with bolts.
The leak is eliminated, everything returns to its place: the timing pulley with teeth (both marks must match), the timing belt is installed using a tension roller.
A useful video about replacing the front oil seal can be viewed here:
Replacing the rear crankshaft oil seal
If an oil leak has formed through the rear crankshaft seal, then an inspection hole is needed, since it will be necessary to dismantle the drive elements or driveshaft on rear-wheel drive vehicles. Sometimes a leak in the crankshaft rear oil seal can be eliminated by placing the car on jacks or supports - this is unsafe and is strictly not recommended. You will also have to remove the heavy gearbox. After dismantling it, we also remove the clutch disc. Next comes the flywheel with casing.
Types and location of oil seals on the crankshaft
Oil seals are used in various elements of the car, including the crankshaft. They ensure that the lubricating fluid does not leave the engine. The element is made in the shape of a ring with an elastic inner edge and also has a rigid outer ring. A spring is used to strengthen the inner edge. It prevents oil from escaping. The devices installed in any car can be of two types:
- Rear oil seal. It is characterized by high wear resistance, which is reflected in service life equivalent to the period of use of the vehicle. It has bulky dimensions.
- Front oil seal. The device is slightly smaller in size and is also more prone to wear. The module is located in the oil pump cover. To gain access to it, you need to disconnect the timing belt element. The oil seal itself is located under the lower crankshaft pulley.
Inspection to identify oil leaks
If there is a suspicion that the presented device is operating incorrectly, the driver will first need to determine which oil seal is leaking. If a flaw is observed in the rear of the engine, you need to conduct a visual inspection of the pan and gearbox unit. In order to determine whether there is a leak of working fluid, you need to drop a little water onto the pan and observe: if transformer oil is leaking, it will spread over the surface, motor oil will stick to a single drop.
Causes of leaks
The most common causes of oil seal leaks are the following factors.
- Achieving a car mileage of 100 thousand kilometers. In such situations, under the influence of the vibration effect of the crankshaft, the inner part of the oil seal wears out. As a result, it no longer fits tightly to the box and will contribute to the flow of working fluid.
- Drying of the oil seal, which is associated with the use of low-quality oil. This often occurs if the working fluid is kept at low temperatures for a long time.
- Poor quality of the part or its incorrect installation, which should also not be excluded as the cause of the breakdown.
- Malfunctions in the engine itself. The most common failure in this case is an increase in crankcase gas pressure, which leads to displacement of the oil seal.
- The oil filter is leaking, as a result of which the problem is unlikely to be solved only by replacing the oil seal.
Signs of cap failure
Due to the fact that the main working element subject to wear is rubber, over time the material loses its elasticity and begins to leak oil. Reasons that have a negative impact on the product:
- aggressive working conditions;
- low-quality materials;
- natural development of the product resource;
- damage to the element as a result of its incorrect installation or removal.
Indeed, low-quality or outdated materials used in the manufacture of caps significantly reduce their service life. If we talk about natural wear and tear, then its average interval is 20,000 kilometers of a car. As a result of the constant work of the part, the elastic, rubber material hardens over time and begins to wear out and wear out. Damage to the product during poor-quality repair work is a fairly common problem. The fact is that to remove the oil seals, a special puller is required. Some car enthusiasts, when disassembling the engine, pry off the caps using two flat-head screwdrivers, which leads to damage to the valve guides.
Leave a comment:
Click to cancel reply.
Replacing the front crankshaft oil seal
Replacing any part or assembly of a vehicle always takes place in two stages: removing the old worn-out module and installing a new one. Crankshaft seals will be no exception. Such a repair cannot be done without a hammer and a screwdriver, but before you start work, you need to stock up on the necessary tools to perform the following procedures: removing the gas distribution mechanism drive, removing the cylinder head cover. The replacement process for the front oil seal itself consists of three steps.
STEP 1. First, remove the timing belt from all pulleys. After this, using two flat-head screwdrivers, lift the gear-type pulley, which must be removed from the crankshaft toe.
STEP 2. Using a screwdriver, remove the worn element from the cover, after which it is lubricated with engine oil. A new oil seal requires the same treatment with working fluid.
STEP 3. The repairman must press the new oil seal into the desired location using a pipe of a certain diameter or a mandrel. This field is repeated in reverse order, everything that was specified in the first step.
How to replace the camshaft oil seal on a VAZ 2108-VAZ 21099?
Removal: 1) At the beginning of the operation, with the “AKB” (which means rechargeable battery), remove the “negative” terminal. (How to remove the terminal from the “battery”, see the article: “Replacing the battery” in paragraph “1”)
2) Next, be sure to set all the “Gas distribution mechanism” marks, and then remove the “Timing Belt” from the car. (You will find how to set all the marks and then remove the timing belt in the article: “Replacing the timing belt”, in the “Removal” section)
3) When the belt is removed, insert a “10” socket with an extension through the hole in the camshaft pulley, and then put it on the nut that secures the rear timing belt cover, thereby securing the pulley from turning. After the pulley is fixed, using a spanner wrench, unscrew the central bolt that secures the pulley.
Replacing the rear crankshaft oil seal
Replacement of the crankshaft rear oil seal is carried out in an inspection pit or using a lift. The work involves removing the gearbox. During this procedure, all adjacent nodes should be additionally inspected. This is due to the fact that removing the gearbox is a rather complex and time-consuming process. Due to the high wear resistance of the rear oil seal, it is extremely rare to resort to such actions.
Replacing the oil seal for rear wheel drive vehicles
STEP 1. First of all, the cardan transmission is removed, followed by disconnecting the starter and clutch slave cylinder (removed entirely along with the hose).
STEP 2. The speedometer cable and reverse gear wire are disconnected. After this, you need to release the gearbox slide in the vehicle interior.
STEP 3. Remove the bolts connecting the gearbox and engine. After this, the cross member (rear mount) of the gearbox is removed.
After removing the clutch basket and disc, flywheel and shield, unimpeded access to the oil seal will be provided. The crankshaft oil seal is replaced using a self-tapping screw, which is placed on the edge and gradually screwed into it. First, you need to hit the tool a little so that it goes into the metal more easily. The most successful would be to use a device used during apartment renovations to secure the profile.
After several turns of tightening, the worn out oil seal is pulled out using pliers. In some cases, several screws can be used to achieve greater effect.
Replacing the oil seal for front-wheel drive vehicles
Initially, the left front wheel is removed. Before doing this, you need to loosen the axle nut, which will eventually be completely unscrewed. This will allow the strut to be moved from the axle shaft. Sometimes you have to remove the steering pin in the fastening.
Along with replacing the oil seal, it is necessary to inspect the bearing in the crankshaft, which includes the input shaft of the gearbox: when it sticks and makes noise when turning, you need to install a new one.
After completing the replacement of the oil seal, all procedures must be carried out exactly the opposite.
How to unscrew the crankshaft pulley bolt - solving the problem
The pulleys of front-wheel drive cars are usually secured with a bolt. In such vehicles, the pulley is oriented perpendicular to the axis of the machine, which, of course, complicates repair work (it is very difficult to get to the fastening). In order to unscrew the bolt as quickly and easily as possible, it is advisable to prepare in advance:
- set of auto tools;
- the so-called “stump” (or “tragus”);
- car jack;
- head (socket) with a lever and extension (the head must be selected according to the size of the bolt).
The process with these devices is as follows:
- remove the wheel (of course, before doing this you need to lift the front right part of the car with a jack);
- we install the vehicle on the “stump”;
- remove the engine shield, which protects it from dirt, the air filter (they are located on the top side of the hood) and the generator belt;
- open the plug on the clutch block so that you can fix the crankshaft, and wedge the flywheel teeth using a pry bar;
- We put the head on the bolt and begin to unscrew it (if it does not give in, we slowly increase the length of the lever).