The manufacturer recommends replacing the front crankshaft oil seal of VAZ 2101-2107 engines every 150,000 km. However, in practice such replacement has to be performed more often. Accelerated wear of the sealing element and the appearance of engine oil leaks are caused by:
- skewed oil seal during installation;
- loss of elasticity due to engine overheating;
- increased radial runout of the drive pulley of mounted units;
- use of low-quality motor oil;
- wear on the crankshaft pulley hub.
In addition, we cannot rule out hardening of the cuff due to natural aging and the possibility of a manufacturing defect - unfortunately, the quality of parts for rear-wheel drive VAZ models leaves much to be desired.
Purpose
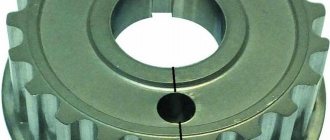
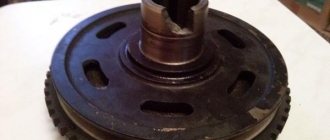
The crankshaft pulley serves to transmit rotation from the crankshaft to such important vehicle components as the generator, power steering and air conditioning. In addition to this function, in the injection engine there are special teeth on the damper-type pulley, which are read by the crankshaft sensor.
This is one of the most important indicators for the electronic motor control system, which is responsible for the correct operation of the entire unit.
If it fails (beating and deformation, cracks and tears), the VAZ crankshaft pulley will most likely need to be replaced. This part of the car can be repaired, but in very rare cases (if minor defects are detected).
It is not necessary to go to a specialized car workshop; if you have free time and skillful hands, you can do the replacement yourself, which will not only save money, but also increase your self-esteem.
Unscrew the locking bolt
The only bolt that secures the pulley to the crankshaft is not so easy to unscrew. The threads of this bolt coincide with the direction of rotation of the crankshaft, so if you do not have a pneumatic impact wrench, you will have to cope with this task with some trickery.
The crankshaft pulley bolt can be easily unscrewed using a spanner, a piece of pipe and your car's starter. We put a 19mm head on the bolt, and using a pipe we extend the handle of the key to the surface, and in such a way that it rests on the floor on the side opposite to the direction of rotation.
After that, we get behind the wheel, ask the nervous neighbors in the garage to leave and start the car with a quick movement of the key. The starter should not turn for more than a split second. After making five or six such attempts, you will be able to unscrew the “stuck” bolt without making titanic efforts. Be prepared to be accused of wasting the starter's resource, damaging your property, etc.
Yes, this method is not used in service centers, but there are witnesses to its effective implementation. Nothing was spoiled by this, except the mood of those who opposed this method of unscrewing bolts.
Pulley removal
A special key confidently holds the pulley hub on the shaft even with the bolt removed. A special puller allows you to perform this operation quickly with minimal effort. If you don't have it, you'll have to tinker a little longer. First, treat the interface between the pulley and shaft with a special liquid (like WD-40).
After this, you need to wait a little for the liquid to do its job. Using a pry bar, pry the crankshaft pulley around the circumference and swing it in the direction away from the engine. The procedure is long and tedious. The main task is not so much to remove the pulley hub as to avoid damaging the keyway.
What problems might you encounter?
There is a possibility that you may not immediately notice the characteristic disc part under the hood of your car. It may also be difficult to access. It will be difficult to fix the shaft. Over a long period of time, the joints of fasteners will “stick” and you will have to use special liquids.
To perform all the necessary steps step by step, you will need the following tools:
How to remove a crankshaft pulley bolt: why is everything so complicated?
A knowledgeable motorist usually spends no more than a quarter of an hour on the process of dismantling the crankshaft pulley. But inexperienced drivers, when trying to remove this part on their own, are faced with many problems that they often simply cannot solve. The instructions for carrying out repair work and maintenance of any modern vehicle contain comprehensive information about the dismantling process, but, unfortunately, it does not help car enthusiasts.
First of all, difficulties arise with fixing the crankshaft. It is very difficult to dismantle it if the part is constantly rotating, “slipping” out of your hands. It is also not clear to many from which side to approach the bolt that holds the pulley. And its strong tightening usually makes the process of removing the unit very, very difficult, since dismantling under such conditions is fraught with damage to the body covering or elements of the car’s engine compartment.
All car manufacturers and car service specialists use great force to tighten the nut or bolt of the crankshaft pulley (on some vehicle models the mechanism is supported by a bolt, in others by a nut).
This is done specifically to avoid self-unwinding of this part during vehicle operation. If a bolt (nut) falls out while driving, it will not be easy to bring the car back to life in order to continue driving it, and the repair itself will cost, believe me, a pretty penny. In addition, the described fasteners increase their tightening level independently when the engine is running. And the final “indestructibility” of the bolt is given by the phenomena of coking, sticking, and corrosion.
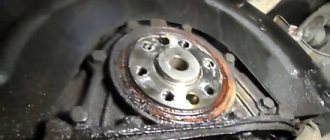
When and why to change the front oil seal
It is impossible not to notice damage to the sealing element - the rotating pulley scatters oil in the front of the engine and throughout the engine compartment. However, do not think that such a malfunction only leads to oiling of the units and a decrease in the lubricant level. If engine oil gets on the generator belt and other rubber parts, it can quickly render them unusable.
Keep in mind that the appearance of a leak through the engine seals is provoked by another factor - increased crankcase gas pressure. For this reason, be sure to check the cleanliness of the engine ventilation system.
Step-by-step instruction
Due to the limited space between the front of the engine and the radiator, it is difficult to press in a new oil seal without distortion. For this reason, experts recommend replacing the sealing element with the front engine cover removed.
Of course, doing this on a mechanic’s workbench is much more convenient, but there are also pitfalls here.
As practice shows, after such dismantling it is difficult to restore the tightness along the junction line of the oil pan, and in addition, there is a danger of breaking the internal threads in a rather delicate duralumin cover.
Car battery heater
For this reason, we recommend using the more common and less labor-intensive method, in which the damaged oil seal is replaced directly on the engine. This work will require your attention and accuracy. It is more convenient to perform all manipulations on a lift, overpass or inspection pit.
- Put the car on the handbrake and set the gear lever to fourth speed.
- Disconnect the power terminals and remove the battery from the vehicle.
- Using a 17mm socket and a long wrench, loosen the self-locking nut securing the generator to the adjusting bar.
- Having installed a pry bar or the same wrench between the generator and the right subframe (spar), use it as a lever to move the generator towards the cylinder block. This will allow you to loosen the serpentine drive belt of the mounted mechanisms and remove it from the engine.
- Moving under the car, remove the mudguard and oil pan protection.
- Unscrew the ratchet nut using a special 38 socket wrench. In some cases, the fasteners grab so tightly that even the foot brake cannot be used to block the wheels. In this case, mechanics recommend removing the starter and using a strong wrench to block the flywheel. To remove a stuck nut, the wrench is extended with a suitable pipe. Please note that the crankshaft shank has a right-hand thread, so turn the ratchet counterclockwise.
- Remove the crankshaft pulley. For these purposes, use a mounting spatula, prying the part from different sides and using the tool as a lever. However, do not overdo it, as if you press too hard, you will break the front engine cover.
To play it safe, make sure you have a puller in your arsenal. With its help, you can easily and safely dismantle even those parts that are installed with a noticeable interference. - Clean the front part of the cover, the oil seal and its seat, otherwise dirt will get inside the engine when removing the sealing element.
- Using a strong, wide-bladed screwdriver, use a strong, wide-bladed screwdriver to pry up the seal with support from the oil seal socket. Tapping the handle of the tool, remove the damaged part.
- Before installing a new oil seal, wipe its seat until it shines - this will make installation easier in the future. If the damaged oil seal is removed too easily, this indicates wear of the socket in the camshaft drive cover. To ensure sealing in the future, apply a layer of automotive sealant to the side surface of the new seal.
- Carefully install the oil seal into place. Make sure that it does not warp and fits evenly into the socket.
- Using a suitable mandrel (you can even take a wrench to remove the ratchet if it is the right thickness), carefully press the oil seal into place with a hammer.
- Carefully inspect the crankshaft pulley. If there is significant wear on its working part, then replacing the oil seal will not eliminate the problem of oil leakage. In this case, replace the part.
- Before installing the pulley, lubricate the inner and outer surfaces of the pulley hub with engine oil. Lubrication will make it easier to install the part on the crankshaft, and most importantly, it will prevent premature wear of the working edge of the oil seal in the first minutes of engine operation.
- While turning the pulley, align the groove with the key installed in the groove of the crankshaft. By shaking and simultaneously pressing on the part, ensure that the hub fits inside the oil seal.
- Screw the ratchet nut all the way in by hand and tighten with a wrench. According to the manufacturer's recommendation, the tightening torque does not exceed 101.3-125.64 N×m (10.34-12.8 kgf×m).
- Reinstall and tension the poly-V-belt of the accessory drive. Remember that excessive tension will cause accelerated wear on the alternator and coolant pump bearings. The deflection of the belt between the pump and the crankshaft with a pressure force of about 10 kgf x m is 12 - 17 mm.
- Tighten the generator mounting nut.
- Install the battery and connect it to the vehicle's on-board network. At this point the repair is considered complete.
How to unscrew the crankshaft pulley bolt - solving the problem
The pulleys of front-wheel drive cars are usually secured with a bolt. In such vehicles, the pulley is oriented perpendicular to the axis of the machine, which, of course, complicates repair work (it is very difficult to get to the fastening). In order to unscrew the bolt as quickly and easily as possible, it is advisable to prepare in advance:
- set of auto tools;
- the so-called “stump” (or “tragus”);
- car jack;
- head (socket) with a lever and extension (the head must be selected according to the size of the bolt).
The process with these devices is as follows:
- remove the wheel (of course, before doing this you need to lift the front right part of the car with a jack);
- we install the vehicle on the “stump”;
- remove the engine shield, which protects it from dirt, the air filter (they are located on the top side of the hood) and the generator belt;
- open the plug on the clutch block so that you can fix the crankshaft, and wedge the flywheel teeth using a pry bar;
- We put the head on the bolt and begin to unscrew it (if it does not give in, we slowly increase the length of the lever).
I think there is no need to talk about how to tighten the crankshaft pulley and return the car to its pre-repair condition. All operations are performed in reverse order.
How to unscrew the crankshaft pulley nut?
This procedure is easier to perform using a lever and an extension for it (you can use a relatively long piece of pipe), as well as a socket or socket wrench (38 or 36). A nut, called a “ratchet,” is usually used to secure pulleys on rear-wheel drive vehicles. Such a nut usually has special ledges.
To remove it, you need to get under the car and try to unscrew the element with a wrench and extension. In cases where it absolutely does not lend itself, the gearbox should be put in neutral, the spark plugs should be removed, the key and lever rested on the side member or floor, and an impulse should be given by turning the ignition switch. After this procedure, the nut easily comes off on the first or second try.
Let us add that a device for removing the crankshaft pulley makes the dismantling process easier. It consists of a nut with a pin with 2-3 grips attached to them (the pin rests on the center of the shaft, the grips are placed over the edges of the pulley). Such a “folk” puller makes it possible to pull the pulley off the shaft without any problems by turning the device clockwise.
What's the result?
Using the method described above, you can unscrew the pulley bolt both on a car with a manual transmission and unscrew the crankshaft pulley on an automatic transmission. After unscrewing the fastening element, you can begin to remove the pulley itself. When reinstalling this part in its place, tightening the nut or bolt will be much easier.
In this case, it is strongly recommended to use a torque wrench and apply only the force specified in the repair and operating manual for a specific car model. The fact is that not only the reliability of fixation and integrity of all elements, but also the ease of unscrewing next time will depend on the correct tightening torque.
One day, every car owner is faced with a problem that cannot be solved without prior preparation. One of them is removing the crankshaft pulley.
As a rule, difficulties are associated with dismantling and installing new cuffs, which become deformed and cease to perform their functions. As a result, an oil leak appears that has to be repaired. For an experienced car owner, removing the crankshaft pulley is not a problem. Another thing is for beginners who are just learning the basics of car repair.