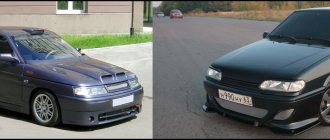
An operation such as replacing VAZ 2106 steering rods is carried out on the basis of diagnosing the technical condition of the car’s front suspension. The unit is responsible from the point of view of the safety of the driver and passengers, so if it malfunctions or wears out, you should not hesitate - you need to install new parts.
Replacing the Tie Rod End of a VAZ 2106
The method of replacing connecting rods on a VAZ 2106
This is the operation of replacing a VAZ Control tape 2106
, carried out on the basis of diagnostics of the technical condition of the front suspension of the car. Tie rods VAZ, REPLACEMENT OF REACTION VESSELS VAZ 2106 REPLACEMENT OF ENTERPRISE ROUND LINE. VAZ steering linkage, how to replace the steering linkage and blowing out parts on a VAZ 2106 1. The device responds based on considerations for the safety of the driver and passenger, so do not hesitate in case of malfunction or wear. new parts need to be installed.
How to detect a fault
You can inspect the control rods without assistance, only from a ditch or overpass. Do the following check on a VAZ car 2106
preferably every 5000 km or after every long journey on bad roads. Such a short interval is justified by the quality of manufacture of the parts in question; they average 15-20 thousand km.
To diagnose, you need to park the car over a ditch or call an overpass and secure the car with the hand brake. Holding the rod with one hand pulling tip is close , you need to sharply push it up and then down. A working tip either has no free play at all, or is only a couple of mm long and can be felt with your hand.
If the free game is bigger, but with all this the core is traction
it simply rotates in both ball pins
; replacement
due to the VAZ
2106
is inevitable.
With this method, it is necessary to check all 6 pins, and if they are severely worn, it is better to replace the entire steering
trapezium, consisting of 3 rods.
Sometimes there is no clearance in the joints, but the protective boots are torn or cracked. Carry out the following check on the VAZ 2106. If not changed, all VAZ steering rods. If left unchanged, the dust and dirt that constantly fills the hinge will work: the assembly will quickly fail. Worn saws are subject to constant changes. You will need a minimum of tools to get the job done:
- a set of ring or open-end wrenches;
- mounting oars;
- puller for squeezing ball pins out of seats.
The puller is an iron cup with a slot in it so that it can be mounted on the control mechanism or pendulum. There is one in almost every garage where there is a VAZ 2106 or another model of the “classic” Lada.
replacement of steering rods, ends from VAZ classics
The Auto_Repont channel will help you troubleshoot your car yourself.
Replacing the steering wheel on VAZ 2101, 2103, 2105, 2106 and 2107
Description of the video task: replacing the steering wheel
VAZ
cars from 2101 to 2107.
Replacement instructions
Replacing the trapezoid steering wheel is done at the inspection hole or overpass. The task of repairing the steering rack on a VAZ 2110, replacing the steering rack of the steering rack. video. The disassembly procedure is as follows.
- Loosen and unscrew the ball nut Pin. On some machines you can still find traction
with walnuts. Replacing the front viburnum edit. photo report on how to remove and install the VAZ 1117, 1118 and 1119 steering mechanism cover. In this case, you will need to remove the pins earlier by bending their antennas using pliers. - From the rounded end steering
for attaching the puller so that its support platform is under the armpit. - Turn the key at the top of the puller and push it out of the slot.
- Repeat the operation with all other tips.
From time to time, when the nut is loosened due to contamination of the ball thread, the pin begins to rotate with the nut, rotating near the seat. Then, to unscrew the nut, you need to secure it with a locking blade. Small function: left and right last traction
VAZ
2106
they are different from each other, so it is better to mark them after removal.
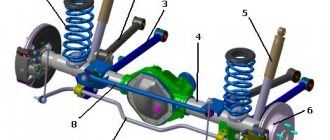
Steering items
: 1. lateral traction;
2. bipod; 3. medium traction; 4. pendulum lever; 5. adjusting coupling; 6. lower ball joint of the front suspension; 7. right steering knuckle; 8. upper ball joint of the front suspension; 9. right lever handle; 10. pendulum lever; 11. right lateral member of the body; 12. oil filler plug; 13. steering gear housing; 14. steering shaft
;
15. steering shaft ; 16. steering wheel; 17. upper support pipe steering shaft
control;
18. bracket steering shaft control;
19. left lateral member of the body; 20. clutch, clutch adjustment; 21. left joint After all, 3 traction
removable, you need to adjust the new parts to the length of the old ones. Holding the rod rod with one hand by the tip, replacing the rod VAZ 2106. This applies to the two outer steering rods. Using threaded mounting tips on them, the toe angle of the front wheels is adjusted. To prevent the wheels from initially pointing in different directions, twisting or unscrewing the tips on new parts adjusts their length in accordance with the size of the elements being removed.
The next step is to install the new rods, the spherical pins of which are inserted into the seat, after which the nut is screwed on top. Changing the oil in the gearbox and rear axle of the VAZ 2106 Changing the oil in the gearbox and transmission. Tighten it well. If there is a hole in the hole, insert the last one and straighten the antennas.
In most cases, the tips on the edges near the wheels fail. Self-replacement of steering rod from VAZ. You can then change them individually. Disassembly can be done following the same instructions, but only one end of the pull rod
. Then you need to unwind the clamp, which fixes the rotation of the workpiece along the thread. Replacing the steering wheel means unscrewing the old part, then screwing in a new part of the same length and tightening the clamp. You can then insert your finger into the socket and tighten the nut.
traction steering VAZ 01-07 models are the same, so don’t worry when purchasing, read the 2101 numbers on the packaging. The only thing to note is the mobility of the ball pin in the traction . Replacement of UAZ Patriot Connecting Rod: Replacement of the side rod of silent blocks. Replacing the steering rackPriceReplacing the steering rack of the VAZ Kalina trunk. In the new product, it should be difficult to transform the nest with the effort of your hands. After successfully replacing at least one piece of advice
You can't go straight away, you need to adjust the toe angles of the front wheels included in the nearest service station.
Preparatory activities
Many experts advise taking certain steps to prepare for the replacement so that everything goes easier and faster. These actions include the following.
- Treat all nuts and fasteners with penetrating liquid. WD40 works great.
- If the tips last longer than one winter, to remove their fist you will need to use a 17 socket to unscrew the nuts.
- If the nuts stick, try heating them with a hair dryer. A gas burner is also suitable, but you need to be as careful as possible with it.
- Prepare tools for removing tips.
Today, two methods are used to dismantle steering tips - modern and traditional. The first involves the use of a special puller, and the second - a sledgehammer.
Jack and WD40 at the ready
The traditional dismantling method involves the following actions:
- The steering wheel is turned all the way;
- Several strong blows are applied to the steering knuckle;
- Vibration causes the tip to pop out.
But the method has two serious drawbacks.
- It will take special skill to deliver precise, but at the same time accurate and strong blows.
- This method can reduce the service life of steering racks.
Therefore, the best option is a puller. You can literally buy it for 200-300 rubles, but it will be useful in the future and will significantly preserve the integrity of the remaining parts when replacing the launch vehicle.
Dismantling works
Replacement
The replacement procedure is quite simple. Especially if you have prepared the connecting elements in advance and acquired a puller.
- Using a jack, lift one of the sides where you will begin to change the tips.
- Turn the steering wheel to such an extent that it is convenient for you to replace damaged elements.
- Treat the elements again with a penetrating liquid.
- Unscrew the fastening nut.
- Remove the tip from the steering knuckle hole. Here you just need a puller or the traditional old-fashioned method using a sledgehammer.
- Check the condition of the steering rods. Sometimes it is better to replace them in the first couple of wears. Besides, you still got into this knot.
- Replace damaged tips with new ones.
- Perform the reassembly procedure.
Assembly
- Do the same with the second wheel.
- We recommend that you think additionally about protecting threaded fasteners from moisture and dirt. To do this, the threads can be lubricated with lithol, graphite grease, a tube of a suitable diameter can be put on, or heat shrink can be used.
- After completing the replacement of the steering tips, visit a service station to adjust the wheel alignment.
- If you don’t want to go to a service station, then count in advance the number of revolutions when removing the old tip. The new one is twisted by the same number of revolutions.
- Drive onto a straight road and check whether the car does not skid to the sides when driving in a straight line.
One of the main conditions for a successful replacement is the choice of quality parts.
New part
What to choose
Finally, we will present several options for the most popular steering tips, which are used today when replacing a VAZ 2114. So you can decide for yourself what to choose and which ones are better.
| Manufacturer | Price |
| AvtoVAZ | 620 rubles |
| TRACK | 620 rubles |
| VIS | 730 rubles |
| Lemfoerder | 830 rubles |
| Finwhale | 860 rubles |
The last two tips are foreign made. This makes their price higher. But the quality is somewhat higher than AvtoVAZ products.
Replacing a LV is not so difficult that you need to go to a service station and pay 500-1000 rubles for the work of the craftsmen. You can easily cope with this task yourself, relying on the video and instructions provided.
Loading …
VESKO-TRANS.RU
AutoNews / Reviews / Tests
Replacing the Steering Rod of a VAZ 2106
Method for replacing connecting rods on a VAZ 2106
An operation such as replacing the control rods of a VAZ 2106 is carried out on the basis of diagnosing the technical condition of the front suspension of the car. The device is responsible for the safety of the driver and passengers, so there is no need to hesitate in case of malfunction or wear;
How to detect a fault
You can inspect the control rods without assistance, only from a ditch or overpass. This check is best carried out on a VAZ 2106 car every 5 thousand km or after each long trip on bad roads. Such a short interval is justified by the quality of manufacture of the parts in question; they average 15-20 thousand km.
Price issue.
Manufacturers offer several options for steering linkages for the VAZ 2107. The price of a complete set (with mounting parts) ranges from 1,100 to 2,000 rubles, depending on the manufacturer and seller.
Among the most popular and popular offers, the following products stand out:
- Vazinterservice. An original kit from a well-known manufacturer is offered at a price of 1400-1800 rubles. Supplied in packaging with holographic protection. According to motorists and experts, it provides the optimal quality/price ratio.
- Track. Trademark PA "Trek" from the city of Miass, Chelyabinsk region. Several modifications are produced - “Classic”, “Champion”, “TS”, differing in materials, technologies and, accordingly, reliability. For the most common “Classic” series, prices start from 1,700 rubles. At the same time, it outperforms almost all analogues of competing companies in terms of reliability and provides a service life of more than 100 thousand kilometers.
- Belman. Products of acceptable quality at a relatively low price (from 1400 rubles).
- Cedar. CJSC Kedr is one of the largest manufacturers of auto parts (also located in Miass). Despite the presence of certificates, the kits often cause complaints from car owners. The main advantage is the low price (from 1200 rubles).
Replacing steering rods VAZ 2106
To remove and replace steering rods on a VAZ 2106, hang up the front of the car and remove the wheels.
We take out the cotter pin and use a 22mm wrench to unscrew the nut securing the ball joint pin
Use a puller to press the rod tip pin out of the steering axle lever of the VAZ 2106
It is more convenient to unscrew the nuts securing the rods to the bipod of the steering mechanism and to the pendulum lever using a socket wrench from the engine compartment
The ball joint pins can be pressed out using a puller or by placing a stop in the lever (you can use a piece of angle iron)
We knock out the finger by hitting its end with a hammer through a suitable rod. In order not to damage the thread on the pin, we do not remove the nut, but only unscrew it until the ends of the pin and the nut coincide
Before replacing the VAZ 2106 steering tip or the entire side link assembly, measure the length of the old link (the distance between the centers of the plugs). The new rod should be the same length. To do this, we either screw one tip into the threaded coupling, or adjust the length of the rod by turning the threaded coupling. Do not forget to tighten the coupling clamps on the coupling after adjustment. After installing new rods, you should check the wheel alignment angles of the VAZ 2106.
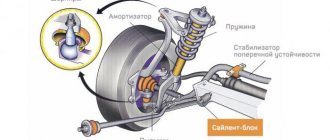
Causes of joint wear
During operation, the working pair of the tip (plastic insert and ball pin) experiences loads from the steering rack, which pulls or pushes the steering knuckle depending on the direction of movement of the car. Another type of load affects the element from the side of the wheel falling on uneven road surfaces.
In the first case, the force is applied perpendicular to the axis of the ball pin and acts on the fracture; in the second, the forces tend to pull the part out of the socket. There is a third type of load - the friction force that arises in the unit when the wheels turn. Since the finger is rigidly fixed in the eye of the fist with a nut, it rotates inside the plastic bushing and rubs against its walls.
Due to the impact of these loads, the hinge joint wears out as follows:
- Over time, the walls of the liner wear out, a gap forms between them and the ball, which is why a quiet knock is heard when moving over small uneven surfaces.
- Abrasion of the side walls of the bushing leads to loosening of the pin, because it is pressed by the spring only from below.
- When the spring and heel are unable to remove the play resulting from wear of the plastic, the ball pin moves easily in the bushing, causing the steering tip to knock heavily.
Such defects must be identified in a timely manner, otherwise the damaged tip will quickly become unusable.
In cars equipped with a double-wishbone front suspension, sometimes a breakdown occurs that is not related to the operation of the hinge. Since the rod is located low, if you drive carelessly on bad roads, the metal rod can bend when it hits a stone or other obstacle. In this case, knocking does not occur, but other symptoms are observed, described below.
Procedure
Before replacing the VAZ 2107 steering rods with your own hands, you need to place the car on a reliable surface, jack it up, and firmly fix the car. It is certainly better to work from the pit. The operating procedure is as follows:
- The assembly must be cleaned of rust and dirt, and a special compound must be applied to the threads.
- Accurately measure the length of the entire assembly using a ruler.
- The fixing cotter pins are removed with pliers, the nut is removed with a head or a spanner.
- It’s better to knock the unit first - dismantling will be done quickly.
Now you need to take a puller, put it on top of the assembly, press it out of the eye with a bolt - this is how the parts are disconnected from the fist. If you have difficulty with this operation, apply a penetrating lubricant, it will make it easier to detach the part.
On a note! If the master does not have a special puller, you need to take a hammer and apply sharp blows to the assembly. Continue beating until your finger leaves the ear. The lever should be struck along its axis, not across it. Then you also need to press in another finger - the internal node.
Preliminary assessment of the situation
It is advisable to first independently check the car for the presence of a faulty steering column or rack, rather than immediately rushing to a service station. After all, even for diagnosing the rack, the car owner will be asked to pay a significant monetary fee.
How to properly change steering shaft bearings? To do this, you can carry out all the necessary work yourself, if the car owner understands the structure of the rack and column. Or you can turn to car service specialists for assistance, who can quickly fix the steering shaft fault.
But it must be taken into account that such repair work to replace rack bearings will cost significant finances. Moreover, in the repair of columns and racks there is nothing very difficult to contact specialists. Therefore, it will be much better and faster to do everything yourself, you just need to be patient and stock up on the necessary tools.
Replacing rods on VAZ 2101-VAZ 2107
Note! Together, the rods are called “Trapezoid” for short, so in some cases it is more profitable to completely replace the trapezoid than just one part. Sometimes, replacing a trapezoid is cheaper than replacing the parts separately.
Our instructions show the replacement using the example of one side rod; the rest are replaced in the same way.
Removal
1) First remove the wheel from the side where you are going to replace it. (Found difficulties? – read the article: “Replacing a wheel on a VAZ”)
2) Next, using pliers, unclip the ball joint pin nut.
3) After the cotter pin is removed, use a 22mm wrench to unscrew the pin securing nut.
4) Now, taking a special puller in your hands, install it as shown in the photo below, and after installation, start tightening the nut present on the puller. The finger should come out of the fist lever.
Note! If you don't have a puller, take a hammer and give it a few sharp blows to the fist lever and continue hitting until the finger indicated by the red arrow comes out of the lever ear! (You need to hit the lever along its axis).
If you have difficulty removing the pin, try applying some penetrating lubricant like WD-40, it should help and make it easier to remove the part.
5) Then do exactly the same procedure for pressing out the pin, but now press out the inner joint pin, indicated by the red arrow.
6) After all operations are completed, remove the steering rod from the machine.
Installation
Installation of a new rod is carried out in the reverse order of removal.
Note! The new part must be installed exactly the same length as the old one, otherwise the wheel alignment will be disrupted!
It is recommended to adjust the wheel alignment of the car after installing new spare parts! (read details in the instructions: “Adjusting wheel toe”)
Removal & installation
- Ball joint remover.
- Jack.
- Car stand.
- A set of keys.
- Pliers.
- Mount.
The ball puller is usually not universal. If you do not find a suitable puller, it can be successfully replaced with a hammer. You just need to know where to hit. There is no need to knock your finger out of its seat. The blow should be perpendicular to the finger, and it should be hit on the eye (since the conical finger, a slight landing pressure will squeeze it out of the eye). Hammer is a universal puller. It should not be too heavy or too light; 600 grams will be just right.
Removal: Loosen the wheel. Raise the car on a jack. Remove the wheel. Turn the steering wheel so that it is convenient to work. If the pin nut becomes cotter, remove the cotter pin using pliers. Unscrew the nut. Take a puller and squeeze your finger out with it. Unscrew the ball housing fastening. Using a pry bar, press down the lower arm and remove the ball joint. Removing and repairing tie rod ends and ball joints is no different, you just need to use another puller. The recovery methods are identical.
Installation: Attach the hinge body to the lower arm, tighten the fasteners, use a pry bar to press the lower arm, insert the pin into the seat. Screw the nut onto the pin and tighten it. If the finger rotates, pull the lever upward (the pin with the seat is conical, so when the finger is pressed in, it stops turning in the seat). Don't forget to tighten the nut. No puller is needed for installation. The next replacement of supports will not force you to fiddle with cotter pins if you change the nuts to self-locking ones.
How to detect a fault
You can check the serviceability of the control rods without the help of others; for this purpose you will only need an inspection ditch or overpass. to do such a check on a VAZ 2106 every 5 thousand km, as it is also called, after each long trip on bad roads. Such a small interval is justified by the quality of production of the parts in question; on average, they last 15-20 thousand km.
To perform diagnostics, you need to park the car over a ditch or drive onto an overpass and secure the vehicle with the hand brake. Grasping the rod near the tip with one hand, you need to sharply push it up and then down. A serviceable tip either has no free play at all, or it is only a couple of mm, you can feel it with your hand.
If the free play is not easy, but at the same time the thrust rod simply rotates in both ball pins, then changing the ends of the VAZ 2106 is inevitable. Using this method, we need to check that our client has 6 fingers left, and if they are clearly worn out, it is better to change the entire control trapezoid, consisting of 3 rods.
Replacement procedure:
- Raise the right front wheel using a jack and remove it.
- Unscrew the steering tip nut.
- Remove the tip.
- We turn the steering wheel to the extreme left position, after which we remove the clamps, then the boots on the slats.
- Unscrew the locknut of the tip, then remove it and the boot.
- Using an adjustable wrench, remove the rod; to do this, you can slip the wrench under the lower engine suspension arm.
- We turn the steering wheel to its extreme position to gain access to the bushing.
- We pry it off with a long screwdriver. For this operation, it is better to use an assistant to turn the steering wheel several times left and right, this will allow you to pull it out faster.
- We install a new steering rack bushing for Renault Megane 2.
After this, we reassemble in the reverse order and be sure to go to the wheel alignment.
Some installation details
If both rods are changed, they must be tightened at the same time, making sure to fix the rack shaft. This will help prevent damage to the nut that holds the shaft inside the rack. During factory assembly, both rods are simultaneously screwed to the rack and tightened equally, without destroying the block or its stop.
If it is possible to use a vice when replacing, you must carefully clamp one of the rods in it and tighten the second. To do this, it is advisable to use a torque wrench. During tightening, the rack body will rotate slightly. It's not scary. After tightening the rod, you should process its hinge, since burrs may remain on its plane after clamping in a vice.
Important! When installing parts without dismantling the steering rack, they should be tightened extremely carefully and correctly in order to obtain the required tightening torque, while avoiding the occurrence of increased torque on the rack shaft. The shaft has special flats for which it is secured with a key. But this is not always possible, since not all shafts have them; in addition, due to the peculiarity of their location, a special key is needed
Please note that it is strictly forbidden to use pliers to fix the shaft, as their jaws will damage the polished surface
But this is not always possible, since not all shafts have them; in addition, due to the peculiarity of their location, a special key is needed. Please note that it is strictly forbidden to use pliers to fix the shaft, as their jaws will damage the polished surface.
As you can see, the procedure for replacing rods is not complicated. Difficulties can only arise with tightening them, which is why motorists prefer to carry out this procedure in a car service center.
How to determine if a trapezoid is broken?
The main symptoms by which you can understand that the rod ends are out of order:
- Increased free play (play) of the steering wheel.
- There are knocks in the steering system.
- Tire wear is too fast (or uneven).
Rubber wears out quickly if the toe angles of the front wheels are violated. Also, similar symptoms appear when the steering rod itself is deformed. At the same time, the car leaves the trajectory, the camber and toe angles are quite difficult to adjust.
Purpose of the mechanism.
During a maneuver, the radius of the vehicle's trajectory is determined by the angle of rotation of the steered wheels. However, the simplicity of this action is only apparent. When making turns, a problem arises - the wheels describe curves with different radii: for the outer one it is larger, for the inner one it is smaller. Accordingly, in order to eliminate slippage of the internal wheel and deterioration of adhesion to the road surface and loss of control during a maneuver, it is necessary to provide different angles of deflection of the steered wheels: smaller for the external one, and larger for the internal one.
This problem is solved by the design of the steering linkage.
Caring for steering wheel parts
The first and, it may seem to you, the most banal advice, but, unfortunately, it is often neglected - this is the banal dryness of the room in which the machine is located. Most garages have extremely damp spaces, which is not very favorable for the steel and other parts that are in the car. Due to the prolonged presence of the car in a damp room, parts become susceptible to external influences, and metals oxidize over time.
It is recommended to store the machine in a dry place
The second point is one that you can influence extremely minimally, but you still can. This means trying not to drive on roads with poor surfaces, off-road conditions and, of course, being wary of potholes. Yes, all these insidious surprises on the road can damage literally any part of the car.
Some tips and tricks
In conclusion, I would like to say a few very important points. Remember that if you have the opportunity or desire to entrust all manipulations to specialists, then you should do so. Your safety and the safety of your passengers will depend on this decision. You cannot save any money on your security. History has many examples when people, due to their carelessness, got into accidents, which sometimes ended in failure. But if you still decide to do everything yourself, then double-check that you have tightened all the bolts and nuts all the way. After all, there is nothing more scary than an out-of-control car rushing at high speed.
Also, do not buy extremely cheap spare parts. As you know, original spare parts are used by the manufacturer himself when assembling a car. These parts are best suited for your car, since the manufacturer always tests its products for wear resistance under extreme conditions, and, most importantly, they are designed specifically for your car. If it is possible to get original spare parts, this should be done. Original spare parts have special markings that you will not find at the auto market seller in your city. All these spare parts were created at the automaker’s own plant, which naturally speaks of the quality of the products. Although they are expensive, they are durable, since the manufacturer himself is interested in their high quality. Each manufacturer of such parts always provides a guarantee on them.
It is recommended to use only original parts instead of inexpensive Chinese analogues
Duplicates or non-original spare parts are also produced by factories, but not by the manufacturer, which indicates questionable quality in most cases. They are made by other companies that may not even be licensed by the original manufacturer. Usually this is all due to the fact that the manufacturer either does not have time for their own production, and they order parts from the outside, or they are completely satisfied with this policy. At the same time, there is always a risk that, under the guise of a duplicate made at the factory, parts simply made in a garage will go on sale. Of course, you cannot buy such parts; always try to make purchases from reliable sellers.
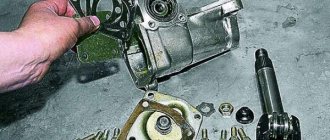
How to replace the gearbox?
Replacing the gearbox is a more complex operation, but it will make the steering mechanism more reliable. To replace the gearbox, use the following instructions:
- Raise the left side of the VAZ 2106 to make room for manipulation;
- Remove the wheel on the left side;
- Unscrew the nuts, after removing the pins;
- Tighten the puller bolt, remove both tips;
- Tighten the bolt on the steering shaft near the gearbox;
- Remove the shaft from the splines;
- Tighten the nuts that secure the gearbox to the body;
- Repair or replace the gearbox.
To return the gearbox to its place, follow the same instructions, but in reverse order.
Please pay attention to an important point: you should not knock out the tips with a hammer, this may damage the threads and the reliability of the steering will significantly decrease, but its reliability is directly related to the safety of the driver.
Required Tools
To replace the steering tip, you must prepare the following tools and accessories:
- jack;
- a wheel wrench for unscrewing the wheel mounting bolts;
- hammer;
- crowbar or pry bar;
- metal brush for cleaning parts;
- WD-40 lubricant;
- calipers;
- set of heads and open-end wrenches;
- graphite lubricant.
Experienced motorists carry this set of tools in the trunk; it can come in handy on the road.
This is interesting: Where is the throttle sensor on the VAZ 2110