The crankshaft oil seals (cuffs) act as plugs that lie at the ends of the shaft to prevent oil from leaking out and dust from entering the engine. Signs of wear on the crankshaft seals, both front and rear, are splashing and oil leaks. The standard service life of oil seals is no more than 150 thousand km.
When is it necessary to replace the crankshaft oil seal?
- if an oil leak occurs in the pulley area, or at the junction of the engine and gearbox;
- when the oil seals are “squeezed out”, that is, they are displaced outward from their places, which indicates increased oil pressure;
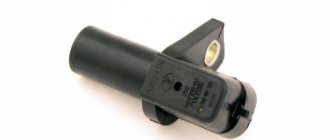
On the injection model there is a crankshaft position sensor; it measures and synchronizes its rotation frequency with the fuel supply. If the sensor has limited the engine speed, then the reason is also a faulty oil seal. The sensor is placed on the oil pump cover.
What reasons lead to premature wear of oil seals?
- poor material, counterfeit parts;
- increasing engine speed, using low-quality fuel, incorrect ignition timing;
- engine overheating;
- long-term operation on old oil and a dirty filter.
During winter operation of the car, the breather can become clogged with snow, and the increased gas pressure can “squeeze out” the seals.
The front seal changes much faster than the rear. To replace the rear one you need to spend much more time.
Regardless of which oil seal (or both, as recommended by the experts) will be changed, the following is required:
- put the car in the pit.
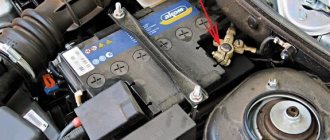
- de-energize the battery;
- engage first gear to lock the crankshaft;
- securely secure the vehicle with the parking brake.
In what cases should the pulley be removed?
Most often, it is necessary to dismantle the crankshaft pulley when changing oil seals. The role of the O-rings is to prevent oil from the crankcase from reaching engine components. Over time, the seals wear out, crack, and as a result, oil leaks appear. To fix this, you need to change the seals. During this procedure, you have to remove the crankshaft pulley.
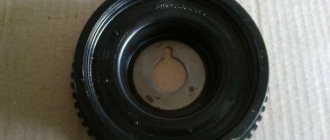
Also, the need to dismantle the crankshaft disk arises when replacing the timing belt on a VAZ 2107 injector. It is changed according to the regulations specified in the operating instructions for the VAZ 2107 injector, as it wears out after a visual inspection or if it breaks. During a technical inspection, the pulley must be inspected to identify any defects. If chips or scratches are found, the part should be replaced.
Damaged part with broken part
The procedure for removing the product itself is not difficult, but some problems arise.
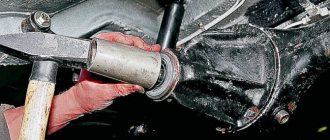
Firstly, with access. The pulley we are interested in is located in the lower part of the engine compartment behind the generator. It is difficult to get to because other engine components are in the way. Before removing the pulley, you need to remove the alternator and power steering belt.
Secondly, the crankshaft pulley mounting nut is very difficult to unscrew. When it is put in place, it is screwed with great effort. This is necessary so that it does not unscrew accidentally while the car is moving, as this can lead to expensive repairs. While the engine is running, the nut is tightened even more. In addition, the process is aggravated by high operating temperatures, at which oil coking and metal corrosion occur under the influence of the external environment.
Where is?
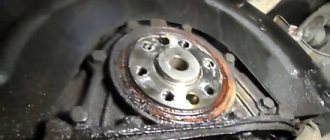
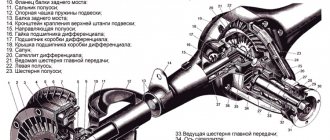
The oil seals are located in small holes on the camshaft drive covers. Being at the ends of the shafts, they perform two roles, the first is to prevent oil from leaking out and the second is to protect the components from dust and dirt entering the system. The camshaft cover is circled in red in the photo. The blue arrow shows where the crankshaft pulley is located, behind which the cuff is located.
Shaft cover
Removal instructions
With the clutch disengaged, the crankshaft can be easily turned with a wrench.
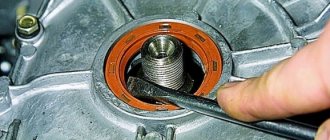
To carry out the removal procedure, it is necessary to secure the shaft from turning.
There are special devices that are bolted to the pulley into the technological holes, preventing the shaft from turning. If there is no such device, then you need to install supports under the wheels and place the car on the fourth. You can also secure the crankshaft flywheel by inserting a long screwdriver or pry bar between its teeth.
Removal and Installation
On a VAZ 2107, the injector crankshaft pulley is held in place by a fastening nut. Another name for it is ratchet. To remove the crankshaft pulley, you will need to unscrew this nut. It is better to carry out work on an inspection ditch or overpass. The tools you need to prepare are:
- set of keys and sockets;
- socket or socket wrench 38 (36);
Preparing tools for unscrewing
- extension;
- screwdrivers;
- mount.
If the threaded connection is difficult to unscrew, there are special products, after application of which you can easily unscrew the fasteners. These products include WD oil. You can also use vinegar essence or brake fluid.
Work on dismantling and installing the crankshaft pulley on a VAZ 2107 injector consists of the following steps:
- The car must be set to the handbrake.
- The crankshaft should be fixed by engaging 4th gear.
- After unscrewing the lock bolt and loosening the tension nut, you need to remove the generator belt.
- To get to the crankshaft you need to remove the front right wheel.
- In the upper part of the engine compartment, you need to dismantle the air filter and remove the engine mud shield.
- Next, you need to secure the crankshaft from turning using one of the methods described above.
- Before unscrewing, the nut should be tapped on all sides. Using a spanner, unscrew the crankshaft pulley mounting nut by turning it counterclockwise.
- If you cannot unscrew it manually, you can use another method. To do this, you need to put the car in neutral and remove the spark plugs. The wrench with the extension should be installed so that the end of the extension rests against the spar or floor in the direction of the shaft movement. At this time, you need to turn the ignition key to give a short impulse.
Work plan
To remove and replace a damaged cuff, we suggest using step-by-step instructions:
1. Take a 10mm wrench and remove the clutch housing protective shield. To do this, unscrew the two bolts that are fixed on the back of the oil seal holder.
2. Having gained access to the back cover, clean it of any adhering dirt. Replacing the sealing element could also be done on the engine - in this case there would be no need to change the gasket and restore the tightness at the junction of the oil sump. But since this creates a risk of damage or distortion of the sealing collar, press-fitting should be carried out under more convenient conditions.
3. To remove the rear cuff mounting cover, remove the six bolts securing the engine end and the two bolts that hold the oil pan to the holder. As in the previous case, a “10” socket head is suitable for this.
4. The oil seal mounting unit is installed on the sealing gasket, so it often “sticks” to the surface of the cylinder block. In order not to damage the part made of fragile duralumin, it is pryed off from the side of specially cast protrusions and, carefully swaying from side to side, is removed from the engine.
5. The lid is placed on wooden stands. Using a suitable punch, the oil seal is knocked out of the socket through a special cutout in the holder. Don't be afraid to damage the worn sealing element - you still have to throw it away.
6. Wash the holder thoroughly to remove any dirt. Pay attention to the seat of the cuff - by polishing it to a shine, you will simplify the pressing of the new part and reduce the risk of its damage.
7. Before installing the new oil seal, lubricate it with engine oil. This will reduce the friction of the rubber on the metal, which will prevent the cuff from bending and damaging the race when pressed. If desired, a layer of lubricant is also applied to the seat in the lid - this will only be beneficial.
8. Carefully install the new sealing element into the socket. Make sure that the top plane is strictly parallel to the top edge of the holder. Remember that misalignment of the part during installation will lead to jamming. Removing a stuck cuff without damaging the clip will not be easy.
9. Using a suitable tool, put the oil seal in place. Use the old seal as a mandrel (if it was removed without damage). As a last resort, you can press in the oil seal using a hammer and a wooden block, tapping the surface of the part in a circle. The installed seal must be flush with the top surface of the seat.
10. After unscrewing the edge of the cuff from the side of the cutout for dismantling, make sure that the garter spring is not damaged during installation.
11. Before replacing the rear cover, thoroughly wipe the surface of the crankshaft flange. In addition, be sure to clean the junction of the holder and the cylinder block from traces of sealant and remnants of the old gasket.
12. To prevent the oil seal from turning up during installation, lubricate its edge and seat on the crankshaft with engine oil. This will prevent the working part of the cuff from being abraded in the first seconds after starting the engine.
13. Carefully inspect the removed gasket. If it is damaged during disassembly or is strongly compressed, replace the sealing element.
14. Lubricate the gasket on both sides with sealant and glue it to the cylinder block. Also, apply a thin layer of liquid sealant to the cork (rubber) seal of the powertrain oil pan.
15. Replace the bolts that secure the clutch housing protective cover.
16. Gently pressing the working edge of the oil seal with your fingers, install it on the flange. After the flat of the cover touches the cylinder block, the area where the oil seal meets the crankshaft can be carefully adjusted using a screwdriver with a thin flat blade.
17. Hand-tighten the six bolts securing the rear engine cover to the block and tighten them crosswise with the required force. Using the remaining two bolts, tighten the oil pan to the oil seal holder.
18. Be careful with the tightening torque so as not to damage the threads in the duralumin cover.
Reinstall the clutch housing protective shield and tighten it to the cover with nuts. This completes the work of replacing the rear oil seal of the VAZ 2101-2107. All that remains to be done is to reinstall the clutch, gearbox and driveshaft. Be sure to center the clutch disc using a special tool, otherwise the transmission input shaft will not fit into the crankshaft bearing.
Video “Replacing the crankshaft pulley on a VAZ classic”
This video talks about oil leakage due to wear on the crankshaft pulley.
The front oil seal of the VAZ 2101-2107 engine is used to prevent engine oil leaks in the place where the accessory drive pulley is attached to the end of the crank. Although the sealing lip is made of high-quality fluorine rubber, over time its working edge wears out and lubricant leaks into the gap. Today we will share a method for replacing the front crankshaft oil seal of a VAZ “classic”. Even a novice driver can cope with the job, because to do this you don’t even have to remove the camshaft drive cover from the engine.
labavto.com
The oil seal or cuff of the crankshaft plays the role of a plug and the functionality of this unit largely depends on its condition.
According to the instructions, replacing the crankshaft oil seal on a VAZ 2107 must be carried out every 150,000 kilometers. If you decide to replace the front or rear oil seal yourself, then check the crankcase ventilation system in the engine. If it is clogged, be sure to clean it, otherwise all your efforts may be in vain.
When and why to change the front oil seal
The manufacturer recommends replacing the front crankshaft oil seal of VAZ 2101-2107 engines every 150,000 km. However, in practice such replacement has to be performed more often. Accelerated wear of the sealing element and the appearance of engine oil leaks are caused by:
In addition, we cannot rule out hardening of the cuff due to natural aging and the possibility of a manufacturing defect - unfortunately, the quality of parts for rear-wheel drive VAZ models leaves much to be desired.
It is impossible not to notice damage to the sealing element - the rotating pulley scatters oil in the front of the engine and throughout the engine compartment. However, do not think that such a malfunction only leads to oiling of the units and a decrease in the lubricant level. If engine oil gets on the generator belt and other rubber parts, it can quickly render them unusable.
Keep in mind that the appearance of a leak through the engine seals is provoked by another factor - increased crankcase gas pressure. For this reason, be sure to check the cleanliness of the engine ventilation system.
Something else useful for you:
What to do if the valve cover of a VAZ-2107 is “snotty”?
As you remember, last time we tried to eliminate an oil leak from the junction of the filler neck and the valve cover using silicone sealant. However, we were unable to do this; apparently, the gas pressure on the “tired” engine was quite high.
Therefore, when setting up the valves, I decided, while there was a possibility, to try to weld this very joint on both sides for reliability. A 2 mm electrode and an inverter apparatus were used, since the metal is quite thin.
However, this did not help, apparently in some place it was not cooked well enough.
It was quite a hassle to remove the lid again and boil it again, so I decided to try to seal it with “cold welding” for metal.
We thoroughly degrease the pre-treated area, clean it with emery cloth for better adhesion and thoroughly rub in the glue until it sets.
After a few hours you can start the engine, but we will leave this matter for the night.
After a couple of hundred kilometers, the result is already visible - the oil has stopped oozing from the joint, only a small evaporation has formed from under the cap.
So, it was better to use this method right away, but who knew.
Replacing the valve cover gasket of a VAZ-2107 with your own hands
Very often you see cars, and most of the owners, whose engines are all in oil, as if not a car, but a tractor. On all classic models, from the VAZ 2101 to the VAZ 2107, there is such a problem as oil leaking from under the valve cover. But you can solve this problem by simply replacing the gasket, which costs mere pennies. I don’t remember exactly, but I had to buy it in different stores and the price ranged from 50 to 100 rubles.
And this replacement is as easy as shelling pears, all you need is:
The first step is to remove the air filter along with the housing, as it will interfere with further work.
Hello everyone, as you remember, in the summer I changed the oil seals, then I was in a hurry, and I didn’t change the valve gasket. And when changing the oil in the box, I noticed a fresh oil leak on the bell and the pan, but did not attach much importance to it, the front cover was also covered in oil, and attributed this to the missing stabilizer and tensioner bolts.
However, the oil level in the engine began to decrease over time, a burning smell appeared in the cabin, and the belt began to spin due to oil getting on it. As a result of a thorough inspection, I discovered two leaks from under the valve, in the rear of the engine near the shield and in front under the air intake corrugation, although you won’t really notice them. Apparently, due to the frost, the gasket began to leak even more; tightening it did not help.
I decided to replace the gasket with the same one, now they all come with plug inclusions, I haven’t noticed pure rubber yet.
The old one was already very pinched, apparently, it was pressing on the holes, since when tightening, the rubber in these places was just stretched, and it was leaking from the corners where the cover was attached.
Step-by-step instruction
Due to the limited space between the front of the engine and the radiator, it is difficult to press in a new oil seal without distortion. For this reason, experts recommend replacing the sealing element with the front engine cover removed. Of course, doing this on a mechanic’s workbench is much more convenient, but there are also pitfalls here. As practice shows, after such dismantling it is difficult to restore the tightness along the junction line of the oil pan, and in addition, there is a danger of breaking the internal threads in a rather delicate duralumin cover.
Replacing the mechanism
If you replace the front oil seal, changing it is quite simple. But as for the rear, you will have to tinker with it quite a bit and spend more time. In the case of an injector, you can change the cuffs without removing the radiator.
Immediately before the work itself, you should place your VAZ-2107 in a pit and disconnect the battery.
Afterwards, it is extremely important to engage first gear - this way you can fix the crankshaft. Be sure to also securely lock the vehicle in place using the parking brake. The procedure itself takes place in the following stages:
- We unscrew the engine protection, remove the generator belt and remove the generator pulley.
- Now you can clearly see the oil seal - remove it with a screwdriver.
- We treat the new cuff well with oil and insert it into the right place.
- Then we put all the parts in place in reverse order.
As for the back cuff, as mentioned above, not everything is so simple. You will have to tinker under the bottom of the car for hours, and you can only do the procedure if you have extensive experience in such work. In order to understand how to replace the rear oil seal yourself, it is better to watch a detailed video on the Internet.
If not changed in a timely manner
On some cars, gasket failure is a chronic problem. The original standard part can withstand no more than 70-80 thousand kilometers. During active use of the car, it breaks down even before the mileage of 40 thousand km.
Changing the gasket on time is extremely important. If this is not done, there will be many unpleasant surprises: the entire valve group of the engine will be subject to a powerful attack of dirt and dust, which will penetrate inside without obstacles; severe oil leakage will begin, and a lack of lubrication will have an extremely negative effect on the service life of the piston group and valves; oil will get on sensors, spark plug wells, wires, and other mechanisms in the engine compartment - the risk of fire will increase; cooling of the power plant will become worse.
Change the gasket as soon as it stops doing its job. If you choose a low-quality product or make a mistake during replacement, oil leaks will appear again within a few days after replacement.
Source