Experienced owners of VAZ 2101-07 cars know that costly repairs or complete replacement of the engine can only be avoided if all mechanisms are carefully taken care of.
The VAZ 2101 oil seal is an inexpensive, but very important part. It is not only used to seal joints, but also prevents the leakage of working fluid. If you install a low-quality reinforced cuff or do not change it in time, the element will leak. Often car owners do not notice this, so there is a risk of failure of the unit where this oil seal is installed.
It is always cheaper to buy a new seal on time than to repair or completely replace a specific unit later. Our company builds trusting relationships with clients. It is in our interests to provide the client with a suitable rubber product, which will be distinguished not only by its suitable size, but also by the high quality of the material.
Purpose of oil seals
The main mechanisms in a gearbox are shafts. They are equipped with oil seals, which are necessary to seal the gearbox gaps. Thanks to this, the fuel and lubricant does not leak out of the box. The existing differential seal provides the necessary protection of this mechanism from dirt.
What material are the seals made of? This element is made of composite materials XSP and NBR. Their distinctive feature is that they tolerate temperature loads well, therefore, their minimum output is noted during long-term operation of vehicles.
Diagnostics of VAZ 2107 gearbox seals
The transmission system needs to be checked if there are leaks of transmission oil under the car, noise, or grinding noise from the gearbox. The leak may be between the gearbox and the transfer case. Also, if the sealing elements are worn out, difficulties may occur when changing speeds. In most cases, the need to replace the gearbox seal occurs after 60,000 km.
The gearbox shaft seal must also be checked. If this component of the box has become unusable, liquid leaks are noted. Wear of the shank oil seal may be due to natural wear or mechanical damage. High-quality products will not lose their properties even after 70,000 km.
Why might oil leak?
First, let's try to understand how to determine the time to replace the oil seal. If you believe the manufacturers, a high-quality cuff should last more than 60-70 thousand kilometers. But is this really so? Of course not. Under conditions of constant load, bad roads, dirt falling on parts, and poor quality oil, the oil seal cannot withstand and needs to be replaced quickly. A visual inspection of the rear axle will help identify the need for replacement. It is clear that for a better inspection it is recommended to put the car in a pit. It is often possible to eliminate a leak from the gearbox by tightening loose fastening bolts or replacing the washers with softer options. In this case, copper washers are considered ideal. Often, instead of a washer, a sealant in the form of a thread or ordinary gel is used on threaded connections.
Sealant for threaded connections
In addition, the cause of an oil leak may be an insufficiently tightened drain or filler plug.
Careful attention should also be paid to this. If everything is in order with the plugs, then it would be a good idea to pay attention to the connection of the gearbox to the crankcase
Connection of the gearbox to the crankcase
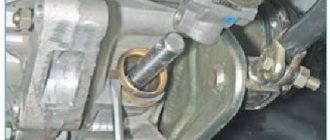
If the tightness of this connection is broken, then oil leakage cannot be avoided. In this case, replacing the oil seal on the VAZ 2106 bridge or replacing the axle shaft seal will help. As a rule, any leaking oil seal needs urgent replacement. No other type of repair will help here. Oil seals are inexpensive and it is better to replace them periodically so that no problems arise in the future. It also happens that the cause of the leak is the breather. It is located on the upper side of the car crankcase, on the right side.
Breather cover VAZ 2106
First of all, we check the breather cap to see how freely it moves. If everything is fine with it, then it’s all about the oil seal, which requires replacement. Needless to say, if you delay replacement, the oil level will drop and ultimately lead to tragic consequences. As you know, oil for all parts and components of a car is comparable to the oxygen that a person breathes.
Replacing axle seals on a VAZ 2106
A common reason why the oil seal fails is an increased oil level. Therefore, you must always monitor this and not allow it to increase or decrease.
Replacement of the secondary shaft oil seal for gearbox 2101-07.
I created this video with the help of YouTube Video Editor ()
- Disconnect (better remove) the battery.
- Engage neutral gear, disengage the handbrake, raise and hang the rear axle.
- Unscrew the bolts securing the cardan and the gearbox flange, and disconnect the cardan.
- Remove the exhaust manifold pipe by unscrewing the bolts.
- Disconnect the oxygen sensor.
- Remove the starter.
- Inside the car, remove the console and gearshift knob.
- Remove the gearbox protection.
- Unscrew the clamp connecting the catalyst to the exhaust pipe.
- Remove the clutch slave cylinder.
- Unscrew the speedometer cable, remove the boot and the reverse speed sensor wire.
- Remove the driveshaft.
- Unscrew the traverse while holding the gearbox.
- Unscrew and pull out the gearbox.
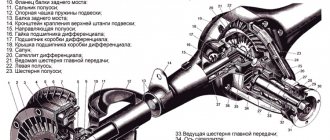
What are axle shafts, why are they needed and how are they designed?
In rear-wheel drive cars, which the “seven” actually belongs to, the rear wheels are driving. It is they, rotating, that make the car move. The torque is transmitted to them from the gearbox through the drive (cardan) shaft, gearbox and axle shafts. There are only two axle shafts: one for each rear wheel. Their role is to transmit torque from the corresponding gear of the gearbox to the wheel rim.
Axle shaft design
The axle shaft is an all-metal shaft made of steel. At one end there is a flange for attaching the wheel disk, and at the other there are splines for engagement with the gearbox gear. If we consider the axle shaft assembly, then in addition to the shaft, its design also includes:
- oil deflector;
- sealing gasket;
- oil seal (cuff);
- bearing.
In addition to the shaft, the design of the axle shaft also includes an oil deflector, a gasket, an oil seal and a bearing.
Each of the axle shafts is installed in the corresponding (left or right) rear axle housing. An oil deflector with a gasket and an oil seal are used to prevent lubricant from leaking out of the casing. The bearing is designed to ensure uniform rotation of the axle shaft and distribute shock loads coming from the wheel to the rear axle of the vehicle.
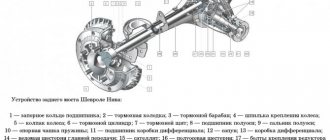
1 — oil deflector; 2 - gasket; 3 - seal; 4 - oil seal; 5 - axle shaft; 6 - casing; 7 — bearing mounting plate; 8 — brake shield; 9 — bearing; 10 — fixing sleeve
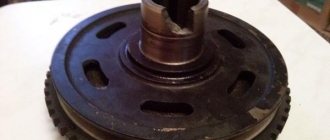
Replacing the bearing of the input shaft of the VAZ 2107 gearbox
Remove the bell and retaining rings from the dismantled box. No further disassembly is required. The procedure is as follows:
- Using a powerful screwdriver, pick up the bearing of the input shaft of the VAZ 2107 gearbox by the annular groove . Serious efforts will be required, so you need to choose a screwdriver that is as strong as possible so that it does not break or bend.
- Push the transmission input shaft forward using the shaft bearing as a support.
- Slowly pull the bearing off the input shaft
by tapping it with a hammer. Between hammer blows, the shaft must be rotated slightly to avoid bearing misalignment.
Knocking out a bearing takes from 5 minutes to half an hour. It all depends on the skill of the mechanic and on how closely the bearing is “affined” with the shaft.
The new bearing is pressed onto the shaft using a light hammer. The blows must be applied to the inner ring of the bearing. This should be done carefully and evenly, pulling the input shaft forward.
The advantage of this method is that there is no need to sort through the insides of the box, risking unbalancing it. Bearing of the input shaft of the VAZ 2107 gearbox - replacement. Also replacement
bearing without disassembling the entire gearbox significantly saves time.
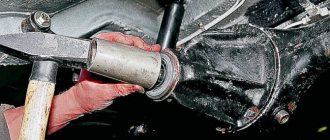
Pulling out the internal grenade from the gearbox. Video
Therefore, it is better not to try to tear the grenade out of the box by pulling the brake disc, but to insert a prybar under the grenade and a tube under the prybar, try to squeeze the grenade out of the box if it was squeezed out perfectly. It happens that a grenade cannot be squeezed out, then it is knocked down with hammer blows.
Photo. Removed grenade from the gearbox.
But before squeezing out the grenade, place a container to collect the oil; it can be made from an old canister by cutting a hole. If the oil in the box is normal, then it will definitely flow out of the box.
replacing the secondary shaft seal of a VAZ 2107 gearbox
To perform the work of replacing the oil seal in the gearbox, you will need a three-jaw puller and fixing glue.
2. On VAZ 2107 cars with an injection system, remove the heat shield (see “Drivetrain - removal and installation”).
3. Disconnect the driveshaft from the rear axle gearbox and unscrew the two bolts securing the intermediate support of the driveshaft to the cross member (see “Driveshaft - removal and installation”).
4. Disconnect the elastic coupling of the cardan drive from the flange on the secondary shaft of the box (see “Drivetrain - disassembly and assembly”) and move the cardan drive backwards.
5. Using pliers, remove the stubborn ring.
6. Secure the flange of the elastic coupling from turning by inserting bolt A into its hole. Using a 30 mm wrench, unscrew the flange fastening nut and move the centering ring B of the elastic coupling along the shaft.
Replacing the gearbox seal of the secondary shaft of a VAZ 2106-CLASSIC
Replacing the gearbox seal
secondary shaft
VAZ
2106-CLASSIC.
How to make a replacement?
To start work, you should send the VAZ-2107 to the pit (otherwise you won’t be able to get to the parts). After this, you need to set the first gear to fix the crankshaft. Attention! The machine must be well secured with the parking brake. To replace the front crankshaft oil seal you will need:
- Disconnect the protective shield. A key set to “8” is suitable for this. If an injection model is being serviced, it is possible to install an additional shield; it will also have to be dismantled.
- Remove the alternator belt. To do this, unscrew the generator nut and move it all the way to the side.
- Using a “38” open-end wrench, unscrew the nut securing the pulley to the crankshaft and remove it.
- Remove the oil seal from its seat. To do this you will need a wide screwdriver. After this, the box needs to be thoroughly wiped with gasoline and the new cuff lubricated.
Then everything is assembled in reverse order. The outer diameter of the oil seal is 4 mm, the outer diameter is 56 mm.