Replacing the front
To perform this procedure on your VAZ 2114 car, you will need a minimum set of tools, which includes:
- 10mm socket;
- 10mm wrench;
- Mandrel;
- Screwdriver.
We pry it off with a screwdriver.
The replacement work is performed in the following sequence.
- The oil pump is removed from the car. It is not difficult to do this, and it is quite possible to do it yourself.
- Next, the oil seal is removed from the cover of this same oil pump. Here you will need a thin screwdriver, which can be used to pry the device and thereby remove it.
- The new element is pressed in using a mandrel, the outer diameter of which should be about 41 millimeters. In this case, the working edge should be directed inward.
- The oil pump is returned to its place.
Replacing the rear
It should be noted that the clutch discs may become oily due to a leak through the gearbox input shaft oil seal, or due to the rear crankshaft oil seal.
The smells of oil from the engine and transmission are different, so many experienced specialists can use the smell to determine which element is causing problems.
Changing the rear oil seal is actually somewhat more difficult than changing the front oil seal. But this does not take away the fact that it is still more than possible to do the work with your own hands.
Disassembled
Following the instructions step by step, replacing the crankshaft oil seal on a VAZ 2114 will become a fairly simple task for you, which will add to your experience in repairing a car yourself.
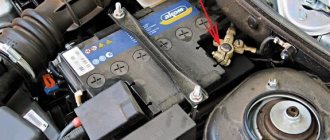
- Disconnect the negative terminal from the battery of your VAZ 2114.
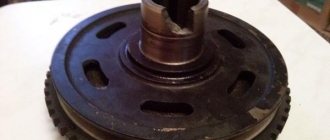
- Make notes on the location of the flywheel relative to the crankshaft, and then remove it.
- Next, the rear shield of the clutch housing is removed from the guide bushings.
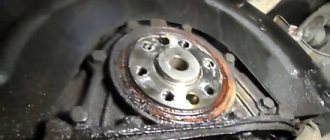
- The next step is to remove the eight bolts that are responsible for securing the oil seal.
- This will allow you to remove the holder.
- The oil seal is pressed out of its holder.
- The new element is installed in place of the old one until it stops. Here you will need a mandrel again. Its outer diameter is 99 millimeters. Press in the element so that its working edge points inward.
- To make pressing easier, a chamfer is made on the seating edge of the element using a needle file. An alternative tool for bevelling is a small sanding wheel.
- Now we change the gasket, which is probably torn on the holder. Even if the old gasket looks fine, we strongly recommend replacing it with a new one.
- The gasket is glued with a special thick lubricant. This will ensure the strength of its retention, as well as additional tightness of the connection.
- The working edge of the pressed-in oil seal is treated with regular engine oil, as is the case with the front one.
- The crankshaft flange is subjected to similar processing.
- The fasteners of the engine oil sump to the cylinder block will need to be loosened slightly. To do this, it is enough to make 2-3 turns on each of the 14 bolts that hold the crankcase.
- When installing the holder, the working edge of the new oil seal is carefully tucked onto the crankshaft flange. Arm yourself with a wooden stick for this purpose, but do not use metal objects.
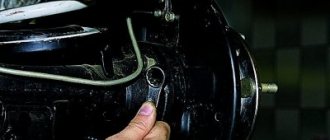
- Retighten the holder bolts.
- Screw back the engine crankcase mounting bolts.
- Place the clutch housing rear shield back onto the guide bushings.
- According to the previously marked places, mount the flywheel, gearbox and clutch in their place. To ensure that the flywheel mounting bolts have high quality adhesion and reliability, first apply sealant to their threaded part.
Obviously, it is quite possible to replace the crankshaft oil seals on a VAZ 2114 car with your own hands. The procedure requires accuracy and consistency of actions. Plus, do not forget to use new high-quality auto parts, so that after a short period of time you do not have to carry out the entire procedure again.
Source: luxvaz.ru
Replacement process
If you have some auto mechanic skills, you can replace the front oil seal yourself.
- remove the protective crankcase and timing covers;
- align the ignition marks so as not to disrupt the operation of the gas distribution mechanism;
- remove the timing belt;
- dismantle the pulley and remove the generator belt;
- remove the crankshaft pulley (you will need a puller, do not forget to purchase it);
- remove the oil pump (drain the oil first);
- assess the condition of the oil seal (it may be “oaky” from time to time or, conversely, softened by oil);
- Press in a new oil seal with a socket of the appropriate size.
Pressing in the front crankshaft oil seal
Replacing the rear oil seal is an extremely labor-intensive process, which is accompanied by checking the condition of important vehicle components - the crankshaft and clutch parts.
We strongly recommend changing the rear crankshaft oil seal on a VAZ 2114 at a normal car service center.
The process for replacing the crankshaft rear oil seal is as follows:
- separate the engine and gearbox;
- remove the clutch and flywheel;
- pull out the old oil seal and press in a new one.
At the same time, we check the shaft for play, examine the condition of the clutch, and after assembling the engine, you should also make sure that the breather is open.
After replacement, observe the car at idle and make sure there are no leaks. For a while, try not to over-spin the engine. It takes time for the seals to “get used” to the temperature conditions. Due to high oil pressure in the system, they can be squeezed out again.
Replacing the front crankshaft oil seal.
Dirt has appeared on the timing mechanism. Clear signs of oil seal leakage.
I bought a front oil seal 2108-1005034 110 rubles. Dimensions: 28.0 x 42.0 x 7.0 mm.
We change it, we remove the generator belt, we remove the generator pulley, we remove the timing belt.
To remove the pulley from the crankshaft, a special puller is used, which I did not have. Therefore, I placed a screwdriver on the right side of the pulley and pressed the screwdriver with a little force. While turning the pulley, I repeated pressing with a screwdriver. In about 5 minutes the pulley came off. You could say I was lucky to get off easy.
Until the old oil seal is removed, I wash everything with white alcohol and foam.
Next, we pick out the old oil seal. It turned out that it is not so simple. The seal was sitting tightly. I drilled a 2 mm hole in the oil seal with a drill and tore out the oil seal with a crooked nail.
We install a new oil seal. We coat the outer part of the oil seal with sealant and the inner part with oil. I pushed the oil seal in with a 32mm head. I installed it by hand.
We install the pulley. During installation, the key kept popping out. I struggled a bit to get the key in place.
AutoNews / Reviews / Tests
Replacing the Crankshaft Oil Seal VAZ 2115
Replacing the front and rear crankshaft oil seals on a VAZ 2114
On any car, crankshaft seals seal the technical holes in the engine, on the one hand, preventing dirt from seeping inside, and on the other hand, preventing oil leakage. Leakage of oil seals manifests itself in oil drips on the cylinder block housing from the timing belt or rear of the engine.
Replacing the front crankshaft oil seal. VAZ 2108, 2109, 21099, 2113, 2114, 2115
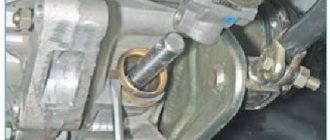
We hang up the right front wheel and remove it. Drain the oil from the engine crankcase.
| Using a 10mm wrench, unscrew the four bolts securing the front protective timing cover. | . and remove it. |
| Using an “8” wrench, unscrew the six bolts securing the right half of the lower engine protective casing and remove it. | Using a 17mm wrench, loosen the nut securing the generator to the tension bar and, moving the generator, remove the drive belt. |
| We engage first gear and use a 19mm wrench to unscrew the bolt securing the pulley to the crankshaft. | Remove the pulley from the crankshaft. |
| Before removing the timing belt, align the timing marks on the camshaft pulley and the rear protective cover by rotating one suspended front wheel with 5th gear engaged.
| Use a 17mm wrench to loosen the bolt securing the tension roller. |
| . and remove the timing belt. | Using a 10mm wrench, unscrew the four bolts securing the lower clutch housing cover and remove it. |
| Using a 10mm socket, unscrew the 16 bolts securing the oil pan to the cylinder block. | . and remove the crankcase along with the gasket. |
| Using a 10mm wrench, unscrew the bolts securing the oil receiver to the pump housing and the cover of the second main bearing; remove the oil receiver. | Use two screwdrivers to move and remove the toothed pulley from the crankshaft. |
| Use a screwdriver to pry up the key and remove it from the crankshaft groove. In this case, we act carefully, the key is small and quite insidious - it is easily lost. | Using a 10mm wrench, unscrew the six bolts securing the oil pump to the cylinder block. |
How to replace the oil seal
If you already have experience in disassembling a car, then the procedure described below is unlikely to seem complicated to you. After removing the wheel and protecting the engine, replacing the crankshaft seal is carried out in just a few steps:
- open the hood and unscrew the protective cover of the timing belt to gain access to the camshaft and crankshaft pulleys;
- manually rotate the shafts so that the marks on their pulleys coincide;
- dismantle the timing belt along with the pulley;
- remove the crankshaft pulley;
- unscrew the crankcase cover and completely drain the oil into a previously prepared container;
- remove the VAZ-2114 engine sump, oil pump and oil receiver. The latter must be very carefully inspected for mechanical damage;
- to remove the oil seal, you can use two screwdrivers or simply pull it out by hand;
- We also remove the oil pump gasket;
After this, the seal and gasket of the VAZ-2114 are replaced, as well as all components and mechanisms are reassembled in the reverse order. At the same time, you should be aware that sometimes the cuff does not immediately sit in its place. To fix the problem, you need, firstly, to carefully wipe the crankshaft oil seal seat, remove dirt and traces of lubricant, and secondly, very carefully install the part using a hammer and a mandrel. Be extremely careful not to cut the cuff.
Replacing the VAZ-2114 crankshaft seal is carried out together with installing a new oil pump gasket. Before installation, it is advisable to treat the latter with graphite lubricant, which significantly extends the service life of the seal. Also, do not forget to wipe the oil pan gasket well and lubricate it with a thin layer of sealant to prevent lubricant leakage.
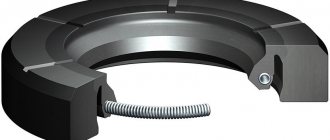
Crankshaft oil seal
Today we will talk in more detail about the crankshaft oil seal, a spare part that is designed to seal (seal - approx.) connections in this moving part of the engine, as well as prevent engine oil from leaking . Below, we will describe in detail how to replace this element as quickly as possible.
Signs of crankshaft oil seal failure
The very first and main sign of failure of the crankshaft oil seal is considered to be the loss of its tightness.
Oil leak due to leaky crankshaft oil seal
And if in the case of oil seals on other engine elements it doesn’t look so bad, then if there is a malfunction on the crankshaft, oil can leak from the system in liters per 1000 kilometers.
Main causes of wear
- Wear and tear due to natural reasons due to expiration of service life.
- Incorrect installation of the oil seal in advance can cause cracks on its surface.
- Mechanical damage.
- The material is not original, made in violation of production technologies.
Please note that with an increase in oil consumption, due to leaks of the crankshaft oil seal, traces of oil will certainly be observed under the car; they are clearly visible and will not leave any owner unnoticed.
Also think about the presence of oil seal leaks and slight slipping of the clutch. This effect can be observed due to oil getting on the clutch disc and basket located near the gearbox.
How to change the crankshaft oil seal on a VAZ 2115
On any car, crankshaft seals seal technical holes in the engine, on the one hand, preventing dirt from penetrating inside, and on the other, preventing oil leakage. Leaking oil seals manifests itself in oil leaks on the cylinder block housing from the timing belt side or the rear of the engine.
Replacing crankshaft oil seals is considered one of the most difficult types of repair of a VAZ 2114. To install the front one, you have to remove the timing belt, and the rear one - the gearbox. In car services, such repairs are expensive, but without a pit and an assistant, carrying out the procedure is almost impossible.
Step-by-step process for removing the front oil seal
- Before starting work, you need to prepare a set of tools and wrenches.
- Make sure that the car is installed on a level surface and that wheel chocks are installed under the wheels.
- First of all, open the hood and remove the timing belt protection.
We remove the timing case
We combine according to the marks as in the picture
Here we also combine
Removing the timing belt
This work should be carried out very carefully.
Place the old oil seal aside.
Step-by-step installation process
- When installing a new spare part, first lubricate it with oil and, using an old ring or pipe of the same diameter, press it into place.
A socket head is suitable for fixing.
Step-by-step process for removing the rear oil seal
If no special experience is required when replacing the front oil seal, then to work with the rear oil seal, an assistant and a more thorough study of the technical component of the car may be required.
- When carrying out such work, it is necessary to do all the above points from 1-12.
- Next, you need to move on to dismantling the gearbox and clutch.
- When the clutch is removed, unscrew the four bolts that secure the flywheel, and then remove it.
- Then, when access to the oil seal is open, you can dismantle the housing in which it is located, or replace it directly in it.
- We remove the sealing ring from the place where it is fixed.
We install the new part and perform the entire assembly in the reverse order.
Upon completion of assembly, start the engine and pay attention to the presence of oil leaks at the places where they are installed.
Auto repair school - Do-it-yourself car repair
Jun 21, 2022 VAZ 2108, VAZ 2109, VAZ 2110, VAZ 1117 Kalina, VAZ 2170 Priora by admin
Is the front wheel drive seal leaking ? Thoughts like: How expensive is it to replace an oil seal? Is it possible to replace the oil seal with your own hands? And how difficult is it to replace it? Yes!? Then you have come to the right place... I can say for sure that it is not difficult, and you can easily carry out the work yourself. Of course, only if you have the desire, the necessary tools and precise instructions for correctly replacing the front wheel drive oil seal on VAZ-2108, VAZ-2109, VAZ-2110, VAZ-2115 from the Auto Repair School website! ))) Well, as they say, from words to deeds! Let's move on to the description of the main thing - a list of tools, purchasing spare parts and the process of replacing the drive seal with photographs