Good day, dear readers! In this issue of the in-flight magazine we will talk about how to adjust the valves to 8 cells with your own hands. Lada Granta engine. I tried to compile detailed step-by-step instructions for adjusting the valves, which will help those who for the first time decided to do this on their own on their car. I would like to note right away that valve adjustment is carried out within the framework of TO-0, TO-1, TO-3, TO-5, TO-7.
This manual is applicable to adjust all 8 keys. engines of the VAZ family, starting with the VAZ 2108 and ending with modern LADAs (at the time of writing, 2022).
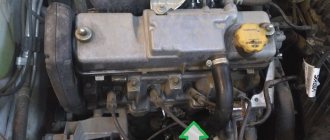
The valve adjustment was carried out on an editorial car LADA GRANTA 2022 model year, engine model 11186 (with a lightweight connecting rod and piston group); volume 1.6 l, 8-valve, power 87 hp. The mileage at the time of adjustment was 15,300 km.
Let me remind you that the previous adjustment was carried out at an official dealer at zero maintenance with a mileage of 2,920 km. But since it was decided to independently service the car (I wrote about the reasons in issue 5), all subsequent maintenance on this car will be carried out independently, with a detailed photo and video report, as well as the “price of the issue.” So let's get started.
Valve adjustment Lada Granta 8 valve
This time we propose to consider such an important issue for every owner of not only the Lada Grant (2190), but also any car, as valve adjustment.
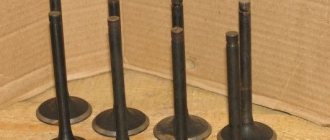
Valves in every car are an integral and integral part of the gas distribution mechanism. Surely you know that each cylinder has at least two valves. One of them is inlet, through which the combustible mixture enters, and the second is outlet, which releases the combustion chamber from exhaust gases. Every car enthusiast understands the importance of this system.
Signs of the need to adjust the valves of the VAZ 2190
After the engine warms up as it operates, its parts naturally expand due to the release of heat. Thus, car manufacturers set certain timing clearances when cold. These clearances take into account changes in valve dimensions during heating. If the valves have the wrong clearance, then this is fraught with consequences. The efficiency of the power unit immediately decreases and the service life of some engine parts, including the valves themselves, decreases. For example, if the gap sizes are set small, the valve itself and its seat will burn. When large gaps are installed, the valves do not open completely. In the second case, the overall engine power decreases noticeably and a characteristic metallic knock appears. The manufacturer of the VAZ 2190 recommends monitoring and adjusting the valve mechanism every 20-30 thousand mileage.
The procedure for adjusting the valves of the Lada Granta 8 valve
When all the tools are in place, you can start working. However, before doing this, you need to familiarize yourself with some of the recommendations given below.
Important! Measuring work must be carried out only on a cold engine, preferably at an ambient temperature within 20 degrees.
The measurement is made with a feeler gauge, which is installed between the valve pusher adjustment washer and the camshaft cam. For Lada Granta valves (2190), the nominal gap size is: Inlet valve – 0.2±0.05 mm Exhaust valve – 0.35±0.05 mm The adjustment process is carried out by installing adjusting washers of different sizes. The repair kit has washers with a thickness of 3 to 4.5 mm with a pitch of 0.05 mm. First of all, you need to remove the engine protection, namely its right side.
Removing engine protection Lada Granta 2190
- Unscrew the two bolts that secure the rear part of the protection on the right
- Unscrew the middle part of the protection fastening on the right side
- You now have access and space to directly remove the right side of the motor guard. You need to remove two bolts on the right side.
- Remove the required part.
Removing the cylinder head cover VAZ 2190
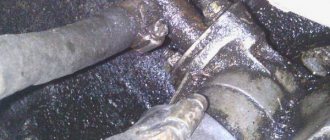
- First you need to loosen the clamps that hold the hoses of the engine cooling system and disconnect the pipes themselves from the fittings.
- Unscrew the pair of nuts that secure the engine cylinder head cover.
Setting the piston of the first cylinder to the TDC position of the compression stroke
- Disconnect the battery terminal (negative)
- Place the car in the neutral position of the gearbox, and also secure the car with special shoes.
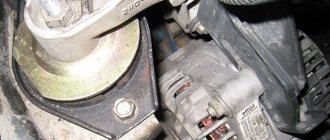
- Remove the three bolts securing the timing case from the front.
- Carefully remove the casing so as not to touch the wires passing nearby.
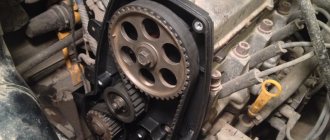
- Use the wrench to turn the crankshaft. This is done with a special bolt on the generator drive pulley. In this case, the marks on the camshaft pulley and the rear casing of the engine drive belt must coincide.
Important! If these marks do not match, then you need to remove the timing belt and install them in the desired position (this is unlikely to happen to you, but it’s worth mentioning).
Valve adjustment Lada Granta (2190) 8 valves
So, we have come to the most important issue of adjusting the valve group, after we have carried out all the preparatory work and provided access to the camshaft.
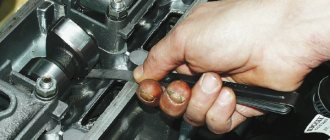
- We take the dipstick in our hands and begin to measure the gaps. The first ones to check are those cams that point upward from the pusher mechanism. For you these will be the fourth, sixth, seventh and eighth valves. After the measurement, you will have data on which to decide whether to replace the adjusting washer. Where the gaps are within normal limits, nothing needs to be done. It is better to write down all the obtained measurement results.
- To facilitate the process of dismantling the adjusting washer, the manufacturer left special grooves in the pusher. They need to be turned with a screwdriver so that it is convenient to pry off the washer and remove it accordingly.
- Now you need to use a special tool - a valve spring compressor (you can buy it at any auto parts store). It is installed on the cylinder head cover mounting studs. Having mounted the device, you need to press on it and press in the pusher of the valve whose washer is being replaced. Then you should install the clamp between the camshaft and the pusher.
- Next, use a screwdriver to pry up the washer and pull it out of its seat in the pusher. Additionally, it is better to use tweezers to hold the washer.
- Record the thickness of the washer removed. It is indicated on it, but there are cases where the inscription is worn out, so it is better to have a micrometer or a caliper with hundredths.
- Now you need to remember the math and calculate the thickness of the new shim. For these purposes, a simple formula is used: H=B+AC, where B is the thickness of the previous washer, A is the measured gap and C is the nominal gap. All calculations are made in millimeters. When you get the H value, it may not coincide with the dimensions of the new washers, so you need to find the closest value within a tolerance of 0.05mm. For example, H turned out to be 3.81 mm, and the closest thickness of the washer from the kit is 3.8, which means we will install it.
- Having selected a new adjusting washer, it must be installed in the pusher with the inscription down towards it.
- Press down the pusher with a compressor and remove the clamp.
Source
Let's sum it up
Which engine to choose - 8 valves or 16 - is a matter for each individual client. If the future owner of a LADA Granta likes an engine with 8 valves, then he will need to be concerned about routinely checking the condition of the timing belt and be inclined to periodically adjust the valves in order to ensure the “health” of the unit. Fans of the 16-valve engine will be deprived of the need for adjustment. The timing belt here does not have such whimsicality due to a more durable belt, but this does not relieve the owner of a LADA Granta from a similar verification procedure regarding the components of this “capricious” unit.
Issue No. 13: Self-adjustment of valves for 8 cells. Lada Granta engine
Good day, dear readers! In this issue of the in-flight magazine we will talk about how to adjust the valves to 8 cells with your own hands. Lada Granta engine. I tried to compile detailed step-by-step instructions for adjusting the valves, which will help those who for the first time decided to do this on their own on their car. I would like to note right away that valve adjustment is carried out within the framework of TO-0, TO-1, TO-3, TO-5, TO-7.
This manual is applicable to adjust all 8 keys. engines of the VAZ family, starting with the VAZ 2108 and ending with modern LADA mi (at the time of writing, 2022).
The valve adjustment was carried out on an editorial car LADA GRANTA 2022 model year, engine model 11186 (with a lightweight connecting rod and piston group); volume 1.6 l, 8-valve, power 87 hp. The mileage at the time of adjustment was 15,300 km.
Let me remind you that the previous adjustment was carried out at an official dealer at zero maintenance with a mileage of 2,920 km. But since it was decided to independently service the car (I wrote about the reasons in issue 5), all subsequent maintenance on this car will be carried out independently, with a detailed photo and video report, as well as the “price of the issue.” So let's get started.
How to choose a quality spare part
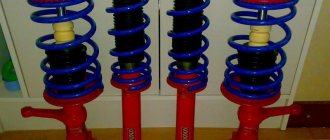
The Lada Granta timing belt plays a primary role in engine operation, so you need to choose it carefully. During movement, this part can withstand enormous loads, and it must be of the highest quality. Today, there are several proven manufacturers whose products deserve high marks. The most famous and good timing belts for Granta brands: • Contitech • Gates • Dayco • Bosch Among domestic manufacturers, one can highlight the BalakovoRezinotekhnika (BRT) company, which provides Granta timing belt life and an affordable price.
For ease of selection for a 16-valve Grant, you can use the following table:
| Brand | Catalog number |
| BRT | 2112-61006040 |
| Lynx | 137FL22 |
| Conti | CT1137 |
| Bosch | 1987949662 |
| Gates | 5631XS |
| Contitech | CT1137 |
| Dayco | KTB944 |
When purchasing products from a well-known company, every driver thinks about which timing belt is best for Grant. But besides this, the car owner must be careful not to fall for a fake. It is necessary to check the presence of holograms and other identification marks used by a particular company, as well as the coincidence of the original part number and the inscription on the box.
Preparatory work before adjusting valves
I would like to note right away that the adjustment is made on a cold engine. If the engine was started before adjustment, it is recommended to cool it to +20 degrees. The temperature can be controlled on the instrument panel. If, say, the car sat in the garage overnight and the engine temperature dropped to +15 degrees, then there is no need to warm it up to +20 - this is insanity (I adjusted it exactly at +15 degrees).
Go ahead. Before you begin adjusting the 8 valve engine on the Lada Granta, it is necessary to carry out a number of preparatory work.
1 Step. We hang up the right front wheel and engage 5th gear.
At the first stage, you can immediately jack up the right front wheel (so that it can be easily turned) and engage fifth gear. This will make it more convenient to “turn” the engine to rotate the camshaft and align the marks on the camshaft pulley and the plastic timing case. Don't forget to keep the car stationary. To do this, put the car on the handbrake or place chocks under the rear wheels.
Photo 1: Jacking up the front right wheel
Step 2 Remove the valve cover and upper timing case
To remove the valve cover of the Lada Granta, you must first disconnect:
- support bracket for the intake module (plate with 3 nuts);
- crankcase ventilation tube (the thinnest one);
- upper crankcase ventilation hose;
- lower crankcase ventilation hose (the thickest);
- Unscrew the 2 nuts securing the valve cover and carefully remove it.
At the same time, unscrew all the spark plugs (to make it easier to rotate the camshaft) and unscrew the top part of the plastic timing case. It is secured with four 5mm hex . The photo below shows the procedure.
Photo 2: Unscrew the support bracket, disconnect the pipes, unscrew the spark plugs
Photo 3: Remove the timing case and unscrew the valve cover nuts
Photo 4: Removing the valve cover
3 Step. Aligning the marks on the camshaft pulley and the plastic timing case
Turning the front right wheel clockwise (preliminarily jacked), we align the mark on the camshaft pulley with the mark on the inside of the plastic timing case (timing mechanism), as in the photo below.
Photo 5: Aligning timing marks
In this position, valves 1, 2, 3 and 5 remain unclamped, available for gap measurement and subsequent adjustment.
Photo 6: Measuring gaps on 4 valves at once
Although the camshaft cams of all adjustable valves are in different positions, this does not interfere with adjusting the clearances. The image below schematically shows how, at different cam positions, the clearance remains the same.
Photo 7: Schematic illustration of different cam positions at which the clearance remains unchanged
4 Step. The size of the gaps on the intake and exhaust valves of the Lada Granta
According to the information letter of JSC AVTOVAZ No. 44-12, the manufacturer recommends setting the following clearances on 8 valve engines:
- for intake valves: (0.25 ± 0.05) mm;
- for exhaust valves: (0.40 ± 0.05) mm;
Schematic arrangement of valves
Photo 8: Schematic arrangement of intake and exhaust valves
5 Step. Measuring valve clearances
Before you begin measuring the gaps and subsequent adjustments, use a medical syringe and a piece of tubing from the dropper to pump out excess oil in the wells (around the pushers). Photo below.
Photo 9: Pump out excess oil with a syringe
Let's start measuring the gaps from the 1st valve. Since the first valve is an exhaust valve, its nominal clearance should be 0.40 mm. In the set of feeler gauges, select size 0.40 and try to insert it between the camshaft cam and the adjusting washer. In my case, 0.40 did not enter, neither did 0.35 and 0.30 and 0.25, but only 0.20. It was this size (0.20 mm) that became the “gap determined by the feeler gauge” or the actual gap.
Photo 10: Gap on 1 valve 0.20 mm
As you can see, the drawdown on the first valve was -20 hectares from the norm.
We take measurements in the same way on valves 2,3,5. For valves 2 and 3 (since they are intake valves), the nominal clearance will be 0.25. It is with a probe of this size that we begin measurements. For valve 5, we measure the gap in the same way as for valve 1, since it is also an exhaust valve. It is better to write down the data so as not to forget.
6 Step. Removing the shim
To remove the adjusting washer from the pusher and find out its thickness, we will use a special adjustment device, photo below. The cost of such a device in an auto parts store ranges from 250-300 rubles.
Photo 11: Device for adjusting valves for 8 cells. engine
To begin, rotate the pushrod so that the slot on the pushrod is in the “access zone.” It is through this slot that you will have to pry the washer with an awl to remove it. During adjustment, the valve is not clamped, so the pusher turns very easily, see photo below.
Photo 12: Rotate the pusher for easy removal of the washer
Next, using the device, press 1 valve all the way down. In this case, it is not enough to simply move the lever behind the camshaft cam, only slightly pressing the valve. In this case, the latch (or stopper) will not fit and you will not be able to fix the pusher to remove the adjusting washer. The lever of the device must be pressed down until it stops. See photo below.
Photo 13: Press the lever all the way
Having pressed the valve all the way, insert the latch, then use an awl to pry up the washer and remove it using tweezers.
Photo 14: Removing the shim
On the back of the shim there is usually a marking on its thickness. In my case, the thickness of the washer on valve 1 was 3.75 mm.
Photo 15: Marking of shim thickness
Be sure to write down the dimensions of the adjusting washers (their thickness), as is the case with the size of the gap established on the feeler gauge between the washer and the camshaft cam. It is on the basis of these values that the dimensions (thickness) of the new adjusting washers for each valve will be calculated.
After recording the size of the washer, put it back, remove the lock and remove the device lever from under the camshaft cam.
Next, we do the same with 2, 3 and 5 valves.
7 Step. Camshaft rotation 180 degrees
Having measured the thickness of the gaps on valves 1, 2, 3 and 5, and also having measured the thickness of their adjusting washers, we proceed to measurements on the next 4 valves (4, 6, 7 and 8). To do this, turn (using the front wheel) the camshaft 180 degrees.
Photo 16: Rotate the camshaft 180 degrees
Next, we measure the gaps and shims on valves 4, 6, 7 and 8, the same way we did with valves 1, 2, 3 and 5 (according to steps 4 to 6).
For clarity, I recorded all the data obtained as a result of measurements in the table below.
TABLES IN FORMAT
8 Step. Calculating the thickness of the new adjusting washers
To calculate the thickness of new washers, a special formula is used:
for intake valves: Z = X + Y – 0.25 mm;
for exhaust valves: Z = X + Y – 0.40 mm;
X – gap determined by the feeler gauge;
Y – thickness of the removed adjusting washer;
Z – thickness of the new adjusting washer.
If we take the data that we obtained from the example of 1 valve and substitute it into the formula, we get the thickness of the new adjusting washer: 3.55 = 0.20 + 3.75 – 0.40.
The remaining washers for each valve are calculated in the same way. If you noticed, in the table next to the size of the new adjusting washer - 3.55, there is a number (2) in parentheses. So I noted for myself that there is no need to buy a washer of size 3.55, but you can use the washer from valve 2, since the size is the same. The washers, the sizes of which are highlighted in bold, will need to be purchased. With these sizes we go to the store. Cost of one washer = 40 rubles. (in Zlatoust, as of July 2022).
9 Step. Installing new shims
To install new shims, follow the instructions described in step 6. Since our camshaft remains rotated 180 degrees, it means we will start changing the washers from valves 4, 6, 7 and 8, since they remain unclamped. After replacing the washers, we again turn the camshaft 180 degrees and change the washers on valves 1, 2, 3 and 5. After replacing the adjusting washers, in order to eliminate errors (“the human factor” has not yet been canceled), we once again check the nominal clearances with a feeler gauge. It may happen that in the chaos you can mix up the washers, but control measurements will help eliminate this kind of error. If everything is in order, then you can install the valve cover back.
10 Step. Valve Cover Installation
Before installing the valve cover of the Lada Granta, we replace the gasket with a new one.
2 rubber bushings are also subject to replacement.
In general, it is recommended to replace the gasket with a new one after each opening of the valve cover to avoid subsequent oil leaks. Everything is clear with the rubber gasket, it “dumbs” very quickly, but what about the silicone gasket? I can't say anything. Although I had already replaced the factory gasket with a silicone one at zero maintenance, I still installed a new one, exactly the same. I didn’t throw away the old one, because it had not lost its elasticity and looked no worse than the new one. After the valve covers are screwed on, we connect the rubber pipes, the bracket, screw in the spark plugs and install the plastic timing case cover in its place. In general, assembly is performed in reverse order. That's all, that's it for adjusting the valves for 8 cells. The Lada Granta engine is finished. Yes, also remove the car from the jack :))
- Valve cover gasket + 2 bushings = 120 RUR.
- Device for adjusting valves = 270 rub.
- Shoop = 315 rub.
- Adjusting washer 5 pcs x 40 rub. = 200 rub.
Total: 905 rub.
If we consider that next time there will be no need to buy an adjustment device and a probe, then the actual costs will be only about 300 rubles. Over time, the number of shims that you need to buy will decrease, because your personal supply will begin to accumulate. How much did we save on the cost of work? Adjusting valves at a car service costs about 600 - 800 rubles. (work only, excluding spare parts). So much for the savings. As they say, a ruble saved is a ruble earned.
The procedure for selecting and installing new washers
At this stage, valve adjustment on the Lada Granta moves to the stage of replacing washers that have worn out during operation. Measurements of parts must be carried out using a micrometer.
So, the calculation system is quite simple: the thickness of the worn washer is added to the difference between the measured and normal gaps (subtracted in that order). The result will indicate the thickness of the new washer to be installed.
After the Lada Granta valve clearances have been set according to the standards, the engine is assembled.
You can first check the gaps again to finally make sure they meet the standards. After this, the lid is returned to its place (always with a new rubber band), and the pipes are connected.
The timing belt and its casing are installed, then the spark plugs are installed. Now the adjustment can be considered completely completed.
In order for the non-professional adjustment of the Lada Granta valves to the norm, which is based on the above measurements, to be successful, you need to carefully study the instructions. At the same time, the tuning kit and replacement washers are quite cheap. Therefore, the motorist will be able to save both on the cost of repairs and on setup time. You can purchase all the necessary tools and parts at any auto store.
Self-adjustment of valves on a Grant seems difficult at first glance. But the procedure is quite easy, it only requires the concentration of the performer and the premature preparation of the tools necessary for the work.
Using improvised items is highly discouraged. They will not only complicate the adjustment process, but can also cause damage to the valve system.