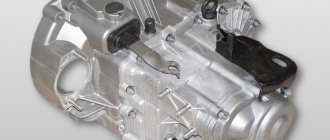
Lada Priora (2013+). Removing the fuel rail and injectors of the VAZ-21126, -21127 engine
We remove the fuel rail to check the operation of the injectors and replace them.
We show the work on engine 21126; on engine 21127 the operations are similar. Relieve the pressure in the power system (see “Replacing the fuel filter”, page 19).
Remove the air filter (see “Removing the air filter”, p. 95).
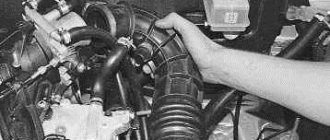
After releasing the engine control system wiring harness connector,
disconnect it from the injector wiring harness block.
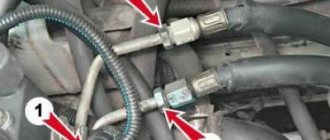
Using a 17 key, unscrew the fitting of the fuel supply tube to the ramp, holding the tip of the ramp tube with a 22 key (on the 21127 engine the tip is held with a 17 key),
Remove the fuel supply tube from the tip of the ramp tube.
We remove the remaining injectors in the same way and replace the injector O-rings with new ones. Before installation, apply a thin layer of engine oil to the injector sealing rings.
We assemble and install the fuel rail with injectors in the reverse order. Tighten the fuel rail mounting screws to a torque of 6-8 Nm.
Video on the topic “Lada Priora (2013+). Removing the fuel rail and injectors of the VAZ-21126, -21127 engine"
Removing injectors on a Priora (Lada 2170, VAZ 2112) How to remove the fuel rail on a Priora without removing the receiver, part 1 Removing injectors on a Lada Priora, etc. VAZ 21126 engine.
Source
The best injectors for VAZ 2110-12
Injector malfunctions or how to check the injectors: 1. Coking of the outlet holes.
Symptom: increased gas consumption, poor engine starting, deterioration in vehicle dynamics. Otherwise, the engine behaves normally, idle speed is stable and starts normally at positive temperatures; at negative temperatures, starting is difficult.
2. Leaky closing of the nozzle valve.
- Symptom: increased fuel consumption, poor engine starting, tripping or detonation at idle.
- Diagnostics: measure CO (on a normally running engine without a catalyst, CO should not exceed 1% in idle mode. One leaking injector increases CO by approximately 1.0-1.5%).
3. Valve stuck.
- The sign is engine tripping.
- Diagnostics: disconnecting and then connecting the injector electrical connector with the engine running. If the injector is faulty, then there will be no engine response; if the injector is working, then there will be a temporary drop in speed.
4. Unstable valve hanging.
- Symptom: floating idle (a sharp drop in idle speed followed by an increase to 1000 - 1400 revolutions or a complete stop of the engine).
- Diagnostics: as in point No. 3. If one injector hangs unstable, it is guaranteed to be diagnosed as a shutdown. If two or more, then only by replacement.
Example, injectors with a mileage of 198 thousand km. At 40 thousand km, ultrasonic washing was done, and at 170 thousand km. Lavr decarbonizer was poured.
About VAZ injectors of the tenth family: “Dozens” were equipped with Bosch and Siemens injectors. Standard injectors from the factory are mainly Bosch injectors 0 280 158 996 (or 996e).
Interchangeability of VAZ injectors: Injectors come in not only different sizes, but also different in performance. To understand which injectors are suitable for your car, just use the table:
Addition to the table: BOSCH 0 280 150 996 nozzles are no longer produced; their analogue is BOSCH 0 280 158 110 (capacity 170 cc/min). There are some differences, for example, the rubber sealing ring on the 110th is a couple of millimeters higher than on the 996th, and the “tail” (from which it splashes) is longer. But there should not be any difficulties when installing the injectors.
Removing the fuel rail
You will need : relieve pressure in the fuel system, remove the engine air filter, prepare a Phillips and flat-head screwdriver, a 22mm open-end wrench, a 17mm wrench, pliers, a 10mm socket, a 13mm socket and a 5mm hex socket. .
Procedure:
- Disconnect the connector from the injector wires and remove it from the bracket.
- Unscrew the screw securing the pressure plate of the fuel supply tube to the ramp using a Phillips screwdriver.
- Unscrew the fitting of the fuel supply tube to the ramp using a 17 wrench, holding the tip of the ramp tube with a 22 wrench. Otherwise, the ramp may be broken.
- Remove the fuel supply tube from the tip of the ramp tube, and remove the rubber sealing ring.
- Loosen the crankcase ventilation hose clamp using a Phillips screwdriver. Remove the hose from the cylinder head cover.
- Unscrew the self-tapping screw securing the guide tube using a Phillips screwdriver.
- Remove the tube with the oil level indicator facing up.
- Remove the brake booster hose from the intake manifold by using pliers to loosen the clamp.
Disconnect the end of the throttle valve drive cable from the drive sector. Move the throttle body away from the intake manifold (see replacing the throttle body). Disconnect the blocks with wires from the ignition coils (from cylinders 1, 2 and 3), and move the wire harness to the side (see replacing spark plugs).
- Unscrew the two nuts from the upper fastening of the intake manifold using a 10 mm socket.
- Then two bolts and three nuts for the lower fastening using a 13mm socket.
- Disconnect the block with wires from the phase sensor. Remove the ignition coils from cylinders 1, 2 and 3. Cover the holes for the ignition coils with a rag.
- Push the intake manifold towards you and lift it up, bringing it out from under the wiring harness.
- Unscrew the two screws securing the fuel rail to the cylinder head using a 5mm hexagon.
- Remove all four injectors from the cylinder head holes by pulling the ramp along the axes of the injectors. Remove the ramp with injectors and wiring harness.
- Fuel rail assembly with injectors and wiring harness.
Removing Priora fuel injectors
- Disconnect the block with wires from the injector by pressing the spring clip.
- Remove the bracket by prying it off with a screwdriver.
- Remove the injector from the fuel rail, overcoming the resistance of the sealing ring.
- Remove the injector O-rings using a flat-head screwdriver.
Before installing the injectors, it is necessary to replace the O-rings.
Then apply a thin layer of engine oil to the O-rings. Assembling and installing the fuel rail with injectors is performed in the reverse order. Source
Removing Priora fuel injectors
- Disconnect the block with wires from the injector by pressing the spring clip.
- Remove the bracket by prying it off with a screwdriver.
- Remove the injector from the fuel rail, overcoming the resistance of the sealing ring.
- Remove the injector O-rings using a flat-head screwdriver.
Before installing the injectors, it is necessary to replace the O-rings. Then apply a thin layer of engine oil to the O-rings. Assembling and installing the fuel rail with injectors is performed in the reverse order.
Removing / installing injectors on Lada Priora
Is the engine stalling, not pulling or running rough? The cause may be faulty injectors, which should be checked and cleaned if necessary.
Removing the fuel rail on Lada Priora
— relieve pressure in the fuel system.
— Remove the engine air filter.
- Prepare Phillips and flathead screwdrivers.
1. Disconnect the block from the injector wires and remove it from the bracket.
2. Unscrew the screw securing the pressure plate of the fuel supply tube to the ramp using a Phillips screwdriver.
3. Unscrew the fitting of the fuel supply tube to the ramp using a 17 wrench, holding the tip of the ramp tube with a 22 wrench. Otherwise, the ramp may be broken.
4. Remove the fuel supply tube from the tip of the ramp tube, and remove the rubber sealing ring.
5. Loosen the clamp securing the crankcase ventilation hose using a Phillips screwdriver. Remove the hose from the cylinder head cover.
6. Unscrew the self-tapping screw securing the guide tube using a Phillips screwdriver.
7. Remove the tube with the oil level indicator facing up.
8. Remove the brake booster hose from the intake manifold by loosening the clamp using pliers.
Disconnect the end of the throttle valve drive cable from the drive sector. Move the throttle body away from the intake manifold. Disconnect the blocks with wires from the ignition coils (from cylinders 1, 2 and 3), and move the wire harness to the side.
1. Unscrew the two nuts of the upper fastening of the intake manifold using a 10mm socket.
2. Then two bolts and three nuts for the lower fastening using a 13mm socket.
3. Disconnect the block with wires from the phase sensor. Remove the ignition coils from cylinders 1, 2 and 3. Cover the holes for the ignition coils with a rag.
4. Push the inlet pipe towards you and lift it up, bringing it out from under the wiring harness.
5. Unscrew the two screws securing the fuel rail to the cylinder head using a “5” hexagon.
6. Remove all four injectors from the cylinder head holes by pulling the ramp along the axes of the injectors. Remove the ramp with injectors and wiring harness.
7. Fuel rail assembly with injectors and wiring harness.
Let us remind you that in the previous article we told you how to replace brake discs on a Lada Priora.
Removing fuel injectors on Lada Priora
1. Disconnect the block with wires from the injector by pressing the spring clip.
Repair of the power system, instructions for repairing the fuel system of the Lada 2170, the procedure for assembling and disassembling elements of the power system of the Lada 2172, stages of removing and installing injectors on the Lada Priora car. Maintenance of the power supply system, cooling, lubrication, exhaust gases of the VAZ 2170 Priora engine, engine repair manual, cylinder heads of the VAZ 2172 Priora. Modifications of the VAZ 2171 Priora engine.
The fuel rail is removed to replace injectors and repair the cylinder head of the VAZ 2171, as well as when replacing the rail itself. You will need: a 5mm hex wrench, a flat blade screwdriver, a 17mm wrench (two). 1. Reduce the pressure in the fuel system (see “Reducing fuel pressure in the engine power system”). 2. Remove the wire from the negative terminal of the battery. 3. Remove the decorative engine cover (see “Removing and installing the decorative engine cover for Lada Priora”). 4. Remove the air filter VAZ 2170 (see “Removing and installing the air filter”). 5. Remove the throttle assembly from the intake manifold (see “Removing and installing the throttle assembly”).
6. Remove the priora intake manifold (see “Replacing the cylinder head cover gasket”). 7. Squeeze the clamp... 8. ...and remove the injector wiring harness block. Similarly, remove the pads from the remaining three injectors.
9. Carry out an initial check of the Priora injector windings. To do this, connect an ohmmeter one by one to the contacts in the injector connectors and in each case measure the resistance of their windings. It should be 11–15 ohms. If, when measuring an injector, the resistance value differs from the specified value, then this injector is faulty and must be replaced (see “Checking and replacing injectors”). 10. To replace the injector wiring harness or fuel rail, you need to cut the mounting clamps with side cutters. To replace the Lada Priora injectors, this operation is not required. Later, for clarity, the wiring harness was removed. 11. Unscrew the fuel supply pipe fitting...
Helpful advice: Use a special “17” wrench to unscrew the tube fittings.
Warning Be sure to hold the fuel rail tip nut with a second open-end wrench.
12. ...and disconnect the fuel pipe from the ramp.
13. Unscrew the two screws securing the fuel rail VAZ 2172... 14. ...and remove the ramp together with the injectors. Note
Please note: the connection between the tube and the ramp is sealed with a rubber ring. Be sure to replace a heavily compressed, hardened or torn ring.
Warning If, when removing the fuel rail, any injector remains in the engine intake pipe, replace its O-rings and retainer.
15. Install and secure the Lada Priora fuel rail in the reverse order of removal, lubricating the O-rings of the Lada Priora injectors with engine oil or WD-40. Note When installing the fuel rail, so that the injector wiring harness does not touch the Lada Priora engine, secure it to the rail with new plastic clamps.
16. Having installed the fuel rail, connected the fuel line and connected the wiring harness block, secure the minus terminal on the battery, turn the ignition key 3-4 times to position “I” (ignition) at intervals of 2-3 s between turns on and check for leaks connections of the pipeline and seals of the Lada Priora injectors. 17. Install all removed parts in the reverse order of removal.
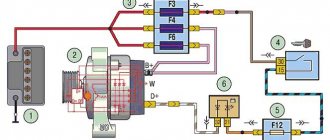
General principle of operation of Lada Priora injectors
Gasoline is pumped into the fuel rail using a gasoline pump, to which the injectors are connected. Based on a signal from the electronic control unit (ECU), an electric current is supplied to the injector coils, their cores are drawn inward, opening the fuel channels. Gasoline is sprayed into the combustion chambers and ignites under the influence of enormous pressure created by the upward pistons.
The design of Lada Priora injectors is quite complex
Causes of injector contamination
When a mixture of air and fuel burns, a tar deposit is formed. It is deposited not only in the combustion chamber of the engine, but also on the surface of the nozzles. This leads to their gradual contamination. The shape and diameter of the hole in the nozzle body gradually decreases. The result is insufficient supply, a change in the spraying process. The mixture turns out to be heterogeneous. Instead of the injector delivering a mist of fuel into the engine, it sprays small streams of fuel.
The structure of the mixture changes, and an excessive amount of air or fuel appears in it. Engine performance decreases, the on-board computer tries to adapt the car to new conditions, supplying even more gasoline, which cannot burn completely.
Gasoline injectors work even worse in winter, when fuel evaporates more slowly. This leads to more intense pollution.
Injectors installed on Priora
The Lada Priora car is equipped with imported injectors manufactured by the German company BOSCH. These devices are highly reliable. Their service life can reach 160 thousand kilometers. However, car service specialists strongly recommend changing injectors every 120 thousand km.
Almost all Prioras are equipped with German injectors from BOSCH
Injectors for 8 and 16 valve engines
You should know that the injectors of the 8-valve Priora engine are no different in appearance from the injectors of the 16-valve engine. These are all the same devices from BOSCH, consisting of a housing, a coil, a diffuser and a fuel grid. When choosing injectors for a Priora, you need to think not about the number of valves in the engine, but about its volume. Because the markings of injectors for 1.5 liter engines are different from the markings of injectors for 1.6 liter engines. In the first case, the BOSCH injector should be marked 0-280-158-110, in the second - 0-280-158-502. You can clarify the markings in the car’s operating instructions, at the end of which there is a summary table with digital designations of all BOSCH injectors depending on engine size.
How to check for faults
The car owner can independently check the performance of the injectors on his car. The procedure is quite simple and does not require special training or expensive equipment. In garage conditions, diagnostics can be performed with a set of open-end wrenches, screwdrivers and a tester with a resistance measurement mode.
Reasons indicating problems
Diagnostics must be performed not after any period of operation or mileage has expired, but in the presence of external manifestations of injector failures. In cases where other vehicle systems are operating normally, the following indicators indicate problems with the injection solenoid valves:
at idle there is instability in engine speed;
starting the engine is difficult - the engine may stall;
when overclocking it is impossible to achieve the same dynamics;
The amount of fuel consumed has noticeably increased.
Unclip the plastic clips that secure the valve's power cable. Remove the connector.
Switch the tester to resistance measurement mode and take measurements of the windings of each of the injectors in turn. That is, you need to apply one contact of the tester to each of the five terminals, and the second one to the fifth wire for power.
Checking Lada Priora injectors
As mentioned above, both the fuel system ECU and the injector itself can fail. To carry out a complete diagnosis of the ECU, special software is required, which the average motorist simply does not have. Therefore, the only option is to diagnose the machine at a service center. The program, connected to special equipment, will quickly detect ECU errors and correct them.
A full check of Priora injectors is possible only on a special stand
And if problems arise in the mechanical part of the injector, then the diagnostic program will be useless. The maximum that it can do is indicate which cylinder is not working correctly. After this, the car owner can only replace the failed injector on the specified cylinder, since these devices cannot be repaired.
In order to clean the injectors in VAZ 2114/2115 cars, it is recommended to read this material: https://vazweb.ru/desyatka/pitanie/zamena-forsunok-vaz-2114.html
How to check and adjust the pressure of the Priora fuel pump
Normal pressure of the Priora fuel pump is necessary for the process of supplying the combustible mixture to the carburetor and its normal spraying through the nozzles. The slightest disruption in the operation of this system leads to the fact that either an excessively saturated or lean mixture is supplied to the combustion chamber, which is why the engine operates abnormally. How to check the fuel pump pressure, and what should be done if it is abnormal?
Checking the fuel pump pressure
The first thing to do is to specifically check the operation of the pump. To do this, just turn the ignition key not to the extreme position and listen to whether the electric fuel pump turns on (and this is exactly the variation that is installed in the Lada Priora car). If you hear a noise for a few seconds, followed by a click, everything is fine.
Using a pressure gauge, the check is performed on the ramp - this is where the protective valve cap is hidden, which does not allow air to get in, but presses the fuel out with pressure. The first step is to unscrew the cap and check whether the rubber in it is broken - this may be the main reason for the inoperability of the fuel pump. If it is damaged, it is better to completely replace it; fortunately, it is cheap. Then the spool is twisted. Next, a pressure gauge is connected to the outlet of the safety valve from the pump. Normal pressure is in the range of 380-400 kPa. If it is lower, then either the pump has failed or there is a blockage in the system. If it is more, then it is quite possible that the internal pressure gauge of the fuel pump is faulty and it is simply pumping fuel excessively to the carburetor. Replacing it is easy.
Naturally, before checking the pressure, the ignition is turned on, but the engine itself is not. The pump itself will equalize the pressure to the desired parameter. If this is not done, then the pressure will be at the level of 1 atmosphere with a slight deviation, because pumping is not performed.
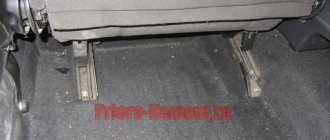
It should also be taken into account that all manipulations are carried out at reduced fuel pump pressure. To do this you will need:
- remove the rear seat and gain access to the pump (by removing several screws on the rubberized cover);
- release the lock and let the fuel run out completely (the engine will be in neutral gear and will stall literally after a few seconds);
- Next, you need to turn on the ignition and equalize the pressure;
- It is also recommended to turn on the starter for 2-3 seconds and immediately reset the ignition key to its original position (turn off the ignition).
What happens if the pressure deviates from the norm?
If the pressure in the fuel pump is too high, too much fuel will be supplied to the carburetor.
The air will mix with it through the filter and burn in the cylinder. But if there is a lot of fuel and not enough oxygen, the mixture will not burn completely. At the same time, black smoke comes out of the exhaust pipe, and fuel drips from its end (may even be mixed with soot).
If the pressure in the system is very low, the mixture will be lean. There is too much oxygen. At the same time, the engine power is radically reduced; at idle speed the engine simply stalls, and the choke, of course, will not help, since it only regulates the operation of the throttle valve in the carburetor.
It is interesting that the on-board computer will not report a breakdown of the fuel pump - this is truly a huge mistake by VAZ engineers. In Priora, you can only read indicators when you connect a computer to the EMU unit, but not everyone can do this. And the indicators may not be true if the on-board computer itself is damaged. That's why checking with a pressure gauge on the ramp is the best option for checking pressure.
https://www.youtube.com/watch?v=QaJwthsYi3Q
Replacing injectors on a Lada Priora car
Before we move on to describing the process of removing the injectors, you need to select everything you need for the job. Here is a list of tools and consumables:
- Phillips screwdriver;
- set of hex keys;
- set of open-end wrenches;
- pliers;
- wrench and set of socket heads;
- flat screwdriver.
Sequence of work
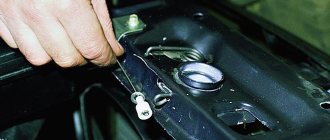
The block with wires on the Priora fuel rail is removed manually
The mounting fuel rail on the Priora can only be unscrewed with a Phillips screwdriver
The Priora fuel fitting should be unscrewed with only two keys
The O-rings from the Priora ramp should be removed so as not to lose them
The Priora ventilation hose can only be removed after loosening the clamp
It is convenient to loosen the Priora brake hose clamp with pliers
The Priora intake pipeline is held on top by only two nuts
After unscrewing the fasteners, you can simply pull the Priora pipeline towards you
Two 5-point screws on the Priora ramp can only be unscrewed with a hexagon
The Priora fuel rail is removed along with injectors and wires
The injector on the Priora can be unscrewed from the ramp manually
Video: removing injectors from Lada Priora
Cleaning Priora injectors
There are two options for washing injectors: with and without removing them from the car. The removed injectors are washed on special stands using ultrasound, under the influence of which even the oldest contaminants disappear. Ordinary drivers do not have such stands, so below we will consider a more popular option for washing injectors without removing them from the Priora. Here's what you'll need for this:
- liter of special flushing fluid;
- two automobile nipples;
- automobile fuel filter;
- a pair of metal clamps;
- a meter piece of rubber hose with a diameter of 12 mm;
- drill with 13 mm drill bit;
- electric pump;
- two liter plastic bottle.
Flushing sequence
- The bottom and cap are drilled into the plastic bottle. This is done with a “13” drill. Automotive nipples are inserted into the holes.
Ordinary car nipples are inserted into the holes of a plastic bottle
Priora injectors are washed using a filter and a plastic bottle
The green button is clearly visible on the Priora fuel hose
The main fuel hose of the Priora is connected to the fuel filter for flushing
The device for washing Priora injectors is assembled and ready for use
A car water pump plays an important role in the operation of a car engine. It is possible to recognize its malfunctions using the following article: https://vazweb.ru/desyatka/pitanie/zamena-forsunok-vaz-2114.html
Troubleshooting injector problems
DIY pump replacement for Lada Priora 8 and 16 valves
First you should try to wash the Priora injectors. There are three methods for this procedure:
- Flushing during operation.
- Hardware flushing method, without removing it from the Priora engine.
- Ultrasonic cleaning in a special machine.
The most affordable and easiest way is to clean the Priora injectors yourself. This is done by pouring a special liquid into the tank. They are available for sale in a sufficient variety. The most popular of them are the following drugs:
- German "Liqui Molly".
- US "High Gear"
- Russian "Laurel".
To rinse, it is enough to pour liquid into the tank at the time of refueling, according to the instructions on the bottle. And drive quietly until all the fuel is used up. After this, replace the spark plugs.
Important! This operation is more likely not a repair, but a preventative measure for the Priora. It is advisable to carry it out every 30,000 kilometers.
Then it will be effective.
Then it will be effective.
The other two methods require special equipment and can only be carried out in a service station. Washing the injectors, without removing them from the Priora, is carried out by connecting a special container to the engine fuel frame. The electric fuel pump turns off. The fuel line fitting is disconnected from the frame and the flushing tank is connected. It contains a mixture of gasoline and washing liquid under pressure. The Priora engine starts and runs until the mixture is completely exhausted. After which, the Priora spark plugs are also replaced.
Cleaning injectors using ultrasound
To do this, you will have to remove the injectors from the Priora engine. The operation is performed on a special stand or in an ultrasonic bath. Such equipment costs quite a lot, and not every car service center can afford it. Moreover, it is a risky operation. Sometimes, instead of putting the injectors in order, ultrasonic treatment, on the contrary, completely disables the components
Therefore, you need to treat this process with great caution
But in any case, the injectors, as when replacing, will have to be dismantled. How to do it?