Priora engine compartment photo
The small class car VAZ-2170 Lada Priora with a four-door sedan body (class C according to the international classification) is designed for operation at ambient temperatures from -40 to +50 °C on public roads with hard surfaces.
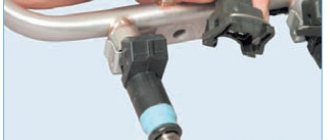
The Lada Priora is equipped with an injection 16-valve engine mod. located across the engine compartment. VAZ-21126-00 with a working volume of 1.6 liters. The engine is equipped with a distributed fuel injection system and an exhaust gas catalytic converter, structurally made in a single block with the exhaust manifold (catcollector).
The body is load-bearing, all-metal, of welded construction, with hinged doors, front fenders, hood and trunk lid.
The driver's seat of the Lada Priora is equipped as standard with an airbag, and in an optional version - with a front passenger airbag, as well as front seat belts with pretensioners and load limiters, which significantly reduces the likelihood and severity of head and chest injuries in a traffic accident.
The airbag only deploys when there is a strong impact to the front of the vehicle. In minor frontal impacts, vehicle rollovers, rear or side impacts, seat belts are the primary means of protection.
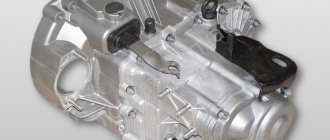
The transmission is made according to a front-wheel drive design with drive wheels of different lengths.
The front suspension is independent, spring, with anti-roll bar, with hydraulic shock absorber struts. The rear suspension is semi-independent, lever-spring, with hydraulic shock absorbers.
The front wheel brakes are disc brakes with a floating caliper, the rear wheels are drum brakes.
In a variant version, Lada Priora cars are equipped with an anti-lock brake system, which prevents wheel locking during braking and maintains controllability and directional stability.
The steering is injury-proof, with a rack-and-pinion steering mechanism, with an electromechanical booster that changes the transmitted torque depending on the speed of the vehicle.
Lada Priora cars are equipped with a remote control system for locking or unlocking door locks (in an optional version and locking the trunk lid lock) with simultaneous activation or deactivation of the vehicle security mode. In addition, remote activation of the alarm system in case of violation of vehicle security zones and blocking of all doors by pressing a button from inside the vehicle are provided.
This system also includes an electronic engine locking system (immobilizer), which provides additional protection against unauthorized engine starting.
The overall dimensions of the car are shown in Fig. 1.4, technical characteristics are given in table.
Elements of the engine compartment of the VAZ-2170 Lada Priora are shown in Fig. 1.5, the location of the main components and assemblies is shown in Fig. 1.6 and 1.7.
Figure 1.4. Overall dimensions of the Lada Priora car (mm)
Figure 1.5. Engine compartment of the car:
1 - engine; 2, 14 — power unit supports; 3 — steering mechanism; 4 - throttle assembly; 5 — reservoir of the main brake cylinder; 6 — expansion tank of the engine cooling system; 7 — main fuse block; 8 — washer reservoir; 9 - battery; 10 — air filter; 11 — mass air flow sensor; 12 - alarm signal; 13 - generator; 15 — hood stop
Figure 1.3. Location of the main components of the vehicle components (bottom front view, engine splash guard removed): 1, 3, 13 — power unit supports; 2 - generator; 4 — radiator of the engine cooling system; 5 — electric fan of the engine cooling system; 6 - starter; 7 — cross member of the front suspension; 8 — front suspension extension bracket; 9 — front suspension stretch; 10 — shock absorber strut of the front suspension; 11 — stabilizer strut; 12 — left front wheel drive; 14 — gearbox; 15 — exhaust pipe of an additional muffler; 16 — engine oil sump; 17 — catalytic collector; 18 — right front wheel drive; 19 — anti-roll bar; 20 — front suspension arm; 21 — front wheel brake mechanism
Removing and installing the front driver's and passenger seats on a Priora
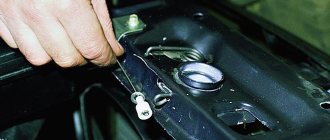
First of all, disconnect the power wires from the heated front seats, if your car has one. Then you can unscrew the 4 fastening nuts from the front, which are shown in the photo below:
Then unscrew the 5 bolts securing the seat (runners) to the car body. Two of them are at the front of the sled:
It is much more convenient to do this on the left side than on the right. We perform this action in the same way from the back of the runner mounting, having first moved the chair all the way forward.
Everything is done using the same torx e10 head.
Again, the left side of the slide is secured with one bolt at the back, and the right side with two. This was clearly visible in the photo above. When everything is unscrewed, you can start removing. First, we pry it off and, as it were, “tear off the front” part.
And then we remove the entire seat from the car.
Installation occurs in the reverse order and there will be no difficulties with this repair! The right seat is removed in the same way, so there is no need to describe this procedure separately. As for the cost of new seats on a Priora, one factory one can cost you 5,000 rubles or even more!
Modified shock absorbers
As a rule, the factory shock absorber does not have any effect on the ground clearance. But if you are working with an already worn-out unit, then while driving it may be subject to swinging in the forward direction, which greatly increases the possibility of damage not only to the bumper, but also to the components and parts of the Lada located under the bottom of the car.
In order to qualitatively increase the ground clearance on a Priora (this rule is also relevant for any other car), you should use only original shock absorbers, which will differ from the factory ones in a number of characteristics. So, for example, the length of the rod, the length of the spring will be increased and the quality of the spring stiffness will greatly increase. The latter is achieved by adjusting the shock absorbers - thickening the coils.
It should be noted that increasing the parameters of the shock absorber is a rather expensive way to change the ground clearance. That is why it is rarely used. However, the possibilities for working with shock absorbers are very large, since you can use not only Lada components, but also components of other cars. In addition, there are special offers from manufacturers of units that allow you to increase ground clearance.
How high the ground clearance of the Lada Priora is will depend on what kind of spring is installed on it. Since the body will be mounted on it, not only the ground clearance, but also the quality of the suspension as a whole will depend on the stiffness of the spring and the distance from its lower point to the upper one.
There are not too many options for which springs to attach to the car we are interested in. There are 2 classes in total: A and B, of which the earlier version is considered the most stringent. There are also some types of springs that are installed on the car during factory assembly. By qualitatively changing them, we can also increase ground clearance.
But do not forget that the desire to obtain excessive spring stiffness can lead to unintended consequences. So, for example, you can make the car bounce when encountering bumps and speed bumps. Spring stiffness is very useful when the machine is heavy or heavily overloaded. However, going light will degrade the performance of the suspension and prevent it from operating smoothly.
The vehicle's ground clearance is a parameter that does not happen much on our roads. Although, if you look from the other side, it is not uncommon to come across a car on the street with a lowered suspension.
Most often they decide to increase clearance due to the following cases:
- A loaded car hits the fender liners with its rear wheels or the mudguards on the ground, so they want to lift the rear of the car.
- It touches the bottom or crankcase protection on uneven roads, so they want to raise the front of the car.
In some cases, they decide to raise the rear and front suspension at the same time. It is no secret to many that after such actions some troubles may arise, wear of some components may increase, and the characteristics of the car may change. Let's try to find the answer to the question: how to increase ground clearance without negative consequences.
Removing and installing the rear row of seats on Priora hatchback 2172
So, the first step is to remove the lower part of the seat, since it is the easiest to dismantle. To do this, use a flat-head screwdriver or use your hand to pry up the canopy cover, as shown in the photo below:
And in the recess we unscrew the nut using a 10 mm socket:
Now the canopy is moved to the side, because nothing else holds it.
We perform the same procedure with the second half. Then, by pulling the special belt in the back of the seat, on both one side and the other, we lift them and remove them from the passenger compartment.
As for the back, everything is also quite simple to do here. First of all, we recline the backrest, lifting the clamps next to the headrests, and from the inside we see several fastening nuts, both on one side and on the other. We unscrew them with a key number 13.
To show everything more clearly, below is another photo.
Also, on the back side there are still nuts that need to be unscrewed:
On the other side we do the same. After which you can begin removing the seats from the Priora. Once again, it is worth noting that the fastenings on the sedan will be different, so this procedure will have to be considered in the following articles. Installation occurs in reverse order.
Friends! Can you please tell me whether the rear seat backrest folds down on all Prior sedans? Maybe it depends on the configuration or something else? Where do you need to press or what to pull for it to fold? Thanks in advance!
Comments 21
yeah, only these ropes tend to fall to the bottom and have to be pulled out of the trunk with a screwdriver. They really couldn’t come up with anything more serious.
yes yes, they wrote about it. Apparently they didn’t have enough imagination =)
To be honest, it’s better not to touch the backrest unless absolutely necessary, the rear backrest locks are made of such rubbish that after opening the closures a few times they will stop latching…
To be honest, it’s better not to touch the backrest unless absolutely necessary, the rear backrest locks are made of such rubbish that after opening the closures a few times they will stop latching…
I'll keep that in mind, thanks!
If the straps fall, then pass a thin wire into the trunk and hook it to the straps there. Pull them into the cabin and open it. But it doesn’t fold up, it can be removed (the back) You’ll shoot it when you fold back the 2 buttons of the trim and see 2 hooks at the bottom
Thank you! I'll keep it in mind, but I'd like to hope that they didn't fail =)
The only catch is that the trunk upholstery is riveted to the backrests.
That's how... it turns out that they will need to be “unriveted?” Are they holding tightly?
To be honest, I don’t even know, but I reclined the seats a couple of times and 3-4 rivets vomited out. I didn't try to fasten them back.
Are they reusable or something, these rivets? Or just tore them out and that’s it...
There is a rope behind the headrest that you pull and the backrest opens. When I wanted to remove my backs, to my surprise, I didn’t find them. I had to open them from the trunk with a screwdriver. The trick was that these straps just fell into the gap between the back of the seat and the rear parcel shelf.
Lada Priora Sedan › Logbook › Entry No. 46. Seat trim/seat trim. Part 2
It is necessary to remove the stock plastic cover, as it will get in the way. Trying on...(((((
There is one support point, but you will have to bore the hole to an oval so that the seat back adjustment knobs will fit in. Look further.
Here the face stretches out, frowns, and takes on a puzzled and upset look. And there’s nowhere to attach it! There is a lot of unnecessary things that get in the way, there is a corner that will have to be smoothed out... there are a lot of questions and a lot of bad emotions. Where to go?
I was pleased with the lever handle on the driver's side, although there is no need to saw here. We grind out the oval along the intended contour.
We saw off the fastening of the cladding, which is visible in photo No. 4. I didn’t want to fasten it with screws to... to... and God knows what! My fastening option is for a plastic wiring tie. I found a piece of plastic in the garage, cut it to the size I needed, and drilled a hole (this is where the tie strap will go through).
We sand comparable surfaces and degrease them with alcohol. Using a silicone soldering iron, apply silicone and press firmly.
The result exceeded all my expectations! It holds tightly, in my opinion reliably, but time will tell.
The driver's side is ready. The passenger side remains. Here the beginning of our work is the same as on the driver’s side: we grind out an oval, saw off both front fasteners, since they rest against the seat trim and do not allow our trim to fit tightly, glue the same fastener to the silicone under the plastic tie strap. But there is a nuance . It is necessary to raz...sorry, bore/cut out any hole for the handle of the seat lever.
During installation, it will become clear why I tore up our cladding so much (it’s a pity that I had to do this to the part, but it wouldn’t work any other way).
Now the installation process: I'll start from the driver's side:
It was secured to the tie strap surprisingly firmly. The screed tightens the cladding, and the angle that is visible in photo No. 4 is smoothed out. The lining is pulled close to the seat. Durable and surprisingly tough. The cladding does not move.
The lining was specially attached higher from the floor so that the rug could be pulled out without effort.
Now the passenger side:
The facing has no angle, it is smoothed. The height from the floor is maintained according to the driver's side.
That's why there was such a huge hole and the part was cut down like that. Let me clarify: unlike the driver’s side, on the passenger seat the lever handle is turned toward the trim, and not away from it. And the handle rests against the lining. And with its lower end, the lining rests against the floor tunnel, against the carpet, against the rug, it bends, tucks in... it behaves ugly. They cut it. Now the rug can be pulled out.
The review is completed, which I would like to note:1 The installation/adjustment process took me 5-6 hours (well, I’m such a scrupulous person, I like everything to be done efficiently and conscientiously)2 Getting the rugs became more difficult and inconvenient.3 If anything then you drop it under the seat, you can only get it from the rear passenger seat (fumble with your hand while standing doggy style in the back seat)4 Spend money on buying more expensive linings, only to end up cutting them off like God a turtle... well, I don’t know5 I had a fire extinguisher installed under the driver’s seat — (Entry No. 38. Attaching the fire extinguisher OP-2 under the driver’s seat.) I had to move it to the trunk.6 For those who like storing any useful (nonsense) luggage under the driver’s seat, this is a taboo.7 This is purely my opinion - I was disappointed/upset because - for damaging the goods.
So tnank you. Click like or subscribe to my car. Bye!
source
Electromagnetic relay
An electromagnetic relay is a switching device designed to relieve contacts. The work is based on the law of electromagnetic induction.
In cars, relays are used to unload contacts on control buttons, so that they, in turn, do not melt or heat up when more current appears on them. The relay consists of moving and non-moving contacts, a DC coil, a return spring, a coil core and an armature.
Relay operating principle
When a current appears on the relay coil, a magnetic field is formed in it, which in turn begins to attract the armature to which the movable contacts of the relay are attached. As a result, the moving contacts close with the fixed ones and the electrical circuit is completed.
Dismantling the upper and lower lining of the floor tunnel
First of all, it should be noted that the lining should be removed after cleaning the floor in the cabin, after which disconnect the “?” terminal. from the battery and perform the following steps.
1. There are two mounting screws on the right and left sides of the floor tunnel lining. Unscrew them and remove both trims.
3. The lining, which is located on the facing, is removed by pressing its front part under the parking brake lever. Take it off too.
4. Remove the gear shift lever handle by pulling it up.
5. The car gearshift lever cover is attached to latches on each of the four sides. To remove it, press out each one with a screwdriver.
6. Now you can move on to the cladding itself. Unscrew the central fastening screw.
7. Fold the front seat back, which raises the front edge. This will open access to the middle fastening of the cladding. Remove the screws on both sides of the cladding.
8. Slide backwards and remove the top lining of the tunnel. It is installed in the reverse order of removal.
9. Move the seats forward. There are air vents underneath them. They can be removed by unscrewing the fastening nuts.
10. The lower tunnel lining is secured with six nuts. Unscrew each one and remove the lining itself.
11. When the manipulations to repair the required unit have been completed. All that remains is to install the lower lining of the car floor tunnel
This is done in the reverse order of dismantling. Pay attention to the air vent pipes: both should fit into the holes on the lower lining
As you can see, there is nothing difficult in dismantling the floor tunnel lining. This event requires attention to detail and adherence to order.
Disconnect the negative battery from the terminal, and for ease of work you can remove the front seats. Then:
- Unscrew the nut of the air duct securing to the legs of passengers in the rear seat, using the socket “10”.
- Remove the air duct. Similarly, remove the second air duct on the right side.
- Raise the armrest and pry the pad onto the armrest hinges.
- Remove the armrest of the Priora Lada.
- Unclip the latches to pry open the storage container for small items. Pull it out. Unscrew it.
- tunnel 2 bolts securing the armrest hinge from the head using “10”, and remove it.
- Unscrew the 4 screws of the floor fastening tunnel using a Phillips screwdriver.
- Through the opening, press the latch and remove the block with wires from the trunk lock button control.
- Unscrew the 2 fastening tunnel nuts using a high 10mm socket.
- Place the front seats in place and move them forward as far as possible. self-tapping screw Unscrew the tunnel fastenings to the base on the left and right - similarly, using a Phillips screwdriver.
- Remove the plastic plug at the bottom of the cup holder using a flat blade.
- screwdrivers, self-tapping screw for securing the cross-shaped tunnel. Unscrew.
- self-tapping screw Unscrew the fastenings of the front part of the tunnel using a Phillips screwdriver. Unscrew the self-tapping screw on the right side in the same way.
- Unclip the latches and remove the Priora gearbox cover. Leave the frame with the cover on the lever. Unscrew.
- Gearbox 2 screws securing the tunnel to the instrument panel console using a Phillips screwdriver.
- Raise the tunnel up.
- Press the latch and disconnect the cigarette lighter plug from the wires. Remove the central tunnel of the Priora.
lining Installation of the tunnel is carried out in the reverse order.
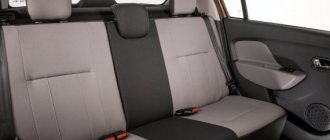
Interior
The updated Lada Priora 2013 2 received the greatest number of changes inside. The most important update to the Priora 2 interior was the upholstery material (soft-look), which to the touch resembles rubberized plastic, often used in new mobile phones and is immediately visually similar to leather.
In addition, the new 2013 Priors are distinguished by improved sound insulation and sizing, providing 71 decibels of volume at a speed of 100 km/h, which is exactly in line with competitors of European cars. Maybe this is why the old glass control panel was left on the old door panels with new upholstery, which constantly cracks while driving.
And so, the updated Lada Priora 2013 received two elongated by 40 mm. front seats with new headrests and almost sporty lateral support. They are attached to a new mechanism with an increase of 20 mm. longitudinal adjustment, in the hope of getting rid of previous unwanted feedback.
In addition, Priora 2 2013 sports a new instrument panel, seemingly optimized for understanding by lateral (peripheral) vision, plus a completely new center console with a 7-inch screen, USB socket, navigation (GPS/GLONASS) and wireless data transfer function (Bluetooth). The new Lada Kalina 2nd generation received a similar one.
An eyeglass case appeared on the ceiling, other visors with flush stamping and a retouched armrest below, because the previous one was immediately removed due to the complete lack of ergonomics. In the hands of the driver of the Lada Priora 2 2013 there will be a steering wheel similar to the Grant model, but with a plastic black or white spacer, and next to it is a new audio control unit and three wheels from the air conditioning system. The previous ones quickly failed. The metal tip erased the teeth of the plate.
How to remove the front seats on a Priora
Removing and installing the front and rear seats on a VAZ 2170 2171 2172 Lada Priora
The front seat in a Lada Priora car is attached at 4 points to the floor. The need to remove the seat arises in the event of its repair (welding of power frame parts, etc.), or the need to access the floor under the carpet of the seat.
1. Move the seat forward all the way, use a screwdriver to remove the ends of the torsion bars from the brackets and remove both torsion bars.
2. Move the seat all the way back and unscrew the two nuts securing the brackets using a 13mm wrench.
3. Remove both brackets from the studs.
4. Using a TORX E10 wrench, remove the two bolts that secure the front slide to the floor.
5. Move the seat forward all the way and, using a TORX E10 wrench, remove the three rear mounting bolts for the slide.
6. Remove the seat from the interior.
7. Install the Lada Priora seats
in the reverse order of removal. Please keep in mind that the upper ends of the torsion bars (1 – right torsion bar, 2 – left torsion bar) are mirror bent.
How to remove the seats
on Lada
Priora
.
How to remove seats on a Priora (hatchback-station wagon)
INSTRUCTIONS Removing the rear seats is easy and quick. (10 x 13 regular keys and ratchet heads)…
8. It is more convenient to install torsion bars as follows: move the seat back, insert first the lower end of the right 1 and then the lower end of the left 2 torsion bar into the holes of the brackets and, moving the seat forward, place the upper ends of the torsion bars behind the hooks on the seat base post.
1. Press the seat cushion lock handle...
2. ...and lift the edge of the pillow.
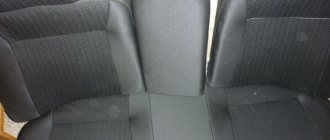
3. Similarly, release the second edge of the cushion... 4. ...and remove the seat cushion. The photo below also shows the rear seats from the luggage compartment side of the Lada Priora hatchback and station wagon. For these cars, all operations are similar.
Removing the rear seat back in a Lada Priora car
5. Pull up the seat back latch strap...
6. ...and remove the backrest by lifting it up.
7. Remove the second seat back in the same way. 8. Remove the screw securing the armrest to the hinge.
9. Remove the screw securing the armrest hinge to the body...
11. Similarly, remove the second armrest hinge and the armrest. 12. If the airbag clamp is faulty, remove the screw securing it...
14. Replace a broken or loose spring or retainer assembly.
15. Install the removed components and parts in the reverse order of removal.
Priora seat reupholstery
- 5 0 16k
- 6 0 30k
The upholstery in your car will tighten over time, even if you use cleaning products. The door panels, headliner and seat upholstery are combed out, become tarnished, greasy and simply have holes in them or are simply burned with a cigarette. Therefore, often dry cleaning is also powerless.
And here we are faced with a choice. Either install covers or replace the upholstery. Each of these options has its pros and cons.
In this case, such a problem concerns the Lada Priora car. If you like to take care of your car, then this instruction will be useful for car owners. Since it will be clearly shown how to reupholster the old rear seat with new upholstery. The instructions will have the most detailed explanation of how to disassemble and reassemble, as well as what you need to pay attention to and where to start when replacing the seat upholstery with your own hands.
How to remove the rear seat back on a Grant
So, I welcome everyone who has come here. Sobsna would like to tell you about the replacement of dry cleaning, because I don’t know about others, but the toad is choking me, but it’s necessary. Fortunately, you can completely perform this washing function with your paws. Because I had no experience, I decided to start from the back seat. Because friends managed to pour 300 grams of cognac into it (very good, I must say) and the upholstery frankly smelled.
READ How to Remove Toyota Avensis Radiator Grille
In general, my sofa is in this condition
All the upholstery is held on similar rings that need to be loosened (in principle, it can be done with ordinary pliers).
Having removed the external fastening, we are faced with the internal one. It works on the same principle
Well, in the end, after half an hour, the upholstery was removed, in this state it looks even worse.
Well, we put it all in the washing machine, I added some kind of fabric conditioner, you can add a lady then and the washing process will be absolutely amazing.
In the end, washed upholstery looks like new.
My own rubles for 20 and half an hour of wasting time, I think the result is wonderful.
Tools:
- Ratchet wrench
- 10 mm head
- Open-end wrench 10 mm
- Medium flat screwdriver
Remove the rear seat cushion hinge plugs.
Lift the front of the airbag up and remove the airbag hinges from the holders on the body.
Remove the rear seat cushion.
To remove the rear seat backrest, use a 10 mm wrench to unscrew the backrest mounting bolts from the trunk side: on the right (see 1st photo), in the center (see 2nd photo) and on the left (see third photo).
Then unscrew the bolt securing the rear seat back, located in the center of the passenger compartment.
Pull the rear seat back out of the passenger compartment.
Install the rear seat on the car in the reverse order of removal.
How to remove upholstery from Granta seats?
Information will be needed by those who plan to wash the seat upholstery, change it to the newest one, change the foam molding, or install heated seats.
For work we will need: - Needle nose pliers - Side cutters - Plastic clamps
The front part of the casing is attached to the frame using iron parts marked in green:
Orange indicates the plastic removable seam of the backrest. And blue - elements that do not require dismantling when replacing or removing the upholstery.
But let's start with the headrest. We remove it and remove the rubber decorative washers.
Then, applying force, we separate the plastic seam (training before disassembling the backrest).
And we tighten the upholstery, squeezing the foam.
We turn the chair over and begin to disassemble the seat. From below, the upholstery is attached to the springs with metal rings.
Don't even try to remove them carefully. Even if you succeed, you’ll waste a lot of time, but you still can’t put them back on. Therefore, we simply take the wire cutters and destroy them.
It is convenient to hold and remove these rings with thin-nose pliers. Ultimately, there is nothing holding the upholstery underneath.
We begin to pull off the upholstery from the front of the seat...
... and we rest against the fastening element that tensions and creates the relief of the front part of the upholstery.
A fastening element in the form of a wire rod is sewn into the casing (places highlighted in green) and tied with the same rings to the foam casting reinforcement.
We take wire cutters and remove the rings...
... first releasing 2 longitudinal fastening elements, and then 1 transverse one.
The longitudinal elements are freed, the transverse elements are shown in the photo. It is placed where there is a transverse seam on the seat
When all 7 rings are removed, remove the upholstery.
And foam casting as needed.
Having folded the backrest one hundred percent, we see a plastic seam like on the headrest. Let's disconnect it.
And we begin to roll up the upholstery until we come across the same fasteners...
We remove the same 7 rings as in the seat and tighten the upholstery.
The upholstery remains on the two headrest guides. You can either simply pull it off, or remove the guides.
Well, the foam casting is not secured in any way...
The chair is disassembled. It took an hour to disassemble the first seat, but if I had this annotation, it would have taken about 20 minutes. In the 2nd part I will tell you how to return the trim to its place.
So, the seat is disassembled...
If you did everything like I did, you killed all the fastening rings. Well, after you have washed/changed/repaired the upholstery, you need to somehow secure it to the seat. This is where plastic ties come to our rescue. By the way, I used polyamide ties from DKS - a reliable thing...
We find reinforcement in foam casting...
... and thread the ties through it.
After this, we begin to tighten the upholstery until the fastening element coincides with the corresponding part of the foam casting. Next we attach the fastening element with ties.
... and tighten them.
We remove the tails of the clamps with pliers.
We do the same with the rest of the fasteners on the back and seat.
We fasten the plastic seam of the back and fasten the seat straps.
Usefulness lies in decorative and direct purpose
First, the plug covers a fairly large space from the seat to the floor, thereby eliminating a large open space, which does not look very beautiful and laconic, because in general there are no obvious open spaces in the car interior that look like a flaw. Also, these plugs, as a rule, have the same texture and color as the lower part of the seat, so they look like a single unit.
The second purpose is functional. The bottom line is that, although not often, it has happened to all of us when an object falls out of our hand and falls in a simple way under the seat. Accordingly, in order to get it, we turn into a snake, because there is no other name for the bend in which we try to contrive and get the fallen object. In addition, moisture and dirt fly under the “open seat”, which comes from the street when the door is opened, and in winter it is also snow, which then melts and water seeps through the floor covering to the metal, causing its slow corrosion.
Thus, from a seemingly simple detail, so many unpleasant problems arise. However, recently such plugs have begun to be produced for domestic cars. The first “testers” were Priora models. Car owners are happy, and those who do not have plugs as standard purchase them with great popularity. Therefore, the result suggests itself.
Installation of the plugs is quite simple with minimal effort. There is no need to remove the seats. The main mounting point is the connecting bolt between the seat and the backrest - it is this that secures the plug. Next, it is installed in shape and fits tightly to the shape of the seat itself, without interfering with its movement (closer or further from the steering wheel). The plug also contains additional holes for fastening along the perimeter of the edge of the seat. However, there are no such holes in the seat itself, so you will have to make them yourself - this is at the request of each car owner.
Seat covers for Lada Priora in LADA TUNING Shop ★ Low prices ★ Call: 8-919-819-40-37 We guarantee delivery within the Russian Federation and high quality of goods
Seat covers for Lada Priora - cover the seat slides with a cavity and do not interfere with the movement of the seat
Material: ABS – Plastic. embossed surface – “Shagreen”
Set: 2 pcs (left and right)
Easy fastening: attached to the bolt of the seat back (the seat back must be folded forward) and in front of the seat with a self-tapping screw to the seat frame.
Delivery by mail: YES possible.
Delivery by post by cash on delivery: YES possible.
Delivery by transport company: YES possible.
The latest restyling of the Lada Priora brought many changes, one of them is a plastic cladding that is screwed to the front of the front seat cushions. With such an overlay, the car interior looks more aesthetically pleasing and modern. We are studying the question of how to install such a cladding on the seats of the Lada Priora before restyling.
You will need: buy seat trim (catalog number: 2170-6810066), a “10” wrench, a piece of plastic, clamps, glue, a file.
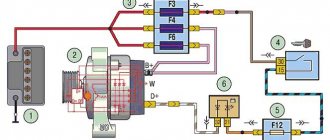
Relay and fuse blocks on a LADA Priora car
The VAZ Priora passenger car, regardless of the type of engine installed, is equipped with several junction boxes. They are located under the hood and inside the car. The use of several boxes made it possible to separate circuits with high and low currents. In addition, separate small-sized mounting blocks were installed, introduced as the configuration expanded.
Main power fuse block
The vehicle's power circuits are protected by inserts installed on the positive terminal of the battery. The block is designed to protect circuits with maximum currents. To gain access to the fuses, you need to remove the plastic cover; this can be done without the help of tools.
Block diagram and its location in the car
The removal of the most powerful circuits on the Lada Priora into a separate unit located close to the battery ensured maximum protection of the car's electrical system from overloads.
The location and designation of the inserts is indicated in the photo. Depending on the year of manufacture and installed equipment, it is possible to install fuses of different ratings.
Priora power insert block