No pressure in the VAZ 2110 ramp reasons
Due to the residual pressure in the rail after removing the nipple, gasoline will splash out.
Pressure in the fuel rail of a VAZ 2110 - pictures and photos.
Removing the fuel rail and fuel pressure regulator of the VAZ-2112 engine.
Removing the fuel rail of the VAZ-2111 engine.
How to measure the pressure in the ramp.
If the regulator is working properly, the fuel pressure should increase by 0.2–0.7 bar (0.
Fuel pressure dsc01374_2.
27 in the figure). It screws perfectly onto the fitting of the “tens” ramp.
Pressure in the fuel rail of a VAZ 2114.
How to remove engine injectors on VAZ 2110, 2111, 2112.
pressure in the VAZ ramp is free. check, pressure, ramp, VAZ, check.
VAZ-2111 engine. Removing the fuel rail.
There is no pressure in the fuel rail of the VAZ 2110.
Fuel pressure control.
Using two 17mm wrenches, disconnect the fuel rail pipes from the hose.
Do-it-yourself fuel rail disassembly diagram for VAZ 2110.
The starter turns, the car does not start - the main reasons.
2. Remove the decorative trim of the engine (see 8.1.4).
There is no pressure in the fuel rail of the VAZ 2110.
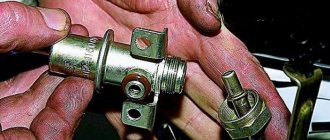
While rocking, remove the fuel pressure regulator from the rail.
Removing the fuel pressure regulator.
27 in the figure). It screws perfectly onto the fitting of the “tens” ramp.
Removal
2. Relieve the fuel pressure in the fuel line (see “Fuel line - pressure relief”).
4. Two 17 mm
unscrew the fitting (2) of the fuel rail tube, holding the hexagonal tip of the fuel line hose supplying fuel to the ramp. We remove the hose tip from the tube. Similarly, disconnect the fitting (3) of the fuel drain pipe into the tank. Release the clamp (1) securing the wiring harness.
5. Using a Phillips screwdriver, unscrew the screws securing the fuel pipes and remove the clamping bar of the bracket (see “Fuel rail of engine 21124 (1.6i 16V) - removal and installation”).
6. Remove the rubber sealing rings from the tubes (see “Fuel rail for engine 21124 (1.6i 16V) - removal and installation”). We replace damaged o-rings.
8. Disconnect the wiring harness block and disconnect it from the bracket (see “Injectors - check”).
9. Using a Phillips screwdriver, loosen the clamp securing the crankcase ventilation hose and remove the hose from the cylinder head cover pipe.
10 mm socket wrench
Using a ratchet, unscrew the bolt securing the oil level indicator tube.
. and remove the tube along with the pointer.
5mm hex wrench
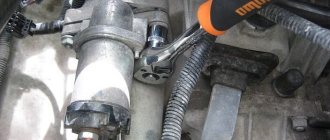
unscrew the two bolts securing the fuel rail to the cylinder head.
12. Remove the fuel rail assembly with injectors, wiring harness and fuel pressure regulator.
Comment. To remove the fuel rail, you need to pull it towards you and then move it to the left side
Causes of RDP malfunctions
Most often, the valve fails due to sagging of the spring, which begins to wedge. This is caused by natural wear and tear of the metal and, unfortunately, there is no escape from it. This can also be caused by the car being idle for a long time. To prevent this from happening, the car needs to be driven more often.
The second reason why the regulator fails is low-quality fuel. Many gas stations dilute fuel with water to increase volume and make more money. Therefore, refuel only at trusted gas stations.
No pressure in the fuel rail VAZ 2110 8 valves
The tuning pressure is 6 atm in the VAZ fuel rail, not in order.
There is no pressure in the fuel rail of the VAZ 2110.
Removal and installation of the fuel rail and regulator VAZ fuel 2110, VAZ 2111.
Removing the fuel rail and fuel pressure regulator of the VAZ-2112 engine.
2.17.1.7. Checking and replacing the fuel pressure regulator.
Removing the fuel rail of the VAZ-2111-1 engine.
a special membrane-type valve, on which it turns on one side.
Pressure in the fuel rail of a VAZ 2110 - pictures and photos.
Checking the pressure in the fuel rail of a VAZ 2109 Do it yourself.
It is installed in the injector rail and represents.
8. Screw in the bleeder fitting until it stops.
DIY car repair. fuel rail. DIY car repair.
diagram for disassembling the fuel rail of a VAZ 2110.
There is no pressure in the fuel rail of the VAZ 2110.
If the regulator is working properly, the fuel pressure should increase by 0.2–0.7 bar (0.
There is no pressure in the fuel rail of the VAZ 2110.
pressure in the VAZ ramp is free. check, pressure, ramp, VAZ, check.
2.1.10 VAZ 2115 timing belt.
Fuel rail - checking operating pressure.
How to remove the fuel rail on a VAZ-2111 car engine yourself.
2. Remove the decorative trim of the engine (see 8.1.4).
Comment on Removing and replacing the fuel rail of the VAZ-2111 engine.
Removing the fuel rail of the VAZ-2112-8 engine.
If the regulator is working properly, the fuel pressure should increase by 0.2–0.7 bar (20.
We move the pressure plate of the fuel supply pipe along the ramp and remove the pipes.
Cleaning engine injectors
First of all, this is much faster, but on the other hand, the result is not always effective. However, as VAZ-2112 car owners say, in some cases, this really helps.
Work process
- A compressor is connected to the system, similar to that described earlier, which is capable of increasing the pressure in the ramp to 3.2 atmospheres. In parallel, we connect a purifier in a container of at least 1 liter. (Most often, special injector cleaners are used in metal containers - approx.).
- Next, we start the engine and let it run for 10 minutes, after which we stop and let it rest for the same amount of time.
- Then we start it again and, by re-gassing, pass the entire liter of liquid through the injectors.
- When the engine stalls, change the spark plugs, which will become covered with soot.
The entire process of work in this way should not exceed one hour.
By the way, such work can render spark plugs unusable, so clean the injectors on the engine using old or spare spark plugs. Or guess the moment when you will change the spark plugs. We have already talked about the choice of spark plugs for 16-valve engines.
FINDING FUEL SYSTEM MALFUNCTIONS
Let us recall the composition of the fuel supply system. It includes: a fuel tank with an installed submersible fuel pump, a fuel filter, fuel lines (supply and drain lines), an injector ramp and a pressure regulator. Any component failure can cause incorrect fuel pressure. Let's try to list common faults for each component.
Gas tank. Through special pipelines, the gas tank communicates with the atmosphere, which prevents its deformation (flattening). If the connection with the atmosphere is broken, a vacuum is created inside the gas tank. In this case, the pressure in the fuel rail may be low.
Gasoline pump. There are several malfunctions:
- the fuel pump does not develop the required pressure, resulting in low fuel pressure;
- the check valve of the fuel pump does not hold pressure, as a result - a rapid drop in pressure after turning off the ignition;
- contamination of the fuel pump mesh filter, as a result - reduced pump performance, which affects the dynamic operating conditions of the engine.
Fuel filter. A dirty fuel filter can lead to low fuel pressure due to reduced fuel line capacity. If the fuel filter is damaged (torn), dirt can enter the injectors with all the ensuing consequences.
Fuel lines. Fuel lines may be pinched. If this happens to the supply line, then the fuel pressure will be reduced, if it happens to the drain line, it will be increased. In addition, the use of low-quality gasoline with a high tar content can lead to a decrease in the capacity of fuel lines.
Fuel pressure control. There are regulators with a stuck diaphragm in the open or closed position. In the first case, the fuel pressure in the system will be reduced, in the second - increased.
Injectors. The following types of faults are typical:
- the injector does not open, resulting in a lean air-fuel mixture;
- the injector is constantly open, resulting in an enriched air-fuel mixture;
- the injector works, but its characteristic has “floated away”, as a result - the air-fuel mixture is incorrect.
A LITTLE ABOUT THE OPERATION OF THE FUEL SENSOR
The latest developments by the designers of the automobile plant in Togliatti have brought the produced models closer to the best European models, but annoying, minor breakdowns can add “a fly in the ointment.” These fully include problems with the gasoline level sensor in the car tank.
It is located in the same block as the fuel pump. It includes a movable lever with a float, a resistor and a contact group, which turns on the signal lamp for the gasoline reserve in the tank. Among the most common malfunctions of this unit, the most common are problems such as resistor breakage, oxidation of the moving contact or output terminals. It is very rare that the float in the fuel level indicator loses its seal.
In any case, to repair or service this unit, it must be removed from the fuel tank. To perform this work, remove the rear seat cushion and upholstery that blocks access to the gas tank cap. When performing this operation, do not forget that you are working with a flammable substance. Fire safety rules must be strictly followed.
Unscrew all the screws securing the cover, move it slightly forward and remove it from the fuel tank. Before removing the fuel block, it is necessary to relieve the pressure in the fuel line. There are several ways to do this, and the simplest of them is to leave the car idle for about 4 hours.
Disconnect the wires and fuel line from the module, being careful not to spill any remaining gasoline in the hoses. You need to pull out the fuel pump carefully so as not to damage the float.
Replacement of the fuel sensor is carried out using a screwdriver with a thin blade.
How does this happen:
- Use a screwdriver to move the locking ring and make it possible to remove the cover from the fuel module;
- Remove all the wires, release the latches on the cover and remove the sensor itself along the grooves;
- The next step is to remove the meter from the block.
To install a new fuel sensor, everything must be done in reverse order.
VAZ 2110 low rail pressure
27 in the figure). It screws perfectly onto the fitting of the “tens” ramp.
7. Carefully remove the regulator fitting from the hole in the fuel rail and.
Key words for the article » fuel rail. vase auto repair.
Checking the pressure b in the/bb fuel/bb system/b.
There is no pressure in the fuel rail of the VAZ 2110.
injection regulator setting pressure. I saw only injection ones, races.
fuel pump VAZ 21099 injecto what wire is ground? Its own business.
27 in the figure). It screws perfectly onto the fitting of the “tens” ramp.
Pressure in the fuel rail of a VAZ 2114.
Photo of a malfunction of the VAZ 2110 RTD valve, moto-torg.com.ua.
While rocking, remove the fuel pressure regulator from the rail.
8. Screw in the bleeder fitting until it stops.
How to measure the pressure in the ramp.
Replacing the RTD
Replacement is carried out in the following order:
- It is necessary to reduce the pressure in the fuel system, then unscrew the nut securing the fuel pipe to the RTD;
- Unscrew the bolt with a 10mm wrench securing the oil level indicator guide tube and remove it;
- Unscrew the bolts securing the RDI to the ramp;
- Remove the fitting from the fuel rail, remove the RTD;
- When installing a new regulator, experienced car owners advise lubricating the O-rings with gasoline.
In the future, do not forget to look at the fuel level sensor. If a large flow rate is detected, you may suspect that the replacement was not carried out entirely correctly, and it needs to be carried out more carefully.
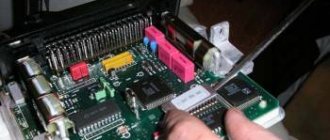
Removing injectors VAZ 2114 2110 Video
A nozzle (or injector) is an important part of the injection system, which is designed for dosed injection of fuel, atomizing it in the combustion chamber and forming a fuel-air mixture.
The injectors are installed on gasoline and diesel engines. Most domestic cars run on gasoline engines, for this reason we will look at how an electromagnetic injector works (there are also electrohydraulic and piezoelectric ones) and the removal of VAZ 2114 2110 injectors, since they are the ones used on these types of engines.
Electromagnetic injector device
These injectors do not have a sophisticated device; they consist of an electromagnetic valve with a needle and a nozzle.
1. strainer 2. electrical connector 3. spring 4. field winding 5. electromagnet armature 6. nozzle body 7. nozzle needle
8. seal 9. nozzle nozzle This type of nozzle works according to the following scheme. Depending on the program installed in the electronic control unit, at a certain moment voltage is applied to the valve excitation winding. As a consequence of this, an electromagnetic field is created, which compresses the spring and retracts the armature with the needle and opening the nozzle. Then fuel injection occurs. When the voltage disappears, the spring expands and returns the injector needle to the seat. If one or more injectors are faulty, a cold engine will not start the first time. Within a few seconds after the engine starts, you will hear misfires in one or two cylinders. They say, in this case, that the engine is tripping. The car will not be responsive enough. When you press the gas sharply, a dip appears before the speed increases, and the engine may stall. The color of the spark plug insulators is different. This is also one of the signs of poor injector/nozzle operation.
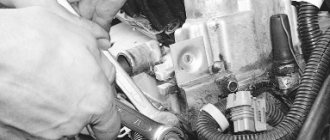
Removing injectors and fuel rail
1. Disconnect » — » from the battery. 2. Remove the hose from the pressure regulator. 3. Relieve the pressure in the rail. Unscrew the cap on the left side of the ramp and press the valve (nipple) with a screwdriver or your finger. Take two “17” keys. We will support one, and unscrew the fuel supply hoses with the other. Label the hoses so that they are not mixed up during assembly. 5. Disconnect the ramp power supply. 6. Using a Phillips screwdriver, unscrew the screw of the fuel pipe fastening bar and remove it
7. Use a 5mm hexagon to unscrew the two ramp mounting screws. One is located between the first and second nozzles. The other is between the third and fourth injectors. Don't lose the washers.
8. You can also unscrew the coolant supply hose to the throttle. This will make it easier to get the ramp.
9. Pull the ramp up at the injector installation angle, remove all four injectors and remove the ramp towards the left side of the car. To the side there is a barrel of washer fluid.
10. Squeezing the spring clip, disconnect the chip from the injector
11. Use a screwdriver to move the injector lock along the ramp... 12... and remove it.
13. While rocking, remove the injectors from the ramp. 14. Using a thin screwdriver, remove the O-rings...
If you decide to change the nozzle, then the following table will help you choose an analogue of the one you had.
Replaceability of VAZ 2110 injectors
Install the injector in the reverse order.
It is better to replace the O-rings and lubricate them with engine oil before installation.
Similar articles
VAZ 2109 injector diagram: how it works
In 1997, they began producing 2109-20 cars, which are equipped with an engine with a distributed injection system (injector). This improves their efficiency, environmental and traction performance. Distributed injection is so called because fuel is injected directly into each cylinder by a separate injector.
Such a system makes it possible to somewhat reduce the toxicity of exhaust gases, as well as improve the driving performance of the 2109 car. Today, there are injection systems without feedback and with feedback. Both presented systems can include domestic and imported components. Each of the systems has its own design, repair and diagnostic features. I would just like to note the main principles of the design, normal operation, engine repair (if necessary) and subsequent diagnostics of the fuel injection system (the VAZ 2109 injector diagram is presented below).
The automotive fuel injection system, which has feedback, is used mainly on export VAZ 2109. The exhaust system of these cars is equipped with a catalytic converter for exhaust gases and an oxygen sensor. It provides feedback. Using an oxygen sensor, the oxygen concentration in already exhaust gases is monitored.
Next, the electronic control unit (ECU) of the vehicle, according to its signals, maintains the appropriate ratio of fuel and air, that is, one at which the special converter works extremely efficiently. The injection system, in which there is no feedback, is not equipped with a converter and an oxygen sensor.
Their function (regulating the concentration of CO in already completely exhausted gases) is performed by a CO potentiometer. They also do not use a gasoline vapor recovery system.
VAZ 2110 no pressure in the rail
Pressure in the fuel rail of a VAZ 2114.
2. Remove the decorative trim of the engine (see 8.1.4).
Pressure in the fuel rail of a VAZ 2110 - pictures and photos.
How to measure the pressure in the ramp of a VAZ 2110.
VAZ-2111 engine. Removing the fuel rail.
Removing the fuel rail and fuel pressure regulator of the VAZ-2112 engine.
How to measure the pressure in the ramp of a VAZ 2110.
diagram for disassembling the fuel rail of a VAZ 2110.
7. Carefully remove the regulator fitting from the hole in the fuel rail and.
How much antifreeze is needed for a VAZ 2110.
The car arrived for firmware adjustment, and the pressure in the fuel rail was 6 atmos.
8. Screw in the bleeder fitting until it stops.
Removing the fuel rail of the VAZ-2111 engine.
Key words for the article » fuel rail. vase auto repair.
Using a 24mm wrench, unscrew the nut securing the fuel return tube.
We move the pressure plate of the fuel supply pipe along the ramp and remove the pipes.
There is no pressure in the fuel rail of the VAZ 2110.
If the regulator is working properly, the fuel pressure should increase by 0.2–0.7 bar (0.
Fuel pressure control.
While rocking, remove the fuel pressure regulator from the rail.
How to measure the pressure in the ramp of a VAZ 2110.
pressure in the VAZ ramp is free. check, pressure, ramp, VAZ, check.
injection regulator setting pressure. I saw only injection ones, races.
Fuel rail VAZ 2110 VAZ 2111 VAZ 2112 - checking operating pressure.
There is no pressure in the fuel rail of the VAZ 2110.
Fuel pressure dsc01374_2.
Fuel rail - checking operating pressure.
Disassembly
13. Using a slotted screwdriver, release the two brackets securing the wiring harness.
14. Disconnect the four wiring harness connectors from the injectors.
15. Remove the wiring harness from the fuel rail.
16. Move the spring clamp along the fuel rail and remove the injector.
17. Remove the spring clamp of the injector from the fuel rail.
18. 24 mm
Unscrew the nut of the fuel outlet pipe.
. and remove the end of the tube from the pressure regulator.
5mm hex wrench
unscrew the two bolts securing the fuel pressure regulator (1) and move the clamping bar (2) of the fuel supply tube along the fuel rail. Remove the fuel pressure regulator (3).
. and remove the tube from the ramp hole.
Warning! Damaged O-rings of fuel pipes and injectors must be replaced.
Messages 16
1 Topic by denisby4kov.77 2015-06-22 23:57:56
- denisby4kov.77
- New member
- Inactive
- Registration: 2015-06-22
- Messages: 6 Thanks : 0
Topic: no pressure in the fuel rail (filter, pump and regulator replaced)
Hello. Such a problem - I was driving and began to tune the engine. I got to the garage and that was it. It starts, just under the throttle it stalls. I made a mistake on the fuel pump, I bought a pump motor and a filter. everything has been replaced. the problem has not gone away. I suspect a pressure regulator. purchased and replaced. the same. on the fuel rail there is a fitting for a pressure meter - so, I press the nipple on the fitting, three drops splash from there and that’s it. I suspect the injectors. who can tell me what?
2 Reply from 7491cm3x 2015-06-23 04:45:36
- 7491cm3x
- Connoisseur
- Inactive
- From: Norilsk
- Registration: 2015-01-29
- Messages: 467 Thanks : 119
- Car: VAZ 2112 1.5l 16v
Re: no pressure in the fuel rail (filter, pump and regulator replaced)
Connect the pressure gauge, turn the ignition key and measure the pressure. I don’t remember how much there should be, but Google will help. If below normal, look for a leak. If the injectors are pouring so much pressure that the pressure drops below normal, you will hardly start the engine, because the spark plugs will be flooded to the very top. Is there a smell of gasoline anywhere? Has the fuel filter been changed recently? Mesh in the tank?
3 Reply from denisby4kov.77 2015-06-23 07:59:06
- denisby4kov.77
- New member
- Inactive
- Registration: 2015-06-22
- Messages: 6 Thanks : 0
Re: no pressure in the fuel rail (filter, pump and regulator replaced)
The fuel pump, mesh and filter are new + pressure regulator. After turning off the ignition, the sound is like a Kamaz is leaking excess air. from under the hood
4 Reply from v258 2015-06-23 12:46:02
- v258
- Participant
- Inactive
- From: Krasnodar region
- Registration: 2015-05-14
- Messages: 171 Thanks : 37
- Car: VAZ 2111, 1.5 8V
Re: no pressure in the fuel rail (filter, pump and regulator replaced)
5 Reply from kuler_78 2015-06-23 13:01:06 (2015-06-23 13:07:35 edited by kuler_78)
- cooler_78
- Experienced
- Inactive
- Registration: 2014-10-22
- Messages: 142 Thanks : 57
Re: no pressure in the fuel rail (filter, pump and regulator replaced)
And this is not clear yet. It seems like there was no pneumatic compressor on the top ten. Is it possible that this is poisoning gasoline? Author, check the fuel line carefully. There can be no miracles. Maybe the line itself is clogged somewhere. I’ve seen this happen. The fuel rail was completely clogged. Yes and until you check the pressure in the rail, it’s not worth changing everything. Maybe the reason is elsewhere. You decided that it was the fuel pump based on indirect signs. And the fact that you press the nipple and three drops of gasoline flows out is not an indicator. I have the same situation. and the problem here is in the fuel pump valve, but it works fine even without it, only the pressure immediately drops and does not start the first time.
What should be the pressure in the VAZ-2112 16 valve ramp: photo
In order to find out more about the pressure in the fuel system of your car, you need to go to a car repair shop and pay 500 rubles. Or you can purchase a fuel pressure gauge and adapter for about 1,500 rubles and do this whole operation yourself. And you can also farm! More details below.
The video below measures the pressure in the fuel rail using a conventional tire pressure gauge:
Measuring pressure using improvised means
Homemade design for measuring pressure in the fuel rail using a conventional tire pressure gauge
It’s easy to measure the pressure using available tools; you just need to have a regular tire pressure gauge on hand (which is used to monitor tire pressure - approx.). All you have to do is follow our instructions exactly. We will tell you how to carry out this operation correctly, and what the correct pressure should be in the fuel rail of the VAZ-2112.
What should be the pressure in the VAZ-2112 ramp?
The operating pressure in the ramp should be in the range of 2.8–3.2 bar (2.8–3.2 atmospheres).
Preparatory work
- We take a pre-prepared pressure gauge, and to prevent fuel spills and air leakage, we wrap flax or fum tape around the tip.
- We are preparing a hose with a maximum internal diameter of 9 millimeters, and clamps will be needed to secure them.
- We place the prepared rags on the engine in such a way that the hose and pressure gauge fixed on it cannot roll off the surface. This is done to prevent excess fuel from spilling over the surface of the engine.
- We wrap flax or tape around the pressure gauge, then fix the hose on it and tighten everything with a clamp.
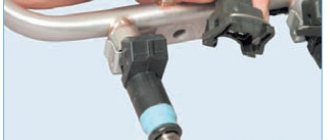
- On the ramp, unscrew the spool valve from the nipple (in this case, fuel splashes are possible due to the presence of residual pressure - approx.).
A regular wheel cap came in handy.
We put a hose with a pressure gauge on the ramp connections and secure everything with a clamp.
Pressure gauge with pipe assembly.
We place the pressure gauge on a previously prepared rag, and the preparatory work can be considered completed.
Measurement procedure
Before you start working, you can try to relieve the pressure in the fuel system. To do this, remove the fuel pump fuse (which is located on the right side of the panel, under the front passenger’s left foot - approx.). Where 3 relays and 3 fuses are located. In the photo below it is located under the number “5”. After removing the fuse, turn on the ignition and check by ear that the fuel pump is not pumping. We start the car and wait for the engine to stall.
- After everything is ready, we check the already attached end of the pressure gauge with the hose for a secure connection.
- Next, start the engine and look at the readings that appear.
Thus, we diagnose the results that appear and compare them with the results of the norm.
After all the work has been done, unscrew the hose with the pressure gauge, screw in the spool and return everything to its original state.
Note!
The peculiarity of measuring pressure using a pressure gauge is such that its initial value on the scale has a certain inaccuracy. That is, when the air analogue has a measurement period of 15-20 atmospheres, and for fuel control the required maximum value is 5-7 atmospheres, then all measurements taken will have an error equal to the initial values on the device. Therefore, pressure testing should be carried out on a pressure gauge with maximum values of up to 8 atmospheres.
Procedure for removing oil injectors
Before you begin removing injectors from any car of the tenth VAZ family, you will need to relieve the pressure in the fuel system. Removing any element that is under pressure in any way can result in personal injury.
How to get rid of excess fuel
To relieve the existing fuel pressure, you need to turn off the fuel pump and exhaust the remaining gasoline:
- Fold down the cushion from the back row of seats.
- Below it is the fuel tank hatch.
- Unscrew the screws securing the hatch.
- Disconnect the wiring harness from the pump housing (the wires supply power).
After this, start the engine and wait until it stalls. It is recommended to turn the ignition on several times to ensure that there is no gasoline left in the system.
in this video I will explain how to remove the injectors
With2110
. Thank you so much for watching my videos, tell your friends.
Removing injectors from a VAZ 2112 8 valve
subscribe to our channel.
Next, you can begin to remove the injectors. It is recommended to prepare the necessary tools in advance:
- open-end wrench 17;
- a flat screwdriver with a narrow blade;
- Phillips screwdriver;
- hex key 6;
- rags.
All elements of the repair kit are usually at hand for any driver
How to remove parts from the engine
- Remove the air filter box (it will interfere with free access to the engine).
- Remove the wiring harnesses from the injectors.
- Then you will need to disconnect the wires from the idle speed control and from the throttle sensor.
- Next, remove the vacuum seal from the pressure regulator (it has a white braid).
- Using a 17 key, unscrew the bolts that secure the fuel frame to the body. To make it more convenient, you can remove the gas cable.
- It is better to unscrew the fasteners of the plate with which the ramp is pressed using a hexagon.
- The fuel rail must be removed very carefully, with the nozzles facing up.
- On a 16-valve engine, dismantling will take longer, since the ramp has a more complex structure and several types of fasteners.
- Next, you can remove the injectors themselves - to do this, disconnect the fastening brackets of the electrical connector with your finger, and then the injector bracket. During removal, gasoline may leak; it is recommended to place a cloth under the ramp.
To install a new injector, the socket is first thoroughly cleaned of dirt and fuel, and only then can the product be screwed in. It is better to drop a few drops of gasoline onto the rubber ring before installation - this will make the nozzle fit into the mounting hole more easily. All work is then carried out in reverse order.
Recommended reading
Malfunctions of the fuel system can make themselves felt in a rather unpleasant form, for example, sudden “dips” when the engine reaches a large number of revolutions.
If the car “stumbles” while accelerating or jerks while driving, etc., then this may also mean there are problems with the fuel system. A mandatory engine check in such a situation is simply necessary! Only after diagnostics can you understand where the problem lies. The text below will discuss the principle of operation of the system. I would like to say right away that there is nothing complicated here. The main task of a fuel pump, which it does an excellent job of, is pumping fuel. Excess gasoline goes back through the pressure regulator. As a rule, changes in gasoline pressure in the ramp can vary depending on pressing the gas pedal. After turning off the engine, the pressure will begin to decrease. Depending on the quality of the valve fixation, this can take from 5-10 minutes to 5-6 hours. It is also worth remembering that in order to check the pressure during diagnostics, the following mandatory conditions must be observed - do this when the ignition is turned on, at idle, with the hose crushed and the regulator tube dropped.
If no problems arise, at XX the pressure should be within 2.5 atmospheres. Approximately 3.2-3.3 atmospheres with the RTD tube dropped. And 6.8-7.0 atmospheres if the return pipe is compressed. Indicators when pressing the gas pedal should be given special attention. During a sharp gas boost, the pressure can rise to about three atmospheres, but soon it will return to 2.3-3 atmospheres.
There is another way to check the fuel system that can help you even if you don't have a pressure gauge on hand. There is nothing complicated here either. Unscrew the hose that supplies fuel and apply voltage to the fuel pump, also do not forget to prepare some container. If about a liter and a half of gasoline comes out in about a minute, this means that everything is in order.
There is also one simple method for checking the fuel system. This is done using spark plugs. To determine the condition, you need to open the hood and carefully inspect the spark plugs. Wet spark plugs are a sure sign of fuel supply. If the spark plugs are dry, most likely fuel is not supplied, which means that it is necessary to diagnose the fuel system.
To summarize, it should be mentioned that in reality, checking the fuel pressure on a VAZ-2110 is not as difficult as you might think. But it is also worth remembering that anything can happen, so you must be prepared for any unforeseen situations.
Alteration of the engine power supply system 21126 - June 18, 2012
Alteration of the engine power supply system 21126
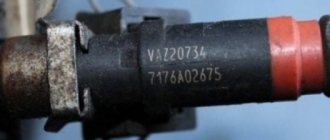
The ramp of the VAZ 2170 Priora car, which is a hollow part welded from tubes, serves to supply fuel to the injectors and is fixed to the cylinder head. The engine uses a drainless power supply system; the pressure in the rail is maintained by a fuel pressure regulator installed in the electric fuel pump module. The injectors are inserted into the ramp through special O-rings and secured with metal clamps. To equalize the pressure in the injectors, fuel is supplied to the middle part of the ramp. As a rule, Siemens injectors marked VAZ 20735 are installed on a VAZ 2170 car.
This modification of the VAZ 21126 engine power supply system was made in order to reduce the likelihood of vapor locks forming. To do this, the “blind” ramp of the Priora engine is replaced with an aluminum one from a VAZ 2110 - 2112 with a pressure regulator and a fuel drain line. Due to this, constant circulation of fuel and its cooling are carried out. For the conversion you will need a fuel rail, a fuel pump and missing fuel lines.
However, the biggest problem turned out to be when installing the injectors, due to the fastening features; when installing a ramp from 2110, it turns out that the injectors are 15mm shorter.
There are several ways out of this situation. It is possible to redo the fastenings and move the ramp itself lower, but in this case the fitting for monitoring the pressure in the ramp rests against the cylinder head and becomes inaccessible for use, so this option is not considered. The next option is to replace the “short” injectors with “long” ones, but since long injectors have a different design and different performance, you will have to bother with controller calibrations.
But it is better, of course, to leave the original injectors, because the Priorovskaya blue short injector, two-flare, unlike the others, has 4 holes and they are specifically located, not on a plane like other injectors, but on a special protrusion. Thus, it turns out that the injector pours fuel in two jets in 2 directions, clearly on each valve, and not on the partition between the valves in the cylinder head, as on the VAZ 2110. This ensures a more stable filling of the combustion chamber with fuel.
To realize the plan, 4 injector extensions were manufactured. The nozzle extension is a cap made of non-ferrous metal; its outside shape follows the shape of the nozzle; inside it has a hole where the nozzle is inserted. Thus, the nozzle extension increases the nozzle size by 15 mm.
The only disadvantages of this design are that we abandoned the use of injector clamps to the fuel rail, and the fact that 4 additional o-rings appear in the fuel system, which complicate the system, worsen its reliability and increase the amount of consumables for repairs.
During installation, all 12 seals are replaced with new ones; this is recommended for any assembly or disassembly of the system. Before installation, the rubber rings are lubricated with a thin layer of engine oil to avoid damage during installation.
In the photo there are long and short injectors, as a rule, the long one is designed for a 1.5-liter engine, and the short one is designed for a 1.6-liter engine
Blue short two-flare nozzle, Priora VAZ 2170
Regular red injector VAZ 2110, VAZ 2112
In the photo there are 4 nozzles with extensions and sealing rings.
It is advisable to thoroughly polish the surfaces where the sealing rings are adjacent to ensure the tightness of the system
The photo shows a ramp with installed nozzle extensions
As you can see in the photo, the ramp does not interfere at all, it fits perfectly, you may have to bend the fuel pipes a little.
Rail pressure VAZ 2110 8 valves
Checking the pressure in the fuel system.
If the regulator is working properly, the fuel pressure should increase by 0.2–0.7 bar (20.
injection regulator setting pressure. I saw only injection ones, races.
fuel pump VAZ 21099 injecto what wire is ground? Its own business.
How to measure the pressure in the ramp of a VAZ 2110.
2.17.1.7. Checking and replacing the fuel pressure regulator.
Due to the residual pressure in the rail after removing the nipple, gasoline will splash out.
Fuel rail - checking operating pressure.
pressure in the VAZ ramp is free. check, pressure, ramp, VAZ, check.
27 in the figure). It screws perfectly onto the fitting of the “tens” ramp.
Pressure in the fuel rail of a VAZ 2114.
Removing the fuel rail of the VAZ-2111 engine.
8. Screw in the bleeder fitting until it stops.
Fuel pressure regulator 2110.
Checking and replacing the VAZ 2110 fuel pressure regulator.
If the regulator is working properly, the fuel pressure should increase by 0.2–0.7 bar (0.
There is no pressure in the fuel rail of the VAZ 2110.
The car arrived for firmware adjustment, and the pressure in the fuel rail was 6 atmos.
2. Remove the decorative trim of the engine (see 8.1.4).
If the electrical circuit in a VAZ 2110-2112-2170 car is obviously in good working order, and the pump hums as usual, this does not mean that gasoline is supplied to the injectors as normal. No! There may be some problems here.
Let's start with the most basic.
Checking the RTD
So, your sensor is already in order, but there is excessive fuel consumption and other problems indicating that the regulator is acting up. First of all, check it.
This is done like this:
- You need to unscrew the plug of the fitting responsible for controlling the fuel pressure. Look, if the seal ring is torn or simply no longer elastic, it (or even the entire plug) needs to be replaced;
- Unscrew the spool from the fitting, this is done in exactly the same way as in any tire;
- Using a tire pressure gauge secured with a clamp to the fitting, measure the pressure while the engine is running. It should be within normal limits;
- When disconnecting the vacuum hose of the regulator, the pressure should increase slightly (by 0.2 - 0.5 kgf/cm2). If this does not happen, then there is only one solution for your VAZ 2110 - you need to replace the RTD. On average, the price of a standard RTD fluctuates around 300 rubles; an analogue of the SOATE RTD costs about 600 rubles.
Types and symptoms of regulator malfunction
The types of RTD malfunctions are as follows. The valve does not hold - fuel begins to circulate freely throughout the fuel system, the pressure in which decreases because of this. As a result, the engine does not have enough fuel when the speed increases, and its power decreases; The pressure in the system should not change after stopping the engine, but since the valve is not able to hold it, when starting the engine, you have to work with the starter for a long time to create the required pressure.
A completely inoperative valve means fuel is not discharged into the tank, and because of this, the pressure in the system increases. As a result, the amount of fuel supplied to the combustion chambers through the injectors increases - there is overconsumption and incomplete combustion of gasoline.
Signs of a faulty RTD are the following engine operation:
- unstable;
- stalls at idle;
- insufficient pickup;
- cannot develop full power;
- the crankshaft rotates at idle speed with a reduced or increased frequency;
- dips and jerks while the machine is moving;
- difficult starting - not always;
- the content of CO and CH in the exhaust gases significantly exceeds the permissible standards;
- excessive consumption of gasoline.
Checking and replacing injectors on VAZ 21124, 21126 engines
Signs of injector malfunction may include: – difficult engine starting; – unstable engine operation; – the engine stalls at idle; – reduced crankshaft rotation speed at idle; – the engine does not develop full power, insufficient engine response; – failures in engine operation when the vehicle is moving; – increased fuel consumption; – increased content of CH in the exhaust gases. You will need: a 5-point hex key, a flat-blade screwdriver, a 17-point key (two), an autotester. 1. Disconnect the connecting block of the injector wiring harness and the engine harness by pressing the lock. 2. Perform an initial check of the injector windings. To do this, connect the ohmmeter to the contacts of the pads one by one.
The block has five contacts: four for supplying a control signal to the injectors and one common “+12 V” (a crimson wire with a black stripe is connected to it).
3. In turn, connect the four control contacts to the common contact and measure the resistance in each case. It should be 11–15 ohms. If in one or more measurements the resistance value differs from the specified value, the tested injectors or their wiring harness may be faulty.
4. For a more accurate check and replacement of injectors, remove the fuel rail from the car (see “Removing and installing the fuel rail”). 5. Use a screwdriver to pry the spring clamp of the injector, remove the clamp and remove the injector from the fuel rail. Remove the remaining injectors in the same way. 8. To identify a faulty injector, connect an ohmmeter to the injector contacts. It should show a resistance of 11-15 ohms. If the winding resistance is not normal, replace the faulty injector, as it cannot be repaired.
Note Check the injector for the shape of the sprayed fuel spray and for leaks at specialized service stations, since such a check directly on the car is very fire hazardous.
The injectors of the VAZ-21126-00 engine of the VAZ-2170 Lada Priora car have an original design and are not interchangeable with the injectors of VAZ injection engines of other models. Buy new injectors with exactly the same markings.
6. Whenever removing injectors, be sure to replace the O-rings on all injectors on the ramp side. Using a screwdriver, carefully pry the edge of the ring and remove the sealing ring from the nozzle and similarly remove the ring from the nozzle side. 7. If you are installing old injectors, carefully wash their nozzles with solvent or carburetor cleaner. Warning
Install new O-rings carefully, without using any tools, after lubricating them with engine oil.
Note The sealing rings on the injectors are identical to other rings installed on early VAZ models with fuel injection systems and are interchangeable with them.
8. Before installing the injectors, lubricate the O-rings with engine oil or WD-40. 9. Install the injectors in the reverse order of removal, securing them to the ramp with clamps, after tightening them a little.
10. Having installed the fuel rail, connected the fuel line and connected the wiring harness block, secure the minus terminal on the battery, turn the ignition key 3-4 times to position “I” (ignition) at intervals of 2-3 s between turns on and check for leaks pipe connections and injector seals. 11. Install all removed parts in the reverse order of removal.
Replacing and removing injectors on a VAZ-2112 16 valves on your own
The injector in a car is almost the most important element in the fuel system. Indeed, in their absence, the operation of the engine will be impossible as a result.
The video below describes in great detail how to remove injectors on a 16-valve VAZ-2112 engine:
Checking the fuel rail pressure
First, remove the protective cap of the fitting (as shown in photo 1).
Be sure to place a cloth underneath so as not to splash the engine compartment with fuel, and use the tip of a thin slotted screwdriver to press on the spool of the fitting. If the stream of fuel is thin or weak, this means low pressure in the fuel rail - you need to look for the cause. If gasoline sprays with strong pressure, then there is hope that the pressure is within normal limits (2.8-3.2 bar), but to be sure, you need to measure it with a pressure gauge. At the service center this is done using fuel pressure gauges with adapters. We will use a simple one from a tire pump. The only main thing is that the measurement limit is at least 4 bar. You will need another part of a gas-resistant hose, the length of which should be 150 millimeters, the internal diameter of which should be 10-12 mm, as well as 2 more clamps. Use the wheel valve cap to unscrew the spool valve from the fuel rail fitting. We put the pressure gauge hose on the fitting and tighten it with a clamp. We turn on the ignition, without starting the engine: after 2 seconds, the gasoline pressure in the rail should increase to 2.8-3.2 bar and remain at this level (photo 3). If it is significantly lower (about 1 bar) and remains at this level for a long time, you need to check the supply line 4 - most likely, it is clogged. There are 2 problem areas: fuel pump mesh 2 and fuel filter 5.
Why is a control valve needed?
The fuel supply system of most passenger cars requires continuous operation of an electric fuel pump. It constantly pumps gasoline into the fuel line and ramp, raising the pressure to the maximum (5–7 Bar depending on the brand of car). But such performance is needed only under increased load on the engine, when it develops high speeds and consumes a lot of fuel mixture. In normal mode, a fuel pressure at the injectors of 3–3.5 bar is sufficient.
The fuel pressure diaphragm valve, installed in the engine power system after the fuel pump, performs 3 main functions:
- Limits the fuel pressure in the line at low engine loads, dumping excess fuel back into the tank through a separate tube.
- When the gasoline consumption of the power unit increases, the return flow is partially or completely blocked by the regulator. In this way, the valve maintains the minimum pressure required for normal operation of the motor.
- Maintaining pressure for a long time after stopping the power unit.
Without an RTD, the pump would “push through” the locking mechanisms of the injectors and gasoline would flow into the cylinders uncontrollably. In addition, the regulator protects the line from leaks at the connections, which will inevitably appear under the influence of strong pressure.
Cleaning the fuel pump mesh
We take the fuel pump out of the tank, remove the screen and wash it. Before installing the fuel pump, it would be a good idea to check it for leaks and the reliability of the connection of its tube (arrow in photo 5) to the fuel line.
You will certainly ask what to do if the supply line is clean, the pump is humming, and the pressure is still below normal. In this case, you need to change the pump itself - it has exhausted its service life! Or it may happen that the pump seems to be functioning normally, but there is no pressure in the rail! This can happen in winter if there is a lot of water at the bottom of the fuel tank. When the grid freezes, it interrupts the flow of fuel to it. What should I do? Lighting a fire under a gas tank, heating it with a blowtorch or some other source of fire - this should not be done under any circumstances. It is preferable to remove the fuel pump and clear it of ice. The second option is for those in no hurry: roll the car into a warm room and wait... Then it would be a good idea to drain the water from the fuel tank. It's a troublesome task, but a rewarding one.
What are the consequences of malfunctions in the operation of RDTs?
Over time, the engine starts more and more poorly. Fuel begins to come out of the cracks, which leads to a strong increase in its consumption. When the pressure changes unevenly, the dynamics of movement are disrupted, surges occur, and the car jerks during acceleration.
Is it possible to repair a failed part? In most cases, no, you have to completely change it. Repair units are almost always non-separable. Some experts suggest repairing the component, but this is dangerous. It is better to buy a new regulator - fortunately, it is inexpensive.
Determining violations in the operation of RTDs is not a very difficult task, which can be handled independently. Remember that this part of the machine needs to be checked periodically. By detecting the problem in time, you will protect important car components from rapid wear.
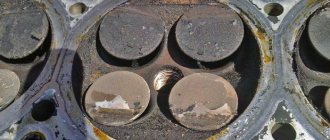
Spark Plug Inspection
If the spark plugs are wet, then gasoline flows. Dry? In this case, you need to check the signal at the harness connector of the mechanical liquid or gas atomizer (injector) with a probe (as shown in photo 6).
Did you do it, but the spark plugs are still dry? Then you will have to unscrew the screws securing the ramp and lift it under the intake manifold so that the injector nozzles can be seen. We turn on the ignition and turn the engine crankshaft with the starter. If there are no streams of fuel, you need to remove the injectors and most likely replace them with new ones. True, almost every serious service will recommend that you wash them.
If the price of a new set of injectors is slightly higher than flushing, then you should choose a replacement. Injectors also experience age-related problems. Also read:
How to check the fuel pressure regulator
If you have any suspicions about the RDT, its performance should be checked as soon as possible. It’s quite easy to do this even at home, just follow a few simple instructions.
We unscrew the fitting responsible for the fuel pressure and inspect the o-ring. Its condition is of great importance, so if this element is old or damaged, you will have to purchase a new ring. The next step is to unscrew the spool valve from the fitting.