Tool:
- Medium flat screwdriver
- Medium Phillips screwdriver
- Pliers
Parts and consumables:
Note:
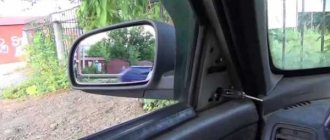
The work is shown on the left outside mirror. Removing the right mirror is similar.
1. Use a flat-head screwdriver to pry off the exterior mirror trim.
2. We remove the lining.
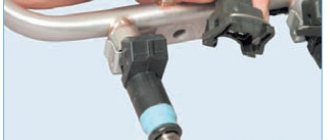
3. Using pliers, remove the locking bracket of the ball joint housing of the handle rod.
4. Using a Phillips screwdriver, unscrew the three screws securing the mirror.
5. We remove the mirror along with the cables and the ball joint.
6. Install the outside mirror in the reverse order.
The article is missing:
- Photo of the instrument
- Photos of parts and consumables
- High-quality photos of repairs
If suddenly, due to unsuccessful parking or, God forbid, your Kalina’s exterior mirrors were damaged during an accident, then the instructions below will be quite useful for replacing these parts yourself. I tried to describe everything in the most accessible language, and the process itself is very simple, so you should not have any difficulties when performing this work.
Life hack: side mirrors on Priora - removal and installation
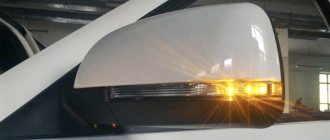
Good visibility is important for safe driving. While driving, the driver always has to “keep his finger on the pulse” so as not to get into an unpleasant situation (accident). The side mirrors on the Priora are initially made quite well - the viewing angle is enough to sit still when reversing or changing lanes. This is not a joke, it’s really like a Kruzak review. After the Priorovskie cars I get into other cars and I miss my familiar overview. Mirrors on Priora come with turn signals (repeaters); this is the Special Edition version of Lada (luxury) Priora cars. The price of these is naturally more expensive, but not by much 900 rubles. They can be installed on a regular Priora. Turn signals in mirrors are a newfangled theme and they look beautiful and are also practical.
The side mirrors of the Priora 1 car have been improved along with the restyling of the car. In the SE luxury version, which is essentially the most expensive and complete package of the car, these devices have changed, the car has become even more convenient “for the driver”. Some people buy such SE mirrors on a Priora 2 and install them even if they originally bought a car with a more economical package.
All that remains is to properly disassemble the mirror and make friends with the wires. Indeed, to install the modernized version you will have to put a lot of effort into finding reasons. You can do simple tuning, if you want to change the appearance to a more curly one - just put covers on the mirrors. It seems like a small change, but the car looks more solid with them.
Who hasn’t felt the thrill of using a car after ten, or a classic, freezing the car in winter - heating seems to be a common thing, but this was not the case on the VAZ. The heated mirrors of the Priora car are implemented using spirals. Often turning on heating in wet weather, a mark forms on them. Despite this, after 6 years of use, they have not faded.
Replacing a Lada Priora mirror (VAZ Priora)
Mirrors on the Priora SE and the old model, what is the difference?
1) The presence of turn signals on the mirrors. SE has them, old ones don't.
2) Visibility, it is greater on the SE mirrors.
3) Mirror mounting triangle. On the SE mirrors it fits better without any gaps.
4) Protection from rain. SE mirror housings provide less protection from rain and snow.
5) The external differences of the mirrors can be seen in the following photos:
At the moment, the price of SE mirrors on Lada Priora is about 3,300 rubles.
Installing SE mirrors on Priora
How to remove a mirror on a Priora. We follow these instructions, dismantle the old-style mirrors and install the SE mirrors in the reverse order.
Standard side mirrors - article number and price
For the Lada Priora car, standard parts with electric drive have catalog number 2170-8201017. Price – about 3,100 rubles per set.
Compared to the SE version, they have one design disadvantage. The surface area does not completely cover the mirror, which can also be “usefully” occupied. This shortcoming was corrected with the SE, where the mirror elements were actually made larger.
Heated mirrors on the Priora received a larger mirror element. Thanks to this, the driver does not have to lower them when reversing – even this difficult-to-reach area is visible. For the SE version, repeaters were added to the mirrors. Priora with electric drive, repeater and heating (catalog number 2170-8201021, price - about 3,800 rubles per set) was much more expensive than conventional versions.
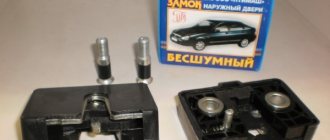
Methods for installing overlays
Step-by-step installation of the lining using adhesive-sealant (usually silicone).
If desired, you can always replace the adhesive sealant with double-sided tape. In this case, the tape is glued in several strips close to the outer edge of the nozzle or mirror, but not on the edge itself. Further, the technology is no different from that which involves the use of glue. If the pads come complete with fasteners rather than silicone, then their installation is even simpler. There are usually 3 to 5 latches. The antennae operate almost effortlessly, but they hold tightly.
Basic faults
Additions to the conventional mirror element make driving even more comfortable. Just in case, the repeater makes it clear to inattentive traffic participants where the driver is going to go. Heating will promptly evaporate moisture - raindrops, and will not leave stains that distort the image. The following malfunctions may occur during operation of the machine:
- The fasteners have become loose. Each part is held in place by several fasteners at different points. They may become so loose that tightening them will be useless. Everything will depend on the severity of the damage. In some cases, replacing the fasteners will be sufficient.
- The heating does not work. Check the connection of the wire blocks. Perhaps it is enough to strengthen the wire connections so that they no longer come loose.
- The electric drive does not work. Adjusting the position of mirror devices while sitting in your seat is much more convenient than doing it manually. Check the wiring.
- Turn signal repeater. If the repeater does not work, it means the signal is not reaching it. The problem, again, is the wiring.
- Broken mirror element. It will be enough to replace it with a new part, but during the replacement you should be extremely careful. It is important to prevent splinters from getting under the cover.
Detailed and universal method
Universal method
Inside the car, you need to unclip the plastic cover that covers the mirror mounting screws. After removing the cover, unscrew the three screws that hold the mirror in place and remove it. After this, you need to carefully remove the rubber gaskets -
If the rubber gaskets are damaged, it will be very difficult to buy new ones; they are rarely sold separately.
Now you need to unscrew the two screws securing the mirror adjustment joystick. Disassembling the joysticks themselves is a simple procedure; you just need to carefully remember the position of the cables and the color, since different colors are responsible for their adjustment. Next, you need to remove the three screws that are located on the lower plastic corner - it is most susceptible to damage during vehicle operation. After that you need to remove it too. How to remove the mirror element has already been described above. After removing the mirror element, you need to unscrew the four screws and remove everything else.
Place on silicone glue
The easiest way, of course, is to ask a mechanic you know or send the car to a car service center if you need to replace the mirror or paint it. But most owners are accustomed to repairing their car themselves - after all, this is a significant saving of money.
How to disassemble a mirror (left and right) on a Priora car - removal and installation
Replacing a device that is installed on a car of the “Norma” or “Standard” trim levels with the SE version becomes a good way of tuning. In order to disassemble these devices, you will have to disassemble the interior trim. Carry out the work as follows:
- Remove the screws that secure the A-pillar trim.
- Pull part of the trim towards you.
- The part is held in place by three bolts. First, lower the glass, then slowly unscrew the bolts, taking the reflective element with your other hand.
- Do not jerk the device. First, disconnect the wires - there should be two terminals going through them. The first is for heating, the second is for position adjustment.
- Place the new part in place of the old one and secure it with bolts.
Heating installation
There is a more complex, but much less expensive method. You can purchase flexible heating elements (GEN) and connect the heating to regular Lada Kalina mirrors.
- flexible heating elements that exactly fit mirrors in size;
- Double-sided tape;
- stationery knife;
- file;
- tools for removing rear view mirrors;
- wires, heat shrink, electrical tape, etc.;
- construction hair dryer;
- screwdriver.
How to remove a mirror element on a Priora
Priora Lada (2013+). Disassembling the outside rear view mirror
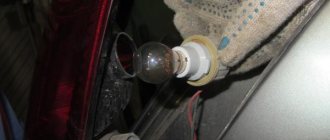
We disassemble the outside rear view mirror to replace the heated reflective element, gear motor unit or side turn signal. The work is shown on the left mirror; we disassemble the right mirror in the same way. At low ambient temperatures, in order not to split the reflective element, we recommend removing the mirror and gradually warming it up with a household hairdryer or warming it up indoors.
To replace the heated reflective element, turn the reflective element all the way down.
Pulling the reflective element towards you, press the upper latches of the element with your finger. . remove the element from the mirror body (arrows indicate the upper clamps of the element).
Disconnect the wire block from the pointer block. _
. and remove the turn signal.
The indicator is equipped with LEDs; if they fail, the turn indicator assembly must be replaced. Install the side turn signal in the reverse order.
I think many will find my photo report of how the mirror is disassembled useful. It all started with the sound of a clatter coming from these mirrors when the music was turned on - the door was taped with noise. And this rattle got to me. It turns out that without knowing, you can easily break the mirrors during disassembly.
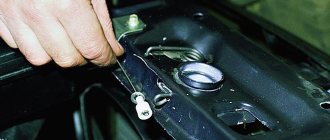
1. Using the handles, tilt the lower part of the mirror away from you until it stops. A gap appears at the top. You need to insert a screwdriver into it, see photo
2. There are latches inside that fasten the mirror to the electric drive.
Having reached the mounting spring, I decided to tighten the nut tighter - the breakpoint probably appeared from its loosening.
And just in case, I laid a noise between the connection of the mirror and the mounting base.
Then I reassembled everything and installed it back. THE RATTLE DISAPPEARED.
There is an idea to add repeaters to these paws like luxury ones