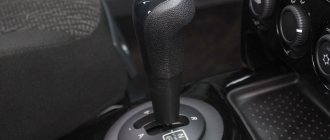
Removing the gearbox
We remove the gearbox to repair or replace it, as well as when dismantling the engine.
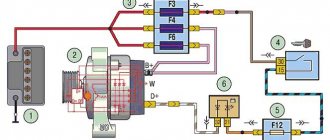
Disconnect the wire terminal from the negative terminal of the battery. We remove the mudguard of the power unit (see “Removing the mudguard of the power unit”) and the right mudguard of the engine compartment (see “Removing the mudguards of the engine compartment”). Drain the oil from the gearbox (see “Changing the oil in the gearbox”). Remove the starter (see “Removing the starter”). We disconnect the clutch release cable from the fork of the clutch release mechanism and the bracket on the gearbox (see “Replacing the clutch release cable”). Disconnect the wiring block from the reverse light switch (see “Replacing the reverse light switch”). Disconnect the engine management system wiring harness block from the vehicle speed sensor (see “Removing the vehicle speed sensor”). Using a 10mm socket, unscrew the three bolts securing the lower cover of the clutch housing...
...and remove it. Remove the front wheel drives (see “Removing the front wheel drives”). We disconnect the transmission control rod from the shaft of the gear selector rod hinge (see “Removing and disassembling the transmission control drive”).
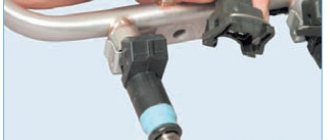
Using the “17” head, unscrew bolt 2 and the “19” head, unscrew bolt 1 of the torque rod bracket...
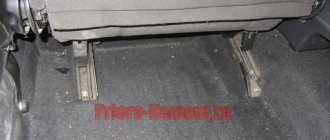
...and remove the bracket with the rod from the gearbox. We install an adjustable stop under the engine oil pan and remove the left power unit support (see “Removing the power unit supports”).
Using a 13mm socket, unscrew the nut securing the wiring harness bracket...
...and remove the bracket with the harness from the gearbox. Using a 19mm socket we unscrew the fastening elements of the clutch housing to the cylinder block...
...upper front mounting bolt...
…bolt of the upper rear mounting (for clarity, shown on the removed power unit)…
...lower front mounting bolt...
...and the lower rear mounting nut. For ease of installation and dismantling of the gearbox in the threaded hole of the cylinder block for the bolt of the lower front fastening of the gearbox...
...screw in the guide pin M12×1.25, 80 mm long (with a sawn slot for a screwdriver).
We move the gearbox away from the engine by removing the gearbox input shaft from the clutch driven disc hub... ...and remove the gearbox. The gearbox is centered...
...two bushings located in the holes in the lower mounting of the box and cylinder block. When dismantling and installing the transmission, do not lose or damage the bushings. Before installing the gearbox, apply a thin layer of CV joint-4 lubricant to the splined end of the input shaft. When installing the gearbox, we orient it so that the guide pin in the cylinder block is located opposite the corresponding hole in the clutch housing, and the standard clutch housing pin is located opposite the hole in the cylinder block. We insert the gearbox input shaft into the splines of the clutch driven disc and push the gearbox all the way into the cylinder block. Use a screwdriver to unscrew the guide pin from the hole in the cylinder block. We carry out further operations for installing the gearbox in reverse order. Pour transmission oil into the gearbox.
The gearbox is the main unit after the engine. The Priora manual transmission is a reliable, modernized unit from 2110. The Priora's mechanics are filled with 3 to 3.5 liters of oil. Russian cars are chosen for their relative reliability, cheap spare parts, and endurance. If we take the manual transmission, then this is a reliable, unpretentious unit - although the box howls in 2nd gear, even when the car is new. The sales leader from 2012 to 2016 was the Lada Priora, especially in the Caucasus and CIS countries. It is well equipped and has decent technical characteristics. Since 2014, it has been possible to find cars equipped with an automatic transmission. The weakest Priora engine has a power of 87 horsepower, depending on the body type. The initial configuration of the Priora is a 1.6-liter eight-valve engine. It is equipped with a manual transmission.
Necessary tools for work
Changing the oil in a Priora gearbox will require you to use the following set of items and tools:
- a set of keys;
- gloves;
- old canister or 5-liter bottle;
- watering can;
- lift or pit;
- new oil in a volume of 3.5 liters of class GL-4;
- rags.
Characteristics of the Lada Priora gearbox
The base of the gearbox is represented by the following units:
- Clutch housing;
- Transmission housing;
- Rear transmission starter flap.
All elements are connected to each other with fixing nuts and sealant. The design is protected from contamination by means of a magnet that retains waste metal products. The main shaft is a set of gears that, when rotated, are connected to additional gears of all speed modes. The additional shaft is designed to regulate and distribute the oil emulsion.
How was the transmission created?
The new gearbox system is based on the previous design, which is familiar to many from the VAZ-2108. Naturally, the engineers made minor improvements. The weaknesses of this box are also well known to all owners of VAZ cars. Thus, among the weak points, many highlight difficulties when shifting gears, large shift lever strokes, a rather smeared shift pattern, and vibrations during operation.
All the details of the box - what's inside
The five-speed gearbox of the Lada Priora is connected to the central gear and differential. The Priora gearbox consists of shafts: the input shaft is made as a block of central gears. The gears of the forward speed modes have oblique teeth, the reverse gears have straight teeth. They contact the gears of the secondary shaft. There is an oil sump at the bottom of the secondary shaft in the bearing area. It is responsible for distributing the oil emulsion and supplying it to the secondary shaft, and then to the driven gears of all gears. The design of the gearbox includes a gear synchronizer. Synchronizers for 3rd, 4th, 5th gears have a similar design. The only difference is the blocking circles. The parts of 1st and 2nd gears have a different design. They have two cone-shaped friction areas installed, which relieve the load, distributing it evenly among themselves.
There is a magnet in the core of the clutch housing. It attracts metal waste and shavings and prevents its penetration into the system. A mandatory element of the box is the drive. It should be treated with special care. In addition to the listed parts of the box, it contains a jet rod, which is fixed at one end to the motor. Thanks to this, independent gear changes while driving are excluded.
The traction-controlled transmission has a three-arm handrail that activates the selected speed mode. A cable-operated transmission has a cable that activates the desired gear.
Lada Priora gearbox malfunctions and ways to eliminate them
Like any car component, the gearbox is subject to the negative effects of external destructive factors. The Lada Priora gearbox can also break down. The nature and frequency of breakdowns is influenced by management style, operating conditions, timeliness of maintenance, and quality of care. The manufacturer recommends changing the lubricant every 60,000 - 70,000 kilometers. The quality and correct choice of substance also affect the service life. Conventionally, all problems with a node are usually divided into two large categories: problems with the node itself or its mechanism.
The main types of faults are shown in the table:
| Problems with the node itself | Mechanism problems |
| Gear wear | Drive rod malfunction |
| Failure of synchronizer clutches | The rod does not function, there is play |
| Spline message failure | Damage to the locking device |
| Reduced oil level | Roller wear |
| Liquid leak | |
| Bearing wear | |
| Deformation of oil seals | |
| Wear of the gearbox cushion |
There are a number of main reasons contributing to the breakdown.
Factors causing defects and breakdowns:
- Operating the vehicle improperly. Untimely maintenance, untimely oil change, insufficient quantity, operation of a vehicle with a faulty clutch;
- Poor quality parts of the unit;
- Operating a vehicle with worn-out parts or failing to replace them in a timely manner;
- Irrational replacement of parts performed by unqualified specialists.
The driver may suspect a faulty Lada Priora gearbox when symptoms appear.
Signs of a box malfunction:
- The first gear is engaged with effort.
- Switching occurs uncontrollably.
- The car jerks while driving.
- Transmissions are not included.
- The presence of uncharacteristic sounds when switching modes: creaks, crackling, grinding.
- Oil is leaking.
- The car vibrates when driving.
- The noise of the box when the engine is running, which disappears after the clutch is depressed.
It is problematic to accurately determine the nature of the breakdown, since the same sign may indicate different defects. To determine the breakdown, disassembly of the unit is necessary. Often the reason lies in adhesion, as these two elements are inextricably linked to each other.
To troubleshoot problems, it is necessary to dismantle the Lada Priora gearbox, replace worn parts, oil, and adjust the gaps.
Design Features
Manual transmissions are installed on cars with both front and rear wheel drive.
Despite the development of engineering and the appearance of automatic transmissions, mechanics continue to be used and improved. The reason for this popularity is no secret. Compared to analogues, this mechanism remains the simplest to manufacture and most reliable to operate. The only drawback of manual transmissions is that in city traffic jams, the variator turned out to be more practical. In recent years, the mechanics began to be equipped with a cable drive, and this made it more convenient.
What changed
Previous designs used a rocker to engage the gear. To put it very briefly, the rocker is a metal lever. When used, vibration from the engine is transmitted to the gear shift lever. Turning on and off was rough. All of the above and other shortcomings disappeared as soon as the cable structure was used in the box. Shifts became clear. The travel of the gear shift lever has been significantly reduced.
Subsequence:
- Using a size 8 wrench, unscrew the nut of the drive housing. Disconnect the cable from the clutch pedal retainer.
- Remove the compensation system box and ring from the pedal. To avoid damage, carefully pick out the box with a knife.
- Remove the plastic sleeve from the pin. If there are signs of damage, replace with a new one. Lithol treatment is required before installation.
- Remove the drive seal from the hole in the front of the shield.
- Remove the tip, first dragging it in the direction of movement of the car.
- Unscrew the cable end fixing nut. It is screwed onto a bracket, which is attached to the transmission with a 17-point head.
- After removing the tip, pull out the cable.
- Unfasten the latch and remove the speed sensor chip.
- Unscrew the fixing screws of the pallet flap and remove it.
- Secure the engine with a reliable support.
- Unscrew the fixing bolt of the rear engine mount to the bracket.
- Remove the limiter on the rear surface of the motor.
- Unscrew the bolts that secure the motor to the body surface.
- Remove the support from the rear side.
- Remove the limit rollers from below.
- Unscrew the motor bracket clamps on the rear surface of the transmission housing.
- Using a size 8 wrench, unscrew the top screw and remove the bracket.
- Unscrew the screw and remove the speed sensor chip.
- We unscrew the bolt securing the gearbox hinge box.
- Remove the click rod from the hinge base.
- Loosen the torque clamps.
- Remove the designer hubcaps from the front wheelbase.
- Using a knife to pick up the edge, remove the hub protective lining.
- Align the hub nuts.
- Loosen the screws securing the wheelbase. Using a 30mm socket, unscrew the hub bolt.
- When you unscrew the screws that secure the wheelbase, the car is positioned on the platform with all wheels.
- To prevent the vehicle from moving, tighten the handbrake and install supports under the rear wheels.
- Unscrew the ball joint clamps and remove the maneuvering knuckles.
- Remove the shank from the hub.
- After removing the left drive, put a plug in its place.
- Press out the drive on the right side. Remove it.
- Place a support under the transmission.
- Remove the screws securing the transmission to the engine.
- Move the gearbox as far back as possible, remove the support, holding it.
The transmission of AvtoVAZ models has the advantage of simplicity of design and the ability to install it yourself if you have the necessary skills.
How to replace the clutch of a Lada Priora
The car's clutch is subjected to heavy loads - constant impact during the use of the car, engine vibration, very huge loads on the engine. The latter wear is usually accompanied by the corresponding smell of a burnt clutch.
The first signs include a feeling of incomplete clutch operation, extraneous sounds, and possibly even crunching sounds. The driver should not leave the clutch without replacing it after removing the box. clutch pedal may also sag , which also indicates that you need to change the clutch on the Lada Priora as quickly as possible.
But inexperienced car enthusiasts often have a logical question: how to change the clutch with your own hands? There is nothing complicated in this process, but it is necessary to stock up on tools and some knowledge.
Made with German precision
When this concept was transferred from paper to a real exhibit, and the mechanism began to work correctly, the module went to Germany, to. The Germans brought the knot to fruition. The company has long been developing various transmission systems and manufacturing engines. German experts carefully looked at the development of Russian engineers and proposed the following. Using a 3D center plate instead of a locking spring return system would make more sense. The special spatial shape of this plate was calculated using computer programs and manufactured using high-precision equipment. This accuracy is due to the fact that a special locking ball moves along the plate. And it is the plate that regulates the effort when selecting and engaging gears. The characteristics that the new cable gearbox will have were selected using a simulation stand. The man sat down on a chair and switched on various gears. Automatic systems simulate shift patterns, lever forces and strokes. And just like that, in small steps, the Germans managed to find the optimal settings. With the help of a computer, parameters and a mathematical model were selected, according to which these plates would then be manufactured.
Preparation
There are 2 ways to replace the clutch. Instructions for replacing the VAZ 2110 clutch with your own hands without removing the box and without the need to drain the oil + informative photo report + video. With the replacement of the clutch, replacement without removal, replacement of the Priora stove gearbox without. One method involves completely removing the gearbox, the other does not. In any case, the following available tools are needed:
See:
- jack;
- an overpass, without which it will be problematic to replace the clutch ;
- logs or bricks;
- a set of keys and sockets of sizes from 8 to 19, you may need a 15 socket, which is rarely required;
- extension cords for keys will not be superfluous, since sometimes a situation arises in which it will be impossible to reach the part by hand;
- mandrel 10-12 cm for centering the driven disk .
Replacing the clutch and release bearing of a VAZ 2114 without removing the box
Clutch replacement
and release bearing VAZ 2114 (VAZ 2108, 2109)
without removing the box
, drives (grenades) and draining.
It is noteworthy that when installing new parts, the length of the lower threaded part of the cable tip is usually not enough to restore its original position.
Therefore, it is necessary to restore the wear compensation mechanism to its original position. To do this, size L must be installed between the leash and the clutch release fork lever.
The clutch pedal should be raised all the way up. Replacing the VAZ 2110 clutch without removing the box. Replacing the Lada Priora clutch with and without removal. Then the spring will automatically return the slider to its original position. After this, all that remains is to check the result of the work and, if necessary, adjust the clutch.
See:
Replacement without removing the gearbox
This process is not too different from the first, as it seems at first glance. The preparation and tools are the same. However, in this case there is one big advantage - there is no need to move the rather heavy gearbox. Replacing the clutch without removing the box and without draining. This is especially true if one person is responsible for replacing the clutch.
In this case, the analysis should begin by removing the left wheel and placing the car on a jack. It is best to do this in a box where there is an inspection hole. In addition to the first points indicated in the first case, it is necessary to remove the air filter, unscrew the corrugation, disconnect the DMVR, and loosen the starter fastenings.
You will have to unscrew the gearbox, but there is no need to touch the CV joints. Since in the process of disconnecting all of the above, the bolts holding the engine will be loosened, you need to place bricks under it so as not to break the hoses. Replacing the boot without removing the grenade. Replacing the CV joint boot without special tools. 1, 3 Opel Astra H box repair did not turn on. Replacing the clutch of an Opel Vectra a. How to change the oil in the power steering of a Lada Priora without replacing the clutch without removing the box. Likewise, you will have to move the gearbox slightly onto the brick stand.
Now the clutch can be changed as described above. As you can see, there is nothing complicated about this.
Quality of transmission lubricants
Dynamic viscosity - at low temperatures, in winter, the thickened oil resists shearing, which is a bad indicator in the operation of transmission units. Pour point is an indicator of the hardness of the oil in cold weather. But even when the lubricant hardens, there is a possibility that the gears can turn without applying torque to them. Viscosity index is a parameter characterizing the change in viscosity of transmission oil relative to temperature. If a car enthusiast wants his car to feel good on the road, he must constantly monitor the gearbox. Its regular inspection and maintenance of technical condition plays a big role in the operation of machine components.
To properly maintain the level, the oil in the gearbox is periodically topped up using a funnel and a hose attached to it.