How to remove the central tunnel on a Priora
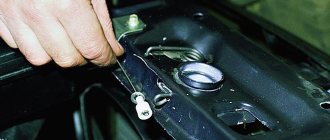
We carry out the work by removing the cigarette lighter, parking brake lever and trunk lock control button.
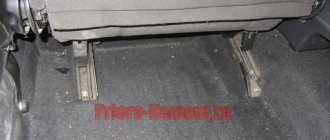
We tilt both front seats back (see “Removing the front seat”). For clarity, the work is shown with the driver's seat removed. Using a 10mm socket, unscrew the nut securing the air duct to the legs of the passengers in the rear seat...
...and remove it. Similarly, remove the air duct on the right side.
Raising the armrest, we pry up the decorative trim of the armrest hinge...
...and remove it. We pry up, overcoming the resistance of the latches, a container for storing small items...
...and take it out of the tunnel lining.
Using a 10mm socket, unscrew the two bolts securing the armrest hinge and remove the armrest.
Using a Phillips screwdriver, unscrew the four screws securing the floor tunnel lining.
Through the opening in the lining, pressing the lock with your hand, remove the wiring block from the trunk lock control button.
Using a high 10mm head, unscrew the two nuts securing the tunnel lining. We install both front seats in their places and move them as far forward as possible along the slide.
Using a Phillips screwdriver, unscrew the self-tapping screw securing the tunnel lining to the base on the left and similarly on the right.
Use a slotted screwdriver to remove the plastic plug at the bottom of the cup holder.
Using a Phillips screwdriver, unscrew the screw fastening the tunnel lining.
Using a Phillips screwdriver, unscrew the two self-tapping screws securing the floor tunnel lining on the left and similarly on the right.
Use a slotted screwdriver to pry up and remove the plug in the niche of the parking brake drive lever.
Use a Phillips screwdriver to unscrew the screw fastening the side panel of the tunnel lining...
...and remove it. We remove the right shield in the same way.
Using a Phillips screwdriver, unscrew the self-tapping screw securing the front part of the tunnel lining. Similarly, unscrew the self-tapping screw on the right side.
Overcoming the resistance of the clamps, we remove the frame for fastening the gear lever cover... ...and leave the frame with the cover on the lever.
Using a Phillips screwdriver, unscrew the two screws securing the tunnel lining to the instrument panel console.
We lift up the tunnel lining...
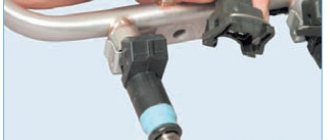
...and by pressing the latch, disconnect the wiring block from the cigarette lighter. Remove the floor tunnel lining. We install the tunnel lining in the reverse order.
Removal of decorative linings of the floor tunnel on a Lada Priora car is carried out to replace them in case of damage, as well as when carrying out other work in which their presence would interfere. De-energize the vehicle by disconnecting the negative terminal from the battery. Prepare a standard set of tools and perform the following sequence of actions:
We carry out the work by removing the cigarette lighter, parking brake lever and trunk lock control button. We tilt both front seats back (see “Removing the front seat”). For clarity, the work is shown with the driver's seat removed.
Using a 10mm socket, unscrew the nut securing the air duct to the legs of the passengers in the rear seat...
...and remove it. Similarly, remove the air duct on the right side.
Raising the armrest, we pry up the decorative trim of the armrest hinge...
...and remove it. We pry up, overcoming the resistance of the latches, a container for storing small items...
...and take it out of the tunnel lining.
Using a 10mm socket, unscrew the two bolts securing the armrest hinge and remove the armrest.
Using a Phillips screwdriver, unscrew the four screws securing the floor tunnel lining.
Through the opening in the lining, pressing the lock with your hand, remove the wiring block from the trunk lock control button.
Using a high 10mm head, unscrew the two nuts securing the tunnel lining. We install both front seats in their places and move them as far forward as possible along the slide.
Using a Phillips screwdriver, unscrew the self-tapping screw securing the tunnel lining to the base on the left and similarly on the right.
Use a slotted screwdriver to remove the plastic plug at the bottom of the cup holder.
Using a Phillips screwdriver, unscrew the screw fastening the tunnel lining.
Using a Phillips screwdriver, unscrew the two self-tapping screws securing the floor tunnel lining on the left and similarly on the right.
Use a slotted screwdriver to pry up and remove the plug in the niche of the parking brake drive lever.
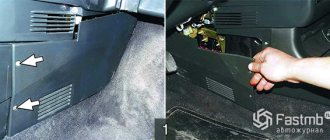
Use a Phillips screwdriver to unscrew the screw fastening the side panel of the tunnel lining...
...and remove it. We remove the right shield in the same way.
Using a Phillips screwdriver, unscrew the self-tapping screw securing the front part of the tunnel lining. Similarly, unscrew the self-tapping screw on the right side.
Overcoming the resistance of the clamps, we remove the frame for fastening the gear lever cover... ...and leave the frame with the cover on the lever.
Using a Phillips screwdriver, unscrew the two screws securing the tunnel lining to the instrument panel console.
We lift up the tunnel lining...
...and by pressing the latch, disconnect the wiring block from the cigarette lighter. Remove the floor tunnel lining. We install the tunnel lining in the reverse order.
Source
Tool
Dismantling a buffer in a garage does not require special knowledge or outside assistance. One person can successfully handle this job. In order to remove the front bumper on the Lada Priora, you need to prepare the following tools:
- a Phillips-head screwdriver;
- 10 mm ratchet wrench.
They will be needed to dismantle the fasteners holding the part to the car body. A screwdriver will be used to unscrew the screws, and a wrench will be used to unscrew the engine protection bolts. For ease of work, you will need to install the car on an inspection hole or overpass. If there are no such structures nearby, then you can raise the front of the car using a jack and securely secure it in this position.
Removal and installation of floor tunnel linings VAZ 2170 (Priora) 2004+
You will need: a 10mm wrench, flat and Phillips blade screwdrivers.
1. Disconnect the wire from the negative terminal of the battery.
| 2. Remove the screws securing the left and right screen... | 3. ...and remove the screens. |
| 4. Remove the two screws securing the top trim at the front (left and right). | 5. Use a screwdriver to pry... |
| 6. ...and remove the plug. | 7. Remove the plug in the center of the cup recess... |
| 8. ...and unscrew the screw securing the upper trim. | 9. Remove the four screws securing the top trim to the floor. |
10. Remove the drawer and lining container.
| 11. Remove the four screws securing the top trim to the bracket. | 12. Use a screwdriver to pry... |
| 13. ...and remove the rear ashtray. | 14. Remove the two screws securing the rear ashtray housing. |
| 15. Remove the two screws securing the upper lining of the floor tunnel to the instrument panel. | 16. Remove the gear shift lever cover from the upper trim. |
| 17. Turn the cover inside out and unwind the adhesive tape securing the cover to the gear shift lever. | 18. Remove the cover from the gear shift lever. |
19. Disconnect the wiring harness connectors from the trunk release button and from the cigarette lighter...
| 20. ...and remove the upper lining of the floor tunnel. | 21. Unscrew the four nuts securing the lower trim to the floor... |
| 22. ...and two screws (left and right) securing the cladding to the bracket. | 23. Use a screwdriver to pry... |
| 24. ...and remove the wire harness holder from the lower trim. | 25. Remove the lower floor tunnel lining. |
26. Install the removed parts in the reverse order of removal.
Dismantling
It all starts with disassembling the interior. Removing the Lada Vesta dashboard yourself is not so difficult, but you need to work very carefully.
The first is the battery, from which you need to remove the negative terminal.
Drain the antifreeze and remove the pipes
Next comes the turn of draining the coolant. To do this, you need to drive the sedan onto an overpass, a pit, or simply drive the front wheels onto supports and wait until the engine cools down, then unscrew the drain tank plug to relieve excess pressure.
When everything is done, you need to tighten the plug so that the flow of antifreeze at first is not so powerful. Next, all that remains is to place a drain container under the radiator, and use pliers to tighten the clamp securing the pipe from the bottom of the radiator. When some of the liquid has flowed out, you should unscrew the cap of the expansion tank so that the antifreeze drains completely.
Then you need to drain the fluid from the cylinder block. To do this, you first need to dismantle the starter, since it prevents access to the drain plug, and during the draining process, antifreeze will get onto the starter itself. The element is secured with three screws, which must be removed using a 10mm socket. After removal, the starter must be moved to the side and secured with a piece of wire.
This opens access to the drain plug, which is unscrewed with a 13-point head. You need to unscrew it and wait for the antifreeze to completely drain.
When this is done, the pipelines should be disconnected from the evaporator block, which requires unscrewing the bolt marked in the figure as number 2, and then putting plugs on both the holes in the block itself and on the pipelines. Next, you need to use pliers to squeeze the clamps indicated by numbers 3 and 4 and remove the hoses going to the heater radiator.
Facing
It also needs to be dismantled. The front pillar trim is held on by clips that snap off. The front sill shield (right) is secured with a screw (No. 3 in the figure) and clips.
Floor tunnel
Soundproofing the Lada Vesta dashboard involves removing the central tunnel of the sedan floor, which is divided into 2 parts:
- The front one is a massive plastic component that fits directly to the dashboard. It contains the cigarette lighter, transmission selector, seat heating buttons, etc.
- Rear – the parking brake is located on it and this section is significantly smaller.
It all starts with the back section. First, unscrew 2 bolts on the sides of the handbrake using a Torx 20 sprocket, and also remove the plastic plug under the parking brake handle. All that remains is to carefully remove the section.
Let's move on to the front. First you need to remove the side panels, each of which is held on by one screw.
Next, using a knife or thin screwdriver, you need to dismantle the gearbox selector cover, then disconnect the plug from the wires and remove the floor tunnel lining.
When everything is done, all that remains is to unscrew the screws marked with the number 2 and remove the floor tunnel.
The video shows how to remove the Lada Vesta floor tunnel yourself.
The dismantling of the cladding continues by unscrewing 2 bolts that secure the entire panel to the floor tunnel.
Steering column
First you need to unscrew the 3 screws that secure the column casing and remove it.
Next, when the casing is removed, you need to unscrew the 4 nuts, marked in the figure with the number 2. With them, the steering shaft (together with the amplifier) is attached to the cross member of the tidy.
Then you need to disconnect the plug with the wiring, and then lower the steering shaft to the floor, setting the steering wheel adjustment lever to the locking position to eliminate the possibility of the shaft being disconnected from the electric booster.
The next step in independently removing the Lada Vesta dashboard is to disconnect the plugs with wires, marked with the number 1, from the instrument panel, brake and clutch pedal switches, as well as from the electronic gas pedal. Only after this the 2 nuts (No. 2 in the figure) that provide the mass are unscrewed.
Side panels
When the steering column is finished, it is necessary to dismantle the side panels of the dashboard and loosen the fasteners.
To do this, use a knife or screwdriver to remove the plug (No. 1 in the figure), and then the bolt (No. 2 in the figure) securing the cross member is released 3-4 turns. In this case, it is necessary to take care of the safety of the windshield.
The next step is to dismantle the side panels of the dashboard, indicated by numbers 4 and 7, and also unscrew 4 bolts numbered 5 and 11.
Connectors
It's a small matter. All that remains is to disconnect the plug from the wiring, unscrew the nut and remove the wire to ground. It is important not to forget to disconnect the connector that goes to the antenna.
Lastly, remove the hose from the climate control, designed to drain condensate.
When everything is turned off, all that remains is to remove the Lada Vesta dashboard, but you won’t be able to do this alone, and therefore you can’t do it without an assistant.
After the panel is removed, it would be a good idea to inspect the “underside” of the dashboard. There are times when there is wiring dangling there that will simply fray in the future. Sometimes you can notice broken fasteners and the like. It’s better to fix them all so you can have peace of mind later.
Removal and installation of floor tunnel linings
11.15.4. Removal and installation of floor tunnel linings
You will need: a 10mm wrench, flat and Phillips blade screwdrivers.
1. Disconnect the wire from the negative terminal of the battery.
| 2. Remove the screws securing the left and right screen... | 3. ...and remove the screens. |
| 4. Remove the two screws securing the top trim at the front (left and right). | 5. Use a screwdriver to pry... |
| 6. ...and remove the plug. | 7. Remove the plug in the center of the cup recess... |
| 8. ...and unscrew the screw securing the upper trim. | 9. Remove the four screws securing the top trim to the floor. |
10. Remove the drawer and lining container.
| 11. Remove the four screws securing the top trim to the bracket. | 12. Use a screwdriver to pry... |
| 13. ...and remove the rear ashtray. | 14. Remove the two screws securing the rear ashtray housing. |
| 15. Remove the two screws securing the upper lining of the floor tunnel to the instrument panel. | 16. Remove the gear shift lever cover from the upper trim. |
| 17. Turn the cover inside out and unwind the adhesive tape securing the cover to the gear shift lever. | 18. Remove the cover from the gear shift lever. |
19. Disconnect the wiring harness connectors from the trunk release button and from the cigarette lighter...
| 20. ...and remove the upper lining of the floor tunnel. | 21. Unscrew the four nuts securing the lower trim to the floor... |
| 22. ...and two screws (left and right) securing the cladding to the bracket. | 23. Use a screwdriver to pry... |
| 24. ...and remove the wire harness holder from the lower trim. | 25. Remove the lower floor tunnel lining. |
26. Install the removed parts in the reverse order of removal.
Removing the lining of the Priora floor tunnel
We carry out the work by removing the cigarette lighter, parking brake lever and trunk lock control button. We tilt both front seats back (see “Removing the front seat”). For clarity, the work is shown with the driver's seat removed.
Using a 10mm socket, unscrew the nut securing the air duct to the legs of the passengers in the rear seat...
...and remove it. Similarly, remove the air duct on the right side.
Raising the armrest, we pry up the decorative trim of the armrest hinge...
VAZ Lada Priora Removal and installation of floor tunnel linings
Please enable JavaScript!
11.15.4. Removal and installation of floor tunnel linings
You will need: a 10mm wrench, flat and Phillips blade screwdrivers.
1. Disconnect the wire from the negative terminal of the battery.
| 2. Remove the screws securing the left and right screen... | 3. ...and remove the screens. |
| 4. Remove the two screws securing the top trim at the front (left and right). | 5. Use a screwdriver to pry... |
| 6. ...and remove the plug. | 7. Remove the plug in the center of the cup recess... |
| 8. ...and unscrew the screw securing the upper trim. | 9. Remove the four screws securing the top trim to the floor. |
10. Remove the drawer and lining container.
| 11. Remove the four screws securing the top trim to the bracket. | 12. Use a screwdriver to pry... |
| 13. ...and remove the rear ashtray. | 14. Remove the two screws securing the rear ashtray housing. |
| 15. Remove the two screws securing the upper lining of the floor tunnel to the instrument panel. | 16. Remove the gear shift lever cover from the upper trim. |
| 17. Turn the cover inside out and unwind the adhesive tape securing the cover to the gear shift lever. | 18. Remove the cover from the gear shift lever. |
19. Disconnect the wiring harness connectors from the trunk release button and from the cigarette lighter...
| 20. ...and remove the upper lining of the floor tunnel. | 21. Unscrew the four nuts securing the lower trim to the floor... |
| 22. ...and two screws (left and right) securing the cladding to the bracket. | 23. Use a screwdriver to pry... |
| 24. ...and remove the wire harness holder from the lower trim. | 25. Remove the lower floor tunnel lining. |
26. Install the removed parts in the reverse order of removal.
Removal and installation of Lada Priora floor tunnel linings
You will need: a 10mm wrench, flat and Phillips blade screwdrivers.
1. Disconnect the wire from the negative terminal of the battery.
| 2. Remove the screws securing the left and right screen... | 3. ...and remove the screens. |
| 4. Remove the two screws securing the top trim at the front (left and right). | 5. Use a screwdriver to pry... |
| 6. ...and remove the plug. | 7. Remove the plug in the center of the cup recess... |
| 8. ...and unscrew the screw securing the upper trim. | 9. Remove the four screws securing the top trim to the floor. |
10. Remove the drawer and lining container.
| 11. Remove the four screws securing the top trim to the bracket. | 12. Use a screwdriver to pry... |
| 13. ...and remove the rear ashtray. | 14. Remove the two screws securing the rear ashtray housing. |
| 15. Remove the two screws securing the upper lining of the floor tunnel to the instrument panel. | 16. Remove the gear shift lever cover from the upper trim. |
| 17. Turn the cover inside out and unwind the adhesive tape securing the cover to the gear shift lever. | 18. Remove the cover from the gear shift lever. |
19. Disconnect the wiring harness connectors from the trunk release button and from the cigarette lighter...
| 20. ...and remove the upper lining of the floor tunnel. | 21. Unscrew the four nuts securing the lower trim to the floor... |
| 22. ...and two screws (left and right) securing the cladding to the bracket. | 23. Use a screwdriver to pry... |
| 24. ...and remove the wire harness holder from the lower trim. | 25. Remove the lower floor tunnel lining. |
26. Install the removed parts in the reverse order of removal.
Do-it-yourself armrest reupholstery for a Priora car
There is no need to throw away the old box - re-upholstering the soft backing under the elbow is easier than re-upholstering the steering wheel. Fabrics wear out over time and need to be replaced on time. The new covering of the elbow box on a car can be completely different - eco-leather, fabric, genuine leather. Before covering the substrate, prepare:
- textile;
- glue “Moment” (it works great);
- hair dryer;
- clips, clothespins;
- knife.
First you need to remove the box assembly. The new reupholstery can be made on top of the standard fabric or under it. Do the work like this:
- Measure the required length for the covering, leaving a gap of two centimeters.
- Fill the working surface with glue - this is necessary so that the new fabric does not crawl over the lid, and also wrinkles do not collect on it.
- Push the ends of the fabric under the plastic frame and secure them with clothespins. You can put old plastic cards under the clothespins so that the iron parts of the clips do not leave their mark on the sheathing. You can also use other methods of fixing the tissue.
- Wait 15 minutes. Warm the surface with a hairdryer and work for 4-5 minutes.
- Set the finished covered box aside for 10-15 minutes.
- Remove the clamps. Check your work. Install in place of the old backing, a part with a new covering for the lid.
How to remove the center console (panel trim) of Lada Priora
The interior of Priora 2 (after the latest restyling) is significantly different from the previous version of the car. The interior now has a more stylish dashboard (dashboard) with the ability to install a modern multimedia system. If you are engaged in independent modifications or repairs of your car, then you will need instructions for removing the central lining (together with the tunnel, it is also called the “beard”).
The plastic center console is attached to the panel (dashboard) with 6 screws. To gain access to the lower two mounting screws, you will have to remove the tunnel cover:
screws for fastening the tunnel cover of the Lada Priora; screws for fastening the tunnel cover of the Lada Priora; lower screws for fastening the center console of the Lada Priora
To remove the remaining four screws securing the center console:
plugs for the center console of the Lada Priora, upper mounting screws for the center console of the Lada Priora, middle mounting screws for the center console of the Lada Priora
All that remains is to pull the center console towards you and disconnect the connectors with wires at the back. Installing the plastic cover is done in the reverse order. The process is also shown in the video:
Interior details of Lada Priora, Lada Priora
Salon Lada Priora
Why do you have to change bumpers?
The obvious answer to this question is after the car gets into an accident, when the body kits literally fall apart. It is impossible to repair and paint broken parts, so in this situation you have to buy new ones. Fortunately, the price of the products is quite affordable and it is possible to select elements by color or buy them unpainted.
The nickel-plated grille on the front bumper looks better than the stock one.
There are other reasons why Prior owners resort to removing or replacing these parts:
- During operation, the bumper received multiple cracks or the paint peeled off, and the owner does not have the time or desire to repair and paint the elements.
- If a car enthusiast still wants to repair and paint the body kit, then it will still have to be removed.
- As a result of the impact, the plastic latches of the bumper broke off or the fastening screws were torn out in such a way that the material cracked.
- When you need to gain access to other parts and parts of the car body. For example, install new headlight units.
- Cars sold as standard were at one time equipped with black budget bumpers. They have to be removed to paint or exchange for painted ones.
- If the owner of a VAZ 2170 decides to start tuning his car and install beautiful body kits that differ from the standard ones in shape.
Removal and installation of floor tunnel linings
You will need: a 10mm wrench, flat and Phillips blade screwdrivers.
1. Disconnect the wire from the negative terminal of the battery.
| 2. Remove the screws securing the left and right screen... | 3. ...and remove the screens. |
| 4. Remove the two screws securing the top trim at the front (left and right). | 5. Use a screwdriver to pry... |
| 6. ...and remove the plug. | 7. Remove the plug in the center of the cup recess... |
| 8. ...and unscrew the screw securing the upper trim. | 9. Remove the four screws securing the top trim to the floor. |
10. Remove the drawer and lining container.
| 11. Remove the four screws securing the top trim to the bracket. | 12. Use a screwdriver to pry... |
| 13. ...and remove the rear ashtray. | 14. Remove the two screws securing the rear ashtray housing. |
| 15. Remove the two screws securing the upper lining of the floor tunnel to the instrument panel. | 16. Remove the gear shift lever cover from the upper trim. |
| 17. Turn the cover inside out and unwind the adhesive tape securing the cover to the gear shift lever. | 18. Remove the cover from the gear shift lever. |
19. Disconnect the wiring harness connectors from the trunk release button and from the cigarette lighter...
| 20. ...and remove the upper lining of the floor tunnel. | 21. Unscrew the four nuts securing the lower trim to the floor... |
| 22. ...and two screws (left and right) securing the cladding to the bracket. | 23. Use a screwdriver to pry... |
| 24. ...and remove the wire harness holder from the lower trim. | 25. Remove the lower floor tunnel lining. |
26. Install the removed parts in the reverse order of removal.
Download information from the page
↓ Comments ↓
1. Car structure 1.0 Car structure 1.1 General information about the car 1.2 Passport data 1.3 Car keys 1.4. Controls 1.5. Heating and ventilation of the cabin 1.6 Ensuring a comfortable air temperature in the cabin 1.7. Doors 1.8. Passive safety equipment on the car 1.9. Seats
2. Recommendations for use 2.0 Recommendations for use 2.1. Safety rules and recommendations 2.2 Running in the car 2.3 Operating the car during the warranty period 2.4. Preparing the car for departure
3. Malfunctions along the way 3.0 Malfunctions along the way 3.1. The engine does not start 3.2 Malfunctions of the fuel injection system 3.3 Idle speed has disappeared 3.4. Interruptions in the operation of the 3.5 engine. The car moves jerkily 3.6 The car accelerates poorly 3.7 The engine stalled while driving 3.8. Oil pressure dropped to 3.9. Engine overheating 3.10. The battery does not recharge 3.13. Knocks in the engine 3.16. Wheel puncture
4. Maintenance 4.0 Maintenance 4.1. General provisions 4.2. Inspection work 4.3. Lubrication and filling works 4.4. Diagnostic work 4.5. Repair and adjustment work
5. Engine 5.0 Engine 5.1 Design features 5.2 Possible engine malfunctions, their causes and solutions 5.3 Useful tips 5.4 Checking compression in the cylinders 5.5 Removing and installing the decorative engine casing 5.6 Removing and installing the engine splash guard 5.7 Installing the piston of the first cylinder to the TDC position of the compression stroke 5.8 Replacing the timing belt and tension roller 5.9 Replacing the power unit supports 5.11. Replacing engine seals 5.13. Engine cylinder head 5.15. Engine repair 5.16. Lubrication system 5.17. Cooling system 5.18. Power supply system 5.19. Design Features
6. Transmission 6.0 Transmission 6.1. Clutch 6.2. Gearbox 6.3. Front wheel drives
7. Chassis 7.0 Chassis 7.1. Front suspension 7.2. Rear suspension
8. Steering 8.0 Steering 8.1 Design features 8.2 Possible steering malfunctions, their causes and solutions 8.3. Steering column 8.4. Steering linkage 8.5. Steering gear
9. Brake system 9.0 Brake system 9.1 Design features 9.2 Possible malfunctions of the brake system, their causes and solutions 9.3 Bleeding the brake system hydraulic drive 9.4 Removing and installing the vacuum brake booster 9.5 Replacing the brake pedal axle bushings 9.6. Main brake cylinder 9.7. Front wheel brakes 9.8. Braking mechanisms of the rear wheels 9.9. Pressure regulator 9.10. Brake hoses and tubes 9.11. Parking brake
10. Electrical equipment 10.0 Electrical equipment 10.1 Design features 10.2. Battery 10.3. Mounting block (relays and fuses) 10.4. Generator 10.5. Starter 10.6. Ignition switch (lock) 10.7. Electronic engine control system (ECM) 10.8. Ignition system 10.9. Lighting, light and sound signaling 10.10. Windshield cleaner 10.11. Washer reservoir 10.12. Electric fan of the engine cooling system 10.13. Electric motor of the heating and ventilation system fan 10.15. Cigarette lighter 10.16. Instrument cluster 10.18. Electronic anti-theft remote control system 10.19. Immobilizer 10.21. Replacing sensors and switches
11. Body 11.0 Body 11.1 Design features 11.2 Possible body malfunctions, their causes and solutions 11.3 Removing and installing windshield frame lining 11.4 Removing and installing soundproofing upholstery in the engine compartment 11.5. Removing and installing bumpers 11.6 Removing and installing the fender liner and protective wing cover 11.7 Removing and installing the front fender 11.8 Removing and installing decorative sill trims 11.9. Hood 11.10. Trunk lid 11.11. Doors 11.12. Seats 11.13. Seat belts 11.14. Rear view mirrors 11.15. Interior fittings 11.16. Instrument panel 11.17. Heater 11.20. Body care
12. Appendices 12.0 Appendices 12.1 Appendix 1. Tightening torques of threaded connections, Nm 12.2 Appendix 2. Fuels and lubricants and operating fluids 12.3 Appendix 3. Nominal filling volumes 12.4 Appendix 4. Basic data for adjustments and monitoring 12.5 Appendix 5. Spark plugs, used on a car 12.6 Appendix 6. Lamps used on a car 12.7 Appendix 7. What you need to have in a car 12.8 Appendix 8. Tools used when repairing a car
13. Electrical diagrams 13.0 Electrical diagrams 13.1 Diagram 1. Instrument panel harness connections 13.2 Diagram 2. Vehicle front wiring harness connections 13.3 Diagram 3. Engine electronic control system (ECM) harness connections 13.4 Diagram 4. Vehicle rear wiring harness connections 13.5 Diagram 5. License plate light wiring harness connections 13.6 Diagram 6. Left front door wiring harness connections 13.7 Diagram 7. Right front door wiring harness connections 13.8 Diagram 8. Rear door wiring harness connections
Dashboard
To display the technical health of the vehicle and monitor its condition, there are visual indicators that are located on the dashboard. If any breakdown occurs in the car, a certain sensor will notify the driver.
The Priora dashboard has maximum information content and contains the required number of indicators. Each sensor on the panel is illuminated from the inside in a different color; alarm signals are usually colored red.
The lighting is provided by a set of light bulbs mounted on the other side of the dashboard.
Indicator interpretation
In order to easily navigate this particular state of the car, it is necessary to understand the purpose of all indicators. This will also help to understand the breakdown of the device and its cause. The following signal indicators are located on the Priora dashboard:
- speedometer – informs about the speed at which the vehicle is moving;
- tachometer - shows the crankshaft revolutions per minute, the red zone reports a critical excess of the indicator;
- battery condition – the normal state of the sensor is off; if it lights up, then there is a problem with the battery itself or the power supply (except for the moment the ignition is turned on);
- oil pressure – lights up when the lubricating fluid pressure in the engine is critically low; further operation of the vehicle is highly discouraged;
- parking brake sensor – yellow indicates that it is on;
- coolant temperature – normal needle position is 80-90 ℃, above 100 ℃ the cooling system overheats, engine operation is prohibited;
- presence of fuel in the gas tank – informs about the amount of gasoline.
Additional sensors
A few more important information indicators on the Priora dashboard:
- button for controlling the car’s daily mileage and navigation between modes;
- alarm - the normal position is characterized by a pressed button without light indication;
- a malfunction in the power steering - if this device breaks down, the sensor will signal when the ignition is on;
- high beam headlight indicator – lights up blue when activated;
- side lights – notifies that the side lights of the vehicle are on;
- faulty airbags - when the ignition is turned on, an indicator lights up on the Priora dashboard, the system scans the integrity of the airbags and if the result is satisfactory, the indicator goes out;
- belt sensor – signals a violation of driving safety, the driver is not fastened with an appropriate belt;
- brake system malfunction - vehicle operation is prohibited;
- breakdowns in the ABS system - you can move, the braking system is normal, but it is better to eliminate the problem of the braking assistance mode;
- internal combustion engine malfunction (Check Engine) - an extensive list of malfunctions that affect the operation of the engine; prompt diagnosis and immediate repair are required.
To illuminate the instruments in this vehicle, two types of light bulbs are installed: conventional and with a VDO category socket.
Sometimes they burn out, the reason may be overvoltage in the car's electrical network, strong vibration of the body, the end of their service life or poor quality of workmanship (which is most often).
To determine the type of light bulb being mounted, you need to remove the instrument panel and unscrew the burnt element on its back side. The light components themselves are the same. However, their contacts, in the form of very thin wires, are soldered to the cartridge contacts.
Replacing light bulbs
Replacing the Priora dashboard light bulbs can be done in two ways. The first is the easiest: just buy a light bulb along with a socket and easily replace it. In the second case, you will have to arm yourself with a soldering iron and patience, since the wire contacts of the light element are soldered to the socket.
It is necessary to unsolder the old contacts, free the socket from the burnt out lamp and solder a new one
It is important to pay attention to polarity during assembly. If connected incorrectly, the light bulb will burn out and you will have to start all over again, including purchasing a new light element
Soundproofing floor Priora
| 2. Remove the screws securing the left and right screen... |
| 4. Remove the two screws securing the top trim at the front (left and right). |
Assembly after soundproofing. On top of the second layer we lay standard Priora sound insulation and carpet. The thicker the additional sound insulation, the higher the floor will rise. Consequently, it may not be so easy to install the seats in place; the bolts may not reach the threads (you can use longer bolts). As a result, such noise insulation of the Priora with your own hands will require about 2-3 days of free time. Quantity of materials required:
There is certainly an effect from the soundproofing of the Lada Priora floor: noise from the road and wheels is reduced, the sounds of the suspension become more muffled, and there are no creaks in the central tunnel. Remember that the best sound insulation is when a set of works has been carried out aimed not only at insulating from external noise (noise from wheels, engine, wind, etc.), but also eliminating creaks and crickets inside the car.
Manufacturers (analogues of armrests) and prices
There are some good suggestions that can be used to replace these stock seat parts. There are copies with any coating - even eco-leather and any design. Among them:
- Varta – 1500 rubles. The base is wood, the covering is eco-leather. With a gray stripe in the middle, which is emphasized by black stripes on the sides.
- Azard bar10013 – 1500 – 1,700 rubles. The covering is strictly black, made of eco-leather.
- Autochecly models RR-01 - RR-05, RR-20, RR-26. Made of eco-leather, the central insert of the backing can be made in several colors. Cost – 2,200 – 2,400 rubles.
Some craftsmen make the armrest on the Priora themselves - but this is a dubious activity for those who do not seriously engage in this. It’s very easy to become a collective farmer, I think you understand this very well yourself!
Installation of a Priora floor tunnel on a VAZ 2110
| 5. Use a screwdriver to pry... 6. ...and remove the plug. |
| 11. Remove the four screws securing the top trim to the bracket. |
| 20. ...and remove the upper lining of the floor tunnel. |
| Why change the standard tunnel (beard) of the VAZ 2110? There are several reasons, the Priora tunnel is higher, it has a cup holder and an armrest. The advantages are obvious; such a replacement will not be without modifications. |
You will need: Lada Priora tunnel, polyurethane foam, putty, sandpaper, paint or reupholstery material.
The main problem is that the VAZ 2110 tunnel approaches the dashboard at a right angle, and the Priorovsky one at an angle of 45 degrees. Therefore, a more correct solution would be to cross two tunnels (standard and from Lada Priora). From the “ten” we will borrow part of the tunnel, which is attached to the dashboard, and the rest we will take from the Priora tunnel. This way, it will be possible to avoid gaps between the dashboard and the tunnel.
Does it make sense to cross the Priora tunnel and the VAZ 2110?
Source
Cigarette lighter
The domestic auto industry is in no hurry to replace the cigarette lighter with sockets, so all our cars are equipped with its classic version.
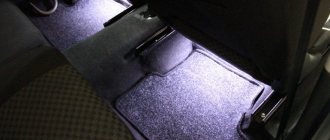
Lada Priora is no exception. Here it is located in a place of honor - the central floor tunnel, next to the parking brake handle. This arrangement of the device was not chosen by chance. It is always in sight, you can reach it with your right hand without bending, it does not interfere, and it is impossible for your pant leg to get caught on it. For greater convenience, it is also equipped with a backlight, which makes it easier to find in the dark.
It is worth noting that the Priora’s cigarette lighter differs from previous models not only in location, but also in configuration: its socket is somewhat smaller than that of other VAZs.
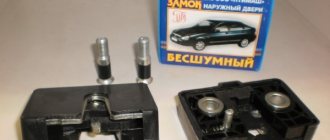
Design and operating principle
The Priora's cigarette lighter is no different from the cigarette lighters of other cars.
Structurally, it consists of a socket (a hollow metal cylinder) and a metal cartridge with a nichrome spiral inside. The cartridge is equipped with a plastic button, when pressed, the “plus” is connected to ground through the spiral. The principle of heating the coil here is exactly the same as in an electric stove or iron, but unlike the latter, the Priora cigarette lighter does not have a thermal relay. Its task is performed by bimetallic “ears” inside the cartridge, which, when heated, expand, and the spring ejects the cartridge, setting it to its initial position.
Malfunctions
Like any other electromechanical device, the Priora cigarette lighter tends to break. Sometimes this can be caused by design defects, sometimes by malfunctions in the machine's on-board circuit, and sometimes by the fault of the user himself. Common cigarette lighter malfunctions include:
- sinking of those same bimetallic “ears”;
- burnout of the spiral;
- broken contact in the connector;
- fuse blown.
Malfunctions can also include the burnout of a backlight lamp, however, this is more related to a decrease in the level of comfort than to serious breakdowns. In addition, it does not in any way affect the operation of the device itself and can be easily eliminated by replacing the lamp.
The sinking of the lugs is characterized by the lack of fixation of the cartridge in the pressed position. It can be caused either by the low quality of the metal from which they are made, i.e. defect, or high intensity or long period of use of the cigarette lighter.
The problem is solved by bending the “ears” inward using a thin screwdriver, naturally after de-energizing the on-board circuit. If after a short period of use the problem occurs again, it is better to replace the cigarette lighter.
When the spiral burns out, the cartridge is fixed when pressed, but does not heat up. The fault is diagnosed by ringing it using a car tester. It is not recommended to restore the spiral, as this may lead to a decrease in its resistance, which will make unwanted adjustments to the operation of the on-board circuit. In this case, the cigarette lighter also needs to be replaced.
Contact failure can be easily determined by removing the tunnel lining and checking the condition of the connector. This malfunction is not critical and can be fixed independently in a few minutes.
But as for the fuse, it makes sense to consider this malfunction separately, since its malfunction is most often caused by the human factor.
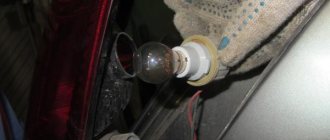
Replacing the cigarette lighter and its backlight
The cigarette lighter itself is not difficult to replace, you just need to pry the antenna inside the cigarette lighter with a screwdriver and pull out the inner part, and then we take out the plastic itself with the lamp, prying it with a thin screwdriver on both sides and pressing on the antenna. In principle, if you have already purchased a new cigarette lighter, you can simply look at how it works and everything will become clear.