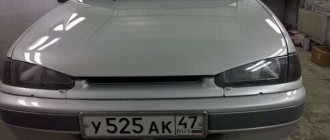
How to adjust the hood latch
The first faults that the driver notices can be eliminated by a simple inspection and tightening or replacing some parts. Adjustment of the hood latch on all VAZ cars is carried out in two main stages: horizontal and vertical.
Vertical adjustment
Vertical adjustment is a check of the optimal length of the lock latch. This must be done if the hood cannot be securely locked in the closed position. When driving, a rattling noise is heard, even with the engine turned on, when the car is standing still, there is a slight bouncing of the cover.
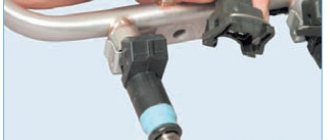
To adjust, use a 19 mm spanner and a flat head screwdriver. Stages of vertical adjustment.
- Loosen the locknut on the latch. To prevent the latch itself from turning, hold it with a screwdriver.
- If the hood lid does not close well or does not close at all, it is necessary to adjust the length of the latch. You just need to unscrew it (enlarge it) with a screwdriver.
- If the cover rattles and vibrates when driving, shorten the length of the latch by screwing the latch several turns.
- Verifying the correct latch length setting can only be done through experimentation.
- There are no dimensions, calculations or measurements with a centimeter tape, even in production.
- After the mechanism is adjusted, the locknut should be tightened with a wrench while holding the lock latch.
Horizontal adjustment
It is necessary to carry out horizontal adjustment on a VAZ 2115 if the lock jams when opening or a metallic grinding noise is heard when driving.
Horizontal adjustment of the latch is carried out in several stages:
- The locknut is loosened.
- The latch lock moves in a horizontal plane so that when closing the cylinder coincides with the standard hole in the frame.
- Checking the fit and tightening the locknut.
- Adjustment helps to get rid of the problem with minor shifts of the working mechanism during constant driving loads.
Reason for knocking
Knocks always cause some concern among drivers, since extraneous sounds may indicate that car parts have worn out and will soon fail. In addition, knocking creates serious discomfort when traveling, and even music in the cabin does not help get rid of the unpleasant sensations.
Many car owners are beginning to sin with the plastic elements of the interior. Someone glues the center console, the glove compartment, and then the entire dashboard, but the sound does not go away. The next idea is to fix the radiator. Having dismantled half of the interior and glued all the plastic parts related to the radiator, the driver gets behind the wheel in the hope that the “crickets” will stop. But no. His next thought is problems with the suspension, but similar faults can also occur on new models that have not traveled even 50 thousand km. Therefore, the suspension has nothing to do with it either.
In fact, unpleasant sounds that haunt you while driving are created due to the hood hinge. In Lada Priora models, play occurs in the hinge, which loosens the fastening. This is the source of noise while driving. To diagnose, use the help of a friend. Press down on the hood while driving at low speed. If the sound disappears, then the problem lies in the loop. This can be determined by checking the play at the bottom of the hinge. If there is mobility in the hinge structure, it is worth ending the search and moving on to repairs.
Adviсe
- When adjusting clearances, never loosen all bolts at the same time. You must leave at least one bolt tightened. Otherwise, the body panel will dangle in the opening and will slide off when you want to tighten it, holding it in the desired position. Always try to gradually move the panel into the desired position by loosening one bolt or the other.
- You can use a simple technique. It consists of tightening the fastening bolts so that they can hold the body panel, but at the same time allow it to be moved into the desired position in place with little effort. You need to experiment and understand with what force you need to tighten the bolts.
- When installing the doors, hood and trunk lid, you can temporarily remove the lock hinge from the opening. This will allow the doors and hood to open and close freely. Having aligned the desired panel according to the gaps, you can screw the lock loop back into the opening and adjust its location.
- It is possible to place washers under the hinges to change the position of the panel by the required few millimeters. In this case, it is advisable not to overdo it with the thickness and number of washers, so that this is not noticeable and is not an additional sign of the car being repaired. There are even special shims for such purposes that can be inserted under the mounting bolts without removing them.
- Sometimes, when all parameters for the location of a body panel are adjusted as much as possible and the gaps are even, but the panel is not at the same level as adjacent panels. This often happens with edges that protrude slightly. In this case, you can press this edge, having previously made a safe stop for this panel, so as not to damage anything.
Primary problems with the hood latch
The first malfunctions in the locking mechanism are noticeable immediately
If you pay due attention to them, a simple adjustment will help you repair the lock. The hood lock cylinder on the VAZ 2109, for example, is made of industrial steel and for it to break completely, you need to ignore the first malfunction signals for more than one month
- Each time you close the hood, you need to slam the lid harder and even put pressure on the frame.
- The lid clangs and rattles on rough roads. Moreover, this can be clearly heard in the cabin.
- The lock does not close the first time.
- When the cable is loosened, you need to pull the handle several times for the lock to open.
- After pressing the hood handle in the cabin, the lid does not lift, forming a gap, but remains in place. The gap between the frame and the cover can only be seen if you lift the cover yourself.
If these signs have just appeared in the car, you can adjust the lock, this will prevent the need to completely replace it.
Door structure: lock, gaps, handle, hinges
When there are preconditions for a malfunction of one of the doors, a visual inspection of the car is carried out. First with the doors closed, then with the doors open. The check will show whether there is skew, displacement or other changes in the streamlined shape of the vehicle. Nuances that require attention:
- When open, the height of both door fragments should be identical.
- The gaps are no more than 1–2 cm.
- Unnatural position of the loops. If this is caused by mechanical damage or shock, then simple adjustment will not help.
- The backlash is set incorrectly. The skew will tell you about this.
- The lock does not close well or the handle causes difficulty in operation.
Depending on the problem, an adjustment algorithm is determined. Serious sagging of the door after an accident will not be corrected by tightening the hinges, so it is necessary to straighten the automotive element.
trunk lid
Just like the hood, the trunk, so that it closes correctly, should be adjusted on the hinges and rubber stoppers (read the “Training” subsection below). The lock mechanism can then be adjusted slightly to ensure it operates well. If a mechanical button or toggle switch is difficult to move, start with adjustments and lubrication.
Many cars have electric hood and trunk release mechanisms. If the electrical drive unit is dead, you will have to find the source of the problem using a digital voltmeter (good up to 5 megohms, for safety) and a circuit description. But if you hear the motor click but the lock does not open, you have a problem with the structural components.
If there is a key hole, you should be able to open the trunk lid or lock using the key. There is one “horror story” about the owner of an expensive luxury car who had a flat tire and was unable to open the trunk and get a spare tire because the battery in the remote control was dead. After waiting two hours for the towing vehicle to arrive, the owner was amazed to see the driver of the assistance vehicle easily open the trunk with the key and then change the tire. Moral: keep it simple.
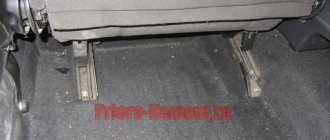
Do you have a minivan? You can crawl into the rear cargo area to remove the trim panel and manually open the lock to get to the mechanism. If your sedan's trunk lid stubbornly refuses to open, you can fold or remove the rear seat to get closer to the mechanism. Check your owner's manual, there may be tips on how to open the trunk in an emergency - there may be a simple cable that you need to pull in case of serious problems. All new cars have a spare release cable designed to prevent your child from becoming trapped in a locked trunk. If you can reach this spare cable by getting behind the back seat, you will be able to open the trunk. When the lock has loosened or the trunk lid has opened, you can clean and lubricate all the parts so that the lock opens more freely.
Trunk and latches usually require proper adjustment and fit, just like hoods. Install the trunk lid so that it sits evenly, with equal gaps, then adjust the lock and stop for good operation. Don't forget to lubricate the part of the lock that is hidden from view. Another important thing to do is to lubricate the hood and trunk door hinges, as well as all the locks. If your mechanic ignores this part of the job, take five minutes and lubricate these parts yourself.
Most often, when a lock malfunctions, a broken plastic part is to blame. You will have to contact your dealer to purchase a replacement part. Locks that stick or are difficult to open usually just need to be lubricated and adjusted.
see also
Comments 90
There are rubber bands there on the right and left that can be unscrewed, you take them out of the screw and how you screw them in and see how the hood sits. I also had one side raised, so I twisted the rubber band and everything aligned
Well, they line up perfectly with the wings, but the gap still remains ((I completely tighten the gap on the wings, it’s not the same, but between the hood and the bumper it’s just excellent)) I think we need to adjust the hood latch, somehow do it lower, so that only the center drops
don’t f*ck your brains, everything is fine, the hood and the headlight and the bumper, this is a factory defect, I have the same garbage, and you can fix the bulging bumper near the headlight yourself, remove the bumper and adjust the bumper clamp and everything is OK!
Yes, it’s just not like that for everyone ((good)
remove the bumper, inspect the mounting points, maybe there is something bent somewhere, you can see that the bumper and headlight have come off, look, the fasteners break easily, maybe they glued everything on (tape) and held it until this moment (an autopsy will show)
the boys at the factory fucked her up, a friend works as a parking attendant, he said that every 10th one is broken, get them off the assembly line as best they can, and then we suffer,
stop joking already =
put eyelashes, the gap will decrease
know, eyelashes are not ice =
the same garbage, but smaller, but it seems to me that this gap is on the left when you look at the car from the front and it turns out due to the deformation of the hood while it is standing on the support in the open state (after all, that is where the support is located
he's like that on both sides)))
well, most often this is where the problem lies
I didn’t read what anyone wrote. But I’ll share mine) I removed the bumper and where the lock is attached, I sawed a file just below the bolt holes and now it sits fine. Only one thing... it rubs against the headlight and bumper where the hood release handle is)))
thanks for the advice :D
ADJUSTING THE HOOD LOCK)))
My gap wasn’t that big, I pressed it with my hands)))
I also noticed that the bumper is not in place. Take it off and a lot can be revealed. Most likely there is hidden damage under the bumper.
the main thing is to make you happy;) everything else, use your wits and it will work... Good luck!
makes me happy)) but since it’s a fret, it’s not always))))) it’s like a virgin, it also breaks: D thank you))
to the author of the question - look, your hood is positioned perfectly, the bumper does not sit in place, remove the bumper and align the headlight on the hood, then adjust the gap of the bumper to the hood and everything will be fine, it’s not AvtoVAZ that made mistakes, but the previous 2 owners who made their contribution your car is history... if the work bothers you, give 500 rubles to any painter and ask him to fit it and re-tighten the bumper...
ok, I’ll take it into account... but only then after installing the new bumper
to the author of the question - look, your hood is positioned perfectly, the bumper does not sit in place, remove the bumper and align the headlight on the hood, then adjust the gap of the bumper to the hood and everything will be fine, it’s not AvtoVAZ that made mistakes, but the previous 2 owners who made their contribution your car is history... if the work bothers you, give 500 rubles to any painter and ask him to fit it and re-tighten the bumper...
What is it about your native one that doesn’t suit you? we removed it and installed a regular one... put this money aside and slowly save for a new one;)
Castle defense
It's no secret that Vesta's engine compartment quickly gets dirty in slush. This is due to the suboptimal design of the hood seal. However, the dirt under the hood can be washed away, while sometimes the situation becomes completely unacceptable.
One of the Drayvovites experienced all this first-hand, Mikhail Volkov, who is known in the community under the nickname Smarticus58RUS and drives his Lada Vesta “Mouse”. He said that one day so much dirt flew under the hood through the lock area that sand and other debris jammed the lock, and he was unable to add washer fluid to the reservoir when necessary. It turned out to be a ruined trip for him.
The culprit here is the ill-conceived design of the hood lock. Only at home in the garage was he able to pick out the dirt with a long screwdriver and open the hood. That is why it is recommended to treat the Vesta hood lock mechanism with WD-40 liquid, and then generously lubricate it with lithol or other lubricant. In addition, it would not be superfluous to install some kind of shield - purchased or made independently.
As you can see, it is not difficult to remove the lock, adjust the hood gaps or protect the mechanism from dirt. The main thing is to know the machine’s vulnerabilities.
Source
Problems with the hood latch
What functions does the hood lock perform?
The main purpose of the hood lock is to keep the car's hood closed in any conditions (whether the car is parked or rushing along the highway at a decent speed).
Yes, most designs are not satisfactory, but they (over time) do not provide adequate safety. The main thing is to catch the moment when such “nonsense” as the hood lock should be replaced or repaired.
What he shouldn't do
You are just starting to have problems with your car's hood lock if:
- To close the lock, you have to slam the hood several times, each time applying more and more force.
- The hood rattles and “bounces” on potholes
- It became problematic to open the hood, the handle in the cabin does not respond well.
If you are familiar with these inconveniences, then it’s time to think about adjusting, replacing or repairing your car’s hood latch.
Self-diagnosis of your car won't hurt anyone.
Replacement, repair or adjustment?
To begin with, let’s define the problem that has arisen and the scale of the upcoming work.
- If the lock jams occasionally, and the hood rattles noticeably when the engine is running, then a simple adjustment will help.
- If there is constant jamming and futile attempts at adjustment, the locking mechanism or cable drive requires repair or partial replacement
- In case of very serious damage (warped, crumbled, etc.), only a complete replacement will help.
Using a superficial inspection method, you can determine whether a given device requires replacement or can be repaired. Let’s say that after an examination we determine that “the patient is more likely to be alive than dead,” and he can still be resuscitated.
Replacement process
To carry out this procedure you will need:
- screwdrivers - figured and flat;
- marker;
- a piece of fabric;
- set of socket wrenches.
This is a sufficient set for the procedure. Open the engine compartment cover (hood) and secure it well with the stop. Unscrew and remove the windshield wipers. Pull out the decorative plugs holding the air intake panel of the Priora heater. You will have access to the base of both loops. Carefully place the fabric on the glass, under the lower edge of the Priora hood. Now unscrew the nuts securing the hinge to the lid itself. The second person must fix it so that it does not fall. When all four nuts are unscrewed, remove and carefully set the hood aside to avoid damage. Now you can remove the hinges themselves for replacement or repair.
Be sure to use a marker to mark the points where the old hinges stood and dismantle them. Under them there are rubber gaskets that also need to be replaced. Remove any dirt that has accumulated under the base of the loop and wipe the area. The main thing is not to erase the marks. Install according to the marks and carefully fasten the new hinges. Lubricate moving parts well with grease
Now, together with your partner, carefully put the Priora hood back in place.
When the cover is in place, without large gaps and evenly, tighten all the nuts well. Reinstall the air intake panel and wipers. Close the decorative caps.
Hood: removal, installation and position adjustment
The hood can be removed as an assembly with the elements installed on it. To do this, simply disconnect the hose from the windshield washer pump. In this way, the hood is removed to dismantle the engine using a hoist or winch.
But if necessary (for example, to paint the hood or replace it), the work can be done with preliminary disassembly: removing the hood trim, windshield washer nozzles, and decorative trim.
We carry out the work with an assistant.
1. We prepare the car for work.
2. Remove the casing from the left hinge of the hood.
3. Disconnect the hose from the windshield washer pump.
To remove the disassembled hood, use a 10 mm socket wrench to unscrew the two nuts securing the safety hook and remove the hook.
We turn out the two hood buffers.
Using a screwdriver or a puller, we remove the hood trim holders.
Remove the hood trim.
Disconnect the hose from the windshield washer nozzle.
Using a screwdriver, press the two latches
Similarly, remove the second injector and remove the hose from the hood.
We perform the following operations together with an assistant.
4. Holding the hood on both sides, use a 13 mm socket wrench to unscrew the two nuts securing the hood on each hinge and remove it.
Assembly and installation:
We assemble and install the hood in the reverse order.
We attach the upholstery to the hood with 19 holders.
Damaged holders must be replaced. If the hood closes poorly (you have to press hard) or moves to the side when closing, you need to adjust the position of the hood latch. The holes for the hood lock mounting bolts are made large, which allows you to slightly change the position of the lock.
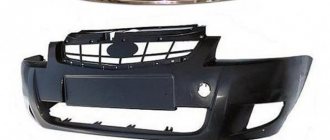
1. To adjust, remove the front bumper.
2. Using a 10 mm wrench, loosen the two bolts securing the lock.
3. Close the hood and, by adjusting the position of the lock, ensure that when closing the hood, the lock latch (welded to the hood) fits into the groove of the lock without touching the edges of the groove.
4. The vertical position of the hood is adjusted by turning in or out the rubber buffers.
5. After completing the adjustment, finally tighten the hood lock bolts and install the front bumper.
How to choose the right one?
To understand which lock is best to choose for your car, it is recommended that you familiarize yourself with the selection criteria:
First you need to decide on the type of product
If a mechanical device is being installed and configured, it is important that it be equipped with a floating cylindrical component. Such devices use cylinder technology. It is necessary to pay attention to the secrecy of the cylinder
It is desirable that this component have at least 5 million combinations. It is recommended that the lock be equipped with a double code password-protected cylinder. If mechanical devices are preferred, the thickness of the metal cable should be at least 26 mm. The security cable must be made of multi-layer material. Each layer performs a specific function to provide protection. If the device is three-layer, then the first element is designed to protect against biting, the second - cutting. The third layer in such devices is used to protect the previous one.