Hello, dear readers of the blog site
.
Today I bring to your attention a detailed photo report on such an event as replacing the Kalina steering rack
(steering rack 2110, 2112 of the new model).
Now it’s June 2014 and the odometer of my car shows almost 170 thousand km, and a year ago, at 144 thousand km, I did it and now drum rolls are coming from the steering mechanism again. I must say that repairing a steering rack is not a pleasant task, and I would like to get rid of the problem for a long time, which is why I decided to replace the entire steering rack of Kalina
.
Strictly speaking, replace
the whole mechanism, in my case, was not necessary.
It was necessary to replace only the rack
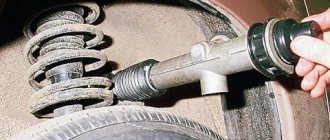
(the so-called
“rasp”
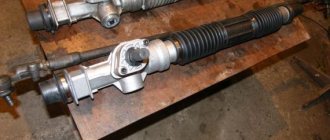
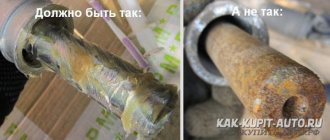
) and the plastic bushing in which the right end of this “rasp” moves, but I was unable to buy it separately, so I decided to replace the entire steering mechanism assembly. This is what the rack (“rasp”) looks like when fully extended to the right from the steering mechanism. As you can see, the right end of my Kalina's old steering rack was completely covered in rust.
The cause of knocking noises in the steering rack is a plastic bushing
, fixing the right end of the rail.
When the bushing stops tightly fitting the rack, the latter begins to dangle, making a drum roll on uneven surfaces. I think that after last year’s repair, the bushing on my Kalina became loose due to rust
that covered the right end of the steering rack. Last year, while repairing the steering mechanism, I replaced the bushing, cleaned the rack and lubricated it thoroughly, but after a couple of thousand kilometers the knocking in the rack began to return, and after another 5 thousand, the rack was already knocking no less than before the repair.
Diagnostics of the Kalina steering rack
So, dear readers, by replacing the bushing, repair the Kalina steering rack
It is only worth it if the right end of the rail is in perfect condition. If there is rust on it (as it was for me), then it will act as an abrasive and will “eat” the nylon bushing quite quickly. The right edge of the “rasp” should shine like a mirror, only then it will not break the sleeve.
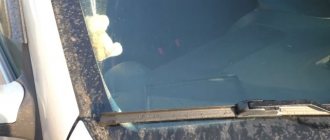
Check the condition of the right edge of the rack
quite simple. To do this, you need to carefully cut off the plastic clamp that secures the long right boot, then remove this boot and, turning the steering wheel to the left, visually inspect the right end of the rack that has emerged from the body.
I advise you to carry out such a diagnosis
before removing the rack from the vehicle. And in general, if you are going to solve the problem with the rack yourself, then I sincerely wish you to remove and install it only once, because the process of installing the rack is quite complicated and can cause discomfort, especially if it needs to be repeated.
In the article about I already mentioned how to determine that a knock
comes precisely from
the Kalina steering rack
.
To do this, open the hood and give the steering rod a good tug with your hand
.
A serviceable steering rack bushing
will not allow the rods to move even a millimeter, but with a “broken” bushing, the rods will shake.
At the beginning of this video you can clearly see the play of the steering rack after a run of 164 t.km, and at the end - a new steering rack after a run of 3 t.km.
As you can see, there is no play on the new rack. If
On your Kalina,
the steering rods do not hang out
, which means
it is NOT the rack that is knocking
.
Replacing the Kalina steering mechanism assembly
So, dear readers, I will describe how I changed the Kalina steering rack
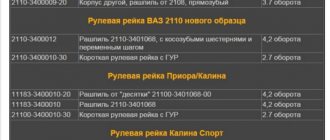
assembled. The day before, after calling a couple of stores, I found out that a regular original 4-turn rack would cost me 4 thousand rubles, and a version of a factory 3.1-turn rack would cost no less than 4,700 rubles. Heading to the store, I intended to buy a 3.1-turn rack, but on the sales floor I suddenly realized that the sporty ambience of the 3.1-turn rack was of no use to me, and the standard factory 4-turn rack suited me completely. In addition, I was also pleased with the opportunity to save money; in general, an original factory 4-turn rack was purchased, identical to that installed from the factory.
If anyone doesn’t know, then 4 revolutions is the number of revolutions of the steering wheel from the extreme right position to the extreme left and vice versa. My car is not equipped with an electric power steering, so with a 3.1-turn rack, turning the steering wheel would be somewhat more difficult than with a 4-turn rack. But with a 3.1-turn rack, the steering wheel becomes more sensitive, for example, less steering movement is required to avoid obstacles. We can say that the rack is 3.1 turns
more
suitable for drivers with a sporty driving style
.
Original steering mechanism
It’s not sold without tie rods, so I had to buy all this stuff as a set, although
I still need to replace
the tie rod ends The steering tips
on the new rack, by the way, differ from the “native” Kalinov ones, with which there are difficulties when adjusting the camber. The rail I bought was equipped with 10's lugs, which made me personally very happy. But this time I still won’t change the steering rods and ends; we’ll talk about this some other time.
When buying a new rack assembly, I prepared in advance to completely disassemble it and thoroughly lubricate it
, because
for some reason they save lubricant at AvtoVAZ
.
If you are not interested in additional lubrication of the rack, then you can skip this moment, otherwise I recommend that you disassemble the new rack
and lubricate it
in advance
, before removing the old rack from the car. For example, no matter how hard I tried, I couldn’t unscrew the stop nut on the new rack - the key failed, and I couldn’t go get another key, since by that time the car was already without a steering mechanism.
The tool that I used when replacing the Kalina steering rack
, described in more detail in the article about, you can look there, here I will only give a photo.
If you disassemble and lubricate the new steering mechanism
, then you will need
nylon ties
to secure the rubber boots of the rack.
The length of plastic ties should be at least 28-30 cm
.
Since the steering rods
I’m leaving the old ones for now, but I’ll put the new ones aside for now. To remove them from the new rail, I use a powerful wrench with a 15mm head and reinforced with a half-meter piece of steel pipe.
As you can see, the bushing
in the new factory rack it works almost “dry”.
On the side of the worm shaft the situation is somewhat better, but it wouldn’t hurt to add lubricant here too, especially from below, where the rack
stop presses
against the worm .
No matter how hard I tried, I could still unscrew the rack stop nut
I never succeeded.
The key that helped me out during last year's repairs, this time lost its position and began to bend at the junction with the octagon. Either the key had softened since last summer, or AvtoVAZ had tightened the nut too tightly, but I only managed to unscrew it half a turn. At the same time, the old steering rack
had already been removed from the car and options such as going for a new key or postponing repairs did not suit me.
In general, I tightened the nut to the maximum, loosened it 2 notches (as required by the instructions) and decided to lubricate the rack without completely disassembling it
.
Turning the worm shaft first in one direction and then in the other, I filled the rack with half a tube of lithol inside, so much so that it began to climb out of there. This is what happened.
Great! New steering rack for Kalina
It is prepared for use and can be installed on a car. The removal and installation process is described in detail in the article on, let’s repeat briefly. First of all, we remove the battery and the pad under it, disconnect the pad from the wires screwed to it, which are secured with a tricky clamp (pictured on the right).
It is advisable to clean the nuts securing the rack to the engine shield from dirt and spill it with “Vedashka” or kerosene in advance. This is a very important point!
These nuts must be unscrewed
with great care
, without applying force, otherwise you can easily twist the pin welded to the body and then replacing the rack can become a big problem.
You will have to look for a suitable bolt, drill a hole in the body and insert the bolt from the inside. In general, be careful when unscrewing and tightening the four nuts that secure the steering gear to the body
!
Removing the locking plate
and with a powerful wrench with a 15mm head, unscrew
the steering rods
from the rack.
It’s good if by this point the penetrating lubricant has already done its job, because now it’s time to unscrew the steering rack from the engine shield
.
I remind you: you need to do this literally with two fingers
, without any extra effort. If it doesn’t work, then it’s better to clean the threads again, spray with WD-40 and wait a couple of minutes.
Unscrewing the steering gear
from the engine shield, go into the cabin and completely unscrew
the bolt
that tightens the flange of the elastic coupling of the steering shaft.
Flange
to loosen it
with something , then it will easily detach from the steering shaft. You can loosen it, for example, with a powerful screwdriver or a small pry bar.
Now, carefully move the steering mechanism
from the engine shield, trying to disconnect it from the steering shaft. If the flange tightening bolt is unscrewed and the flange is loosened, then this will happen easily and naturally.
Having disconnected the rack housing and slightly raised the left front wheel with a jack (it is not necessary to lift it off the ground), we remove the steering mechanism through the opening in the wheel arch. If you do this in the garage, then leave at least a meter of free space
to the left of the left front wheel.
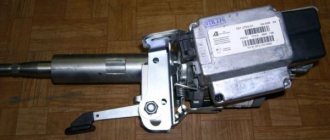
Here it is - the original steering mechanism
, installed on the car at the plant in Togliatti.
We remove the fastening parts and move all this stuff to the new steering rack
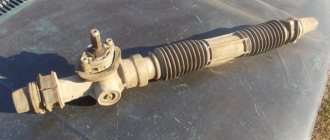
.
New steering rack
ready for installation on the car.
Through the same opening in the left front wheel arch we place a new steering mechanism
into the engine compartment and install it in place. And here, dear readers, is where the fun begins. If you work together, then it will be easy for you to connect the rack with the steering shaft, but doing it alone is quite difficult, but I will now explain to you how to proceed in order to do everything quickly and keep your nerves in order.
Leaning against the steering gear
to the engine shield, lightly tighten the lower nuts securing the
steering rack
to the body. Do not tighten the upper part of the fasteners; let the body hang freely on the lower nuts.
To make the splined part of the worm shaft easier to connect with the steering shaft flange, I recommend that you lightly lubricate the connection point with some thick lubricant (for example, lithol), this way the parts will connect much more readily.
the steering rack removed
Kalina's steering column has free longitudinal movement. To make it easier to connect the elastic coupling flange with the rack shaft, I pulled the steering wheel towards me and it moved a couple of centimeters into the cabin.
Now, using a screwdriver, we combine the rack shaft and the flange of the elastic coupling of the steering shaft. Attention! The flange slot should be approximately in the middle of the ground part of the rack shaft.
This is the only way you will be able to fix the flange with a coupling bolt and not damage the thread of this bolt.
Don’t worry about the position of the steering wheel; it’s easier to move it later to the desired position than to try now to guess the correct position of the flange on the shaft. When the shaft engages the flange of the elastic coupling, turn them so that the groove on the shaft is vertical
.
As you can see, the rack shaft and coupling flange are at an angle to each other, which is why it is difficult to align them. We solve the problem this way: use a screwdriver or a small pry bar to tilt the flange, trying to align its axis with the axis of the rack shaft
. It all looks something like this:
When the coupling flange is on the same axis with the rack shaft, you can lightly hit the center of the steering wheel and the elastic coupling flange will slide onto the steering rack shaft.
.
Check. The shaft should fit into the flexible coupling flange clamp like this.
As soon as the Shaft is in place, return to the engine compartment and tighten the upper nuts securing the rack to the body. Attention! Be careful when tightening these nuts!
Don’t forget,
it’s better to under-tighten them than to over-tighten them!
If it was not possible to align the shaft with the flange the first time, then you need to try again and then everything will definitely work out. And here's another little tip: when you tighten these nuts, lubricate the protruding part of the threads of the studs with grease. Then the studs will not sour even after several years, and you can always unscrew the rail without tearing off the studs.
Now is the important moment
! If you now try to tighten the flange coupling bolt with a wrench, you can easily damage the threads on it, and this will certainly happen if the bolt does not fit into the recess on the shaft. This is exactly what happened to me, so I had to tighten the flange with a thinner bolt and nut and then go to the spare parts store. The ball joint mounting bolt from the classics turned out to be suitable; it cost 5 rubles, so I bought several in stock at once.
So, if you want to avoid this annoying nuisance, then make sure that there are no obstacles in the way of the coupling bolt. Firstly
When the flange is connected to the shaft, the notch of the steering shaft must be in the right place - where the pinch bolt will be located.
And secondly
, push the steering wheel away from you so that it presses against the plastic trim of the steering column, it should look like this:
In this case, the flange will fit onto the steering gear shaft as much as possible:
Now you need to tighten the coupling bolt, but only by hand. There is NO NEED to tighten it with a wrench!
To avoid damaging the threads of the flange coupling bolt, it must be tightened by hand, without using a wrench.
If everything is done correctly, the bolt will tighten without problems. If something interferes, then you need to eliminate the cause, otherwise you will only damage the thread, and you still won’t be able to tighten the bolt.
Now that the bolt is tightened, but not yet tightening the flange, you need to push the steering wheel back towards you so that a gap will form under it again, otherwise the steering wheel will rub against the steering column cover with a squeak. So, with both hands, pull the steering wheel towards you, you can even pull it slightly.
Everything worked out? Great! Now you can tighten the coupling bolt with a spanner.
At the next stage, using a meter wrench with a 15mm head, we fasten the steering rods to the rack and do not forget to install a locking plate over the bolt heads.
Finally, here's the new steering rack.
installed on the car, which means that now is the time to check its condition by pulling its “whiskers” with your hand. The steering rods must remain motionless, no matter how you try to move them.
Then you can collect everything and put it in its place. We install the platform under the battery and screw the wires to it from below. We screw the thermal protection to the body, put the air duct in its place and tighten it with clamps. We install the battery, connect all the connectors, if for ease of operation you disconnected them.
Required spare parts and materials
To repair the Kalina steering rack (steering rack 2110, 2111, 2112, etc.) I bought this repair kit for the 2110 steering rack . The main thing is to replace the bushing and stop of the rack, which will eliminate play in the rack and noise when driving over small irregularities.
On the price tag in the BBC it was indicated that the repair kit was “factory”, but in fact it turned out that the manufacturer was some kind of individual entrepreneur. I hope the quality of the bushing and stop is not inferior to the factory one. From the kit we used: a rack bushing, a rack stop, a rack stop O-ring (small) and a stop nut . The rings are medium and large, I left the old ones as they were in perfect condition.
In addition, while preparing for the repair, I noticed a tear on the left (short) rack boot . The impulse arose thanks to the “fender liners” installed by the craftsmen of the car dealership when purchasing the car. The left front fender liner has been touching the protective cap of the steering rack all these years and as a result has worn it out. I don’t even know how long I drove like this, but eventually there was some play and I was ready to repair the rack. In the right photo, taken from the left wheel arch, the part of the fender liner protruding from above has already been cut off and it no longer rests against the boot:
Before repairing the rack, I bought this very left (short) boot of the steering rack 2110 (for 80 rubles), but I was not able to find it right away. There are anthers from 2108 on sale, but the “eight-foot” ones are not suitable for us, they are a centimeter smaller in diameter. Later, having already removed the rack from the car, I discovered that the central corrugation was also damaged. For 5 years and 140 thousand km. it rubbed against the body of the rack (photo will be a little lower), no wonder that dust got inside.
I still bought the corrugation, thank God, one of the nearest stores had it in stock, but for the future the conclusion is this: the central corrugation must be changed , and therefore it should be bought in advance. The side caps are not subject to friction; decide for yourself whether to change them or not by first inspecting them visually.
a set of Kalina steering rack boots looks like (steering rack 2110). The one on the left in the photo is my original one.
When assembling, it is best to secure the rubber covers with disposable plastic clamps ( nylon ties ), but 30 cm long (28 cm minimum). I bought a hundred zip ties for 75 rubles, but they sell them individually for 5 rubles. each. If everything is normal, then for repair you will need 4 such ties.
In order not to unscrew the studs that secure the rack to the body, their threads must be soaked with a wedge (WD-40) or kerosene before unscrewing, and it is advisable to do this a couple of days before unscrewing the nuts. The bitter experience of many car enthusiasts suggests that rolling the studs is as easy as shelling pears, and this leads to the need to drill the engine compartment shield and insert bolts of the appropriate size from the inside. Attention! Remember this danger and unscrew the rack fastening nuts very carefully! Don't put in much effort! It is very convenient to use a small Vedashka cylinder with a tube in the engine compartment, but if you are going to use kerosene, do not forget to prepare a small syringe, because the nuts securing the rack to the body are in very hard-to-reach places.
If the inside of the rack turns out to be dirty and rusty, then it will need to be washed (with the same kerosene, diesel fuel or gasoline), and then, to be on the safe side, it would be a good idea to blow out all the dirt with carburetor cleaner .
When assembling the rack, it will need to be generously lubricated. In theory, for this you need to use low-temperature lubricant FIOL, but it is quite difficult to find, and it is only sold in large jars, costing 600 rubles.
Litol-24 in severe frost reduces its plasticity, but at higher temperatures it successfully replaces FIOL. In addition, Litol-24 is sold on every corner and is inexpensive.
So, spare parts and materials used in the repair:
- Steering rack repair kit 2110 (RUR 210)
- Protective covers for steering rack 2110 (245 RUR + 80 RUR)
- Plastic clamps 30 cm (at least 4 pieces)
- Penetrating bolt lubricant (WD-40 or kerosene)
- Rail cleaner (carburetor cleaner, diesel fuel or gasoline)
- FIOL lubricant (as a last resort Litol-24)
The result of replacing the Kalina steering rack
Great! Now you just need to do a test drive. Take a marker with you to mark the highest point on the steering wheel when driving in a straight line. Returning to the repair site, we will move the steering wheel so that it faces straight.
So, sea trials. Having closed the garage, I pulled out onto the road and noticed that, out of habit, I was avoiding small bumps and politely slowing down in front of them. Having made a heroic effort on myself, I literally forced myself, without slowing down, to direct the car onto the side of the road covered with coarse gravel, and here was the long-awaited feeling of satisfaction: the roar had disappeared, the car went smoothly, methodically handling the unevenness with the suspension, but in the cabin it was practically inaudible .
I really hope that the well-lubricated and hermetically sealed new steering rack on my Kalina will last at least 3 years (for me it’s 75 thousand km), and after that I’ll definitely take it apart, wash it, lubricate it and replace the rubber covers, but only if The “rasp” will not rust.
How to put the steering wheel straight on Kalina?
After repairing or replacing the steering rack, it is not always possible to position the steering wheel so that it faces straight, so many car enthusiasts have a question: how can Kalina place the steering wheel straight?
Indeed, when the steering wheel is straight when driving in a straight line, it is not only pleasant, but also convenient. It's just easier to hold on to.
To then set the steering wheel straight
, first, while driving in a straight line, make a mark at the top point of the steering wheel, and when you arrive at the repair site, position the steering wheel so that this point is at the very top. Next, pull the central part of the steering wheel towards you, it will detach and end up in your hands.
The horn terminals must be disconnected, the central part of the steering wheel can be put aside.
Using a 24mm wrench, unscrew the nut securing the steering wheel to the steering shaft.
Don't forget to mark the position of the steering wheel relative to the shaft with a marker.
Now we take the steering wheel with both hands (at 9 and 3 o’clock) and, alternately shaking each hand towards and away from us, carefully remove the steering wheel from the splines of the steering shaft. As soon as the steering wheel is removed from the splines, turn it to the position you need (that is, put it straight) and put it back on the splines. Now, when driving straight, your steering wheel will also point straight.
My steering wheel was slightly skewed to the right, so I moved it one slot to the left, like this:
Is it necessary to do a wheel alignment when replacing the steering rack?
In conclusion, I would like to discuss with you this question, which is probably asked by everyone who is going to replace or repair the steering rack: is it necessary to adjust the wheel alignment after repairing or replacing the steering rack?
There is an opinion that this must be done; personally, I believe that
the wheel alignment angles
are NOT violated
during such repairs , and therefore
it is not necessary to adjust them
. When replacing a steering rack, as well as when repairing it, the suspension geometry does not change in any way; the steering rods are unscrewed from the rack and then screwed back, while all dimensions remain the same.
It’s another matter if, when replacing the steering rack, you also change the steering rods
assembled or at least
the steering ends
.
In this case, it is unlikely that you will be able to accurately adjust the length of the new steering rods, and therefore adjusting the
wheel alignment angles is simply
necessary
.
In this article we looked at the option of replacing a rack without tie rods and tips, and therefore the procedure for replacing Kalina tie rods
will be discussed in a separate article.
Electric amplifier
It is better to adjust this unit in the Lada Kalina after the electric power steering rack has been removed. However, there is a way to carry out this action without resorting to removing the specified mechanism.
- We install the car above the pit to provide access to the fasteners of the frontal part of the amplifier.
- We tighten the clamping nut. If we do this from below, then we rotate in the direction of the arrow clockwise, and if we act from above, then, naturally, the opposite.
- For preventive purposes, we check the integrity of the oil seal. Note that strong and frequent turning of the steering wheel leads to premature wear of this sealing element.
Replacing the Kalina steering rack. Results
So is it worth repairing the steering rack on Kalina?
(ten, twelve, etc.) or is it better to replace it right away? Let's summarize which option is better to choose and in which case.
- If the right end of the rack is covered with rust
, then it is useless to change only the bushing; the rasp itself must also be changed. If you come across a rack that is sold separately, then replace this rack and bushing. If you can’t buy a “rasp” separately from the body, then replace the entire steering mechanism assembly, it’s easier. - If the rack is clean, without traces of rust
, then feel free to change the bushing, stop and central protective cover (corrugation), and at the same time thoroughly lubricate the insides of the steering rack. With this kind of prevention you can save several thousand rubles, and how to perform this repair, read the article
That, my friends, is probably all! At the moment, I am satisfied with the repair of Kalina's steering rack (I've been driving with the new rack for a week), the results are exactly what I expected. I only hope that the effect will last for a long time, because I don’t plan to remove the rail again in the near future - this is a very dreary task.
Dear readers! I hope this material will help save your time and effort and I wish that the steering rack on your car will run for a very long time and never knock at all! See you soon in the next articles!
PS Today is January 29, 2015. Mileage 200 t.km. The steering rack is in order, there are no extraneous sounds.
If while driving you hear knocking, especially on roads covered with uneven surfaces, and strange sounds, then you should. This is an important element of the car, and its breakdown is highly undesirable. But a knocking noise when driving indicates a faulty part.
Both the VAZ Kalina and other cars of the brand have a very similar design of this element. Only the algorithm for dismantling and installation is slightly different. Therefore, now we will consider the process of tightening and replacing this element manually, without resorting to special services.
For cars like Kalina, constant repair work on units and components is commonplace. Moreover, even the most reliable spare parts tend to break. This makes replacement and repair of the steering rack virtually guaranteed for any car enthusiast of this brand.
Element design
The design of the steering rack on the Kalina is as follows: rotational motion is transmitted to the drive gear by the steering wheel using a column. The gear is movably connected to the rack. She sets it in motion, transferring her energy. The wheels turn using rods, which are attached at their ends to the rack.
So, the design of the steering rack is quite simple. Therefore, there should be no problems with the process of replacing or adjusting this element yourself. But there is one element that complicates the process. We are talking about a pressure spring. It is made in the shape of a cone, but with use it loses elasticity. This significantly reduces its functionality.
This part needs to be constantly tightened. But here you need a special key, and the process itself is very complicated. But more on that a little later.
Correct fault determination
- The right edge of the rack should shine, otherwise a steering rack repair kit is needed.
- The presence of even the slightest traces of rust, which will act as an abrasive material, is not allowed.
- You should check the integrity of the bushing: if it knocks or shows signs of wear, it needs to be replaced.
- It is necessary to carefully inspect all the fasteners: if places with loose clamps are found, tighten them.
You need to be very careful with the last factor. Excessive physical force will only do harm here. If you decide to diagnose and replace it yourself, you must use lubricant and a wrench. A heavily threaded bolt or nut simply requires the use of oil. In some cases, it can be moved 1-3 divisions, but do not despair. This is enough for a visual inspection.
There shouldn’t be any difficulties, because information on how to tighten the part is contained in the vehicle’s operating instructions.
Repair work involving dismantling of parts
Well, after reviewing the design of the device, it’s time to get to work. First you need to put the front part of the Kalina on a jack and fix the wheels using a stop. After this, the bolt responsible for the splined connection of the column is unscrewed in the cabin.
After dismantling the wheels, you need to remove the steering knuckle nuts. Under the hood you need to remove the battery and heat deflector. The first part of the repair is completed by removing the steering rack by unscrewing the nuts that secure it to the body.
Having squeezed the rack casing into a vice, you need to move it in different directions, thus diagnosing the presence of play. If it is present, you need to tighten the spring nut. But it cannot be tightened more than 10 degrees. After completing the procedure, you need to repeat the test. You need to continue until the problem is resolved.
If there are doubts regarding the serviceability of any element of the rack, it must be changed immediately. Otherwise, you will have to remove and disassemble the part again. New spare parts can be easily purchased in a repair kit. After checking all the elements and making sure that it is in good condition, you need to reassemble the car in the reverse order.
Making adjustments yourself
You can access the adjusting nut from the engine compartment, but to do this you will need to remove the battery, as well as the battery mounting pad. It is better to drive the car into a pit and then remove the crankcase protection (engine mudguard). If you look from under the bottom, the required element is immediately visible:
You need to turn this nut
And when you open the hood, you can feel the nut, but not see it. Its location is marked in the figure:
To make adjustments, place the key here
Before adjustment, remove the rubber cap from the recess. Its appearance is shown in the photo:
Remove the cap and install the key
If it is not entirely clear what exactly needs to be done, it is better to contact the service. The key is installed in the recess and then rotated 10-15 degrees.
When looking at the rack from above, turning the key clockwise corresponds to unscrewing it. The handle of the key comes from the center of the car - which means tightening is being done. By the way, the latter is true provided that the handle faces forward.
Repair of a part without dismantling
But it is possible to tighten the steering rack without removing it. Although the official manual from the manufacturer excludes this possibility, many car owners prefer to repair the part without completely dismantling it.
With this method, the adjustment bolt can be reached by descending into the inspection pit. Next you should find it in the front of the car. The tightening is done clockwise. If you manage to reach the element from above, then pull it clockwise. You should immediately check the play through the steering wheel.
If all operations are done correctly, but knocks and noise remain, then the problem is in the components of the rack. In this case, you need to buy a repair kit for the rack, or buy a new part and completely replace it. But a complete replacement is already an extreme, which should be taken only if it is impossible to carry out repairs. At first, the replacement will take 3 hours. But the more often this operation is performed, the more the process will speed up.
The service life of the steering rack can be extended. If the car is equipped with a hydraulic booster, you need to control the quantitative parameter of the oil level. If necessary, top up the latter to the required level. It would be a good idea to regularly change the tie rod boots. Ignoring this procedure will result in wear and fluid leakage. As a result, the entire steering mechanism may break.
The wear of oil seals, as well as seals, also matters for the steering mechanism. Therefore, these elements should be constantly monitored and checked for wear. If the seal of the rack is broken, the damaged part should be quickly replaced.
Will help increase the service life of the part and driving style. Using the brakes before hitting potholes and pits will not only not be superfluous, but will also have a very positive effect on wear. This will save you both the wheels and the steering rack. Extreme neglect of this rule can lead to complete breakdown beyond repair.
Hello, dear motorists! Happy owners of Lada Kalina do not even suspect that this small city car hides a lot of secrets. Today we will talk about repairing the Lada Kalina steering rack with our own hands.
Judging by the descriptions in the specialized literature, the steering rack of the Lada Kalina is absolutely no different in design from all previous front-wheel drive VAZ designs.
What is the reason for this behavior? And another question that automatically arises: I wonder why on cars that are not even several years old, the steering has to be adjusted. Everything is in order.
Lada Kalina steering rack tightening
The working parts of any, even the most reliable and expensive car, inevitably become unusable and need to be replaced. What can we say about domestic budget models like Lada Kalina?
It’s high time to get used to the fact that repairs are a common condition for such cars. Regarding the steering mechanism, it should be noted that it is indeed the same as on other models, and the steering rack on the Lada Kalina is tightened as often as on its brothers on the conveyor.
How to tighten the steering rack with your own hands
To fix this problem, it is enough to spend about 15 minutes of time and have several keys with you: - A 13 key - A 10 socket with a knob - A special key for tightening the steering rack
Since getting to the rack is not so easy, you will have to first remove the battery.
And then completely remove the platform on which the battery is installed.
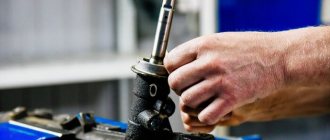
And only after this there is access to the steering rack, and even then, it is extremely inconvenient to do all this. But it’s quite possible, you just need to crawl your hand under the bottom of the rail and feel for the rubber plug there, and pull it out.
This is what she looks like.
Then take the wrench and try to crawl it up and put it on the inside of the nut that needs to be tightened. She is located approximately here.
Turn the key slightly, at least half a turn at first, to avoid overtightening. Try driving and listen to see if there is any knocking noise when driving. If the rack is overtightened, the steering wheel may bite when turning, so test the car at low speed so that there are no bites when driving and when turning the steering wheel fully at speed.
I hope you don’t have any problems repairing the steering rack on your Lada Kalina. While you are on our website, I advise you to read about it yourself.
Hello, dear motorists! The happy owners of the brand new Lada Kalina do not even suspect that this small city car hides a lot of secrets.
And suddenly, the venerable craftsmen of car service centers, for unknown reasons, began to refuse the owners’ requests for adjustments or if Kalina was needed.
Judging by the descriptions in the specialized literature, the steering rack of the Lada Kalina is absolutely no different in design from all previous front-wheel drive VAZ designs.
What is the reason for this behavior? And another question that automatically arises: I wonder why on cars that are not even several years old, the steering has to be adjusted. Everything is in order.
Why do you need to tighten the steering rack on Kalina?
The working parts of any, even the most reliable and expensive car, inevitably become unusable and need to be replaced. What can we say about domestic budget models like Lada Kalina?
It’s high time to get used to the fact that repairs are a common condition for such cars. Regarding the steering mechanism, it should be noted that it is indeed the same as on other models, and on Kalina it is produced as often as on its brothers on the assembly line.
In order to understand the reason for the need to tighten the steering rack on Kalina, you should remember:
- the steering wheel transmits rotational motion through the column and flexible coupling to the drive gear;
- the gear, having a movable connection with the rack, transmits rotational motion to it and makes it move;
- The ends are attached to the rack, which turn the wheels.
An elementary-simple device, as on many cars. In this entire structure there is a very small part that can only be seen from the inspection hole - this is a pressure spring that regulates the force with which the rack is pressed against the gear.
The spring is made in the form of a cone, however, during operation it quickly loses its elasticity and the pressure force decreases. That is why it becomes necessary to clamp the spring harder in order to restore the necessary force.
The steering rack on Kalina is tightened using a special wrench, but due to the design features of this particular model, the operation can only be performed by removing the rack from the car.
It is for this reason that services are reluctant to undertake this procedure. The work only takes 5 minutes, but dismantling is a hassle.
Disassembling the Lada Kalina steering rack without problems
Or the increase on Kalina can be eliminated by turning a special key 10-12 degrees, however, in order to perform this second operation, you must remove the rack, following the following algorithm:
- the front part of the car must be suspended, which can be done using a lift or by installing the car on trestles;
- While your hands are not dirty, unscrew the bolt for the splined connection of the steering column in the cabin. This is not very convenient to do, since the place is under the pedal block;
- Having removed the front wheels, unscrew the steering knuckle nuts and remove them;
- Preparations should also be made in the engine compartment: remove the battery along with the platform and the heat reflector;
- At the last stage, we unscrew the nuts that hold the rack fastenings to the body and take the latter out into the light of day.
Holding the rack casing in a vice, you should try to move the rack by the “whiskers” to the right and left. If the play is noticeable, then you can try to tighten the spring nut, but no more than 10 degrees, after which you should check again for the presence of play.
This procedure must be continued until the backlash disappears. It should be remembered that if the spring is overtightened, it will be very difficult to rotate the steering wheel.
If, during inspection (diagnosis) of the steering rack, other faults are identified, then it is necessary to carry out a full-scale repair of the Lada Kalina with the replacement of all failed parts. Fortunately, there is no shortage of repair kits for the Kalina steering rack.
Design features
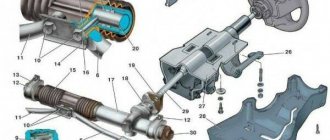
The structure of the Lada Kalina steering unit includes:
- electric amplifier;
- steering column, adjustable for reach and tilt;
- electric power steering rack with gear ratio change mechanism;
- rods with tips, as well as rotary levers.
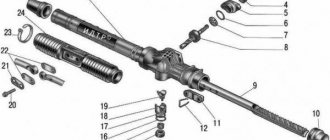
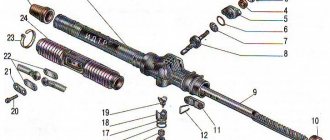
In the mechanism housing there is a unit with mechanical gearing, where the main operating element is a helical gear, the pitch of the teeth of which varies depending on the length of the rack.
The figure shows the design of the Lada Kalina rack and pinion unit.
The pressure in the rack-and-pinion pair is carried out by means of a spring, and the plastic liner present is designed to reduce the friction force. The compression level of the spring element is adjusted using a nut. The factory gap between the steering shaft and the rack is 0.1 mm in the LADA Kalina model.
If a knock appears inside the unit, it can be eliminated by adjusting the gap with your own hands. The steering shaft is centered using two bearings, one of which is located in the column bracket, and the second is located inside the electric power steering housing. The bracket is connected both to the pedal mounting unit, or rather to its front part, and to the body. Structurally, the bracket together with the pipe forms a hinged connection from a pair of plates. This unit provides a change in the position of the steering wheel, where the width of the range of movement is limited by slots in the designated plates.
The specific position of the pipe is fixed by a lever, which is connected to a special bushing that performs an adjustment mission. It is screwed onto a coupling bolt located just in the slots of the plates. When the lever is turned, the sleeve rotates synchronously. At this moment, the fixation of the plate weakens, and the steering wheel begins to change its position. Springs located in the middle of the bracket and plates, when the fastening is loosened, pull the pipe in the upward direction.
Let us repeat, the steering unit of the Lada Kalina has two rods and rotary levers. The rod design includes two tips, one of which is external, and the second is internal. The process of adjusting the length of the rod is carried out by rotating the threaded bushing present here. Having completed the adjustment manipulation, the position of the tips should be fixed with specially designed bolts. The outer rod end is connected to the swing arm bracket via a ball joint.
The power steering mechanism, operating on an electric drive, changes its degree of gain depending on the driving speed. When the car is stopped, the amplifier produces maximum torque, and the steering wheel turns very easily. As the speed increases, the force on the steering wheel of the Lada Kalina increases, which is facilitated by a decrease in the torque generated by this unit. The mechanism is based on an electric motor, which transmits rotation through a gearbox “hidden” under the column casing. The amplifier is controlled using an electronic unit, which is supplied with impulses from speed sensors, recognizes the amount of force when rotating the steering column shaft, and also reads the number of revolutions of the engine shaft. The instrument panel has a special indicator that allows you to monitor the operation of the amplifier.