Stove tap device
Externally, the faucet of the VAZ 21099 stove from the interior looks like this:
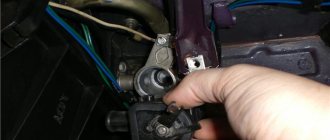
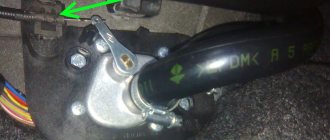
The arrow points to the valve control lever, which is driven by a sheathed rod (“cable”). The tap on the passenger compartment side is connected by pipes to the heater radiator, on the engine compartment side - to the cooling system.
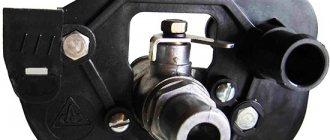
In the photo above it is in the open state, corresponding to the extreme right position of the knob on the stove control panel (bottom photo).
“Souring” of the damper prevents the valve from opening/closing, while incorrect adjustment of the draft increases the free movement of the lever, as a result of which the damper does not open completely and interferes with coolant circulation.
What is hidden under the panel in the car interior?
The “refrigerator effect” becomes most noticeable if you still continue to use old VAZ models with front-wheel drive: 2108, 2109, 21099. Let's try to figure out whether there is any possibility of replacing the heating system yourself. Despite the visual identity of the car models, there is still some difference in these VAZ units of the 8th and 9th models.
This difference is not fundamental. It’s just that in the process of evolution, unnecessary air ducts were removed from the design, the shape of the damper and the location of the radiator were changed. But this does not change the principle of operation. The interior is heated by air, a radiator connected to the engine cooling system is responsible for heating it, and the heater itself is located under the instrument panel in the car, which is higher in the VAZ 21099 due to some design features of the stove. With the help of connected air ducts, heat flows into the interior.
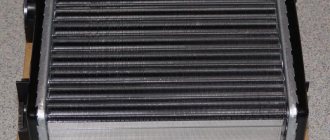
Radiator in the engine cooling system
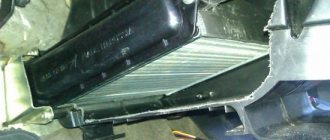
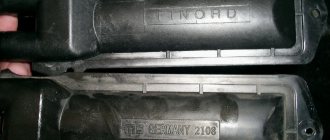
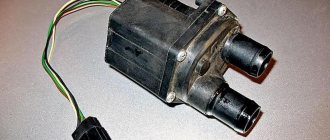
To force heated air into the cabin, a fan is located at the top of the heater, which rotates using an electric motor. The easiest way to access it is from the engine compartment. The heater radiator, mentioned above, is located in the VAZ 2109, 2108 and 21099 models near the heater itself. It has a seal in the form of a polyurethane foam gasket and consists of two plastic tanks, cooling plates and tubes arranged in two rows.
Since heating is connected to the car’s cooling system, fluid circulation through the radiator occurs using the pump of this system. You can regulate its flow using the heater tap and various levers that affect the position of valves and dampers. Warm air enters the cabin through two central and two side nozzles, inside of which there are dampers that regulate the intensity of heating. The direction of flow is also changed by blades-blinds using levers in the cabin.
After the air in the cabin is heated, it is necessary to circulate it and maintain the set temperature. It is necessary to release the waste stream outside. In this regard, on VAZ 2108 models, hot air flows out through holes located in the central body pillars. On 9-model cars, these holes are located in the corners of the rear side windows and have rubber valves that prevent atmospheric air from entering the air ducts.
Where is the heater valve installed on the VAZ 21099?
The part is attached to the front panel with two M6s (10 wrench). In the cabin it is located almost exactly in the center of the car, near the floor. The photo shows a view of the faucet with the instrument panel, heater assembly, console and floor tunnel casing removed:
As you can see, it is installed from inside the cabin and secured with two M6 bolts (or studs); the nuts are screwed onto them from the engine compartment side.
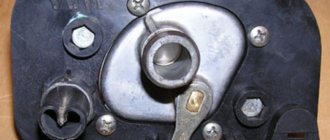
In the engine compartment it is located under the steering rack:
Why do breakdowns occur?
As noted above, the shut-off valves of the heater are a very vulnerable element of the VAZ-2109. If it fails, then it will not be possible to ignore the breakdown. First of all, on the floor, at the base of the passenger seat in the first row, a puddle forms under the carpet. In addition, leaking antifreeze emits a very characteristic odor, which should also suggest a malfunction of the stove.
Leakage occurs for three main reasons:
- use of low-quality cranes by a domestic automaker;
- oxidation;
- mechanical destruction.
The Volzhsky plant supplies its products with membrane-type locking fittings. This system has one inherent drawback - poor tightness. Even with careful use, such taps break very quickly.
- VAZ 2115 heater valve: replacement, where is it located
The second malfunction occurs due to the fact that the heating system is not used for at least 4-5 months a year. This period is quite enough for the valve casing and moving elements to become covered with sediment. As a result, his insides literally stick together. The owner of the car makes a significant effort to open it, and as a result the unit simply collapses. That is, a third type of breakdown occurs.
Replacing the faucet of a VAZ 21099 stove with a high panel with your own hands
Before work, drain the antifreeze from the cooling system - in any way convenient for you. If the heater tap is replaced on an injection machine, disconnect the battery. Loosen the clamps and remove the pipes from the tap fittings.
Remove the floor tunnel and console. If the engine is fuel-injected, then disconnect the block from the ECU (“brains”) mounted inside the console. Having removed the pipes from the tap fittings on the interior side, unscrew the nuts securing it located outside and remove the tap along with the seals.
Before installing a new product, check the damper lever linkage adjustment. The rod shell is secured with a special metal clamp:
By changing the position of the shell, ensure that the tap closes and opens completely when moving the lever on the panel.
Before connecting the pipes, apply sealant to the tap fittings - as a preventive measure against antifreeze leaks.
Having completed the repair, proceed to pouring antifreeze. After opening the expansion tank cap, fill to about. Close the lid and start the engine, and when the coolant temperature begins to rise, turn it off. After opening the lid, wait until the level drops and add liquid to the maximum mark.
Sometimes this procedure has to be repeated up to three times. The pressure generated in the cooling system when the tank is closed will gradually “push out” the air pockets.
What are the signs of a malfunction?
You only need to replace the heater valve on a VAZ 2108-09 if you notice problems with its tightness.
The most important sign of a leaking heater tap is the appearance of puddles of coolant in the car interior on the carpet in front at the passenger’s feet and a typical sweetish smell. In most cases, replacing the heater tap on cars such as the VAZ 2108 and VAZ 2109 can be done by yourself to save money.
Common causes include a leak under the shift lever or valve diaphragm. In these two cases, it is not recommended to postpone replacement until later, because a leaking heater tap is not only a source of an unpleasant odor, but also a decrease in the required level of coolant.
Therefore, to make the task easier, let’s consider which option to choose for this part and clearly demonstrate how to do it.
Problems with VAZ 2108-99 heaters with a high panel
Almost all owners of these cars note that cars with a high panel have a “colder” stove. Moreover, measures such as replacing and adjusting the heater tap, replacing an aluminum stove radiator with a copper one do not bring the desired result.
The point is a flaw, or, more precisely, a miscalculation in the design of the heater as a whole. For comparison, look at how heaters with low (a) and high (b) panels are arranged:
The heater control damper 8, working “paired” with a tap, on a stove with a high “torpedo”, is structurally designed to create less resistance to air movement, which contributes to better “purging” of the radiator.
But in reality, it constantly warps, as a result, cold air is not cut off (when the tap is open), but gets into the cabin in addition to the radiator. It’s practically impossible to eliminate this on your own, so some owners change the stove body by installing the “old” version.
Tap selection
Before you begin replacement, it is important to select a new, high-quality faucet that can reliably serve the heating system of your VAZ 2109.
Factory
| Crane type | Peculiarities |
| Factory | This is a standard type of faucet that the VAZ 2109 is equipped with from the factory. Its main advantage is its affordable price. As for the reliability and frequency of jamming, here we are talking about obvious shortcomings. It is worth taking such a faucet as a replacement only if you could not find others |
| Ceramic | It is more expensive than the factory device, has high strength, but its throughput is lower compared to the third option. Low throughput rates can lead to the fact that the efficiency of the stove in winter will leave much to be desired |
| Ball | Excellent throughput, high reliability and durability. Alas, even such faucets turn sour, although their prices are higher than their analogues |
Considering the features of the presented taps, the optimal solution would be ball or ceramic. The second option is more suitable for those who live in regions with not very severe winters.
Ball
How is the replacement made?
How to open the heater tap on a VAZ 2114
If the tap does not open and you discover a problem in the summer, then there is no need to rush, but the leak requires prompt elimination - after all, the cooling system is constantly losing antifreeze, and this, in turn, calls into question the normal functioning of the power plant.
You should know that in both older and new 2109 models, the tap is located opposite the front passenger seat, under the panel.
To replace the unit in question you will need the following:
- new tap;
- a set of gaskets (usually it is sold complete with the above unit);
- a can of WD40 or its equivalent;
- wire brush;
- wrenches for 13 and 10 (both socket and ring);
- screwdrivers;
- container for antifreeze;
- new coolant.
Malfunction - characteristic symptoms
What actually happens is that the faucet is leaking, as evidenced by the following signs:
- traces of water are found on the floor in the cabin;
- There was a corresponding smell of antifreeze in the car.
Having found one of the above symptoms, you must certainly examine the broken unit. Remember that if you do not fix the damage on time, then the repairs will cost even more money, and it is probably no longer possible to do it yourself.
How to perform an inspection? It will be useful to get under the hood of an unfamiliar engine. It must be emphasized that leaks sometimes occur in different places of the cooling system of accounting programs, so it is useful to examine it all. It is more convenient to do this with a flashlight. Coolant, namely, often drips from:
- radiator;
- joints of hoses and pipes.
When it turns out that the faucet is the culprit of the malfunction, the owner needs to start replacing it as soon as possible.
This requirement is even more pressing if it is winter, because without heating in a car it will be very uncomfortable and also unsafe if you have a long trip through a sparsely populated area.
What to do in case of depressurization
If there is a flood in the cabin, then first of all you need to move the crane control handle to the extreme left position. This will save you from scalding, engine overheating and the need to buy another bucket of antifreeze. If the valve is closed, but coolant flows out from under the torpedo, it means that the supply pipes, hoses, or the valve itself have burst. In this case, you need to urgently stop, turn off the engine and either take the car to a service center, or get the necessary tools from the trunk and begin repairs.
Modernization of the VAZ 2109 heater
Those who like to “tinker” with cars and experiment can carry out a small modernization of the crane in the old “old-fashioned” way. This will require a ball valve with an angled handle. The sequence of actions will be as follows:
- 1. Drain the coolant;
- 2. Unscrew the plug in the tap and pull out the valve. It won't be useful anymore.
- 3. A 3-kopeck USSR coin will be suitable as a new plug. It will need to be inserted into the “glass”;
- 4. Screw in the plug;
- 5. Under the hood, cut off the heater pipe and install a water tap;
- 6. Tighten the clamps on both sides;
- 7. Pour in antifreeze;
- 8. Check the system.
Every car enthusiast has the right to decide what suits him best. Experienced VAZ 2109 owners recommend a ceramic faucet for replacement. The complete set consists of the part itself, fasteners, and rubber seals. Situations of leakage or “sticking” do not occur after installation and during operation. It makes sense to purchase new pipes. It is likely that during use they have lost their elasticity and cracked. And this is one of the reasons for coolant leakage.
Replacing the faucet and fan motor – can we do it ourselves?
If checking the radiator does not fix the problem, the cause is in the heater itself. The next common breakdown is a malfunctioning faucet. But even in this case, you will have to remove the entire device, since it is unlikely that it will be possible to determine the nature of the problem, and, most likely, only a replacement can help. First you need to disconnect the hoses from the pipes on the heater tap, unscrew the faucet fastenings and remove it. Then you should dismantle the rods going to this part, remove the facing panel on the floor and disconnect the air duct located in the tunnel. Next, all that remains is to remove the heater wires, unscrew the mounting nuts and remove the device. Naturally, replacement and installation are done in the reverse order.
Selecting a heating tap and cost of the part
A driver faced with a leaking heating tap will inevitably be faced with the question: which tap to buy as a replacement? The question is not as simple as it might seem at first glance. Because there are three types of heating taps, which differ not only in cost, but also in design. Let's list them:
- faucet with membrane. This is exactly the crane that the manufacturer installed on the “nines” that came off the assembly line. Cost - from 400 rubles. This is the cheapest faucet that can be found on the market today. However, the low price should not deceive the car owner: the reliability of membrane taps leaves much to be desired. And you can purchase them only in one case: when you couldn’t find anything else;
- ball valve As the name suggests, the locking element in this device is a massive ball, which is much more reliable than a standard membrane. However, the above ball is made of steel. And therefore susceptible to corrosion. Therefore, a car owner who decides to open the tap with the onset of cold weather may be in for a very unpleasant surprise. The cost of such a crane starts from 550 rubles;
- ceramic faucet. The most reliable and at the same time the most expensive option. Corrosion is not a problem for such devices: their body is made of plastic, and the antifreeze is locked by two tightly pressed ceramic plates. The cost of a ceramic faucet starts from 700 rubles, and if the car owner is not short of money, then ceramics should be purchased.
Here we should make one digression and tell a real-life incident. One driver I know experienced first-hand all the delights of domestic heating taps. Once again, having discovered a puddle of antifreeze on the floor of the cabin and remembering the domestic manufacturer with a kind word, he solved the problem radically: he disassembled the console, pulled out the leaking diaphragm valve, and replaced it with an antifreeze hose. He brought the long end of this hose under the hood and screwed it to an ordinary Chinese-made plumbing faucet. He screwed the crane itself to the right wheel arch with a piece of ordinary steel wire. Since then he has had no problems with antifreeze leakage. But such a solution cannot be called convenient: every time you need to open a tap, a person has to stop and climb under the hood. So think for yourself, decide for yourself, as they say.
Some car enthusiasts install plumbing taps under the hoods of their cars.
Replacement procedure
If you have been using the car, be sure to let its power plant cool down - otherwise the coolant will be very hot, and this is dangerous.
- VAZ 2110: replacing the stove valve yourself
The car must be placed on a ramp or pit, since you will need access to its bottom.
Before changing the shut-off valves discussed in this article, set the stove regulator to the extreme right position, that is, to maximum heating. Only in this case will you be able to completely drain the coolant from the radiator.
Replacing the heating valve on a VAZ 2109
Before starting work, let's decide on consumables and tools. Here they are:
- new furnace tap;
- a pair of steel clamps for hoses with a diameter of 20 mm;
- canister of new antifreeze (4 liters);
- metal brush to remove rust;
- a set of rubber gaskets for the heating tap VAZ 2109 (in case the old ones are worn out);
- silicone-based automotive sealant;
- a pair of screwdrivers: Phillips and flat;
- socket heads for 13 and 10;
- set of open-end wrenches.
Sequence of operations
First of all, you need to pay attention to two points. Firstly, it is most convenient to change the stove valve in the inspection hole. At least on an overpass. And secondly, before replacing the valve, the engine must be allowed to cool properly, and the antifreeze mode regulator should be set to the “hot” position. This will allow the antifreeze to completely drain from the heating radiator.
- A container is installed under the car standing on the pit to drain the old antifreeze. The cap on the radiator is unscrewed and the coolant is drained.
- Under the hood there is a pair of hoses attached to the faucet pipes using clamps. These clamps are thoroughly cleaned of dirt with a wire brush. If they are very rusty, you can use WD40. Once the rust is gone and the bolts on the clamps begin to move, the clamps are loosened using a flathead screwdriver.
As a rule, a lot of rust and dirt accumulate on the heating tap clamps
The side panel is held in place by two self-tapping screws, unscrewed with a Phillips screwdriver.
After removing the panel, access to the tap opens, you can loosen the clamps and remove the hoses
The faucet is held on by three 10mm nuts; they can only be removed with a socket head
The faulty faucet has been removed from its niche - a new one can be installed
Video: changing the heating valve and radiator on a VAZ 2109
So, replacing the heating valve on a “nine” is a task that even a novice car enthusiast can do. All you need to do is follow the recommendations above and remember to drain the coolant before starting work.
Execution of work
The car must be placed on a pit or ramp. Its wheels are fixed with stops. You should start working no earlier than the engine has cooled down. Don't forget to apply the handbrake! You will also need to disconnect the battery - it will be enough to remove the negative wire from it.
It will not be possible to do without draining the antifreeze. Therefore, the prepared container is placed under the hole intended for this purpose and, unscrewing the plug, wait until the coolant drains out completely.
Next, you need to disconnect the pipes connecting the engine directly to the mechanism that has become unusable. The fastening clamps on them are loosened. Use a brush to clean the threads on the two studs that hold the heater tap itself. As reviews indicate, without WD40 it is most likely impossible to easily remove a faulty unit.
Only after this can you completely unscrew the clamps and remove the pipes. Please note that sometimes some antifreeze remains in them. You should be prepared for this and have a vessel ready. To avoid getting your hands dirty, you should also wear gloves.
Having completed the work on the hood side, you need to go to the interior. It will also be impossible to do without removing the torpedo, or rather, its side panel. Having opened access to the remaining pipes, they are dismantled. In those situations when it turns out that they have completely retained their properties and do not need to be replaced, they will only need to be disconnected from the tap. And coolant often leaks from these pipes - be prepared for this.
After the tap has been rid of the tubes, we move again under the bottom of the vehicle. Here, using a 10mm wrench, unscrew the nuts holding the above element in place. Then, returning to the salon, they pull out the tap itself, removing the spring retainer. Only after this is it possible to dismantle the cable leading to the regulator.
When installing a new mechanism, do not forget to return the rod to its place.
Reassembly is carried out in reverse order.
As practice shows, quite often car owners leave the old gaskets behind when replacing the faucet itself. This should not be done under any circumstances. Even if the seals look good, they still have a very limited life and can quickly become unusable. The new ones are supplied complete and you won’t have to spend extra on them.
When returning the pipes to the tap, the joints should be treated with silicone sealant; this will allow you to forget about grooves for a long time.
Before filling the system with antifreeze, return the drain plug to its place.
Device on the dashboard
It happens that you open the door of your car, sit in the driver's seat, insert the key into the ignition, start it, and liquid begins to drip from under the center panel. And sometimes it doesn’t just drip, but pours. If you are an inexperienced car enthusiast, you immediately wonder what happened. And if you don’t have much experience, then you know perfectly well that the interior heating system has become depressurized. Let's look at how to remove parts of the VAZ 21099 stove without the help of specialists for diagnostics, repair, and possibly replacement.
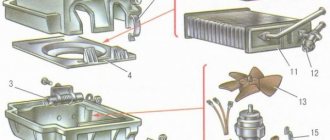
First, let's study the structure of this device. The stove on the VAZ 2108-21099 is located under the central panel, between the dashboard and the engine shield. It is attached with four bolts to the air supply box. Consists of two plastic casings - left and right. The heater radiator is located inside the casings. It consists of two rows of tubes, heat exchange plates and two plastic tanks, and is attached with three screws to the right casing. An electric fan is mounted on top of the heater; it is necessary to pump air into the cabin. It can be removed from the engine compartment side. There is also a stove tap - a miracle device that allows you to keep hot antifreeze out of the heater, as well as tap rods and pipes.