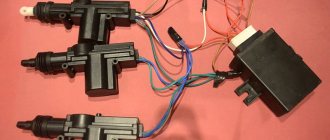
According to current traffic regulations, driving a car that does not have brake lights is prohibited, and this should be clearly remembered. True, this rule can be taken into account in practice only when leaving the garage. But what to do if the feet on the VAZ 2114 fail during the trip? Why not call a tow truck because of such a problem? In fact, this problem can be solved even on the road.
Brake lights VAZ 2114
To do this, you only need to have a minimum set of tools:
- multimeter (even the simplest one will do);
- Screwdriver Set;
- sandpaper (for cleaning oxidized surfaces);
- set of wrenches.
In addition, it is good to have a fuse box diagram on hand.
The rear brake lights on the VAZ 2114 do not light up.
Typically, LED lamps have a certain polarity for connecting to the vehicle’s on-board network.
Manufacturers always take this into account when developing. Incorrect connection results in the lamp not lighting up.
In some cases, such inclusion may lead to damage.
If a connection polarity violation is detected, this indicates that the repair on the vehicle was carried out by an unqualified person.
Malfunction of the car generator LED lamps are very sensitive to voltage surges in the on-board network (along with it, the current through the LEDs increases, which leads to their destruction).
The voltage may increase if the generator components (namely the stabilizer) are faulty. This is especially common on domestic cars due to the lower quality of component production compared to more well-known brands.
Why don't my brake lights come on?
Often, car owners have a situation where the rear brake lights do not light up.
An experienced motorist can guess what the reason might be.
Therefore, it will not be difficult for him to determine the source of the malfunction and eliminate the problem.
For beginners and inexperienced owners, it is advisable to contact specialists or study reliable information on car repairs.
This article outlines the main causes of this malfunction and provides recommendations for eliminating it.
The owner of the car can make the repairs himself or contact a car service center.
Features of this tuning
The brake light in the spoiler has a number of advantages:
- It's stylish, that's why they buy spoilers. Without a spoiler, the VAZ looks like a simple classic car, even a kind of retro, but with a spoiler it looks quite original.
- The spoiler best conveys the stop signal, and you can come up with any animation that attracts attention, but you need to be careful with this.
- The spoiler has a low price, and almost every driver can install it independently.
- The spoiler is installed once for many years, so it is beautiful and profitable.
- The brake light on the spoiler is more visible, so even from a road safety standpoint, the spoiler wins.
Auto-assistance
If the installed fuse of the required rating immediately blows, there is a short circuit (short circuit) in the circuit. Please note that the fuse can protect not only the feet, but also other circuits.
Installing a fuse with an increased rating is fraught with the risk of a car fire;
- If oxidation is detected on the terminals, clean the contacts mechanically or use an aerosol contact cleaner.
- Having turned on the ignition first and holding the brake pedal depressed, check whether there is power on the positive wire that goes from the limit switch to the rear light connector.
If there is power, there is a malfunction in the lights themselves;
- check whether the positive signal is coming from the mounting block to the limit switch.
Lamp burnout
This reason occurs quite often, since the light source for the rear running lights in 2114 is a conventional incandescent lamp, which during operation is subject to various vibrations, which negatively affects the lamp spiral, and it can break. This situation leads to the lamp not working.
As a rule, with such a breakdown, one of the lamps most often comes out. The chance that both lamps will fail at the same time is quite small, but it still happens. Therefore, if a malfunction of the reversing lights is detected, first of all it is necessary to check the integrity of the incandescent lamps.
Checking the lamp
The lamp must be checked after removing it from the vehicle. To do this, just take the lamp, wipe it with a dust cloth, then point the lamp at the light so that the spiral is clearly visible. There should be no breaks in the spiral; it should be intact from beginning to end.
Brake lights of VAZ 2114 do not work
In such a car, having eliminated the malfunction of one system, you cannot be sure that it will not appear again.
Other causes of malfunctioning brake lights Sometimes the reason why the brake light on a car does not light up is a malfunction of the electronics.
In this case, it is better to take the car to a service station.
There are also exceptions, for example, when a defective light bulb comes across. In addition, lamps may burn out due to normal wear and tear. In these cases, the problem is solved by simply replacing them. Do not forget that you need to contact only trusted workshops.
Additional Tips
Before each trip, especially over long distances, you should check the functionality of all lighting equipment, including brake lights. In order to reduce the likelihood of breakdowns along the way, you need to periodically check the condition of the sockets and bases of the rear light bulbs, and periodically clean them of oxides and dirt.
In case a breakdown does occur, you should always have an additional set of light bulbs and 10 amp fuses in your car, as well as a multimeter to check them.
Source
Why do the reverse lights on the VAZ 2114 not light up?
If the brake lights and parking lights do not light up, the most likely loss of contact is at the point of their connection to the body (“ground”) of the car or in the socket.
This can happen due to a broken wire or oxidation. The broken end is connected to the terminal by soldering or crimping. Oxides are cleaned off with a sharp tool (knife or screwdriver); after repair, it is advisable to cover the joint with paint or grease to prevent re-oxidation. It is quite rare to encounter a malfunction when not only the brake light, but also the other indicators on the car do not light up.
This is usually observed in “drowned” cars that have somehow been in water (as a result of careless driving or an accident).
Even after thorough drying, moisture still remains inside the interior trim and electronic components.
Its presence leads to increased oxidation of conductive surfaces.
Electrical Problems
Users
1 messages 0 thanks
Car: vaz 21053
- Top
- Answer
- Quote
- Insert nickname or quote
Our people
848 messages 3 thanks
- City of Odessa, Ukraine
- Car: VAZ 210700-20
- Top
- Answer
- Quote
- Insert nickname or quote
Lord of the spark / Honorary comedian of the club
Legends
674 messages 1 thanks
City of vases, vases,
- Top
- Answer
- Quote
- Insert nickname or quote
Users
5 messages 0 thanks
Car: VAZ2107
- Top
- Answer
- Quote
- Insert nickname or quote
Club founder
6530 messages 33 thanks
- Moscow city
- Car: LADA 21043, VAZ 2101
- Top
- Answer
- Quote
- Insert nickname or quote
Legends
1169 messages 0 thanks
- City of Domodedovo
- Car: VAZ 2114
- Top
- Answer
- Quote
- Insert nickname or quote
#7 Vitaliy2008
Administrators
6041 messages 93 thanks
- Protection against spam bots: 730
- City of Gatchina Len. region
- Car: BMW 730 i burned out after a crooked repair, sold VAZ 21043 sold, BMW X3 E83 2005 I'm driving now
- Top
- Answer
- Quote
- Insert nickname or quote
Legends
2084 messages 2 thanks
- Protection against spam bots: 321
- City of Yaroslavl
- Car: Renault Duster
- Top
- Answer
- Quote
- Insert nickname or quote
#9 Nikos
Users
1 messages 0 thanks
Car: vaz 2105
Good afternoon ! Tell me what could be wrong: I was driving from the sea and the car stalled as if the spark had disappeared. I drove for about 200 meters and it suddenly started up, and so on 6 times in 100 km. At the same time, the fuel level and oil temperature needles dropped to zero, as if the ignition had been turned off. and the starter and dimensions work!
- Top
- Answer
- Quote
- Insert nickname or quote
Users
3 messages 0 thanks
Car: VAZ 21043
- Top
- Answer
- Quote
- Insert nickname or quote
Our people
678 messages 31 thanks
- City of Stavropol region
- Car: VAZ 21051
- Top
- Answer
- Quote
- Insert nickname or quote
#12 Abbot
Administrators
746 messages 5 thanks
- City Ukraine, Kyiv
- Car: Daewoo Lanos 1.5
Igorek, How did you connect the tape? First, disconnect the tape and everything you connected.
Then change fuse F15 (10A)
By the way, your lights went out not only in the rear left, but also in the front right.
- Top
- Answer
- Quote
- Insert nickname or quote
#13 Igorek
Users
3 messages 0 thanks
Car: VAZ 21043
Post edited by Igorek: 25 April 2014 — 23:55
- Top
- Answer
- Quote
- Insert nickname or quote
Administrators
746 messages 5 thanks
- City Ukraine, Kyiv
- Car: Daewoo Lanos 1.5
- Top
- Answer
- Quote
- Insert nickname or quote
#15 Igorek
Users
3 messages 0 thanks
Car: VAZ 21043
Post edited by Igorek: 28 April 2014 — 16:18
- Top
- Answer
- Quote
- Insert nickname or quote
Administrators
746 messages 5 thanks
- City Ukraine, Kyiv
- Car: Daewoo Lanos 1.5
- Top
- Answer
- Quote
- Insert nickname or quote
Users
2 messages 0 thanks
- Protection against spam bots: 123
- Car: VAZ 2104
- Top
- Answer
- Quote
- Insert nickname or quote
#18 Vitaliy2008
Administrators
6041 messages 93 thanks
- Protection against spam bots: 730
- City of Gatchina Len. region
- Car: BMW 730 i burned out after a crooked repair, sold VAZ 21043 sold, BMW X3 E83 2005 I'm driving now
- Top
- Answer
- Quote
- Insert nickname or quote
Users
2 messages 0 thanks
- Protection against spam bots: 123
- Car: VAZ 2104
- Top
- Answer
- Quote
- Insert nickname or quote
#20 Vitaliy2008
Administrators
6041 messages 93 thanks
- Protection against spam bots: 730
- City of Gatchina Len. region
- Car: BMW 730 i burned out after a crooked repair, sold VAZ 21043 sold, BMW X3 E83 2005 I'm driving now
If the fuse is constantly on, then two options are possible:
- poor contact in the fuse box;
- Somewhere there is a short circuit (short circuit).
- We take a 12 volt light bulb and connect two wires to it, + and -, respectively.
- We take out the blown fuse and connect the wires from the light bulb to the places where it contacts the block. If the lamp is on, then there is a short circuit somewhere.
The only way to find the location of the short circuit is to turn it off in order and check in the same way everything that this fuse is responsible for.
The main diseases are:
- Wires that go to the trunk lid and to the license plate lighting. Most often, they are the ones who fray and short out.
- The next weak point, which is why the VAZ 2109 does not light up, then unhook the cable, which is located at the driver’s left foot, which is not on the engine shield, but on the back side of the wing, under the carpet. Having disconnected the cable, we just disconnect the circuit for the license plate illumination and the lampshade.
- If after this our light on the fuse box goes out, then we have found the place where it shorts. Next, you need to completely look at the wiring and treat it with electrical tape.
vote
Article rating
leon1193 › Blog › Decoding the fuse box VAZ 2109-2114
Decoding the fuse block VAZ 2109 F9 (7.5 A)
Right fog light and fog light warning lamp
F8 (7.5 A
) Left fog light fuse
F1 (10 A)
Headlight wiper motors (at the moment of switching on), headlight wiper switch relay (contacts) and headlight washer switch valve
F7 (30 A)
Electric motors headlight cleaners (in operating mode).
Relay for turning on headlight wipers (winding). Electric motor for heater fan, washer pump, rear window wiper. Rear window washer timing relay. Rear window washer activation valve. Relay for the electric radiator cooling fan (winding) and for turning on the rear window heating. Indicator lamp for turning on the heated rear window and glove compartment lighting F16 (15 A)
Turn indicators, relay-breaker for turn indicators and hazard warning lights (in turn indicator mode).
Indicator lamp for turning on the turn signal. Rear lights (high-speed running lights). Windshield wiper motor and relay. Generator excitation winding (when starting the engine) and brake fluid level warning lamp F16 (15 A)
Fuse VAZ 2109 warning lamps: emergency oil pressure, closing the carburetor air damper, turning on the handbrake.
“STOP” display. Coolant temperature and fuel level indicators. Indicator lamp for reserve fuel remaining. Voltmeter. “CHECK ENGINE” indicator light. “TEST” board. Warning lamps for the on-board monitoring system, seat belts not fastened and doors not closed. Power circuit for inertial door lock switch F3 (10 A)
Rear lights (brake signal lamps).
Interior lighting F6 (30 A)
Electric window motor, power window relay
F10 (7.5 A)
License plate lights.
Engine compartment lamp. Instrument lighting lamps. Indicator lamp for turning on the side light. Heater lever illumination display. Cigarette lighter lamp Left headlight (side light). Left rear light - side light F5 (20 A)
Radiator cooling fan electric motor and its activation relay (contacts).
Sound signal and relay for its activation F11 (7.5 A)
Right headlight (side light).
Right rear light (side light) F2 (10 A)
Direction indicators, relay-breaker for direction indicators and hazard warning lights (in hazard warning mode).
Hazard warning light F4 (20 A)
Rear window heating element.
Relay for turning on the heated rear window (contacts). Socket for connecting a portable lamp. Cigarette lighter F15 (7.5 A)
Right headlight (high beam)
F14 (7.5 A)
Left headlight (high beam).
Indicator lamp for high beam headlights F13 (7.5 A)
Left headlight (low beam)
F12 (7.5 A)
Right headlight (low beam)
1 (8 A)
Reserve fuse in the VAZ 2109 block
2 (8 A)
Reserve
3 (8 A)
Electric motors of headlight wipers at the moment of switching on).
Relay for turning on headlight wipers (contacts). Headlight washer activation valve 4 (16 A)
Headlight wiper motors (in operating mode).
Relay for turning on headlight wipers (winding). Heater fan motor. Electric motors for the rear window washer and wiper pump. Rear window washer timing relay. Valve for turning on the windshield and rear window washer. Relay for the electric radiator cooling fan (winding) and for turning on the rear window heating. Indicator lamp for turning on the heated rear window and glove compartment lighting 5 (8 A)
Turn indicators, relay-breaker for turn indicators and hazard warning lights (in turn indicator mode).
Indicator lamp for turning on the turn signal. Rear lights (high-speed running lights). Windshield wiper motor and relay. Generator excitation winding (when starting the engine). Brake fluid level warning lamp. Indicator lamp for emergency oil pressure. Indicator lamp for covering the carburetor air damper. Indicator lamp for turning on the hand brake. “STOP” display. Coolant temperature gauge. Fuel level indicator. Indicator lamp for reserve fuel remaining. Voltmeter 6 (8 A)
Fuse for rear lights (brake signal lamps) in block 2109. Interior lighting
7 (8 A)
License plate lights.
Engine compartment lamp. Instrument lighting lamps. Indicator lamp for external lighting. Heater lever illumination display. Cigarette lighter lamp 8 (16 A)
Radiator cooling fan electric motor and its activation relay (contacts).
Sound signal and relay for its activation 9 (8 A)
Left headlight (side light).
Left rear light (side light) 10 (8 A)
Right headlight (side light).
Right rear light (side light) 11 (8 A)
Direction indicators, hazard warning relay-breaker (in hazard warning mode).
Hazard warning light 12 (16 A)
Rear window heating element.
Relay for turning on the heated rear window (contacts). Cartridge for connecting a portable lamp. Cigarette lighter 13 (8 A)
Right headlight (high beam)
14 (8 A)
Left headlight (high beam).
Indicator lamp for high beam headlights 15 (8 A)
Left headlight (low beam)
16 (8 A)
Right headlight (low beam)
Angel eyes
A fairly popular tuning is the use of LEDs to create “angel eyes”. They look quite attractive. To perform optics replacement work you will need the following tools:
1. Resistors. 2. LED. 3. Jars with an outer diameter of 7 centimeters. 4. 9 volt batteries. 5. Plexiglas sticks with a transparent structure.
Headlights for tuning a VAZ 2114 will look quite interesting, for which you need to do the following work:
- First you need to heat the stick until it becomes soft. Thermal deformation is necessary for the stick to become flexible and become a kind of ring.
- After heating, you should take a stick and twist the jar with it. After giving the required shape, it is left to cool. When the stick cools, its shape will not change.
- After hardening, you can trim off the excess ends.
- The two LEDs must be connected in series using a resistor.
- We sand the ends.
- Using a tape measure, make a notch at the same distance around the circumference of the rod. This must be done to ensure uniform lighting.
- The formation of grooves should be done at the ends.
- All LED connections must be isolated.
- The gap in the ring should be covered with foil.
- You must use sealant to secure the ring to the projector. In this case, the notches should face the inside of the projector.
The last step is to connect the system to a power source. The results obtained will be very interesting.
Mounting block VAZ-2113, 2114, 2115. Location of fuses and relays.
New model mounting block VAZ-2113, 2114, 2115. Location of fuses and relays.
Relay Description:
K1–relay for turning on headlight cleaners; K2–relay-interrupter for direction indicators and hazard warning lights; K3 – windshield wiper relay; K4 – lamp health monitoring relay; K5 – power window relay; K6 – relay for turning on sound signals; K7 – rear window heating relay; K8 – headlight high beam relay; K9 – relay for turning on low beam headlights; F1–F20—fuses; X11 – terminals of the wiring harness block
Table of circuits protected by fuses on the VAZ 2114
Fuse number
Circuits protected by a fuse
Rear fog lamp switching relay. Rear fog lamp lamps. Rear fog lamp switching indicator
Direction indicators, relay-interrupter of direction indicators and hazard warning lights (in hazard warning mode) Hazard warning lamp
Front interior lamp. Central interior lamp. Luggage compartment lighting. Illumination lamp for the ignition switch. Lamp for monitoring the engine management system. Brake light bulbs. Trip computer (if installed)
Socket for connecting a portable lamp. Relay for turning on the heated rear window (contacts). Rear window heating element
Sound signal. Horn relay. Cooling fan electric motor. Fan fuse.
Direction indicators, relay-interrupter for direction indicators and hazard warning lights (in turn indication mode). Reversing lamps. Relay for monitoring the health of lamps. On-board control system display unit. Instrument cluster. Insufficient oil pressure indicator lamp. Parking brake indicator lamp (brake light fuse). Brake fluid level indicator lamp. Low battery indicator lamp. Trip computer (if installed). Generator excitation winding (in engine starting mode). Front windshield wiper. Seat heating control.
Numbering of plugs in the connecting blocks of the VAZ 2113, 2114, 2115 mounting block
Diagram of the VAZ-2113, 2114, 2115 mounting block Option No. 1.
Relay Description:
K1–relay for turning on headlight cleaners; K2–relay-interrupter for direction indicators and hazard warning lights; K3 – windshield wiper relay; K4 – lamp health monitoring relay; K5 – power window relay; K6 – relay for turning on sound signals; K7 – rear window heating relay; K8 – headlight high beam relay; K9 – relay for turning on low beam headlights;
Diagram of the VAZ-2113, 2114, 2115 mounting block Option No. 2.
Pinout of connectors of the VAZ-2113, 2114, 2115 mounting block.
Complete set of mounting blocks VAZ-2113, 2114, 2115.
Date added: 07/14/2014
Author: Dmitriev Alexander
- VAZ 2110
- Other
- Engine
- Steering
- Electrical equipment
- Transmission
- Brake system
- Suspension
- Tuning
- Video publications
- VAZ tuning photo stream
- Operation and repair manuals
Search principle
To find a fault in any vehicle on-board network system, you should use the method of sequential elimination of elements. The point is to consistently check electrical appliances and sections of the circuit, excluding elements from the list of reasons that could cause a breakdown. To do this, you need to clearly understand the design and operating principle of the system. When troubleshooting, you need to move from the components that require the least effort to check, to the most difficult to diagnose elements.
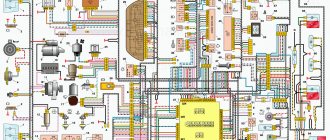
Electrical diagram
We immediately emphasize that the pinout of connectors and color markings of wires may differ not only between different models of the same automaker, but also among one model of different years of manufacture. Before you start searching for the cause of the breakdown, you need to find an electrical diagram specifically for your car model.
We will consider the principle of operation of brake lights and the troubleshooting algorithm using the example of the VAZ 2101-2102 circuit. The photo shows the general diagram of the vehicle's lighting and light signaling. We need to isolate the components involved in the operation of brake lights.
- 6 – mounting fuse block;
- 13 – brake light switch. It is a non-locking button (returns to its original position after removing the force). Located directly next to the brake pedal. When the brake pedal is released, the contacts of the limit switch are open, no current passes through it. Accordingly, when pressed, the contacts close, allowing flow through the lamps;
- 19 – lamps that light up when you press the brake pedal.
We do not have a diagram of the mounting block, but we know in advance that the brake lights only work when the ignition is on. There is a wire from the mounting block to the brake light limit switch, on which there is a constant + after the ignition is turned on. As soon as the limit switch contacts close, + goes to the brake light bulbs, which are connected in parallel. The “ground” of the rear lights is common and consists of a wire screwed to the car body.
In the diagram we presented, the elements are depicted as close as possible to how they look in reality. Don’t be alarmed if you only find a schematic diagram for your car with symbolic images of the elements. Schematic diagram of external lighting for VAZ 2114, 2115:
- 3 – mounting block;
- 8 – lamps for side lights and brake lights;
- 11 – brake light limit switch;
- K4 – relay for monitoring the serviceability of brake light lamps and side lights.
How to get to the right fuse
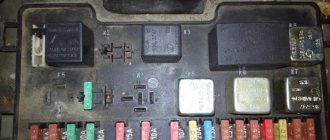
VAZ 2114 fuse box
Almost the entire electrical circuit of the VAZ 2114 is protected by knife-type fusible elements. The most powerful consumers such as headlights, electric fuel pump, etc. are already mounted via a relay. Most fuses can be found in the so-called. fuse box VAZ 2114. However, this diagram has exceptions:
- Next to the battery in the engine compartment there is a fog light relay;
- The fuses for the injection system are mounted under the instrument panel.
No special tools are required to dismantle VAZ 2114 fuses. Therefore, first of all, look at the VAZ 2114 fuse box, which is located under the hood of the car opposite the driver next to the left pillar. In order to open the fuse box, protected by a plastic cover, you need to lightly push a couple of cover latches towards you, lift it and remove it. After this, you will immediately be able to see the modules responsible for the electrical safety of various vehicle systems.
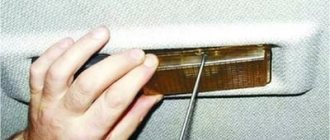
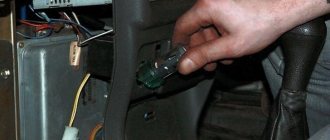
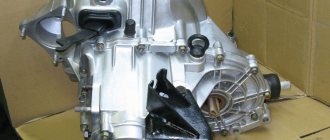
Removing the backplane board
First you need to remove the rear lights on the VAZ 2114, and for this you will need:
- Open rear trunk
- Remove unnecessary things
- Remove decorative trim
- Unscrew the plastic casing
- Take out the back panel
Now you have access to the socket and lamp of the rear license plate lamp, which also needs to be removed. The frog mounting pins are removed and the flashlight is already in your hands. The main thing is not to confuse it with the speed sensor, which is also located on the gearbox.
The purpose of each of the fuses on the car
If you turn over the removed cover, then on its inside you will see a diagram of the location of the relays and fuses in the mounting block (fuse block). On it, all these elements are numbered and designated from F1 to F20. Naturally, everyone is responsible for the performance of various consumers in the vehicle’s electrical network:
Diagram with the location of fuses VAZ 2114
- F1 – rear fog light and indicator lamp for turning on the latter (10 A);
- F2 – turn signal breaker relay, VAZ 2114 emergency alarm, turn signals (10 A);
- F3 – front and central interior lighting, trunk, trip computer and brake light bulbs (7.5 A);
- F4 – heated rear window (20 A);
- F5 – sound signal, cooling system fan (20 A);
- F6 – power windows (30 A);
- F7 – electric motor for heater, front window, washer, glove compartment lamp, cigarette lighter (30 A);
- F8, F9 – fog lights, right and left, respectively (7.5 A);
- F10, F11 – left clearance, as well as right, indicator for turning on dimensions, license plate lighting, as well as instrument lighting lamp, ashtrays (7.5 A);
- F12, F13 – right and left low beam, respectively (7.5 A);
- F14, F15 – high beam left and right, respectively (7.5 A);
- F16 – turn signals, dashboard indicators – parking brake, low battery, etc., as well as a trip computer (15 A);
- F17-20 – reserve respectively for 7.5, 10, 30 and 20 A.
The VAZ 2114 fuse diagram also contains backup fuses for 7.5, 10, 20, and 30 A, located in the lower part of the VAZ 2114 fuse block. Having pulled out the supposedly blown one, you should inspect it visually. If it is clear that the integrity of the thread is broken, then it can be unequivocally stated that the reason for the inoperability of the vehicle equipment lies precisely in the malfunction of the fuses. You can replace the inoperative one with a backup one of the same power according to the data that is presented to you by the diagram on the back of the plastic cover of the mounting block.
Recommendations
Comments 28
And that’s it., finally)) the mounting block turned out to be working, but still left a new one as a spare, because everything on the old glass heating fuses burned out. I replaced the rear boards and harnesses with wire plugs, all the wiring was rotted in the plugs, and the stop on the spoiler was also replaced with a new one, the old one somehow broke along with all the stops for the company.
Total. Stop in spoiler 250 rub. Boards cost 220 rubles each assembled. Flagella 20 RUR, mounting block from disassembly 1000 RUR.
The new stop spoiler is of much worse quality, the factory one was much brighter. The lamps in the new stop are terrible
We got around to replacing the mounting block with a new one. I rearranged everything and ooooopppppaaaa. The feet still don't work)))
To be honest, I don’t know where to dig anymore...
In the meantime, I’m waiting for my salary, I’ve already gotten used to pressing the rear PTF button when braking))) so that no one will correct my ass))) at least somehow attract attention that I’m braking)))
Still, I decided to disassemble the mounting block and the forecast is disappointing, fuse f4, which seems to be used for heating the rear window, the cigarette lighter and somewhere else, melts the board, everything around it is scorched, the board can’t even be reached, the plastic has already melted to it, next to fuse f3 it is is responsible for the brake lights, perhaps the whole reason is this, how reluctant I am to buy a new unit... but I’ll have to go on a hike. So far I have only treated it with liquid electrical insulation before replacing the unit
That's all we have. all 3 brake lights (spoiler) do not work. The light bulbs are intact, the grounds have been cleaned, the boards are in more or less perfect condition, the tracks are intact, the lamp serviceability relay has been replaced with a new one, the frog is working, the frog is receiving power. for a mystic?))))
In short: in the footsteps, today it was the same, two lamps stupidly burned out at the same time. The spoiler most likely has some wiring cut somewhere. Regarding the turn signal: this is a jamb of the board, either change the lights completely, or just start the car, turn on the lights, turn signal and lightly hit the glass with your palm several times until it is fixed (the contact comes off there). Cleaning doesn't help for long.
stripping does not save for very long. If the weather is rainy or winter, then a month at most (
Check the limit switch (frog) under the brake pedal, it may be damaged. Better yet, buy it and replace it right away, the price is reasonable.
I removed the wires from the frog, shorted it out, nothing lights up, I’ll buy a tester, I’ll have to see if there’s any current flowing to it at all
Check the limit switch (frog) under the brake pedal, it may be damaged. Better yet, buy it and replace it right away, the price is reasonable.
There are 12 V on the wires to the frog, so what?) I shorted the wires, everything is quiet. Let's go to the relay then
And if it burns out, the stops don’t burn? It is also responsible for the fact that if they do not light up, it signals or I do not understand its essence correctly
How can I check the relay? With others, it’s clear they click) should this also be?)))
if it’s burnt, you’ll know by the smell)) and you can open it, there are 2 latches on the sides, you can pry them off and the relay housing will come off
The problem with the blinking of the fog lights along with the turn signals was solved by cleaning the contacts of the headlight. My feet don't still burn. I'm looking at the relay
Are both feet missing? Look at the relay for monitoring lamp malfunctions (the largest in the ChYa) when I paralleled the stops with the PTF, the relay burned out from overload, but yours may have just burned out from a bad ground))
How to properly replace a burnt out element
Removing the fuse box
You need to pull the fuses out of the corresponding sockets using special plastic tweezers, which can be found here, in the upper right corner of the VAZ 2114 mounting block. You cannot pry fuses on non-energized circuits with any metal objects due to the risk of a short circuit. It should be taken into account that the electrical circuits of the sound signal, alarm, etc. are always energized. To ensure safety when repairing the circuits, the circuit must be de-energized - you just need to disconnect the wire from the “negative” terminal.
It is not always possible to visually accurately determine the performance of fuses. It will be possible to make a clear decision only after the “ringing”. To do this, you will need a regular tester, which will need to be set in advance to the “dialing” mode. After this, it will be enough to simply attach two terminals of the tester to the terminals of the suspicious fuses. If a characteristic sound is heard, the fuse is good - the cause of the malfunction of the car’s equipment is not in it, but probably somewhere further in the wiring or in the device itself.
Lastly, never use copper “inserts” or fuses that are not rated for amperage. Using an inadequate replacement designed for a higher current, there is a risk of damage to the “track” of the unit’s printed circuit board and even failure of the electrical appliance. Insufficiently powerful fuses will not be able to ensure long-term and uninterrupted operation of the current consumer in the vehicle's electrical network.
Main reasons
Almost all problems related to automotive electrical systems can be solved in approximately the same way. You need to look for a potential or probable cause of malfunctions in the problematic object itself, or understand the system responsible for supplying power.
The situation is exactly the same with devices called brake lights. If they stop working, then you should look for the reason in one of the following points:
- There were problems with the fuse. It has oxidized or completely failed;
- There are faults in the lamps themselves or in one lamp, depending on how many stops are not working;
- The reason lies in the mechanism responsible for turning on the warning signal when the brake is applied;
- In the socket where the stop light is installed, the contacts have oxidized;
- More serious problems appeared related to damage to the wiring.
Based on the stated reasons why the feet may stop working, we can draw a completely objective conclusion. A truly serious malfunction concerns only wear or damage to the electrical wiring. Solving such a problem with your own hands is not always correct.
When the rear brake lights (left and right) or the additional central brake light repeater fail, do not rush to look for an auto electrician and offer him money to fix the problem.
There is a high probability that you will be able to do everything on your own. You will only need a standard set of tools for a motorist, as well as an understanding of how the lighting equipment in general works in your vehicle. Start with the most likely and fairly simple to solve possible malfunctions. Only if it turns out that the problem is bad or damaged electrical wiring, then it makes sense to visit a good car service center. It is better to entrust such tasks to experienced craftsmen. The main components for restoring the operation of brake lights on your own, you will need a spare working lamp, a control unit or a multimeter, as well as suitable tools.
It would be a good idea to study the owner's manual and understand how to get to the stops on your car.
Fuse
The first place to start is by searching for the mounting block in which the fuse responsible for the brake light is located.
Moreover, each machine has its own electrical circuit and specific location of fuses.
These can vary significantly depending on the vehicle, such as:
- VAZ 2110;
- VAZ 2107;
- Toyota Rav 4;
- Ford Fusion;
- VAZ 2114;
- VAZ 2115;
- Ford Focus;
- Chevrolet Lacetti;
- Lada Granta;
- Hyundai Accent;
- Renault Logan;
- Hyundai Solaris, etc.
A blown fuse quite often causes the failure of a number of equipment, including lighting devices. Check fuses visually and using a multimeter.
But there is a simple and effective way to check that takes a minimum of time. To do this, start the engine and hold down the horn button. This is not suitable for all car models, but on many vehicles the same fuse is often responsible for the sound signal and brake lights.
If this is not the case, we continue our search further.
Brake lamps and their sockets
Next, you should switch to the brake lights themselves. In most cars, to gain access to the feet, the luggage compartment is opened, the rear light bulb is removed, after which you can get to the feet themselves.
But the dismantling process may differ on different brands and models. Here, start from your car specifically; if necessary, look for hints in the operating manual. There are examples of cars where you can get to the brake light without removing the rear optics at all. You still have one main task ahead of you. It consists of gaining physical access to the faulty device, the lamp and the socket in which it is located. Not everyone can try to determine the problem by eye. Here it is better to take a different route.
The optimal solution would be to use new, similar lamps instead of potentially faulty ones. Therefore, you will have to buy a light bulb in advance and screw it in. If you can't find a lamp of a similar size, use a marker or turn signal repeater. Make sure these conditional controls work first.
When everything worked after installing the new lamps, you found the reason. You can confidently buy new matching stop lamps, replace old ones and reassemble the unit in reverse order.
It is extremely important to take into account one feature. Some modern cars have such a principle of operation of brake lights, in which when one car brake light fails for one reason or another, the second one automatically stops functioning. That is, sometimes checking one lamp does not give a result, since in fact the chances are 50/50 of replacing the burnt lamp, and not the one that simply turned off in tandem.
If replacing the light bulbs did not give anything, check the sockets themselves. It happens that they oxidize, this breaks contact, and the device does not turn on, although power is supplied to it. Also make sure that the socket is connected to the vehicle wiring. If necessary, the contacts are disconnected, cleaned with fine-grained sandpaper, and then returned to their place. Even during this procedure, it is recommended to apply a special lubricant to the contacts after cleaning.
One more thing. When checking the sockets, it is also worth taking new light bulbs. It happens that due to oxidation of the cartridge, the lighting device itself fails. That is, in fact, 2 malfunctions occur simultaneously.
Problems with the switch
The brake light on a car lights up the moment the driver presses the brake pedal with his foot while sitting behind the wheel. When pressed in this way, the force is transferred to a special mechanism. It is popularly called a frog. It is also a limit switch and it is also a classic brake light switch.
There are 3 main reasons why a frog or limit switch may not work:
- contacts have oxidized;
- carbon deposits appeared;
- corrosion has formed.
Despite the slightly different processes, the essence of the problem is the same. It can be eliminated by stripping the frog, or by replacing the stop switch.
If none of the options are suitable, there is a high probability that the problem lies in damage to the vehicle's electrical wiring. Here it’s up to you to decide whether to try to resolve the issue on your own, or seek help from qualified specialists.
Considering the complexity of the electrical circuits of modern cars, a better solution would be to visit a trusted auto electrician. But the final choice is yours.