Hi all! Agree that the atmosphere in the car interior largely depends on the performance of the audio system, which consists of speakers, a subwoofer, an amplifier and other components. The equipment depends on the specific car. At the same time, situations often arise when the speaker in the car wheezes.
This is an extremely unpleasant phenomenon that can significantly ruin the pleasure of listening to music. Driving in the cabin in silence, or listening to the sound of the engine or wheels touching the road is not particularly pleasant. When there is no interlocutor nearby, the audio system becomes the only way to cheer yourself up and lift your spirits.
Today we’ll talk about what to do in such situations, why they can occur, and how to fix the system yourself. In many respects, you should start from whether only one speaker began to wheeze, or the problem occurs simultaneously on all devices.
Manifestation of wheezing
Here the car owner will be helped by his hearing. You don’t have to graduate from music school or have perfect pitch to recognize the wheezing pattern of a car speaker system. There are often several of the most common situations associated with wheezing in an audio system. Problems may appear as:
- wheezing of only one speaker;
- simultaneous wheezing of all speakers;
- sudden occurrence of a problem;
- gradual increase in wheezing from minor interference to strong extraneous sounds;
- formation of wheezing when working at minimum volume;
- the appearance of wheezing when the system is turned on at maximum volume.
Generally speaking, the main culprits for the appearance of extraneous sound in the form of wheezing in the operation of audio systems in cars are moisture, dust and frequent listening to musical compositions at maximum power. Specialists and medical experts generally strongly advise against listening to loud music. Especially when space is limited. When a person turns on music in a car, while closing all the windows and doors, the sound has an extremely negative effect on the nervous system. Loud music can damage your hearing and even damage your vision. But also using maximum power leads to gradual wear of the audio system elements, which causes that same unpleasant wheezing. Each situation needs to be dealt with separately. This way, the motorist will understand exactly what is wrong with his acoustic equipment and what to do correctly in a given situation.
Simultaneous wheezing of all speakers
It even happens that car owners install new speakers in their car, but they wheeze. The person is perplexed what to do in such a situation and why such a situation arose on new devices. Do not panic. Let's turn on the logic first. When all the speakers start wheezing at once, it is extremely unlikely that they all failed at the same time. Most likely, some speaker has started to work incorrectly and is setting the tone for all other acoustic elements in the car. And here you need to figure out what to do. A breakdown of all speakers at the same time is only possible in a situation where the driver turns the system on at maximum volume and the equipment operates under enormous loads for a long time. As a result, the coils overheat, they fall off their frame, and this is the unpleasant result. When the speaker begins to wheeze sharply, then it’s worth checking the car radio itself. When it operates for a long time at maximum power, there is a high probability of the amplifier failing.
When purchasing a car audio system, always check the quality certificates and product authenticity. Statistics clearly show that recently the number of counterfeit audio systems has increased sharply. The optimal solution would be to purchase equipment from a reputable manufacturer through branded stores that guarantee the quality and authenticity of their products sold. Take into account one more important feature in order to correctly assemble the audio system complex and not provoke premature failure of the equipment. In most cases, manufacturers put numbers on the speaker housing that indicate the maximum peak power. This is an indicator of the power that the system can withstand for a short time. Typically the figure is between 300 and 350 watts. But there is real, that is, rated or long-term power. It differs from short-term and is always less than the peak value.
Also, the cause of wheezing of all speakers at the same time can be a simple lack of voltage. Here it is worth checking the operation of the electrical equipment of the machine itself, which could fail and lose power. Or the audio system itself was selected without correctly taking into account the power available in the car. That is, the equipment consumes more than the machine can provide. For such situations, it is necessary to install a more powerful battery or generator. To determine whether there is a lack of voltage, you can simply look at the car radio screen. If the display goes dark a little when you turn up the power on the regulator, then the problem is definitely a voltage problem. But it is not a fact that it is not enough due to a weak generator or battery. The problem often lies in the contacts of the wires, which have oxidized, come loose and do not fit tightly to their attachment points.
Wheezing in one speaker
If wheezing occurs in the speakers in the car, you need to try to determine exactly how many sources of extraneous sound there are. It often turns out that only one device wheezes, while all other speakers continue to work normally. The culprit in this situation may be the car radio itself, the speaker itself, or the wire with which it is connected to the vehicle’s electrical network. Therefore, a logical question arises about how to eliminate the wheezing of speakers in a car. The solution largely depends on where the source of the problem is. Amplifiers provided on modern car audio systems most often include 4 independent amplifiers. Older versions use 2 amplifiers, while the very first models use only one. Therefore, it is possible that wheezing is provoked by only one of them, while the remaining elements perform their functions efficiently. To check this, just connect another speaker that you are sure is working. If even the new speaker makes wheezing noise, then the problem definitely lies in the radio or wiring.
When a speaker system is just being installed, it is not so difficult to damage its wiring. This usually happens when the installation is not carried out by a specialist, but by an amateur without the proper experience and knowledge. Also, the integrity of the wiring may be compromised during operation. At first this does not manifest itself in any way, but gradually abrasions form, the quality of contacts is impaired, and corrosion occurs. This leads to sound distortions, which the driver hears in the form of wheezing. If the malfunction concerns the radio, it is better to contact the experts. Sometimes repairs are quite cheap, and the problem is fixed in a few minutes. But when the device has already expired or was initially of poor quality, replacement is the best way out of the situation. Speakers and amplifiers will remain in place. Only the unit that is mounted on the front panel of the car will change.
Distortion at maximum volume
If wheezing appears at maximum volume, then there are many reasons: the tape recorder itself, the speaker system, the power supply of the tape recorder.
If the sound is distorted in one speaker, then you need to try replacing it and see the result. If all the speakers in the car are wheezing, think about it and check whether they have been exposed to moisture (it tears the diffuser, the suspension loses its elasticity if it is made of paper), whether dust could have gotten under the coil, through the torn dust cap, and whether the voltage is normal. It is also necessary to take into account such a factor as the old age of the speaker.
Of course, you can do some checks yourself, but it’s still better to contact someone who has skills in working with electronics. I hope this article has clarified for you why the speakers in your car wheeze and what to do in this case.
Wheezing at low volume
It seems obvious that the audio system will wheeze at maximum volume, since the equipment is under enormous loads and sometimes simply cannot withstand them. But what a surprise motorists face when the speakers in their car wheeze when the radio is operating at minimum volume. There are recommendations here as to why one of the speakers or several speakers wheezes in such a situation, and what needs to be done. Practice clearly shows that most often the column itself is the culprit. Wheezing at low volumes occurs due to breaks in the flexible electrical wiring that connects the terminals and coils. Moreover, breaks most often occur directly near the soldering point. To verify this exact cause of wheezing at low volumes, simply touch the wires. If you move the wiring a little and return full contact, the wheezing will immediately disappear. But constantly holding the wire with your hand is definitely not an option. You need to get to the broken wire and secure it properly by soldering and using insulating tape. If the wiring near the terminal breaks, the easiest way is to cut out part of the damaged wire and put a piece of a new one in its place.
Phone drops
The second reason why the speaker on your phone wheezes is when the device falls. In general, any fall for a phone, one way or another, has negative consequences, but in this case we are talking about dynamics. The fact is that if you fall, there is a high risk that the contact of the speaker cable may come off due to the impact, or the speaker itself may come unstuck. As a result, when listening to, for example, music, extraneous noises, crackling noises, etc. will be clearly audible. This, in fact, is why the speaker on the phone wheezes.
What to do in this situation and how can you fix the problem? Here again there are 2 options.
The first is to disassemble the phone yourself, check the contact on the speaker cable, or fix it if it has become unstuck.
The second option is to take the phone to a service center, where a technician will disassemble it and perform all the necessary manipulations.
What is better to choose is up to you.
Causes and signs of sound distortion
Here the car owner will be helped by his hearing. You don’t have to graduate from music school or have perfect pitch to recognize the wheezing pattern of a car speaker system. There are often several of the most common situations associated with wheezing in an audio system. Problems may appear as:
- wheezing of only one speaker;
- simultaneous wheezing of all speakers;
- sudden occurrence of a problem;
- gradual increase in wheezing from minor interference to strong extraneous sounds;
- formation of wheezing when working at minimum volume;
- the appearance of wheezing when the system is turned on at maximum volume.
Generally speaking, the main culprits for the appearance of extraneous sound in the form of wheezing in the operation of audio systems in cars are moisture, dust and frequent listening to musical compositions at maximum power. Specialists and medical experts generally strongly advise against listening to loud music. Especially when space is limited. When a person turns on music in a car, while closing all the windows and doors, the sound has an extremely negative effect on the nervous system. Loud music can damage your hearing and even damage your vision. But also using maximum power leads to gradual wear of the audio system elements, which causes that same unpleasant wheezing. Each situation needs to be dealt with separately. This way, the motorist will understand exactly what is wrong with his acoustic equipment and what to do correctly in a given situation.
Incorrect power selection
If you purchased a car on the secondary market, and all the speakers in it wheeze at high volume, the problem may be hidden in incorrectly selected power. When the radio produces a more powerful signal than the maximum the speaker system can receive, wheezing will be heard from all speakers during their operation.
That is why, before buying a new radio or speakers for your car, you must compare their power. Almost all modern car radios operate at a power of about 50-55 W. At the same time, only high-quality speakers can withstand such power. It is necessary to compare the power of the radio with the rated power of the speakers.
Please note: Most speaker manufacturers use a marketing ploy to emphasize peak power rather than rated power. You cannot rely on this parameter when selecting speakers for your radio. Most often, to find out the rated power from the peak power, you need to divide it by 10. For example, if the peak power, also known as the maximum, is indicated at 300 W, then such speakers will be able to work in normal mode with radios with a power of 30 W or less.
Problems with radio output
On budget radios, all car speakers can be connected to one output. If such a radio is installed in your car and the speakers wheeze during operation (even at not the highest power), you should check the condition of the output. Make sure that there are no signs of corrosion or various damages. It wouldn’t hurt to “ring” the circuit from the radio output to the speakers.
Speaker failure
A situation where all the speakers in a car fail at the same time is very rare, but it is possible. For example, drivers who have been listening to music at high volume for several hours in a row may encounter this problem.
When listening to music at high volumes, the speaker coils may overheat. Most often, they are secured with glue, which begins to melt under the influence of high temperatures, and the coils peel off from the speaker. This leads to wheezing when car speakers operate. In such a situation, they will need to be replaced.
Please note: In some situations, due to long operation of the radio at maximum power, the amplifier may fail.
Diagnosis of wheezing speakers
You should first analyze situations in which extraneous noises, overtones and wheezing are heard. Only after this can you understand why the speakers or individual speakers wheeze. First you need to answer two basic questions to localize the fault:
- Is one speaker wheezing or all at once?
- Is wheezing best heard at maximum or minimum volume?
Do-it-yourself speaker cone repair
Timely restoration of a damaged loudspeaker membrane will ensure its high-quality operation for a long time. Therefore, if wheezing and distortion begin to appear in the speaker system, first of all you need to carefully check the speaker cones. How to repair a speaker cone with your own hands. Minor damage is eliminated by applying rubber glue to the desired area, and larger defects are eliminated by applying a patch. To do this you need to do the following:
- Clean the gluing area from dust and dirt
- Use a sharp tool to cut off the overhanging edges of the tear
- Prepare a patch larger than the hole in size
- Coat the patch with glue and apply it to the back of the diffuser
As a patch, you can use newsprint, which is applied in 2-3 layers. If you use PVA glue, then you need to use office glue rather than construction glue. This completes the restoration of the speaker diffuser and after complete drying it can be installed in the speaker system.
Inadequate car radio setup
This most often occurs when car speakers choke all over the place and at high volumes.
To eliminate this cause, pay attention to the equalizer settings. Perhaps the low frequencies are inverted and the power of the radio is not enough to “feed” them
In BASS, SUPER BASS, ROCK modes, low frequencies are by definition overestimated.
Also, many models have a forced sound amplification setting. Denoted as LOAD. In general, if you use this function wisely, the sound quality of the acoustics of cheap cars can be radically changed for the better. On the other hand, when turned on at high volume, the speakers begin to hiss.
Repairing a subwoofer at home
How to seal a subwoofer speaker, if you find a hole in its diffuser (there are many reasons, carelessness, children playing pranks, and more), do not rush, throw out the old one, or look for a new speaker to replace it. Such damage can be easily and successfully repaired without consequences or noticeable changes in the operation of the subwoofer speaker. How to seal a subwoofer if a problem arises, we will help you now.
Let's get started
If you have firmly decided that rewinding the subwoofer speaker is not a problem for you, then prepare the following materials and tools:
- Shellac (or epoxy) for coating the subwoofer windings
- Solvent
- Rubber glue
- Screwdriver
- Soldering iron
- Micrometer
- Screwdriver
Having assembled a simple repair kit, let's get down to business:
- Disconnect the subwoofer from the amplifier, remove the grille from the speaker using a screwdriver and unscrew the mounting screws from the speaker, carefully remove the speaker from the housing, disconnect the speaker wires
- We inspect the condition of the speaker cone and immediately make sure that the leads from the voice coil have not been damaged.
- Using scissors, cut out a patch from thin cardboard, such a size that it covers this hole by a centimeter in any direction.
- You don’t have to look for electric cardboard, almost any one will do, you can even use a cardboard candy box
- It often happens that the shape of the diffuser is formed by the so-called double curvature surface
- Then you need to make two or three patches, which need to be glued overlapping one to the other
- Align the edges of the damaged part on the diffuser, impregnate the back side with “Moment” glue, diffuser material, wait a little for the glue to dry
- Prepare cardboard patches in advance, then generously moisten the damaged area on the diffuser with glue from the back side, then immediately apply the patches, our goal is to saturate the parts to be joined with glue
- Then we immediately remove the patches from the diffuser without removing them, you need to wait 20-30 seconds, then attach both patches back
- From the reverse side, press them to the diffuser, placing a roll of cotton wool or padding polyester inside the speaker basket
- It is necessary to ensure that the diffuser does not immediately bulge in the place of gluing, which means that you need to select the optimal force for pressing the patches in order to maintain the initial shape of its diffuser
- After a day, we remove the supported support roller from the speaker basket and inspect how well the connection has stuck together.
- If you notice areas that are not glued, then bring the tube of glue to the crack, and gently press the tube and press a drop of glue there
- The main goal is to eliminate chatter when the speaker is operating.
- Use a hairdryer to carefully heat the glue joint until the glue boils, remove the hairdryer and squeeze the gluing area with your fingers.
- Hold for at least a minute, after which the glue will set tightly and hold the patch.
- Carefully move the diffuser both in and out to make sure that the coil does not touch the magnet as it moves.
- If necessary, replace the sealing rubber, connect the speaker cables back to the speaker and install the speaker in place
- As you can see, gluing a subwoofer is not so difficult
- Then you need to do a test run at low volume to make sure there is no chatter during operation.
- Then we gradually increase the volume to maximum, listen carefully for the appearance or absence of any extraneous sounds
- If no extraneous sounds are found, you can return the grille to its place.
How to disassemble a loudspeaker head?
Be careful not to bring steel tools close to the magnetic system, especially from the side of the diffuser or centering washer! This may damage the diffuser or dust cap!
If you still need to use tools near a magnetic gap, use tools made of non-magnetic materials.
If the centering washer is glued with epoxy resin, then repairing the loudspeaker in the absence of spare parts can be very problematic.
In other cases, the complexity of the repair depends only on the design of the speaker and the adhesives used during assembly. If the glue that glues the suspension and the centering washer can be dissolved with acetone, then you can safely begin disassembly.
Most adhesives dissolve better when the speaker is still young. It happened that such speakers could be disassembled in a matter of minutes. Adhesive joints made with BF-2, BF-4 glue or glue with similar properties are best able to be dismantled.
To disassemble the speaker you will need the following tools and materials.
- Acetone is a solvent.
- Alcohol is a solvent.
- Pipette – for dosing the solvent.
- Scalpel – for cutting adhesive joints.
- Spatula – for cutting adhesive joints.
- Matches - as gaskets.
- Calico (cotton fabric) – to remove glue residues.
- Box wrench – for dismantling the magnetic system.
Other tools and materials may also be needed.
Chemically pure acetone is preferable to other solvents due to its relatively low toxicity. Therefore, it is better to choose acetone even when it is inferior to other solvents. For example, adhesive joints made using “88N” glue are better dissolved by ethyl acetate, but it is much more toxic.
True, if the diffuser and centering washer are glued with “BF-2” or “BF-4” glue, then ethyl alcohol can be used as a solvent. However, the possibility that there may be water in the alcohol makes acetone preferable.
Depending on what exactly is being dismantled, the appropriate dismantling techniques are selected. So, for example, if a paper hanger comes off, then the glue should be dissolved with the utmost care. If the rubber suspension comes off from the speaker body, then the work can be done more aggressively.
A convenient pipette can be made from a glass drawer and an “artificial vein” from a dropper (an elastic band into which needles are inserted directly while the medicine is being delivered into the vein). An ordinary medical pipette quickly breaks down under the influence of acetone, and its length does not allow it to reach some adhesive joints.
Pure acetone is easy to distinguish by its smell. You just need to know this smell. Unfortunately, nowadays they sell anything under the name “Acetone”. Often some arbitrary solvent or mixture of different solvents is poured into bottles. And this is not surprising, because we have 400 gr. acetone, costs the same as a bottle of vodka. This is a good reason to exchange a bottle of vodka for a bottle of pure acetone at some production facility.
Dismantling the suspension.
If you're having trouble persevering, consider playing your favorite movie in the background, as dismantling the moving system of a large speaker can take a long time.
Dismantling of the rubber suspension begins from some edge where there is less glue flow. By adding acetone and lifting the edge of the suspension, a cavity is created into which acetone is again poured.
The work will go faster if you start dissolving the glue in several places at once.
Car Speaker Repair
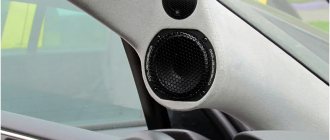
Car sound systems consist of two or three-way coaxial-type systems and a subwoofer. The coaxial device has an oval or round shape. Its design feature is the installation of a high-frequency head or “tweeter” on a special plate above the broadband acoustics diffuser. The system takes up little space, and the high-frequency head does not interfere with the propagation of sound waves. Car acoustics are subject to many negative influences. The presence of dust and constant vibration are the cause of failure of automotive audio systems.
Some models of coaxial car speakers consist of three speakers. Two of which - high-frequency and mid-frequency - are installed above the woofer. Most often, a malfunction occurs in the broadband head. You can restore the speakers in your car. This will require a simple tool and some skills. When repairing oval speakers with your own hands, you first need to remove the high-frequency unit.
To do this, you need to unscrew the central screw located on the rear flange of the speaker. The screw head is usually sealed. You need to remove the label, then the screw head will be accessible. After the module is removed, you need to carefully unsolder the wires that go to it. Now you can work on the broadband head. The rubber suspension of the diffuser is pressed against a plastic pad. It needs to be pryed off with a flat screwdriver or a knife blade and removed from the diffuser holder.
Then separate the rubber diffuser suspension. It is glued with elastic rubber-type glue, so you can pick up the edge with a screwdriver and then carefully peel it off with your hands. When the edge of the diffuser is completely separated from the metal base, the centering washer is removed. First, the voice coil wires should be unsoldered from the contact plate. Then very carefully peel off the centering washer. It is very easy to damage, so it is better to do the job with a flat and thin screwdriver.
When the speaker is completely disassembled, you can start looking for the defect. A malfunction of the acoustic system is determined by ear during operation. The sound in the speaker becomes distorted, wheezing and crackling appear, especially at high volume levels. Sometimes high frequencies disappear completely, and the sound becomes dull and unintelligible. Basically, repairing a car speaker with your own hands comes down to cleaning the magnetic gap of the broadband head from foreign inclusions. Most often, dirt or dust gets into the gap of the permanent magnet.
You can use a vacuum cleaner to remove debris. It is more difficult to remove metal particles from the gap. The speaker magnet is strong and a vacuum cleaner will not help here. When removing magnetic particles, regular tape will help. Small strips of it are inserted into the gap using a thin plate of textolite or other non-magnetic material. Then they are removed along with the adhered particles.
This operation should be repeated several times. You can see the quality of work using a powerful lamp and magnifying glass. The assembly is assembled in the reverse order. It is better not to remove the old glue, as this will allow the diffuser to be installed accurately. All gluing can be done with regular Moment glue. After installing the diffuser, you need to check by hand how well the voice coil moves in the magnet gap. There should be no mechanical interference. The coil should move without effort or rustling. Restoring and repairing car speakers does not require special knowledge, so anyone can repair speakers with their own hands.
The speaker wheezes in the car: diagnosis and solution to the problem
The atmosphere inside a car largely depends on the performance of the sound system. In budget cars, the standard radio and speakers leave much to be desired in terms of sound quality, and drivers often prefer to replace them. But if in this case the installation of new speakers is due to personal preference, sometimes the sound system itself forces the driver to think about replacing the speaker when the sound coming out of it is noisy.
The entire system as a whole, or each of the speakers individually, can fail. In some situations this is related to the power of the radio, in others the wiring may be to blame, in others it is necessary to check the speakers themselves or other elements in the circuit. Focusing on the symptoms and quality of the system, you need to perform various actions so that the acoustics in the car begin to work in normal mode at any volume level.
Easy cleaning of car speakers
Some car owners will find the operation of disassembling and assembling speaker systems too complicated. How to clean car speakers without disassembling them. If there are ventilation holes on the speaker housing, you can try to pull dust and mechanical particles out of the moving system using a strong vacuum.
A small diameter hose is connected to the ventilation hole. This place and free ventilation holes are wrapped with tape. The second end of the hose is inserted into the vacuum cleaner sleeve and is also sealed with adhesive tape. Next, it is connected to the output of the music system, heavy rock with an abundance of low frequencies is turned on, and the vacuum cleaner is turned on for extraction. A few minutes of work and the speaker is completely cleaned.
If you were unable to get rid of the contaminants on your own, then it is better to entrust the phone to specialists. There are two ways:
- a variety of mobile phone repair services - nowadays in any city they are presented in an assortment; due to their considerable quantity, such an “ambulance” for a telephone is usually easy to find within walking distance from home; since cleaning the speaker is not a complex operation, it can most likely be handled by almost any service center;
- specialized service centers are a more reliable option, but, unfortunately, they cannot be found for all brands of mobile phones; contamination of the speaker is not a warranty case, so the operation will be paid in any case, but you can be sure of the quality of the work performed.
The instructions must describe in detail the rules for cleaning the components of the device, deviating from which can be life-threatening. If, during the process of descaling or burning, damage to one of the elements of the device occurs and a gas leak occurs, you must immediately contact the emergency gas service.
Before proceeding with the procedures for cleaning the column, it is necessary to block access to gas and water
If, after weighing all the pros and cons, you have decided to clean the device yourself, we suggest that you familiarize yourself with industrial preparations and folk remedies that will allow you to effectively get rid of contaminants.
Recommendations
To ensure that you do not have problems in the future when operating speaker systems, you should take preventive measures and observe the operating conditions of the equipment. It is enough to follow some rules:
- Periodically check the connection of the wires and monitor their integrity.
- Do not allow dirt or moisture to get inside the equipment's speakers.
- Make sure that the speakers and all device chips are connected correctly.
- Carry out preventative cleaning of equipment.
Simple rules that will help extend the life of your equipment and allow you to enjoy high-quality and rich sound.
Wheezing at minimum or maximum volume
Start testing at low volume. If wheezing appears, then the problem lies in the connection of the wires to the speakers. Most likely they are coming off or damaged. To do this, you will have to disassemble the equipment and look at the internal components.
If everything works well, keep raising the volume. When wheezing occurs at high volume, the following types of problems are possible:
- Large particles of dust or dirt may cause vibrations and distortion of the sound.
- Water inside the speaker casing causes wiring and microcircuits to come loose, which also contributes to hissing.
- Problems with the capacitor not properly outputting the amplitudes of the sound waves.
IMPORTANT: Before starting repairs, make sure that the problem is in the column and not in the receiver.