- 176 2 277k
The heater on my Audi 80 was leaking, something had to be done... But to do this, you first need to remove it.
This is not easy to do; the whole day was spent on the procedure. This tool came in handy:
- pliers;
- insulating tape;
- 24" head, large knob;
- head “8.10”, small knob, extension to it at least 10 cm;
- crosshead screwdriver;
- key "at 8.10".
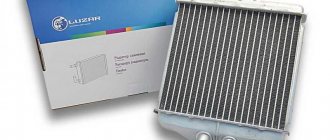
Of course, a new heater core is also needed. The original radiator VAG 8D1 819 030 B will cost plus or minus 7,000 rubles. Analogues of Meyle 100 819 0002, AVA AI 6097, Behr-Hella 8FH 351 311-421, Nissens 70224, Termal 110224BA and others. Their cost ranges from 500 to 3500 rubles.
That's all that needs to be dismantled to get to the heater radiator. But first of all, as with almost any repair, it is necessary to remove the terminal from the battery to preserve the electrical equipment of the car.
Let's start removing the steering wheel. To do this, carefully, but applying a certain force, pull each of the corners of the signal panel towards you.
Then we disconnect the wire coming to the steering wheel.
We unscrew and remove the steering wheel itself, having previously marked its position on the shaft with a marker.
Remove the top cover of the steering switch block; to do this, unscrew two self-tapping screws.
Next, unscrew the two screws securing the dashboard. Carefully remove it, while disconnecting the two connectors on each side.
Then loosen the bolt a little through the oval hole at the bottom of the lower cover of the steering switch block.
Next, pull the switch block towards you and disconnect the two connectors. At the same time, remove the rubber plug on the ignition switch.
Let's start removing the central panel.
First of all, we remove the radio. Carefully remove the stove control knobs; to do this, pull them towards you.
Unscrew the screws under the left and right handles and remove the decorative trim.
Next, unscrew 4 more screws securing the heater control unit to the center console. We also unscrew the 2 screws securing the ashtray.
Let's start removing the shelf under the driver's feet. To do this, remove the choke handle (if equipped) by pressing a thin screwdriver from the bottom onto the latch, while pulling the choke handle towards you.
Then we remove the shelf under the driver’s feet. Everything is simple here, unscrew all the bolts and remove it.
It is advisable to remove the glove compartment, but I did not remove it. Then carefully move the plastic covering underneath the ashtray and unscrew two bolts on each side.
Next, carefully remove the 2 plugs on each side of the main panel and unscrew the bolts.
Then unscrew the two nuts that secure the stove to the central panel. One nut is on the glove compartment side, the second is on the driver's side.
Disconnect the connector on the driver's side.
Then carefully pull the panel towards you, lifting it slightly to the top. At the same time disconnecting the remaining connectors.
Next, we disconnect the six latches on the air duct and unscrew the two screws on the lower air duct.
Then unscrew the two heater mounting nuts in the engine compartment. Don't forget to disconnect the hoses from the heater radiator.
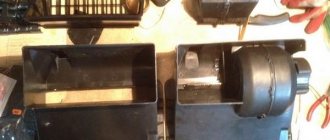
Next, in the cabin, carefully pull the stove towards you. Then we unscrew the two self-tapping screws and, unlatching the two latches, pull the stove radiator itself to the top.
Before removing the heater radiator, you will additionally need to remove the frill from the hood side and unscrew the air intake.
Dismantled stove radiator. Assembly is carried out in reverse order.
I strongly welcome everyone)
After flushing the cooling system, you can safely install a new heater.
As you know, in order to change the heater, you need to remove the dashboard. To do this, we remove all the attachments on the dashboard; I won’t describe in detail how, for example, removing the steering wheel, tidy, etc. I will only describe in detail what directly concerns the stove and torpedo.
If anyone doesn’t know how to remove the attachment, you can look at the article. andrejgrechuha.ru/zamena-pechki-audi-80-b4/
1. Remove the steering wheel, steering column switch, and tidy. 2. Remove the shelf under the driver’s feet. 3. Remove the glove compartment and the small shelf under the passenger’s feet (located behind the glove compartment). 4. We remove the gearbox cover, the beard, it is not necessary to remove the tunnel (just lift the handbrake and move it away). 5. Remove the central frame in the dashboard, and before that: - Unscrew the heater control unit. - remove the radio. — unhook the buttons. — remove the two outer grilles of the blower to unscrew the frame.
So all the attachments have been removed, now you need to unscrew and remove the torpedo.
1.
Unscrew the two nuts holding the center of the torpedo (I unscrewed all three so as not to get in the way).
2.
Remove the plugs on the sides of the torpedo and remove the bolts under them.
3.
Inside the dashboard behind the tidy, remove the screw that holds the windshield blower to the main one. It is convenient to use a short screwdriver.
4.
Unscrew the three screws holding the main braid on the dashboard.
5.
Unfasten the latches from the side blowers.
After that, we pull the torpedo, unhooking the connectors along the way (since I have additional buttons connected to the torpedo, I had to disconnect several connectors).
Stage 3.
Well, the topeda is removed, we take it out of the cabin so it doesn’t get in the way. Next we see the stove, which also needs to be removed to replace the heater.
1.
To do this, remove the right wiper, cover, air filter and unscrew the two nuts holding the stove.
2.
We go into the engine compartment, in the area of the ignition coil, and also unscrew the two nuts. And also don’t forget to remove the cables.
Stage 4.
Replacing the radiator, sealing the dampers and cleaning under the dashboard.
This is how it all looks now)). Taking this opportunity, I decided to at the same time improve the wiring for additional buttons, because... With the torpedo installed, I ran the wires in the way that was convenient.
1.
Next, unhook the stove from the manifold (held on by latches) and halve it to seal the dampers. I took the stove body home to wash it in the bathroom and seal the dampers while it was warm. To halve it without breaking the latches, I took two screwdrivers, pry it up with one and push it apart with the other))
2.
As you can see, the dampers are still intact (no through holes), but they are starting to crumble. I glued it with 4 mm splen. We clean the flaps so that the glue can be easily removed, you can heat it with a hairdryer. Before gluing, I heated the flap with a hairdryer, degreased it and stuck it on. Where the round holes of the damper are, the splen grabbed each other so that you can tear horseradish off))
3.
We wash everything that can be washed, glue fresh foam rubber onto the central blower.
4.
It is also advisable to clean the contacts on the stove block, which regulate the speed of the stove motor. I borrowed a nail file from my wife, it is thin and easy to get to the contacts. For me, the second speed did not turn on immediately, but after 5 minutes, apparently until the contact breaks through the dirt.
5.
Now the time has come for the culprit of this action)) We install the heater itself. I glued strips of the same splenite on the sides of the radiator so that the air would not flow past, but through the radiator. We snap the stove back onto the manifold. I also removed the motor and blew it out at the nearest tire shop with compressed air, for 50 rubles.
6.
Before installing the torpedo, it is advisable to check the operation of the stove and check how the dampers move. In addition, I also refined the wiring for additional buttons, now everything is assembled there according to Feng Shui))
The heater itself cooks very well. For example... it was 5 in the morning, the car had not yet warmed up to operating temperature, but at first speed it was already warm in the car. In general, I’m ready for winter)) ... oh yes, I also need to change the oil to 5w40))
The radiator of the Audi 80, as befits all cars, is located in the engine compartment and is responsible for cooling the “heart” of the car. If the engine overheats, the root cause is in the radiator. What happens next depends on the reasons that caused the overheating.
Sometimes it becomes necessary to replace the radiator.
In any case, a decision can only be made based on the results of the diagnosis, when the full picture becomes clear.
We replace the heater radiator on Audi 80 and 100 cars on our own
In order for the automobile heating system to operate normally, it is necessary to maintain the working condition of all its components and mechanisms. One of these is a radiator device. If this element fails, the driver will know about it the first time the heater is turned on. How to replace the Audi 80 heater radiator and in what cases it is necessary - read in this article.
In what cases does the stove radiator need to be replaced?
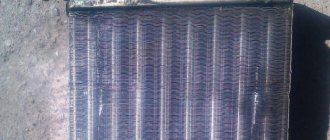
Old and new Audi radiators
By what signs can you determine that the radiator of the Audi 80 B3, B4, Audi 100 C4 or any other model needs repair or replacement:
- Coolant leak. In this case, the radiator of the Audi 80 B4 stove could fail, or the pipes could be damaged.
- The blowers blow cold air, but the heater is set to warm.
- The heating system takes a long time to warm up before it starts blowing cold air.
Heater device
The new generation of Audi 80 in the B3 body was officially presented in the early autumn of 1986. In Europe, sales of the new product started in 1987. Other markets received the updated Audi 80 a little later.
The B3 platform was used as the basis for creating the car. But here it is important to note that the connection with the platforms from Volkswagen B at Audi was severed. That is, the new B3 truck for Audi was not the same as the platform from the Passat B3.
The B3 body was very popular. Largely due to its aerodynamics and full galvanization, which allowed the plant to provide a guarantee not for 8 years, but for 12. Since 1991, they began to produce the next generation in the B4 body. There were no fundamental changes, but Audi still introduced certain innovations.
Many Audi 80 owners prefer to independently repair and maintain their car and its systems, including the heating system. But to work with it, you first need to study the device and circuit.
On Audi 80 cars, the heater is designed extremely simply, regardless of the body type in front of you. B3 and B4 have approximately the same circuit, therefore the design of the Audi 80 stove is considered identical.
This greatly facilitates independent repairs and finding faulty elements without outside help. Audi 80 cannot be considered ideal cars in terms of self-service, since some stages of repair are objectively difficult to cope with.
Stove body
Although this statement does not apply in any way to the heating system of a German vehicle. If we talk about the design and layout of the stove on the Audi 80 B3 and B4, then these cars include:
- heat exchanger, that is, radiator;
- body consisting of 2 halves;
- mounting bracket;
- connection board with resistor;
- fresh air dampers;
- temperature dampers;
- electric fan;
- air ducts;
- tubes and pipes;
- electric fan fuse.
As for the malfunction of the Audi 80 stove, in most cases this is due to the controls located in the cabin, the radiator or the electric fan.
Interior heater
Scheme of work
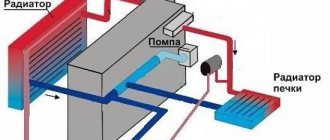
To ensure that fresh air enters the interior of the Audi 80 B3 or B4, a ventilation system is used for this. The air flows around the stove body and, due to the presence of special dampers, enters the outlet nozzles.
When the heating system is set to heating mode, the cold air coming from the external environment is heated. This is provided by the radiator of the heating system, which is heated by the engine coolant.
The stove radiator itself is located inside the heating system housing. The fresh air that flows through the unit is heated by the hot sections of the radiator, after which the heated air ends up inside the cabin.
In Audi 80 cars in B3 and B4 bodies, interior heating is controlled by the air method. That is, the driver sets the temperature based on the ratio of hot and cold air. For such tasks, a control unit with a temperature damper regulator is provided here.
It is important to note that the heater on the Audi 80 involves the use of a four-stage heating fan. To increase or decrease the blowing power, select the appropriate operating mode. To set the fan to a particular rotation speed, connected resistances are used. The resistances themselves can be found inside the electric fan connection board. If any of the resistors fails, then the Audi 80 car owner has to change the entire board complete with resistors.
There are no significant differences between the heating system on the Audi 80 in the B3 and B4 body. In the case of the B4 body, as with the operation of the heater on the B3, counter flows of air pass through the openings located between the windshield and the hood, after which they enter the cabin using the air supply box.
Radiator and heater duct
Air supply is carried out naturally and forcefully. In the second case, the electric fan comes into operation. The only nuance that can distinguish B3 from B4 is the likelihood that the latter has a factory air filter. It allows you to pre-clean the air before it enters the cabin.
When the heater turns on, a special damper redirects air flow to the radiator of the heating system, where hot antifreeze circulates. If the stove is turned off, then the air will flow into the cabin from the air intakes, bypassing the heater radiator.
The control unit provides the ability to adjust the temperature, airflow intensity (different speeds of the electric fan), as well as the direction of air flow. There are corresponding symbols on the regulator that help you understand how to direct air to the legs, to the windshield, or directly to the sides of the driver and passengers.
Replacement instructions
Replacing the Audi 100 heater radiator is not a particularly simple task; to complete it you will need several hours of free time and all the necessary tools. As for the latter, you will need to prepare standard plumbing tools, including wrenches, pliers, screwdrivers, etc. To properly remove the heater stove, we recommend that you strictly follow all the steps specified in the instructions (the author of the video is the Workshop DU channel).
Execution Sequence
So, how to replace the device at home:
- First you need to remove the steering wheel itself - to do this, you first need to carefully remove the signal panel. Then you need to disconnect the wire that goes to the horn. Having done this, unscrew the nut that secures the steering wheel and remove it.
- After removing the steering wheel, you need to unscrew two self-tapping screws and dismantle the top cover of the control unit of the steering column switches.
- After completing these steps, you will need to unscrew the two screws that secure the control panel. After this, the device itself can be dismantled, and then the two plugs can be disconnected from it.
- Now, using a hexagon, you need to loosen the screw of the bottom cover of the steering column switch block; it is most convenient to reach it through a special hole. You also need to disconnect two more connectors, and then remove the rubber plug.
- Having done this, we proceed to dismantling the center console. To do this, you need to remove the car radio, as well as the heating system control levers. When dismantling the handles, be careful as there is a risk of damage. Carefully pull the handles towards you; if necessary, use a screwdriver. It should be noted that under the outer levers you can see two self-tapping screws; you need to unscrew them, after which you can dismantle the plastic cover. Having done this, unscrew a few more bolts that secure the ashtray.
- Next, you will need to remove the shelf located in the driver's foot area, as well as the glove box, which is located opposite the passenger seat.
- Now you need to move the plastic trim under the ashtray, and then use a wrench to unscrew two more screws that secure the middle part of the center console. On the side parts of the console you also need to remove the decorative plugs and unscrew several screws.
- Having done this, you should unscrew another nut that secures the center console to the heating system. This nut is located on the glove box side.
- There is another connector on the driver's side - it needs to be disconnected, after which you can dismantle the console itself by carefully pulling it towards you, while also lifting it. There are still a few connectors left, all of which need to be disconnected during dismantling.
- Having completed all these steps, we proceed to the most important thing - in the engine compartment you need to remove the pipes from the heating unit. In the area of the ignition coil there is a nut that is screwed onto a screw with a large washer. This nut should be unscrewed, and under it you can see another one - it also needs to be unscrewed.
- Now you need to remove the passenger side wiper. To do this, dismantle the cover that covers the filter element; the filter itself can be removed in place with the tray. Having done this, unscrew two more studs that secure the heating unit to the car body. Climb into the cabin and from there, carefully rocking the heater in different directions, pull it towards you. Dismantle the radiator assembly and replace it with a working device. The further assembly procedure is carried out in reverse order.
Replacement frequency, what antifreeze to fill
Speaking about the period for replacing antifreeze, first of all you should refer to the official operating instructions. In it, the manufacturer defines specific deadlines, different for each model and engine.
For Audi 80 B3 and B4, the fluid replacement period is two years. But it is worth considering that these data apply to factory antifreeze G11 VAG ZVW 237 102 green. Now it can no longer be found, but there is an analogue of the G11 VAG G 011 A8C in blue.
If you have a different antifreeze, then you should be guided by the data provided by the manufacturer of your fluid. This is usually average data based on the recommendations of automakers.
Antifreeze volume table
| Model | Year of issue | Engine capacity | how many liters of antifreeze are in the system | Original/recommended fluid |
| AUDI 80 B3 | 1986-1991 | 1.6 | 6.5 | original G11 VAG ZVW 237 102, analogue G11 VAG G 011 A8C, or any antifreeze with VW TL 774-C approval |
| 1986-1990 | 1.8 | 6.5 | ||
| 1990-1991 | 2.0 | 8.5 | ||
| 1983-1985 | 2.1 | 8.1 | ||
| AUDI 80 B4 | 1993-1994 | 1.6 | 6.5 | |
| 1991 | 1.8 | 8.5 | ||
| 1992-1994 | 1.9 | 6.5 | ||
| 1992-1994 | 2.0 | 6.5 | ||
| 1992 | 2.3 | 8.5 | ||
| 1992-1995 | 2.6 | 11.0 | ||
| 1991-1993 | 2.8 | 11.0 | ||
| AUDI 90 | 1985-1989 | 2.0 | 8.0 | |
| 1985-1989 | 2.2 | 8.0 | ||
| 1989-1991 | 2.3 | 8.5 |
Replacing the upper pipe
The upper pipe is tricky in that it can fail at the most inopportune moment. This usually happens for the reason that when all the pipes are replaced, and the top one is still in good condition, it is left alone, which is absolutely not allowed. An accident can happen at the most unexpected moment and anywhere. The worst thing is if this happens right on the roadway.
The fact that it's time to change the pipe is usually indicated by puddles under the engine. Here the situation is resolved quite simply: you can choose a suitable used pipe (preferably, of course, the original one, Audi 80 b 2 or b3, like all representatives of the concern, are sensitive to “original” spare parts. But, in principle, any will do, sometimes they take even from GAZ) and connect it, trimming and shortening it as necessary - the main thing is that the configuration matches.
You can often hear advice: cover the leak with electrical tape and lower the antifreeze level. Such a recommendation is useful only while searching for a service center; you can’t drive like this all the time - the leak will soon resume.
Replacing the Audi 80 B4 Heater Radiator Video
Operations for removing the steering wheel, steering column and instrument panel
1. Turn off and remove the steering wheel 2.4. Remove the two screws that secure the top switch assembly cover to the steering column. 3. Remove two screws, secure the instrument panel from below and at the same time carefully remove it from the electronic pads. Carefully place in a safe place. 4. Remove the movable oars
. It took a bit to unscrew the screw. and don't turn it all the way. access through the round hole on the right or at the top of the steering column switch 5. Pull the steering column out personally and disconnect the two white electronic pads to the right and left of the control shaft and carefully remove it from a safe place. 6. Remove the plug Ignition switch Operations for dismantling the central tunnel
1. Remove the rear ashtray and unscrew the two screws from the bottom 2.4. In the area of the parking brake buttons, remove the plug and unscrew the next bolt 3. Raise the parking brake and slide the freed part of the tunnel back. 4. Remove the screw that secures the transmission handle frame. 5. Unscrew the gear shift knob cover and remove the leather cover. Remove the front part of the frame tunnel. Operations for removing the center console.
READ Audi RS6 with 1001 hp - ideal family car with a speed of 207 mph (333 km/h)
1. Using pliers through a thick layer of thick paper or fabric, remove the handle that controls the plate (3 pcs.) 2. Unscrew the screw under the left and right handles and remove the plate from the control panel 3. Underneath we see a white box, at the corners of which There are 4 more screws, we attach it to the console. unscrew them 4. Open the ashtray and unscrew the head with one screw that secures the cigarette lighter to the ashtray.
How to replace a radiator on an Audi B4 cat
5. Remove the cigarette lighter and disconnect it, not forgetting about the backlight. 6. Remove the ashtray. To do this, unscrew the two screws that secure it at the top and the two screws at the bottom, which are accessible after removing the front part of the central tunnel. 7. Remove the tape recorder 8. If present, remove the small shelf located next to the center console keys. To do this, we will screw you with one screw deep into one shelf 9. I did not remove the center console, but unscrewed the 2.7 nuts under the dash that hold the pipeline together. Removing gloves and racks above the driver's feet 1. It is good that it remains clear to our client. I note that when removing the driver's shelf, only carburetor cars need to be removed. absorption. To do this, you need to use a narrow screwdriver to push the bottom of the hole on this handle and pull it towards you only. Torpedo removal operations
READ Replacement Outboard Bearing Opel Mokka
1. Open the driver and passenger doors on the dashes, remove the two plugs on each side 4. Remove the screws that secure the dash to the body 3. Then I removed the columns from the dash. You may not even find it useful 4. The torpedo is attached to the tunnel on the central floor. give two bolts to the left and right of tunnel 5. In the radio area, one screw and two small nuts should be inserted on the left and right. they strengthen the channels to the furnace Operations are performed under the hood
1. Turn 3 coins over the large dark plastic lining with a coin and lift it up. If you don't mind, of course, remove the 3.2 wiper as well. Remove the cabin filter, if there is one 3. Unscrew the two nuts that secure the filter to the plate box. We push the tapes and select the box (without losing the gasket) 4. Disconnect the 2.7 pins, attaching the oven to the body.
Radiator for Audi 80
5. There are 4.5 large washers in the ignition coil area. one on top of the other 15 cm below. unscrew them 6. The antifreeze did not freeze, just removed the 3.5 pipe from the radiator from an unfamiliar engine compartment Change the radiator plate READ Replacing the heater radiator Kia Sportage 2
1. In the cabin, carefully pull the dashboard towards you only. There is no need to use special forces, which, of course, saved something, in order to break something (I still had to unscrew the connectors under the dashboard from the driver, about 6 of them) 3.5. I refused to shoot the torpedo one hundred percent, took out its right end even further and took out the stove itself with the air duct assembly. 3. The radiator of the stove itself is secured with 2 screws and 2 latches. This one unscrewed and provided the last oven Reassembly.
1. Grab leaves of leaves 3.5. nut 3. Air intake shaft 4. Seal 5. Resistance 6. External fan 7. Heater housing 8. Heater control panel 9. Channel connections 10. Front foot fan nozzle 11. Front heating channel 12. Foot nozzle 13. Adapter for defrosting glass channel 14. Air intake shaft 15. Holding bracket
Audi 80 1994, 115 l. With. — self-repair
Then we remove the shelf under the driver’s feet. Everything is simple here, unscrew all the bolts and remove it. It is advisable to remove the glove compartment, but I did not remove it.
Repair of stove speed switch. How to disassemble the central panel of an Audi 80.
Then carefully move the plastic covering underneath the ashtray and unscrew two bolts on each side. Next, carefully remove the 2 plugs on each side of the main panel and unscrew the bolts. Then unscrew the two nuts that secure the stove to the central panel.
One nut is on the glove compartment side, the second is on the driver's side. Disconnect the connector on the driver's side. Then carefully pull the panel towards you, lifting it slightly to the top.
To do this, carefully remove the signal panel from the steering wheel. Disconnect the wire for the signal from the steering wheel. Unscrew the nut securing the steering wheel and remove it. Unscrew the two screws and remove the top cover of the steering column switch block. Next, unscrew the two screws that secure the dashboard.
We take it out and disconnect the two connectors.
Loosen the hex bolt through the hole in the bottom cover and remove the steering column switch block, simultaneously removing the two connectors. Removing the rubber plug Now we need to remove the center console.
My account
We remove the radio, then remove the heater control knobs. When removing, be careful not to break them.
To do this, carefully pull them towards you, prying them with a screwdriver. Under the outer handles, unscrew the two screws and remove the decorative trim. Remove the glove compartment and air duct.
The following picture opens on the left. These dampers are responsible for regulating the flow temperature. The damper on the left is not visible, but it is 1.5 times smaller than the right one. If the foam rubber on the large one still clung to life, then on the small one it completely crumbled.
Audi 80 1988, 90 l. With. — self-repair
Pieces of used luxury clogged the duct to the radiator. We clean and wash everything, and glue rubber to the flaps and attach it to the clamps. Foam rubber from a small damper Cut a piece in the shape of the damper We fasten two clamps in such a way that their locks do not interfere with the damper closing tightly. We tighten all the clamps and enjoy the warm air in the cabin with the ability to completely block it. There is an electrical harness above the place where the driver's shelf was on the back side of the torpedo, unscrew its screws from the bottom and left, and disconnect all the wiring.
All the pads on the dashboard are connected with special latches; to disconnect them, you need to press this latch from the sides, for example with pliers or with your fingers, if you can bend coins with your fingers.
There is a square plug in the recess under the handbrake, remove it. There is a screw hidden under it, unscrew it. Having unscrewed it, we can now release the gearshift knob casing, unscrew the knob from the handle and lift the casing up.
My knob did not unscrew, so I only had to lift the casing up, the casing itself is also held on by a self-tapping screw, which is located above screw 12. There are 2 screws hidden behind the ashtray of the rear passengers, unscrew it.
I have one nut. Raising the front edge of the console, we move it back. Our view will reveal the screws securing the lower part of the “beard”; we unscrew it. We move it back, the front part is on the guide rails, so you have to be careful not to break it!
I looked in the book for a description of the procedure for replacing it, it says about the need to remove the torpedo. Can anyone tell me whether it is possible to do without such a complete disassembly of the front interior? No one has a normal description of its replacement (and not what they like to write in books)? I don't want to do unnecessary analysis.
PS Which non-original stove radiator is better to buy?
1. Open the doors and “pick out” 2 round plugs from the ends of the dashboard. There are bolts there, unscrew them. 2. Pull out the “rear” ashtray. There are 2 more bolts - unscrew them. 3. Handbrake - up, there is a spring-loaded cap - remove it, unscrew the screw under it. Pull up the gearshift lever cover (unscrew the gearshift lever cap first), when you feel it stretching, pull the entire frame with the cover up. You will see 2 bolts there - unscrew them. 4. Now, sliding into the cabin, remove the lower part of the center console. In this case, you need to pull up and back the part from which the ashtray was removed in step 2. Once you remove it, you will see 2 more bolts (on each side) securing the torpedo - down with them. 5. remove the stove control knobs (using pliers through a cloth so as not to break them). There you will see self-tapping screws - unscrew them. This white “fig” will open with a switch. stove modes. There are 4 more self-tapping screws - take them down. 6. If there is a shelf on the center console, there is still a self-tapping screw in it - unscrew it. I. It’s time to remove the radio, you will have to work without music. 7. Pull out 3 deflectors in the middle part of the console, under them there are recesses with bolts for fastening the center console frame (two more at the bottom of this frame), unscrew them. Remove the frame. There, you will also have to disconnect several connectors from the “rear window heating” buttons, etc. 8. NOW IS THE MOST FINE OPERATION. Take out the white “fig”, but very carefully. Cables (3 pieces) for controlling the heater dampers are attached to it. They are attached to this “fig” with VERY FRAGILE clamps. Pull the “fig” out a little and unfasten the clips. 9. Remove the steering wheel, light/wiper switch, instrument panel and driver's footrest. To remove the light/wiper switch, you need to insert a Phillips screwdriver into the slot of the casing on the right-bottom and feel for the bolt. Loosen and pull (half) the casing along the steering column towards you along with the switch, remove both connectors and remove the mechanism completely. 10. Feel along the edge of the dashboard, where the driver's shelf used to be, you will find a plastic box with wiring, unfasten the covers and pull the wiring out of it. 11. Pull out the remaining air from the deflectors. 12. Disconnect the speakers in the dashboard. 13. If I haven't missed anything, you can now pull the torpedo towards you. I don’t remember exactly, but there is also some kind of fastener in the glove compartment area. If the torpedo doesn’t go, take a look there and you’ll figure it out. WHEN REMOVING THE TORPEDO, BE CAREFUL WITH ALL AIR DUCTS SO YOU DON'T CUT THEM. 14. If you have already removed the dashboard, open the hood and remove both panels in front of the glass. There are 2 “half nuts” - turn them half a turn, they will lock and release. 15. It’s time to drain the coolant and remove both hoses from the heater pipes. Near them are 2 nuts for 8 - take them down. 16. Also unscrew 2 or 4 nuts near the stove air intake. 17. Now climb into the cabin and pull out the entire stove block. By the way, it also has fastenings for the damper control cables. Remember that these “fasteners” are very fragile. 18. How to get the radiator itself now, I think you’ll find out.
Reassemble in reverse order. When assembling, the most difficult thing is to put the air ducts in place and connect all the cables and connectors back and forth.
they are attached. Shine a light on the carrier and you'll figure it out.
Replacing the heater radiator on an Audi 80 (barrel)
The first thing to do, in almost any repair, is to remove the terminal from the battery to prevent the car from damaging electrical equipment.
Let's start removing the steering wheel.
To do this, carefully, but applying a certain force, we pull the signal panel towards each of us from the corners.
Then we disconnect the wire coming to the steering wheel.
We unscrew and remove the steering wheel ourselves, having previously marked its position using a marker shaft.
Remove the top cover of the steering switch block; to do this, unscrew two self-tapping screws.
Next, unscrew the two screws securing the instrument panel. Carefully remove it and disconnect the two connectors on each side.
a little Then release the bolt through the oval hole at the bottom of the lower cover of the steering block Next.
switches, pull the switch block towards you, disconnect two connectors. At the same time, remove the rubber lock on the ignition plug.
Let's start removing the central one first.
panel we remove the radio. Carefully remove the stove control knobs; to do this, pull them yourself.
Unscrew the screws under the left and right handles and remove the decorative trim.
Next, unscrew the 4 screws securing the central console control unit to the stove.
We also unscrew the 2 screws securing the ashtray.
We begin to remove the shelf under the driver with our feet. To do this, remove the handle if (there is a choke),
Using a thin screwdriver, press the latch on the bottom, while pulling the handle towards the choke.
Then remove the shelf under the driver's feet. Everything is simple here, unscrew all the bolts and remove it.
It is advisable to remove the glove compartment, but I did not remove it.
Then carefully move aside the plastic covering at the bottom under the ashtray and unscrew two of each side bolt.
Next, carefully remove the two plugs on each side of the main panel and unscrew the bolts.
Then unscrew the two nuts that secure the stove to the central panel. One side is from the glove compartment nut, the other is from the driver's side.
Disconnect the connector from the driver's side.
Then carefully pull the panel towards you, lifting it slightly to the top. disconnecting the remaining connectors at the same time.
Next, we disconnect the six latches on the air duct and unscrew the two screws on the lower air duct.
Then, in the engine compartment, unscrew the two heater mounting nuts. Don't forget to disconnect the radiator from the heater hoses.
Next, in the cabin, we carefully pull the stove towards us. Then we unscrew the two latches and unscrew them and pull the radiator of the stove itself to the top.
In its place we install Assembly.
a new one is made in the reverse order.
Be sure to check the functionality of the heater control cables. Don't forget to put all the connectors in place. We check all fan speed operation. After assembly, I immediately filled it with water.
If the new stove does not heat, it means it is airy. Remove air from the stove.
Replaced the heater radiator
Report on replacing the heater radiator on the Audi 80 B3 Part 1
Preparatory operations 1. turn off the alarm siren with the key (if it has its own power source) 2. remove the battery cover and disconnect the ground wire Operations for dismantling the steering wheel, steering column and dashboard 1. remove the buzzer from the steering wheel, then remove the contact coming to the steering wheel and unscrew and remove the steering wheel itself 2. unscrew the two self-tapping screws fixing the top cover of the steering column switch block 3. unscrew the two self-tapping screws fixing the dashboard and carefully remove it along the left and right, disconnecting the plug from the device, put it in a safe place 4. remove the steering column switches, for this at least on my model, it was necessary to give the screw back a little, just give it back, and not unscrew it all the way, access to which is possible through the oval hole on the right side of the lower half of the steering column panel. 5. Pull the steering column unit towards you, simultaneously disconnecting two white electrical blocks to the right and left of the steering shaft. We also carefully put it in a safe place 6. remove the block from the ignition switch Operations for dismantling the central tunnel 1. take out the rear ashtray and unscrew the two screws under it 2. in the area of the handbrake button, take out the plug and unscrew another bolt. 3. lift the handbrake and move the freed part of the tunnel back (for amateurs, you can remove the handbrake trim and completely remove and remove the rear part of the tunnel), but the above operation is quite sufficient. 4. unscrew the self-tapping screw that secures the gearshift knob frame 5. unscrew the gearshift knob cap and remove the leather boot along with the frame 6. remove the front part of the tunnel
Report on replacing the heater radiator on an Audi 80 B3 Part 2
Operations for removing the center console (beard) 1. remove the heater control knobs (3 pcs.) 2. under the left and right handles, unscrew the screws and remove the heater control panel cover 3. we see under it a white box, in the corners of which there are 4 more self-tapping screws, fix it to the console. We unscrew them. 4. open the ashtray and unscrew with a head one bolt securing the cigarette lighter to the ashtray 5. remove the cigarette lighter and disconnect the plug from it, not forgetting about the backlight 6. remove the ashtray, to do this, unscrew the two screws securing it from above and two bolts from below, which open access after removing the front part of the central tunnel. 7. remove the radio 8. remove the small shelf, the one to the right of the glass defroster buttons, fog lights, etc. To do this, unscrew the self-tapping screw in the depths of this very shelf 9. carefully remove the buttons and disconnect them 10. take out the shelf 11. then remove the 3 deflectors on the center console and unscrew the two large self-tapping screws under the deflectors on the left and top right 12. unscrew the two same self-tapping screws located in the depths of the console, in the area of the two upper self-tapping screws for fastening the ashtray, approximately in the right and left corners, of the white heater control unit 13. it seems that everything that needs to be unscrewed 14. take the center console and gently, slightly swaying from side to side, pull it towards ourselves 15. remove it away so as not to break anything
Operations for removing the glove compartment and the shelf above the driver's feet 1. here I think everything is clear, I just noticed that on carburetor cars, when removing the driver's shelf, you need to remove the choke handle. To do this, use a thin screwdriver to press the hole on this handle from below and pull it towards you. Operations to remove the torpedo itself 2. open the driver's and passenger compartments. doors and at the end of the torpedo, take out two plugs on each side 3. unscrew the bolts securing the torpedo to the body 4. then I removed the speakers from the torpedo, you may not need this 5. in addition, the torpedo is attached to the central tunnel of the floor, everything is transparent there - give two bolts to the right and left of the tunnel. 6. In the area of the radio, you need to give one self-tapping screw and two small nuts on the right and left, they secure the air ducts to the stove 7. You may also need to disconnect the air ducts coming to the right and left pairs of deflectors. They are fastened with a wire clamp (I did not remove them) Operations carried out in the engine compartment 1. remove the right wiper 2. remove the large black plastic cover, turn 3 of its locks with a coin 3. take out the filter, if there is one 4. give away the two nuts securing the filter bowl to the box stoves, we snap off the tape clamps and take out the box (without losing the gasket) 5. unscrew the 2 studs securing the stove body to the body 6. then in the area of the ignition coil there are 2 nuts with large washers, one at the top and the other 15 cm below, give them away 7. generally speaking, further recommended drain the antifreeze, but I didn’t do that, but did this: I unscrewed 3 screws securing the expansion tank and unscrewed the cap from it and, without removing any pipes, lowered it down the engine compartment, and since the stove is the highest point of the cooling system, all the liquid from the stove drained through the open cap of the expansion tank. In this way, you can save almost all the antifreeze from the system and then add only part of it - I only needed half a liter. True, I had fresh antifreeze, if it is old, it is better to drain it completely and replace it with fresh one. 8. remove 2 pipes from the side of the engine compartment from the old stove Direct replacement of the stove 1. climb into the cabin and begin to carefully pull the torpedo towards you, you don’t need to apply much force, otherwise you might tear something 2. I didn’t remove the torpedo completely but pulled out its right end as far as possible and took out the stove itself with the air ducts assembled 3. the stove radiator itself is secured with two screws and two latches 4. unhooked all this and secured the new stove
Common problems
Typically, the following signs indicate a malfunction of the cooling system:
- Engine boiling or, conversely, overcooling;
- Antifreeze leak.
Temperature jumps are reflected in instrument readings, and the emergency overheating indicator also begins to blink. In some cases, sensors also fail and the failure cannot be detected immediately.
Causes of problems
This happens for the following reasons:
- Contamination of the core or outer part of the radiator;
- Wear and tear, leakage;
- Worn centrifugal pump, loose transmission belt;
- The radiator fan drive is broken;
- Thermostat failure;
- Cracks in the cooling jacket, resulting in antifreeze leakage;
- Cylinder head cooling;
- Breakage of the expansion tank valves or its uncorking (active evaporation of liquid occurs).
Typically, such problems are identified during a technical inspection. However, you can “catch” some signs that the radiator will soon fail. To do this, it is necessary to inspect the tank before each trip, or more precisely, its integrity and the level of liquid in it. Normally, it should be between the maximum and minimum marks. If it drops too low, top it up (use the same brand of fluid).
After the engine has warmed up, carefully unscrew the expansion tank cap. If the fluid is below the minimum, it means it is leaking - the hoses or pipes are damaged.
Replacing the stove on an Audi 80 b4
Hello dear readers of the andrejgrechuha.ru blog! Not long ago I encountered a problem with my car. The heater in the Audi 80 ran out. A liter and a half of antifreeze poured into the cabin... Trouble. Since I had to drive, I turned off the heater for a while, simply removing the pipes from the heater radiator and connecting them together using a suitable piece of pipe.
Since I was still looking to replace the Audi 80 heater, over the weekend I decided to remove the heater radiator and see what happened to it. And so let's start everything in order. For the work I needed a small set of tools, or rather an 8mm socket wrench and two screwdrivers with a long blade, a cross and a flat head, a 22mm head with an extension and a wrench. I did it easier by using a set of plumbing tools from Matrix. I'll tell you a good set. I recommend it. Before starting work, be sure to remove the positive terminal from the battery terminal.
How to remove the radiator of an Audi 80
I once noticed that the temperature did not drop when driving on the highway. At all. Having opened the hood, I was a little shocked: EVERYTHING was in antifreeze. The pearl came from the radiator and fell directly onto the working fan, which successfully sprayed hot antifreeze throughout the engine compartment. I decided not to bother and buy a new radiator. During a trip to the market, I found an aluminum one for my car for only $45.
We also bought: a couple of new clamps (to secure the pipes) and antifreeze (I don’t remember the brand, I remember that it was red G12). We went to change it (I didn’t want to solder and pour sealant right away, because it was a waste of money).
1. Drain the antifreeze. Fortunately, you can drain it by unscrewing the pipe on the pump, but due to the absence of a hole, I unscrewed the lower pipe on the radiator and drained it slowly.
2. Remove the radiator. To remove it, I unscrewed the radiator grille and 2 bolts securing it. I don’t remember the subtleties of the process, I remember that everything is simple. We are horrified by the sight of the old radiator: half of the cells have simply spilled out, the ties are rusty. Still brassy and original
The pipes are copper, but on the new one they are plastic, clamp them carefully.
After installing a new radiator (not without some third-party tweaks, it’s not original after all), we got this result:
3. Next, fill in antifreeze, squeezing the large pipe from the radiator to the tee. Fill it completely, put the car on a slope with the front facing up (I have a convenient driveway to the garage) and rev it up a couple of times at 5 thousand rpm, adding antifreeze. Conveniently thought out system, does not get airy. This is a plus
- radiator $45
- antifreeze and distilled water – $15
Replacing the heater radiator on an Audi 80 B3
The heater on my Audi 80 was leaking, something had to be done. But to do this, you first need to remove it. This is not easy to do; the whole day was spent on the procedure.
This tool came in handy:
- pliers;
- insulating tape;
- 24" head, large knob;
- head “8.10”, small knob, extension to it at least 10 cm;
- crosshead screwdriver;
- key "at 8.10".
Of course, a new heater core is also needed. The original radiator VAG 8D1 819 030 B will cost plus or minus 7,000 rubles. Analogues of Meyle 100 819 0002, AVA AI 6097, Behr-Hella 8FH 351 311-421, Nissens 70224, Termal 110224BA and others. Their cost ranges from 500 to 3500 rubles.
Replacing the radiator of the Audi 80 B4 heater. Photos, instructions on how to change the heater radiator in an Audi 80 B4
Replacing the Audi 80 B4 heater radiator requires the car enthusiast to have minimal experience in picking hardware and a desire to do something with his own hands. It is worth noting that at a service station replacing a stove radiator would cost about $90 or 6,000 rubles.
For work we will need:
- wrench 8 mm and 10 mm;
- ratchet with a set of 20 and 25 mm sockets;
- open-end wrenches 10 mm and 13 mm;
- pliers;
- Phillips screwdriver;
- flat screwdriver;
- Phillips screwdriver;
- T30 star screwdriver;
- sealant (foam rubber) on an adhesive basis;
- new radiator for the stove 893121251G.
Sources
- https://RetroTruck.ru/obsledovanie-i-remont/snyatie-pechki-audi-80-b4.html
- https://5net.ru/zamena-radiatora-pechki-audi-80-v3/
- https://moto-sol.ru/diagnostika-i-remont/kak-snjat-pechku-audi-80-b3.html
- https://vianor14.ru/uhod-za-avtomobilem/kak-pomenyat-radiator-pechki-audi-80-b3.html
- https://zsm-miass.ru/polomki-i-remont/zamena-radiatora-pechki-audi-80-v3.html
- https://aklaypart.ru/remont/zamena-radiatora-pechki-na-audi-80-b3.html
- https://koreec73.ru/uhod-i-remont/snyatie-radiatora-pechki-audi-80-b3.html
[collapse]