Sometimes, during long-term operation of a car, its owner is faced with the fact that there is no charging for the VAZ 2114, that is, the battery does not charge when the generator is running. This situation is quite unpleasant, because the battery may be completely discharged, as a result of which the car simply will not start at the right time. Why this can happen and how to get out of this situation will be discussed below.
VAZ 2114 battery charging lamp
Probable Causes
There can be quite a number of reasons why the battery on a VAZ 2114 is not charging.
The most likely ones look like this:
- the on-board network (and with it the generator - are overloaded);
- the generator does not match the used battery and vice versa;
- contacts have become loose or oxidized;
- the brushes are worn out;
- the drive belt is loose;
- there was a break in the generator windings;
- the rotor has closed;
- a stator short-circuit has occurred;
- bearings have failed;
- the control relay has failed.
As you can see, there are quite a few reasons why the VAZ 2114 generator does not charge, and the search should begin with the most probable and simple ones, moving on to more complex ones.
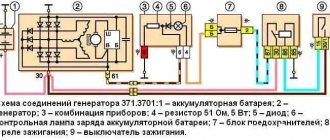
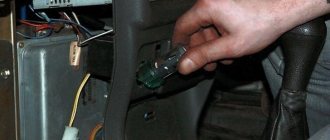
VOLTAGE REGULATOR
It is not difficult to find where the VAZ 2114 generator relay is located. This device is located at the back of the generator itself under a plastic cover. Where is the charging relay located on the VAZ 2114 - a question for backfilling. The fact is that the charging relay, generator relay and voltage regulator on the VAZ 14th are generally one and the same single device. It is also called a relay regulator.
What happens if the voltage in an electrical circuit drops below 13.2 Volts? The battery will stop charging, and after a fairly short period of time the starter will no longer have enough power to crank the engine to start. What if it is over 14.7 Volts? Then elements of the electrical circuit may fail, for example, the radio or one of the engine sensors (mass air flow sensor, phase sensor, etc.) will burn out.
The charging relay on the VAZ 2114 looks like a large black tablet, at the end of which there are two graphite brushes (brush assembly). If there is little or no charging, the voltage regulator is checked.
Voltage regulator location
DIAGNOSTICS OF RELAY REGULATOR
Checking the functionality of the generator on a VAZ 2114 always begins by measuring the voltage of the on-board circuit with the engine running. The most convenient way to measure is with a digital multimeter:
- We set up the multimeter to measure voltage and set the upper limit to 20 Volts;
- We connect the probes of the device to the battery and measure the voltage with the engine turned off. The voltmeter should show somewhere between 12.5 and 13 volts;
- We start the engine, the readings of the device with a good working generator should increase to about 14 Volts (maybe a little more);
- With the engine running, turn on the load (high beam, dimensions, heated rear window, heater motor at maximum speed). We look at the readings of the multimeter - the device should not show less than 13.2 Volts at idle, but it is better if this indicator is in the range of 13.8-13.9.
Checking the generator voltage regulator can also be carried out on a removed device. The device assembled with the brush assembly is checked. For this:
- We connect the mass terminal (minus) of the “tablet” with a wire to the minus of the battery.
- We supply power (12-14 Volts) to terminals “B” and “C” from the battery.
- We connect a 1-3 Watt car lamp to graphite brushes. If the relay-regulator is working properly, the lamp should light up.
Troubleshooting - where to start
The first thing you should check is whether there is an overload in the on-board network. Of course, if your car has nothing installed other than a standard radio, then you don’t need to do this, but if you are a tuning enthusiast, then you should start checking with this option.
Overload of the on-board network of the VAZ 2114
In order to check the load on the network, you will need to at least visually estimate the number of additionally installed light and sound devices, as well as compare their total power with the power of the generator.
If it ultimately turns out that these two values are approximately equal or the power consumption even exceeds the generated power, then you will need to remove some devices (what exactly to “sacrifice” is up to you).
After this procedure, you will need to start the car and check the operation of the generator. If the battery starts to charge, then the reason was precisely the overload.
The fact that the power generated by the generator is not unlimited should always be remembered when connecting new electronic devices to the vehicle’s on-board network.
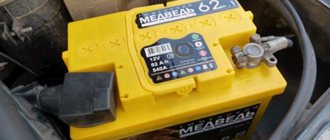
Battery for VAZ 2114
The second thing you will need to check is the compliance of the generator and battery installed in the car. Thus, some motorists who install additional equipment on their cars also install batteries with increased power, thinking that they will be able to provide energy to all newly installed devices.
In fact, this is far from the case. If the power of the battery exceeds the power of the generator, then the latter simply will not be able to fully charge it, which will only increase energy losses in the on-board network. This should always be kept in mind.
How do car electronics work?
A modern car is literally crammed with electronics and all kinds of sensors designed to make driving easier and increase the safety of the driver and passengers. All this equipment is controlled by an on-board computer, which analyzes the data received from instruments and sensors, reacting to them accordingly.
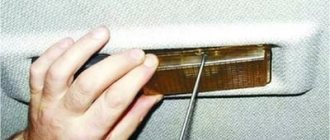
If the incoming information is not consistent with the correct value ranges or it does not reach the ECU, the latter will try to inform the driver of a problem, be it a drop in oil pressure in the system, a critical drop in fuel level, or a lack of battery charge.
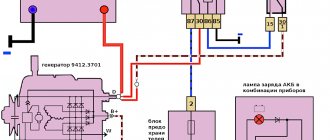
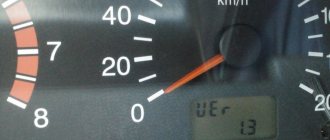
In all these and many other cases, the corresponding lights light up on the dashboard to help the driver navigate and make the right decision. The indicator indicating that the VAZ-2114 is not charging the battery, as can be seen from the figure, is located in the lower left part of the panel (indicated by the number 16):
Generator breakdowns and their elimination
If it turns out that all the equipment is installed correctly, then you should start checking the electrical circuit of the generator. The first thing that needs to be inspected in this case is the contacts. If they are loose, they should be tightened; if they are oxidized, they should be cleaned. Such a seemingly “minor nuisance” may well be the reason that the generator charges the battery very poorly (or even does not charge at all).
Contacts of the VAZ 2114 generator
After checking the contacts, you need to check the tension of the drive belt. If it is very weakened, then it is likely that it will slip and there will be extremely poor transmission of rotation to the generator shaft. After tightening the belt, battery charging should be restored with the engine running.
The next point to check the functionality of the generator is its graphite brushes. They, like any other graphite brushes on any other device, wear out over time. You can simply check their condition visually - if there is little left of the brushes and they do not make good contact with the rotor, then they should be replaced with new ones. After this, the generator should start working again.
VAZ 2114 generator brushes
The degree of wear of the brushes should be checked periodically, without waiting until they are completely worn out and problems begin in the vehicle’s on-board network.
Sometimes, if the generator does not charge the VAZ 2114, the reasons may lie in it itself. Most often, its breakdown is caused by short circuits in the rotor or stator windings, failure of bearings and other reasons. You can find out that the generator is out of order by the warning light in the cabin. In this case, there is nothing left but to replace the generator with a new one, since repairing it in the event of a short circuit is almost impossible.
What is battery recharging?
A working generator supplies no more than 14.5 volts to the battery, while a faulty one can raise the voltage in the on-board network to 25 volts, for this reason lamps and various kinds of sensors and devices can fail. At this voltage, the battery begins to get very hot and boil, which causes it to swell and possibly explode. Batteries removed from the vehicle and charged from a portable charger without supervision are not recommended.
A frequent breakdown of the generator is the failure of the relay regulator, which keeps the network voltage in the car within acceptable limits from 12.5 to 14.5 volts.
When starting the engine, the battery consumes energy by giving the accumulated electricity to the starter, after the engine starts, the generator is turned on by supplying it with a weak current to excite the electric brushes, then the accumulated electricity is restored in the battery by charging it from the generator.
Approximate battery voltage:
- While the engine is running, the average voltage should be 14.5 volts.
- In a quiet state (the engine is turned off), it is 12.5 volts.
- Recharging is considered when the voltage rises above 14.8 volts, respectively, with the engine running.
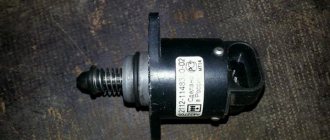
Failure of the control relay
If during the check it turns out that the load on the on-board network is normal, and the generator itself is fully operational, then you should pay close attention to the VAZ 2114 generator relay. Failure of this device very often leads to problems with the mains voltage and lack of charging to the battery. In order to check the functionality of the relay (which, by the way, is located on the back of the generator and is painted black) you will need a multimeter.
The check itself is performed as follows:
- Set the tester to voltmeter mode.
- Measure the voltage at the battery outputs with the engine not running - it should be between 12.5 and 13 volts.
- Start the engine and re-measure the voltage on the battery - now it should be around 14 volts, and sometimes even a little more.
- Turn on the consumers (for example, high beam) and measure the voltage at the battery for the third time. It should now be less than 13.2V, and ideally around 13.9V.
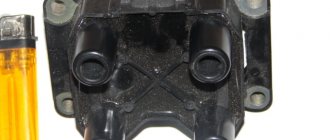
Generator relay VAZ 2114
You can also check the functionality of the removed relay.
This is done like this:
- connect the negative of the relay to the negative of the battery;
- We connect outputs B and B of the relay to the battery positive;
- We connect a 3 Watt light bulb to the brushes installed in the relay block using wires. If it lights up, then the relay is working properly.
If during the test it turns out that the relay is faulty, it should be replaced.
The whole procedure is performed as follows:
- Disconnect the terminals from the battery.
- Unscrew terminals 10 with a wrench and remove the positive wires going to the generator.
- Pull off the “chip” with a thin wire.
- Remove the back cover of the generator by unbending the 3 clips.
- Remove the 2 screws holding the relay.
- Unplug the plug from the relay and remove it.
- Install the new relay in the same order, but in reverse order.
This option for removing the relay is the most convenient, although in some cases it can be removed together with the generator. How it will be more convenient to carry out this procedure in each specific situation is up to the driver to decide.
Step-by-step replacement of generator brushes on a VAZ 2114
Now it’s worth finding out how to quickly replace the VAZ 2114 generator brushes in the shortest possible time. We’ll also consider the process of removing the generator and other related aspects
It is important to know that problems with electrical equipment can arise not only because the brushes on the generator on the VAZ 2114 are worn out. Problems may also arise in the alternator drive belt.
If it has poor tension and squeals are heard when the speed increases sharply, this means that the part is simply slipping along the pulleys on the crankshaft and the device. To check the tension, just turn the belt. If its bending is minimal, the root of the problem is not in this part. When checking, it is possible to detect cracks, which indicates that a complete replacement of the belt is urgently needed.
How to quickly replace alternator brushes in a VAZ 2114
To replace the brushes of a VAZ 2114 generator, the following tools are needed:
- open-end wrenches;
- different screwdrivers.
The replacement process is carried out as follows:
- De-energizing the car. The best option is to remove the terminals.
- Removing dead wires from the generator.
- Removing the front cover that performs protective functions and unscrewing the lower fastening from the engine block.
- Unscrewing the pulley. Before performing this operation, the rotor should be fixed in one position. In this way, you can ensure its immobility and protect it from the possibility of rotation.
- Removing the outer casing. Unscrewing the plastic cap covering the brush assembly located inside the generator.
- Pull out the voltage regulator itself. You can see the brush assembly underneath.
If there is a need to completely remove the generator, you should find the bolts holding the outer casing cover and unscrew them. Then you need to remove them. Then proceed to remove the rear protection. Take a screwdriver. With its help you need to pry off the protection. You will need to apply a little force and press on the device.
After this, it is necessary to inspect all the places where the part is connected to the motor block. The fasteners must be completely unscrewed and the entire generator removed.
Perhaps the device itself will be in working condition and only the generator brushes in the VAZ 2114 need to be replaced without removing the device. In this situation, all work is done much easier. It will be necessary to carry out partial disassembly according to the scheme described above.
Directly replacing the brushes of the VAZ 2114 generator occurs as follows:
- The seats for the brushes on the VAZ 2114 generator are blown with compressed air.
- Then they are wiped with a piece of cloth.
- The brushes themselves for the VAZ 2114 generator are removed and unsoldered from the contacts. This will require the ability to work with a soldering iron. However, this is not as difficult as it may seem initially and any difficulties are unlikely to arise.
- Then the contacts are cleaned and the quality of operation of the preload springs is checked.
- The old ones are replaced with new brushes on the generator on the VAZ 2114 and the contacts are soldered to them.
As you can see, there is nothing complicated. Now you can carry out all the work on replacing the VAZ 2114 generator brushes yourself without any special knowledge and skills. As a last resort, you can find a corresponding video on the Internet.