The VAZ 2114 gearbox is one of the key elements of the car. It is this that is capable of ensuring stable operation of the power unit, as well as helping to change the torque from the engine to the wheels during acceleration. With the help of a gearbox, the rotational force becomes a stepwise movement. What to do if the VAZ 2114 gearbox is humming?
The transmission of this car includes many parts, each of which is needed to perform certain functions. Among the key parts are rotating shafts, as well as gears and transmission mechanisms.
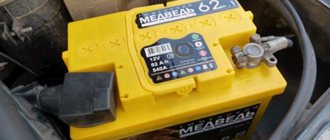
Gearbox VAZ 2114
Additional Information. The main pair is the main gear of the main shaft of the gearbox. It helps in reducing the number of engine revolutions. The main pair is also needed to reduce speed in a ratio of 1 to 4. The standard indicator of the main pair is index 3.7. If you change this indicator, you can change the dynamics of the car. The size of the pair determines the maximum speed of the car, as well as acceleration. The reason for such a strong dependence is the effect on transmission length.
Why does the hum appear?
Most often the release bearing is to blame. This part is practically a consumable for the VAZ-2114.
The first problems with noise in gearboxes arise on cars that have been in service for more than 10 years, or have logged more than 100 thousand kilometers. This is due to the presence of wear due to the expiration of the service life of some parts, which begins to affect the overall operation of the gearbox.
Main gearbox malfunctions
Causes of noise
Transmission clutch diagram
There may be several reasons why noise appears from the gearbox, and here are the main ones that occur most often:
Early signs of a hum in the gearbox on a VAZ-2114
The first, or one might say early signs, after which the box may begin to hum, appear:
In addition, we can note the fact that the gearbox can make noise under various operating conditions, but most often it manifests itself:
Lubrication
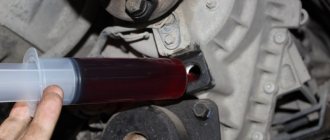
If the bearing is dry, but there is no damage on it, then you can completely get by with lubricating it and install it back. It’s only better to do this if you don’t have a new spare part on hand. There are two ways to lubricate the bearing. The first is to boil it in lithol, preferably in a water bath. A safer method of lubrication is by injection. Using a syringe, lithol is driven into the bearing; this method takes quite a lot of time.
Read more: How to sew a car seat along the seam
The VAZ 2114 gearbox is humming: causes of breakdowns and ways to eliminate them
The VAZ 2114 gearbox is one of the key elements of the car. It is this that is capable of ensuring stable operation of the power unit, as well as helping to change the torque from the engine to the wheels during acceleration. With the help of a gearbox, the rotational force becomes a stepwise movement. What to do if the VAZ 2114 gearbox is humming?
The transmission of this car includes many parts, each of which is needed to perform certain functions. Among the key parts are rotating shafts, as well as gears and transmission mechanisms.
Additional Information. The main pair is the main gear of the main shaft of the gearbox. It helps in reducing the number of engine revolutions. The main pair is also needed to reduce speed in a ratio of 1 to 4. The standard indicator of the main pair is index 3.7. If you change this indicator, you can change the dynamics of the car. The size of the pair determines the maximum speed of the car, as well as acceleration. The reason for such a strong dependence is the effect on transmission length.
Price issue
The cost of repairing each box is determined by the number of worn parts.
When performing work in the service, the average cost will be:
- gearbox overhaul - from 2500 rubles;
- removal and installation of the unit - about 4,000 rubles;
- changing the oil in the box - up to 1000 rubles;
- installation of new bearings on the input shaft - approximately 5,000 rubles.
Service costs are approximate and may differ depending on the city, workshop location and general condition of the box. In most cases, it is more profitable to purchase and install a less worn unit than to rebuild an old one.
Causes of malfunctions
The gearbox, like many other VAZ 2114 units, needs maintenance. There are not so many main reasons that can lead to breakdowns or minor malfunctions of the gearbox. For example, if the gearbox of a VAZ 2114 is noisy, then one of the possible reasons is the gear teeth.
Over time, they wear out and become unusable. Noise from the gearbox is not a reason to panic, because even an insufficiently qualified technician can repair the gearbox.
Disassembly
Having removed the gearbox, you can proceed directly to the main thing - disassembly. This will allow you to change damaged elements as you work, identify existing faults and solve problems on your own.
- Clean and thoroughly wash all external surfaces of the gearbox.
- Place the box in a vertical position and remove the back cover.
- Remove the clutch cable bracket, then use a rubber hammer to knock the rear cover off the gearbox.
- Remove the old gasket. She will be replaced.
- Engage any of the two gears - 3 or 4.
- Unscrew the bolt that holds 5th gear, then turn it on.
- Simultaneously turning on the indicated speeds will allow you to fix the shaft and prevent it from turning.
- Unscrew the nut on the secondary shaft, and then on the primary one.
- Remove the 5th speed synchronizer along with the fork.
- Remove the fork from the coupling. Remove the synchronizer as carefully as possible. If you allow the clutch to move away from the hub, the spring-loaded balls that secure the synchronizer will simply fall apart.
- Remove the 5th speed synchronizer locking ring.
- Remove the 5th speed driven gear from the output shaft.
- Remove the thrust ring located on the needle bearing.
- Remove the needle bearing itself from the 5th speed gear.
- Remove the drive gear from the drive shaft and remove the bearing plate.
- Now the needle bearing bushings should be removed from the secondary shaft, and the thrust washer should also be removed.
Jewelry work
- Take out the ring that secures the input shaft bearing, and then a similar ring for the secondary shaft.
- Unscrew the locking plug and remove the ball and locking spring. Next you can get a couple more clamps.
- Remove the rear engine mount.
- Unscrew the reverse gear lock plug, tilt the box and thus remove the lock ball and spring.
- Remove the clutch housing and gearbox housing mounting bolts.
- Acting as carefully as possible, separate the two units. To do this, there are grooves in the crankcases into which the ends of a screwdriver are inserted. By shaking, you can disconnect the elements without any problems.
- Remove the gearbox housing.
- Unscrew the bolt securing the 1st and 2nd speed shift fork.
- Remove the fork and stem.
- Unscrew the bolt securing the 3rd and 4th speed forks.
- Separate the rod head from engagement with the lever, remove it along with the fork from your gearbox.
When disassembling the box into parts, be sure to pay attention to the condition of the elements. If you detect faults in time and replace gearbox components, you can get by with inexpensive but very effective self-repair
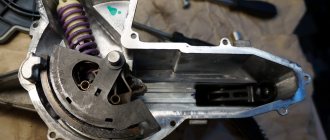
Disassembled gearbox
What to pay attention to
So, following the instructions, we disassemble the gearbox of your VAZ 2109
Along the way, we pay attention to the following points:
- Bearings. When they wear out, a noise from the box occurs. Plus, worn bearings negatively affect the condition of other gearbox elements;
- Synchronizers and sealing washers. If their condition leaves much to be desired, then the gears shifted poorly precisely because of them. Replace them;
- Clutch system, cotters, coupling hub clamps. All this must be replaced separately if there are signs of wear or defects;
- Blocking rings, synchronizers. If there are chips or nicks, don’t even think about alternative solutions, replace them immediately;
- Bearing tracks. Over time they wear out. If signs of wear are found, perform a complete replacement. In this state, they were only a short time away from breaking;
- Gap between gears and locking rings. Normally it is no less than 0.6 mm. In case of deviations, there is only one solution - replacing the rings;
- Retaining rings. If elasticity is lost, these elements must be changed, since they will no longer be able to perform their functions.
When assembling the gearbox, do not forget to lubricate the new gaskets with a layer of lithol. And when pressing the oil seals, do it with the working edge inward. The metal clip should be located on the outside.
During the process of reassembling the gearbox, all rubbing components should be treated with oil, and do not forget about the sealant for connecting the clutch housings and gearbox. Doing everything yourself is quite possible.
Lack of oil
Another common cause of noise in the gearbox is insufficient oil level. In order to solve this problem, you just need to add oil.
The source of noise can be worn seals and mechanisms. To fix the problem, they need to be replaced with new ones.
In some cases, problems occur during gear shifting. Here you first need to look at the drive rods. It is possible that they have already used up their resource and need to be replaced. After this, you need to check the reliability of the hinge fastening. It wouldn't hurt to take a look at the gearshift lever rod.
Lada 2114 2008, 84 l. With. - observation
Cars for sale
Lada 2114 Samara, 2005
Lada 2114 Samara, 2011
Lada 2114 Samara, 2009
Lada 2114 Samara, 2007
Comments 27
Still haven't solved the problem?
No, I haven’t solved it, because the problem is gradually eliminating itself. The extraneous sound has become almost inaudible, apparently, break-in is occurring. Soon I will change the oil in the box, I will look for the presence of metal inclusions: how many there are and what kind. I really don't want to remove and disassemble the box.
Interesting, I haven’t heard this from anyone in Samara
Rare malfunction. Nobody knows what it could be?
An autopsy will show. Maybe a tooth has fallen off the gear. Or don’t go there yet
I decided not to climb for now.
Maybe it will go away on its own. I remember at a mileage of up to 15,000 km the starter clicked after starting the engine, then it stopped on its own
Maybe it will pass. I'll wait, anyway. Long trips are not expected yet, and in the city sudden adventures with the box are not scary.
Damn it's the same nonsense. If you find out, let me know, but in the meantime I’ll repost!
I'm already glad that I'm not alone))). If I find out, I’ll write back, but my hopes are melting like the first snow. I'm very reluctant to remove the box, especially in winter. If people don’t suggest anything, I’ll drive until the summer, and then we’ll see.
How to prevent gearbox failure
Early signs of future failure include:
Another common cause of problems during gear shifting is due to improper adjustment of the shift actuator. Assembly parts often break and can also cause the problem. To eliminate problems, it is necessary to correct or replace the rod as soon as possible, as well as tighten the screws. Then you can start adjusting the drive and replacing the remaining non-functioning parts.
On some VAZ 2114 vehicles, a gear reset occurs. This process occurs spontaneously. The reason is wear or breakage of the teeth (end teeth) on the coupling. Sometimes the teeth on the gears fail. A similar problem arises due to insufficiently competent debugging of the drive. In other cases, the reason lies in inaccuracy during the installation of the traction cover, which is intended for protection.
To correct this problem, you may need to replace all faulty parts. Next you should start debugging the drive.
The next step is to install the cover in the required position. If an oil leak occurs, then it is necessary to install the crankcase and change any gaskets that look worn out. Do not forget about the need to remove the box before repairing.
General information about the process
The initial one is provided by the manufacturer at the stage of assembling the machine. But gradually, due to temperature changes, any material loses its beneficial properties.
Before you start carrying out the “Shumka” on your own, it is recommended to dismantle the seats, door trims, mats and free the car from the old standard insulation.
Note. Only by carrying out a complete and thorough soundproofing procedure can one hope for a significant reduction in noise from the outside. Only in this case will the cabin be perfectly quiet and comfortable.
Soundproofing panel VAZ 2114
It is especially important to treat doors, as they often become the main installation location for speakers. It is clear that this place should be well protected not only from noise penetration, but also from plastic vibrations and other negative phenomena.
Acoustic speakers in the doors
Along with sound insulation, the interior will also receive high-quality insulation. In Russian conditions this is extremely important. To achieve this effect, you need to combine vibration and sound insulation.
Soundproofing for VAZ 2114
“Shumka” carried out on a VAZ 2114 is often called tuning. This is true, because a real modernization of the car is being carried out. Operational parameters are increased and comfortable conditions are created when the vehicle is moving.
The driver is no longer oppressed by engine noise, his nervous system is not irritated by the strumming and vibration of plastic elements. All this cannot but have a positive impact on overall driving safety.
As mentioned above, the standard “Shumka” will not be of good quality; relying on it is the last thing. The process of carrying out “Shumka” on cars with high mileage is especially relevant. In general, such cars are very difficult to drive, since the noise penetrates everywhere, interferes with the normal operation of the acoustics, creates complete discomfort, and the trip turns into a very tedious task.
On sale today you can find a sufficient amount of high-quality materials for carrying out “Shumka”. There are a lot of them and making the right choice can sometimes be extremely difficult. One of the main indicators of a good material is not only the ability to absorb sounds, but also to be light in weight (details about materials in the table below).
Note. If the material itself is heavy, making noise will be difficult. As a rule, good and proper insulation involves laying several layers of material, a kind of sandwich consisting of layers of vibration and noise absorbers. Heavy materials will create excess weight that is dangerous for the car and its body, which will inevitably affect fuel consumption and the overall dynamics of the car.
Splen with foil
Among other things, you also need to lay out materials skillfully. The fact is that if you don’t pay attention to this, the materials will simply turn into a time bomb for the metal component of the car.
Poorly laid material creates gaps through which air, moisture, etc. will penetrate. And all this will inevitably lead to the appearance of the most terrible enemy of the body - corrosion.
Correct installation of the material always means following the instructions in a step-by-step sequence, using the right tools, using a hair dryer and much more.
In some cases, especially when carrying out the noise yourself, partial sound insulation is also appropriate. In this case, the target is the most noise-producing parts of the machine. Definitely the doors, then the trunk, the rear parcel shelf, and so on.
It is important, when working on your own, not to damage the upholstery. Unfortunately, this often happens due to the inept actions of the car owner who is carrying out such an operation for the first time. In general, conducting a “Shumka” is a painstaking and lengthy process, but it’s worth it.
Before carrying out soundproofing, it is recommended to carry out a partial or complete inspection of the machine. The causes of all vibrating and knocking sounds produced by suspension elements or other vehicle components must be eliminated. They may be loose or need to be replaced. The body and its parts must also be checked.
Prevention measures
In order to prevent any damage, you should use only high-quality oil. It is this that allows us to achieve the most coordinated and precise operation of every part and every component of the vehicle’s transmission.
In order to improve the quality of car service, it is better to give preference to oil of the GL-4 category. The best choice is a mineral lubricant, but its cost may not be affordable for the owner of a VAZ 2114. In this case, you can think about purchasing semi-synthetic or synthetic oil.
Gearbox noise
The causes of noise in the gearbox depend on the type of transmission. So, in manual transmissions, a hum may appear, for example, due to wear of bearings, shaft gears, springs on the rocker, or differential. As for the automatic transmission, most often it hums due to low oil level, due to problems with the torque converter and the lever linkage.
To eliminate noise in the area of the box, it first makes sense to check the oil level in it. If it is not enough, then you need to top it up or replace it. As a temporary solution, an anti-noise additive is sometimes used in the box (it will not completely remove it, but at least reduce the operating noise). To effectively eliminate hum, the box should be dismantled, checked and fully repaired. Read about all the causes of noise in the gearbox in the article, and for brief information on why various types of noise appear in the gearbox, see the table.
Conclusion
A gearbox is too complex a mechanism to entrust repairs to unqualified technicians. Some faults can indeed be fixed on your own, but in the case of a gearbox it is better not to take risks.
- We find out which clutch is better to use on the VAZ 2114
- VAZ 2114 gearbox: what you need to know about it
- Gear knob VAZ 2114: eliminating rattling
Thank you for the article. Alas, breakdowns are not always so easy to prevent, since not everyone has enough money for high-quality oil. This, in my understanding, is one of the main problems.
Due to the wear of the oil seal, oil was leaking from the box, so when the oil level dropped below average and when switching to 5th gear, the box hummed (or rather whistled), so we can say that if the oil level in the box is insufficient, first of all The 5th gear gear suffers, as it is located higher than the others.
The author of the article is a knowledgeable person! Since I am a novice driver and my first car is a VAZ 2114, I had problems with the gearbox, using this article I could quickly understand the cause of the breakdown and how to fix it. I recommend to all.
In my case, the gearbox began to hum due to wear on the gears. My wife and I had one car between us, and as the mechanic said, my wife engages the clutch incorrectly or tries to engage the gear without it at all. For this reason, the gear teeth are worn out. I had to learn how to use the clutch correctly.
Source
Why is the gearbox noisy?
Most often, noise in the gearbox, both manual and automatic, occurs when the oil level has become lower or the gear lubricant is no longer suitable for use. The nature of the sound resembles a metallic clang, which intensifies as the vehicle speed increases. So, noise in a gearbox with a low oil level occurs:
ATF level dipstick
The reason for the hum from the gearbox when the engine is running cold may lie in the thickness of the transmission oil and its contamination.
The next common reason why a gearbox hums is partial failure of the bearings of the primary or secondary shafts. In this case, the sound will resemble a metallic hum. The input (drive) shaft bearings will hum in the following situations:
If the bearings of the secondary (driven) shaft fail, the hum of the box will be observed:
Bearing of the input shaft of the VAZ-2110 gearbox
If there is significant wear on the gears or synchronizers, a situation may also arise when the gearbox howls. The sound is reminiscent of a metallic clang, which intensifies as the engine gains speed. As a rule, the hum occurs in one specific gear. This raises additional problems:
As for automatic transmissions, a hum can also occur due to bearing wear, low oil level, and gear wear. However, with an automatic transmission, a hum can also occur if it fails:
Signs of failure
All bearings, of which there are quite a few in a car, have approximately the same signs of failure. But since you know the location of the input shaft bearing, it will not be so difficult to determine that the problem arose with it.
There are several characteristic signs of its breakdown.
Peculiarities
Howling when the clutch is released in a parking lot
The element has failed and needs to be replaced. The howling is usually caused by the formation of chips, cracks, or the destruction of 1-2 rollers
Whistle when driving
The bearing is partially damaged or there is no lubrication. The problem in the absence of lubrication can only be determined by dismantling and visual inspection. To solve the problem, sometimes it is enough to simply lubricate the element and return it to its place
Clutch won't engage or disengage
Most likely the bearing is stuck. If the damage is serious, the input shaft may need to be replaced.
Knock in the area where the element is located
The bearing knocks only when the part is completely destroyed. If you do not replace it in time, the bearing will be welded to the shaft, so you will also have to replace the shaft itself
If you notice the first signs of a malfunction of the input shaft bearing on your gearbox, you should immediately check the condition of the element and, if necessary, replace it.
What kind of noise could there be in the gearbox?
The noise from the box can come from a different nature; depending on the damage, it not only operates with increased noise, but also howls or hums. Let us briefly describe the reasons why the above components lead to the gearbox howling and humming. So that you understand what to do about it and how to fix the problem.
Gearbox howls
The most common reason for noise in the gearbox resembling a howl is old, contaminated or incorrectly selected gear oil . If its level is insufficient, then as a result, the bearings and other moving parts of the box will run dry, producing significant noise. This is not only uncomfortable when driving, but also harmful to parts. Therefore, you should always monitor the oil level in the gearbox and its viscosity.
The second reason why a gearbox howls is because its bearings are worn out . They can howl due to natural wear, poor quality, a small amount of lubricant in them, or dirt that has gotten inside.
If the gearbox is noisy at idle when the clutch is released, in neutral gear and when the car is stationary, then most likely the bearing on the input shaft is noisy. If the box hums more in first or second gear, then a greater load is placed on the front bearings . Accordingly, it is necessary to diagnose the input shaft bearing.
Likewise, the input shaft bearing can make noise when the car is coasting or simply after starting the engine, and it doesn’t matter at what speed. Often the noise disappears in this case when the clutch is depressed. The reason for this is that when the clutch is depressed, the primary does not rotate, the bearing also does not rotate, and, accordingly, does not make noise.
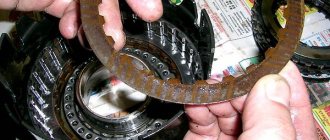
Worn gearbox gear
If the box is noisy in 4th or 5th gear, then in this case a large load goes to the rear bearings , that is, the secondary shaft. These bearings can also make noise not only in high gears, but in any gear, including reverse. Moreover, the hum intensifies in this case with increasing gears (in the fifth gear the hum will be maximum).
Gear wear is the third reason why the gearbox howls. This noise occurs in two cases: teeth slipping and improper contact patch between them. This sound is different from noise, it is more like a metallic screeching sound. This squeal also occurs under load or during acceleration.
Often the cause of noise is the gear itself if the sound occurs in one specific gear. The gearbox makes noise when driving at speed due to banal wear of the corresponding gear on the secondary shaft. This is especially typical for gearboxes with high mileage (from 300 thousand kilometers or more) as a result of significant metal production and/or low oil level in the box.
Replacement
Many people turn to a service station to replace this bearing. It is noteworthy that car services often refuse to perform such work. It’s understandable, because the procedure is painstaking, and you can’t get a lot of money for it.
To do the job yourself, follow the instructions.
- You can often find advice about the need to completely disassemble the gearbox to replace the bearing. But this is optional. You can do without such complex manipulations.
- In any case, you will have to remove the box, so familiarize yourself with this procedure.
- Before removing the gearbox, remove the negative terminal from the car battery.
- All the chips are removed from the box, the wire from the speedometer is unscrewed.
- Next, the trousers of the vehicle exhaust system are dismantled.
- After this, you can completely remove the gearbox.
- At the next stage, the bell is dismantled. You can try to do without it, but then it will definitely constantly interfere with your work.
- Thoroughly clean the box from accumulated dirt.
- The bearing is secured using retaining rings. To remove them you will need a flathead screwdriver.
- The rings are pryed off and loosened a little, after which there will be no more problems with removal.
- To make it more convenient, arm yourself with tweezers that can be used to remove the ring.
- Using a flat-head screwdriver, pry the bearing by the ring groove, and at the same time move the input shaft slightly forward.
- Insert a pry bar between the gearbox and the bearing. It is unlikely that you will be able to do this without an assistant.
- You will operate the tools, while your friend will hold the pry bar.
- Your main task is to press out the bearing. To do this, precise, strong, but most accurate blows are applied to the input shaft.
- In the process of striking, the shaft must rotate.
- This work will take you about 20 minutes. But if you have a special puller at your disposal, you can speed up the work. Although it is really convenient to work with a puller only if you decide to disassemble the gearbox.
- Before installing a new input shaft bearing, be sure to lubricate the element with regular engine oil.
- Carefully press the component into place using gentle, light blows with a hammer. It is better to use a pipe of diameter or a stand.
- When pressing, apply blows to the inner race, in a circle, as evenly as possible.
- Once the bearing is pressed in, make sure it is seated properly. Scrolling should be calm, without obstacles.
- Reassemble the box in reverse order and install it on the car.
Noise additives in the box
Transmission noise reduction additives can temporarily reduce the noise during operation. However, the cause of the hum will not be eliminated. Therefore, it makes sense to use additives only for preventive purposes or during pre-sale preparation of a car in order to get rid of it as quickly as possible.
Different types of additives are suitable for different problems, so when choosing one it is important to determine exactly what is humming in the box. The most popular attachments for reducing noise in manual transmissions are:
There are similar additives in automatic transmissions. Examples for automatic transmissions include:
The additive market is constantly being replenished with new compounds to replace old ones. Therefore, the lists in this case are far from complete.
Conclusion
Most often, a manual transmission is noisy because the oil level in it is low, or the oil is of the wrong viscosity or is old. In second place is bearing wear. Less commonly, wear of gears and couplings. As for automatic transmissions, similarly, most often the cause of the hum is low oil level, wear of gears and bearings, and malfunctions of hydraulic system elements. Therefore, the first thing to do when a howling or noise of a different nature appears is to check the oil level, and then look at the situation, under what conditions it occurs, how big the noise is, and so on.
In any case, it is not recommended to operate any transmission that makes a hum or shows other signs of malfunction. In this case, the box will wear out even more and its repair will cost more. The exact cause can only be found out by disassembling and troubleshooting the unit.
Source
Troubleshooting
If the VAZ 2109 gearbox howls, then the simplest repair is to check the level and change the oil in the crankcase. To eliminate all other defects, it is necessary to remove the box from the car and completely disassemble it. To do this, you need a closed room, a large number of various tools and experience in repairing such units.
Lack of oil
The oil level is measured using a dipstick installed in the upper part of the gearbox housing. A volume located at any distance between the minimum and maximum marks on the probe rod is considered normal. On the oldest gearboxes that do not have an overdrive fifth gear, the amount of fluid is measured through a hole in the side, closed with a plug. The level should be at the bottom edge of this hole.
Dipstick for checking the oil level on the VAZ 2109 box
To maintain the normal condition of the oil, it should be changed after 75 thousand kilometers. When filling, use API GL-4 standard lubricants with a viscosity of 75W-90, 80W-85 or 80W-90. Some owners specially fill in thick oil of the TM-5 type, which reduces the noise of the box. If replacing the lubricant does not correct the situation and the mechanism continues to make noise, then the problem lies in worn-out gearbox parts.
Replacing the drive shaft bearing
Before replacing the bearings, the gearbox must be removed from the vehicle.
To remove the gearbox you must:
The procedure for removing the box from a VAZ 2109 is shown in the video from the author of AUTO REZ.
After completing the steps described above, you need to disassemble the gearbox and remove the input shaft.
To remove and replace worn bearings, follow the steps:
Wear of gears in the box
To perform the repair, you will need to remove the gearbox from the car according to the instructions described above and completely rebuild the gearbox. In this case, the condition of all parts of the mechanism should be assessed, since not only gears, but also other mechanisms can be worn out.
The sequence for disassembling the gearbox is as follows:
The procedure for disassembling the box is described in detail on the video of the AUTO RES channel.
The drive shaft of the VAZ 2109 box has several gears, one of which is made in the body of the shaft, and the second has a high interference fit. Therefore, the input shaft gears cannot be replaced and are replaced with a completely new shaft. Maintenance of this part consists of replacing the bearings, which are removed with mounting tools or a puller. Only the secondary shaft of the box can be disassembled, and the parts should be marked or laid out in the order of removal. This method makes it easier to reassemble the unit.
Shaft disassembly sequence:
Changing the synchronizer clutch
Work on replacing couplings is carried out on a disassembled box in the same way as changing blocking rings. After removing the clutch and hub assembly, it is necessary to disassemble this unit.
The video, made by user Sem, shows how you can quickly assemble a synchronizer.
Clutch adjustment
To adjust the clutch, do the following:
Measure the clutch pedal travel Unscrew the nuts securing the cable Adjust the cable