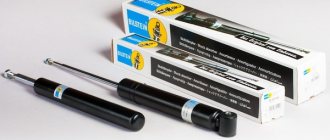
VAZ handbrake
Most often, breakdowns that occur in a simple handbrake system are caused by an inexperienced driver who forgot to set the lever to its original position when starting. A warning light should be on on the parting panel, indicating that the car is set to “handbrake”, but despite this, many drivers still do not turn off the brake. Typically, replacing the VAZ 2109 hand brake is mostly required by novice drivers. In some cases, you can get away with simply adjusting the brake. Replacing the hand brake on a VAZ 2109 is a job that can be easily done at home.
Introduction
The hand parking brake is designed to allow the rear wheels to be locked when the vehicle is tilted. However, not a single existing part in the world can work forever; this rule also applies to the handbrake cable that is equipped with the VAZ-2109. After some time, the device begins to lose its properties and stretch slightly. The car owner himself can return a previously used structural element to its former performance by adjusting and tightening the product. If such manipulations are not enough, most likely you will have to resort to replacing the handbrake cable. The material below discusses in detail the instructions for tightening the handbrake cable in a VAZ-2109 car.
Over time, the VAZ-2109 parking brake cables stretch and need adjustment
How to tighten the parking brake cable of a VAZ 2109
The hand brake, also called the parking brake, must block the rear wheels. This function is carried out due to the VAZ 2109 handbrake cable, which has the ability to stretch over time. In order to restore the functionality of the cable, it is necessary to adjust and tighten it; in some cases, it is necessary to replace the handbrake cable. This publication will tell you how to tighten the parking brake cable of a VAZ 2109.
There is a need to check and adjust the handbrake of the VAZ 2109, having driven more than 30,000 km. The handbrake of the VAZ 2109 should hold the car on a slope of 25%. In this case, the movement of the handbrake lever should be within the range of several clicks. If the car is a VAZ 2109 after 1995, then this figure is from 2 to 4 clicks. If the car is of earlier years of production, then to hold it you need 4 to 5 clicks of moving the VAZ 2109 hand brake lever.
More than 4 clicks of the VAZ 2109 handbrake will not keep the car on a slope, and less than 2 will partially block the wheels in motion.
Rules for adjustment and replacement
Adjusting or replacing the VAZ-2109 handbrake cable, as a rule, is necessary only after the domestic car has accumulated another 30 thousand km. The car owner will have to think about how to tighten this structural element even when the hand brake cannot hold the vehicle on a slope that has a slope of about 25%. If the unit functions quite clearly, the car owner should hear several clicks when moving it. Almost all vehicles that left the Volga Concern after 1995 should “click” 2–4 times. Machines with a long life cycle can count around 4-5 clicks.
If the car starts to “click” more than four times, then the hand-operated parking brake will not be able to hold the car on a significant slope. In turn, just two clicks will only partially block the wheels while moving.
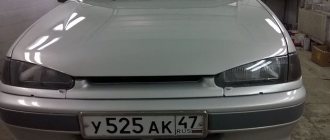
Before taking action, a person who is thinking about how to tighten the handbrake on a VAZ-2109 should check its functionality on a more or less flat surface.
Before pulling the handbrake on the VAZ-2109, you need to check the functionality on a relatively flat surface
Adjusting the parking brake (“handbrake”) drive on VAZ 2108, 2109, 21099 vehicles
The need to adjust the handbrake on VAZ 2108, 2109, 21099 vehicles usually occurs every 20-30 thousand kilometers. It is recommended to check its condition every 15 thousand km. An indicator of its serviceability is 2-4 clicks when the lever is lifted up. If the number of clicks is greater, we adjust the drive.
Necessary tools and equipment
Preparatory work
— We place the car on the inspection ditch, turn on the gear, put stops under the wheels
— We remove the additional muffler (resonator) from the pillows to improve access to the parking system adjusting nut
— We clean the threaded part of the handbrake lever rod with the adjusting and locknut from dirt, treat them with VD-40
Adjusting the handbrake of VAZ 2108, 2109, 21099 cars
— Holding the adjusting nut with one wrench, loosen the locknut with the other
— Rotate the adjusting nut clockwise a few turns
thereby reducing the length of the drive and spreading the brake pads in the rear brake mechanisms.
— Checking the operation of the handbrake
Raise the lever and count the clicks (if there are 2-4, stop the adjustment, if more, tighten the adjusting nut a few more turns).
— After completing the adjustment, fix the adjusting nut
Tighten the locknut with a wrench, holding the adjusting nut with another wrench.
Checking the correct adjustment of the handbrake
— We jack up and hang both rear wheels of the car. We turn the wheels. They should rotate freely and not be slowed down by the pads being too far apart during the adjustment process.
— We put the car on an incline (within 23º), raise the handbrake lever, the car should be held securely on the incline.
Notes and additions
— The following factors may interfere with normal adjustment of the parking brake system: heavily worn brake pads and (or) rear brake drums, drive cables stretched during operation, broken or rusted cable clamps on the car body. In this case, the threads on the lever drive rod will not be enough to tighten the adjusting nut. It is necessary to check the degree of wear of the rear brake pads and drums, replace extended hummocks with new ones, and restore the cable fastenings.
Source
Sequence of repair work
So, car owners who do not know how to pull the handbrake on a VAZ-2109 should position their vehicle above the inspection hole, drive it onto an overpass, or, in the absence of all of the above, resort to using a special lift.
If the car was produced before 1995, the handbrake will have to be lifted by the driver by only one or only two clicks. It should be noted that the adjustment of the mechanism will be carried out directly in the braking device.
The adjusting nut should be tightened until the car owner feels that the cable is tight
The adjustment should begin with an equalizer equipped with a lock nut. It is this element of the mechanism that will have to be unscrewed first.
The next step is to tighten the adjusting nut. The manipulation should be continued until the car owner himself feels the level of tension in the drive cable. It should be taken into account that it will not be possible to tighten the cable endlessly; someday there will come a time when it will need to be replaced.
Due to the fact that the full operating stroke of the parking brake cannot exceed 4 clicks, you should adjust it step by step and check the working condition of the device.
In the end, when the checking actions bring a positive result, you will need to fully tighten the lock nut of the equalizer and make sure that the wheels are functioning properly. After this, it is important not to forget about releasing the lever (it must be set to the lower position). Then you should spin the wheels so that they make several full revolutions. At the moment of rotation, you should make sure that everything happens as evenly as possible, without unnecessary jerks.
How to tighten or loosen the handbrake cable
It is quite rare to tighten the handbrake on a VAZ 2109-2108 and in most cases this is due to wear on the rear brake pads. Over time, the pads wear out and gradually the handbrake lever has to be tightened more and more. But there comes a moment when, even with the lever fully raised, the handbrake does not hold the car on a slope, and in this case it is necessary to tighten the cable.
The parking brake adjustment mechanism on all domestic cars is practically no different and in our case looks like this:
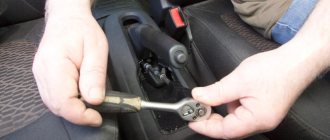
In order to tension or loosen the cable, we need only two 13-size open-end wrenches:
So, this mechanism is located under the bottom of the car closer to the rear. If you need to tighten the cable, you should first unscrew the locking outer nut of the rod, and then tighten the other nut until the cable is tensioned to the desired torque. The weakening occurs in the opposite order.
Normal operation reads a range of 2 to 8 clicks when the handbrake lever is operated. If it exceeds the maximum value, then the handbrake may not hold the car on a slope. But if, on the contrary, the lever stroke is less than 2 clicks, then in this case there is a high probability of clamping the rear brake pads. For VAZ 2109-2108 models produced before 1995, the lever stroke of up to 5-7 clicks is considered normal.
Source
Checking status
Normal PT adjustment ensures that the vehicle is held on a slope. This corresponds to 3-8 clicks of the handle on newer nines or 5-7 clicks on a VAZ 2109 produced before 1995.
To carry out the test, follow a few simple steps:
- Find a slope that has about 25 degrees;
- Turn the handbrake to the required position;
- If the car starts to roll, the handbrake does not hold, adjustment is required;
- If there is no such slope nearby, the check is carried out in a garage;
- Place the car on a flat surface, raise the handbrake handle all the way;
- Approach from behind and try to push the car with maximum force;
- If the car begins to move, the RT requires adjustment;
- Check the operation of the handbrake at 2 clicks on newer versions of the VAZ 2109 and not reaching 5 clicks on versions before 1995. If the handbrake is working at full strength, the cable will be tightened. It will also need to be adjusted.
Operating a car with a tightened PT cable is also dangerous, as this leads to overheating and wear of the rear brake pads.
Bottom view
Adjustment
To adjust the PT cable you will need a pit, overpass or lift. Next we proceed according to the following algorithm.
- Raise the handbrake handle 2-3 clicks from the passenger compartment.
- Get under the car and loosen the locking nut of the parking brake cable equalizer. Before doing this, it is better to treat the nut with a wire brush to remove all dirt.
- Then act according to the circumstances. If the cable is overtightened, it must be loosened by appropriate manipulation of the nut. If the cable holds too weakly, the nut must be tightened more tightly.
- If tensioning the cable does not produce any result, then the element is already at the limit of its capabilities. Therefore, the only solution to this situation is replacement.
- When adjusting the degree of tension, be sure to evaluate the adjustment of the cable along the PT lever. As you remember, normally it is 3-8 clicks for more recent versions of the VAZ 2109, or 5-7 clicks for nines that were produced before 1995.
- Check the freedom of rotation of the rear wheels. If you overtighten the cable, the wheels will spin with difficulty and not as freely as they should.
- After making the adjustment, tighten the locking nut back and check the operation of the handbrake again by driving up a slope or pushing the machine with the PT on.
Adjustment process
Replacement
In some cases, heavy movement of the cable in the sheath is due to lack of lubrication. To eliminate this defect, fill the shell with transmission or engine oil. Pour until grease flows out of the opposite end of the cable casing. Remember to move the cable while adding lubricant.
Cable replacement procedure
But lubrication is more of a temporary measure. If signs of cable wear are detected, it is better to replace it with a new one. This is done as follows.
- Loosen the tension on the PT cable locking nut.
- Unscrew the equalizer adjusting nut, which will loosen the handbrake drive cables.
- Raise the rear of your VAZ 2109 using a jack, then remove the brake drum and brake pad.
- Unscrew the drive cable end from the drive arm.
- Disconnect the fastening nut, and then remove the PT cable holder on the rear suspension beam of the vehicle.
- Remove the shell bushing from the hole in the brake shield.
- Pass the end of the PT cable through the hole in the brake shield.
- Remove the PT cable from all holders on the body of your car.
- Disconnect the end of the PT cable from the equalizer.
- Push the cable end out of the bracket to remove the cable.
- Install a new, tested cable, proceeding in the reverse order.
- Do not forget to adjust the cable tension and the performance of the restored RT at the final stage of assembling the unit.
FakeHeader
Comments 6
There is an opinion that when using a hydraulic handbrake for a long time, the pressure in the system drops and the handbrake does not work. For example, if you leave your car overnight with only the handbrake, in the morning you may notice that it has rolled a little! Is it so? Haven't you checked?
Or write, does the tube go from the GTZ to the sorcerer? If yes, then my question is not relevant
The scheme of operation and interaction of the brakes and handbrake is not entirely clear. At first glance, everything is clear, but why does a tube go from the hydraulic handbrake cylinder to the sorcerer, and this is not the input on the sorcerer, but the output, which, according to the factory diagram, goes to the rear brake cylinder. And secondly, how will the handbrake work if for its intended purpose, the fitting , which in the figure goes to the sorcerer, is intended for the entry and not the exit of fluid, because when you press the clutch on a VAZ 2101, the liquid pushes the right output on the cylinder towards the working cylinder? And it turns out that it is powered from the GTZ, although it should go to the sorcerer
Although the number of tuning companies per 1000 cars in Western countries significantly exceeds the Russian average, in terms of the number of home-grown Kulibins we confidently hold the palm. A European or American car owner, if it comes to improving the design of his car, in 95% of cases he will turn to the nearest car service center. Many of our car enthusiasts would prefer to work on modifying their cars themselves. In particular, installing disc brakes instead of outdated drum brakes is a tuning that is very popular. But such a modification will be even more effective if the system is equipped with a hydraulic handbrake. And although these components can be found in car dealerships and equipped with them on almost any model, many car owners prefer to independently manufacture and install this component of the advanced braking system.
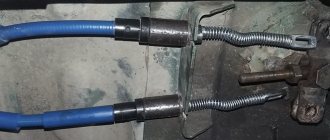
Where is
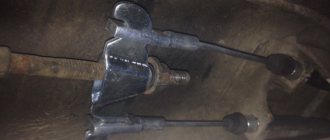
Before you learn how to tighten the handbrake with your own hands, you need to find where it is located. And it is located under the bottom. It is worth noting that the car has several such cables - each goes to its own wheel (right and left).
Closer to the middle of the body they are combined into one single element. This is where the adjusting nut is located that we need to use. We will also need wheel stops and a set of open-end wrenches.
How to tighten the handbrake on a VAZ 2109
“Take off the handbrake!” Surely many of you have heard this expression. In everyday life, this expression means a desire to think faster and use your brain. In the harsh reality of the Rules of the Road there is no expression “handbrake”, however, there is the concept of “parking brake”, which refers to a part of the car that reliably fixes its position in the parking lot.
see also
Comments 19
There is also a possibility that the rod inside the lever is bent, then you need to disassemble the lever and align it... There was such a problem.
There is no need to disassemble anything just yet! If the lever itself is not bent and the teeth on the ratchet are not ground off, then do the following. 1. Unscrew the handbrake button. 2. After unscrewing the button you will see a long spring. 3. Pull it out and stretch it with your hands by about 3-5 cm. 4. Assemble it as before, it will be more difficult to screw the button, but you will succeed
( 2 ratings, average 5 out of 5 )
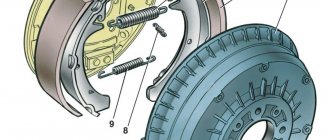
Design
The handbrake (RT) system on VAZ 2109 cars is quite simple. It includes two main nodes:
- Braking devices for rear wheels;
- Mechanical drive.
The drive, in turn, consists of:
- Handbrake lever located in the cabin on the right hand of the driver;
- Front and rear drive cables.
The ends of the rear cable are connected to the levers of the manual brake shoes. In the section where the front cable is brought to the rear area we are dealing with the following elements:
- Equalizer;
- Adjusting nut;
- Tension spring and locknut. They connect the front cable to the car body bracket.
By releasing the lever, the spring releases the tension on the cables and the equalizer returns to its original position. This is where adjustment is required.
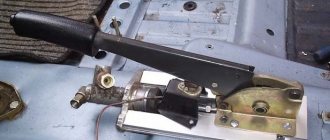
Dismantled RT handle
Additional recommendations
If you cannot depress the brake cylinders, open the cap of the brake fluid reservoir to reduce the pressure. If the pads wear unevenly, pay attention to the caliper. Most likely it will need repairs. When replacing rear pads, replace all springs as well.
They are inexpensive, but they will protect you from possible failures until the next replacement. The front caliper guides can be lubricated with graphite grease for smoother operation.
Replacing the pads on the front axle will not cause problems even for “dummies” of automotive repair. But from the back it’s not so simple. Assess your strengths and capabilities in advance: can you reach the handbrake cable and cope with a stuck brake drum? If yes, then everything will definitely work out.
Handbrake problems
VAZ 2109 handbrake adjustment
Usually the main malfunction manifests itself in the fact that the handbrake no longer holds the car, so it becomes necessary to adjust it (see Adjusting the handbrake yourself). This problem often occurs in the case of domestic cars. Another malfunction lies in the parking device; for example, the parking brake warning light may not light up or stay on continuously.
Adjusting or tightening the hand brake
VAZ 2109 handbrake and its cable
As noted earlier, the mechanical drive of this device is connected to the same brake pads of the rear wheels, which begin to function due to the main, hydraulic brakes of the car. For this reason, faults occurring directly in the drum will not be affected. In the worst case, there would be problems with the main brakes.
Tools
If the handbrake does not work, it can be adjusted. To do this you will need to acquire the following tools:
- wrench size 13;
- pliers;
- you can’t do without an inspection hole or overpass.
Step-by-step instruction
Actions must be carried out in the following sequence:
- the car is placed in a pit for inspection or driven onto a prepared overpass;
- The handbrake goes up two clicks;
- you need to stand under the bottom and loosen the lock nut of the equalizer;
- the adjusting nut is tightened to the cable tension limit;
- the locknut is tightened.
When the locknut does not tension the cable
A similar situation is typical for old, long-used machines. If the cable was extremely stretched, replacement is necessary. In addition, cable replacement will be required if there are signs of significant wear, as there is a large unexpected break.
If the handbrake light does not light up or does not turn off
In this situation, it is difficult to give single recommendations; each individual case must be considered using an individual electrical circuit for the machine, only then can we begin to troubleshoot the problem. If the light simply does not light up when you turn it on, the problem may be that it has burned out, but if it lights up constantly, then most likely there is a short circuit in the electrical system, due to which disturbances in the display have occurred on the dashboard.