Replacing and adjusting the clutch cable VAZ 2108, 2109, 21099
Owners of domestic foreign cars often suffer because the clutch cable stretches. Today we will look at this problem using the example of Samara series cars, namely VAZ 2108, 2109, 21099. These cars are very popular among the people and therefore we will now learn how to first tighten the clutch cable. The next stage will be replacing the clutch cable. Let's start with the simplest thing, namely adjusting the clutch cable
You have to pull it up carefully. It is necessary to ensure that the cable is not overtightened, otherwise it may completely fail after use.
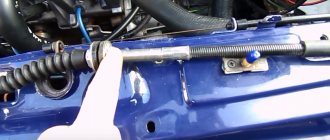
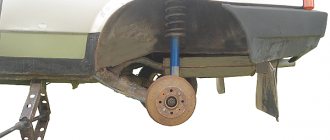
The place for tightening and adjusting the clutch cable is under the hood. If you have a partner with you, let him press the clutch pedal, and you can easily find him. If there is no one nearby, look at this image: the clutch cable runs on top of the gearbox. To adjust the cable, we will need 2 keys at “17”. The tension mechanism consists of two nuts, a locking nut and a tension nut. Loosen the locking nut and tighten it with the tension nut. You will see how the clutch cable is pulled towards the front of your VAZ 2108, 2109, 21099. After pulling the clutch, get into the car and press the clutch. If you do not feel any changes, repeat the procedure again until you achieve the desired result. Once you have tightened the clutch to the level you need, tighten the locking nut. Done! Note: do not overtighten the clutch, otherwise the cable will burst at one point. Do you want to protect your car? Protection for the crankcase and gearbox of the VAZ 2108 will help you. Price of the cable in the store: 200-300 rubles.
| If you still break the clutch cable, then read on. The procedure will be similar to tightening the clutch cable. First of all, we need to loosen the clutch cable in order to pull it out of the mounting bracket. |
| Next, remove the clutch cable from the mount on the gearbox fork: |
| We move to the interior of your VAZ 2108, 2109, 21099. There we remove the locking bracket from the clutch pedal and disconnect the clutch cable from the pedal: |
| Now the last step is to remove the old clutch cable. We remove it together with the rubber cushion from the hole. You will find it at the junction of the clutch from the engine to the passenger compartment. Pull out the clutch cable completely. |
| Now we put everything back together in reverse order and tighten the clutch. As mentioned above, this can be done simply and quickly. |
| Well, that’s the end of the article on replacing and adjusting the clutch. Thank you. Good luck on the roads. Discussion of this photo instruction on the VAZ 2108, 2109, 21099 forum, replacing and adjusting the clutch cable |
The principle of clutch adjustment
If, after a preliminary check, you have determined that the clutch cable needs adjustment (that is, tightening - approx.), then do not be alarmed, since the process of such work is not complicated and will not require any additional effort.
Clutch cable tension is adjusted by tightening it under the hood
Such a process consists of simply changing the length of the cable and its sheath from the adjustment unit, due to which its indicators can change both to the smallest and greatest extent.
As you might have guessed, if the length of the cable is reduced, then the pedal stroke will be less, the same applies to increasing the stroke, all that remains is to achieve those cherished pedal stroke indicators of 12.5 centimeters.
Replacing the clutch cable Lada 2108 (VAZ 2108)
The VAZ 2109 clutch consists of a clutch basket, pressure plate, release bearing, drive foot, release bearing, cable and clutch pedal. The fact that the clutch drive is cable driven, and not hydraulic, like the classic models, is a distinctive feature of the VAZ 2109.
In classic models, when pressed, the clutch pedal presses on the piston of the clutch master cylinder, from which the fluid pressure is transmitted through a tube to the clutch slave cylinder. In the VAZ 2109 everything is simpler; the clutch pedal is connected to the clutch release foot via a cable. The clutch cable is connected to the clutch pedal and is inserted into the engine compartment.
Next, through the cable tension adjusting nut, it is brought to the foot.
The clutch cable of the VAZ 2109 is replaced if it breaks or is tight. The sequence of actions is as follows: Disconnect the cable from the clutch foot.
Then we disconnect the cable from the clutch pedal from the interior of the VAZ 2109.
It’s easy to understand that the VAZ 2109’s clutch cable has broken: the gears will stop shifting when the engine is running. You will press the pedal, try to engage first gear, but it will not engage, but you will hear the grinding of gears as the clutch is engaged and torque is transmitted to the gearbox.
Ask someone to press the clutch, and open the hood yourself and see if the clutch release foot does not move when you press and release the pedal, it means the clutch cable of the VAZ 2109 is torn and must be replaced.
It is necessary to loosen the clutch cable tension. There is also the other extreme, when the clutch cable is too loose and the clutch does not disengage completely.
In this case, when you engage gears, you will hear the crunching of gears. It is necessary to tighten the clutch cable of the VAZ 2109. Go to Home.
Replacing the clutch cable of VAZ 2108, VAZ 2109, VAZ 21099, Lada Samara
DIY clutch repair instructions for VAZ 2108, VAZ 2109, VAZ 21099
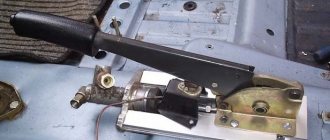
For ease of perception, the disconnection of the drive cable from the clutch lever of the VAZ 2108, VAZ 2109, VAZ 21099 is shown on the box removed from the car.
Section for repairing the Lada 21099 transmission, clutch, and wheel drives. Repair of differential fret 2108, secondary and primary shaft fret 2109.,
- Transmission units and gearboxes VAZ 2108, VAZ 2109, VAZ 21099,
- Transmission repair VAZ 2108, VAZ 2109, VAZ 21099
- . Clutch repair, stages of removing and installing the Lada 2108 clutch, adjusting the clutch of the VAZ 21099, VAZ 2108, VAZ 2109.. Clutch drive cable
www.VazClub.com
More articles on this topic:
20-02-2012, 23:53
Information
If the clutch cable breaks, you will not be able to press the pedal as it sinks to the floor. It also happens that the pedal becomes too tight. In these cases, we recommend that you learn how to remove, change and adjust the clutch cable on a VAZ 2108, 2109, 21099 with your own hands.
You will need: a new clutch cable, 2 17″ wrenches.
Replacement
There are two ways to change the clutch cable:
Each option has the right to exist. We will introduce you to the two operations, after which you can choose which method to prefer.
Taking off the frill
- Raise the car using a jack.
- Unscrew the cable fixing nut. It is located under the clutch pedal.
- On the pedal rod there is a ring and a locking ring.
- To remove the cable, you will need to understand the cotter pin that holds it. To dismantle it, take a size 8 wrench and unscrew the cotter pin.
- It is now partially free as it is still held in place.
- Remove the frill and windshield wiper, then lift the hood.
- In the engine compartment, find the cable fixation point. Dismantling is carried out with a 19 mm wrench, which needs to be used to unscrew the nut.
- An old rubber band is often used if it is not worn out. Yes, and it’s difficult to change it yourself. But if necessary, change it. If you see strange wiring there, feel free to remove them. They do not perform any functions.
- Insert the rubber band into the hole through which the cable went.
- Place all fasteners, bolts, and nuts in a separate box so as not to lose them.
- Install a new cable and tighten the retaining bracket under the hood.
Without removing the frill
Here the operation is somewhat more complicated, since you will have to bypass the frill. But usually the work takes less time, which is why most VAZ 2109 owners choose this option.
- Unscrew the clutch cable fastenings using a 19 mm wrench.
- Remove the cable end from the fork.
- It is not always necessary to remove the tip from the clutch fork. This largely depends on the location of the cable break.
- Go into the interior and find the cable fastener under the clutch pedal. It's small, so a key for 8 will come in handy.
- Unscrew the bracket that holds the tip to the pedal. Try to raise the pedal as high as possible, and then use a flathead screwdriver to hook onto the clip.
- That's it, the cable can be removed. Just don't pull too hard. And what you should be afraid of here is not that it will completely break. You can damage the cable socket with sudden actions.
- It is best to remove the cable through the interior.
- There may be wires in the cable channel that interfere with removal. Pull them out with confidence, as they do not perform any tasks.
- Also, washers located under the hood may interfere with your work. Just carefully unscrew them and you're done.
- Remove the bracket from the pedal lever. This way there will be no problems with removing the cable.
- Carefully insert the new cable into the hole through the interior into the engine compartment.
- Follow the reverse procedure for assembling the assembly.
- The most difficult thing is to put the tip fixation bracket in place. It is because of this that many advise removing the frill. But you can work around this difficulty.
- Make a clip from a regular paper clip. Secure the bracket with it. If necessary, use pliers.
- When assembling, do not forget to lubricate the cable with grease or oil, which does not freeze at sub-zero temperatures. This will make the element more elastic.
Replacing the clutch cable of a VAZ-2109
Removing the clutch cable
On the left side of the engine compartment...
... using two 17mm wrenches, loosen the nuts securing the lower end of the cable sheath to the bracket (for clarity, the radiator hose has been removed).
We remove the cable from the bracket socket.
We remove the cable lead from the clutch release fork.
In the cabin, under the instrument panel, use a screwdriver to pry up the locking bracket of the clutch pedal finger and remove the bracket.
Remove the upper cable end from the clutch pedal pin.
We remove the clutch cable through the hole in the front panel.
We install the clutch cable in the reverse order, having previously lubricated the cable guide with Litol-24 lubricant.
Replacing the clutch cable of a VAZ 2109
The need to replace the clutch cable on a VAZ 2109 most often arises in the following cases:
- The clutch does not perform its functions correctly. It is difficult for the driver to operate the clutch due to the fact that pressing the pedal is difficult, and as a result, the engine is difficult to start.
- The car starts to move with jerks, and in some, but rare cases, it even stalls due to difficulty disengaging the clutch.
- The gearbox makes strange noises, and shifting does not always work.
- After pressing, the clutch pedal remains in the floor and does not return to its original position. When you try to return it to its original position manually, the pedal returns easily, and pressing practically does not cause any effort.
This set of faults indicates that the clutch cable needs to be replaced, adjusted, or the clutch fork needs to be replaced. The plug probably broke during use. However, a fork fracture is extremely rare, therefore, most often, the cause of malfunctions lies only in the clutch cable. The procedure for replacing the cable is as follows:
- We unscrew all the nuts that secure the clutch cable to the lever. We take the lower end out of the special bracket and disconnect it from the clutch fork. We hang the freed end of the cable so that it does not get lost, and go into the car interior.
- In the interior, you need to remove the mats under the pedals and remove the bracket from the clutch pedal. After removing the bracket, you need to pull out the pin that connects the cable and the pedal lever. Now you can release this end of the cable and begin dismantling it.
- The clutch cable should be removed through the engine compartment. To do this, push the end of the cable through the hole next to the clutch pedal. Once the cable is under the hood, it can be removed out.
- Installation of a new cable is carried out in the reverse order. However, before inserting the cable into the rubbing units, it must be lubricated with automobile oil. Thus, damage to it is eliminated, and the pedal stroke will noticeably improve.
- After installing the cable, it must be adjusted. Adjustment is made by unscrewing/twisting two nuts on the bracket. At the same time, the length of the cable sheath between the bracket and the special clip in the shield increases or decreases.
- Before making adjustments, press the clutch pedal all the way to the floor and set the ruler vertically in relation to the inclined part of the floor. Slowly release the pedal up, and after stopping, measure the pedal stroke. For VAZ 2109, the normalized clutch pedal stroke length is 125-135 mm. The pedal travel limit is 160 mm. If the measurement results do not correspond to the norm, then the length of the shell is reduced or increased. Increasing the shell length will correspond to an increase in pedal travel, and decreasing the shell length will correspond to a decrease in pedal travel.
Attention! There are a number of drivers who adjust the clutch by increasing the pedal stroke length gradually during operation. An increase in pedal travel may also indicate that the disc is subject to increased wear, and if you adjust the cable, there is a risk of damaging the engine flywheel during further operation of the car
In this case, you need to make sure that the clutch disc is still in working condition and only then can you adjust the pedal travel by gradually and slowly increasing it.
That's all. There is nothing complicated in the process of replacing and adjusting the VAZ 2109 clutch cable. Good luck on the roads!
Reasons for replacement
Practice shows that there are several main situations that force you to change the clutch cable.
Peculiarities
The clutch does not work properly
It becomes difficult for the driver to depress the clutch pedal, which causes problems when trying to move away or start the car, the clutch slips
It begins to switch with certain problems, and during operation it also makes strange, incomprehensible sounds
If, after pressing the clutch pedal, it does not want to return to its original position when you remove your foot, this may indicate a problem with the cable
Such symptoms can only suggest that the problem lies in the cable. To make sure of this, you should conduct a full check of the node's condition.
All the symptoms mentioned may indicate a broken cable or a broken fork. In the case of a cable, you will have to replace it. If the fork falls off, it will need to be returned to its place and clamped in order to prevent possible repeated falls.
Preparing for work
Initially, it is recommended to find a place where it is most convenient to inspect the car and replace the part. Since you will have to work not only under the hood, but also under the car, the best assistants will be a lift, pit or overpass. If you do not have the opportunity to use one of these options, you can simply raise the car using jacks.
Also, before starting work, you need to make sure that you have everything you need at hand. To replace the cable you will need:
- new part;
- set of wrenches;
- screwdrivers.
On average, you can replace this element on a VAZ-2109 yourself in 20 minutes.
Contacting the service station
The vehicle can be driven by inexperienced drivers who do not know how to change the clutch cable on a VAZ 2110, in which case it is necessary to contact a technical service. You will have to pay for the service, but this has its advantages:
- As for the cost, most service stations have reasonable pricing;
- all manipulations are carried out by highly qualified craftsmen with long experience;
- the process uses modern equipment and tools;
- Only new spare parts are installed;
- fast service times;
- quality assurance.
All these advantages indicate that you should not save money on car repairs if the driver does not know how to change the clutch cable on a VAZ 2110 car yourself.
How to adjust the clutch on a VAZ 2109
Cars of the 09 VAZ family are equipped with a cable-operated clutch. This technology is 5 times more reliable than classic variations with hydraulic drive. However, during operation, any mechanism requires calibration and this unit is no exception.
A scheduled inspection must be performed every 15,000 km or once a year, whichever comes first. However, unexpected breakdowns occur that require surgical intervention.
The following factors are considered signs of incorrect operation of the unit.
- The car starts moving jerkily - the clutch slips, which causes uneven acceleration.
- Increase in fuel consumption by approximately 10-15%.
- Dissonance between engine speed and actual acceleration of the car.
- When shifting into gear, extraneous sounds and squeaks are heard from the gearbox.
- When inspecting the car, there is an unpleasant smell of burnt pads.
- The pedal falls or sticks.
- The drive does not operate in the middle of the pedal stroke.
If even 1 of the listed points is detected, the design must be adjusted.
The cable broke on the road, what should I do?
It often happens that the unit breaks down on the road and there is no spare cable at hand. In this case, the vehicle is allowed to move without a clutch due to the presence of synchronizers at the gearbox.
This allows you to change gears while driving without interrupting the transmission of rotation from the engine to the gearbox, although this requires the use of force.
The main thing in such a situation is to start moving from one place. To do this, turn off the engine and engage 1st gear in the gearbox.
Next, we turn on the starter, which is quite capable of starting the engine connected to the transmission, but the start of movement will occur jerkily. And after starting the engine, the jerking will disappear.
Clutchless gear shifting must be done with a restart. That is, they picked up speed, released the accelerator pedal and moved the gear lever to neutral.
Then they sharply increased the engine speed (breathing heavily) and activated the desired speed. But this needs to be done quickly.
When driving with a broken clutch, it is necessary to choose a route with as few stops as possible, since this will require turning off the engine every time and starting driving at speed. And the snack will not withstand this “bullying” for long.