A handbrake is a necessity in modern cars. If earlier it was possible to put a car with manual transmission at speed, on a hill, now, since every car has an alarm system, it will not allow this. You just won't be able to reserve autostart. Sooner or later you will have to tighten the handbrake (parking brake) on Vesta, because it’s hard to do without it. On a Lada Vesta car, adjusting the hand brake is not a tricky procedure, but it does not always work; if the mechanism is worn out, it will have to be changed. Considering its importance in everyday use, and not during extreme driving, it will prove indispensable at long traffic lights, railway crossings, when the driver wants to rest. Finally, Vaz made a different handbrake on Vesta, both in setting and in appearance. Before that, after all, since 2108, it had been set for 30 years the same way.
It is always recommended to tighten the handbrake when parking on an inclined surface or a hill. But in winter, there is a risk that the pads will become stuck while driving, and the handbrake will freeze. In this case, they will have to be warmed up manually, unless you prepare the car for a winter overnight stay yourself. Otherwise, the parking brake must clearly fix the brake pads and wheels so that the car does not roll away. Read the article to the end where we will cover the topic of handbrake on Lada Vesta cars.
Basic faults
The main malfunctions of the parking brake system include:
- Reduced brake efficiency (the handbrake has to be pulled harder, higher, to lock the car in place on a slope);
- Failure to release the handbrake (manifests itself when the driver releases the handbrake lever, but the car is still held in place);
- Spontaneous release of the brake when the parking system is engaged (this is really scary, but the raised lever of the mechanism can let the driver down - the car will start to roll away).
It is worth noting that the cause of such breakdowns is not always the parking brake system assembly - it interacts with other components and assemblies of the car, so there are problems:
- Drum wear (Lada Vesta has drum brakes);
- Oily or worn pad linings.
As for the mechanism itself, the cause of the above breakdowns may be:
- Lengthening (stretching) the cable;
- Wear of drive parts, latch teeth, combs of the mechanism assembly;
- Sticky cable.
Why do we need a working handbrake?
A hand brake is an element of the vehicle’s braking system, which performs the function of blocking the wheels relative to the axis of movement of the vehicle, and thus ensures the stability of the vehicle on the moving surface (including on a sloped surface).
A working handbrake performs the following functions:
1. Provides vehicle stability on the road surface when parked or on slopes.
2. Helps with emergency braking.
3. If you have the skills, you can use it to enter a controlled drift.
4. If the foot brake breaks down, it can perform its functions.
But it is worth noting that it is impossible to use the handbrake as a permanent braking element (instead of a foot brake), because its main purpose is to secure the car while parking. If you need to use the handbrake when braking while driving, it is not recommended to pull it sharply, as this will cause the car to skid.
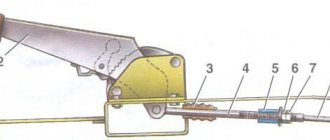
The design and principle of operation of the hand brake are quite simple. It consists of three main components:
1. Mechanical drive.
2. Actuator.
3. Control node.
The mechanical drive is made in the form of a hand brake cable. This cable acts on the rear brake pads or on the transmission (depending on the design features of the car). The rocker arm installed in the handbrake ensures uniform cable tension on the two brake pads.
The actuator of the handbrake is the brake pads of the rear axle, which can be driven not only from the handbrake lever, but also from the foot brake pedal. This was done for simplicity of design and for easier vehicle maintenance.
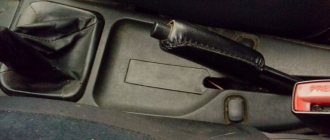
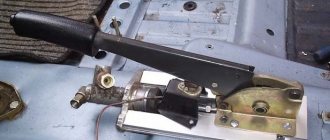
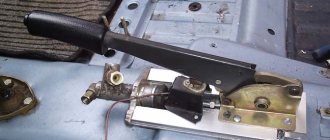
The handbrake is activated by a control unit, represented by a handbrake lever with a ratchet, which controls the tension of the cable. It is located between the driver's seat and the passenger's seat in the central tunnel. On cars with an automatic transmission, there is a foot pedal for the parking brake instead of a lever.
The activation of the handbrake is indicated by a sensor in the form of a light bulb on the dashboard. This sensor helps the driver navigate when the handbrake is on and remember to remove the car from the handbrake before starting to drive. In some cars, if you drive with the handbrake on, a beep will sound, which is very convenient, because drivers often forget to turn off the handbrake.
Handbrake tightening - instructions
On the Lada Vesta, adjusting the handbrake is much more convenient than previously in older AvtoVAZ models - now this can be done while sitting inside the car in the driver's seat. According to the manufacturer's regulations, the tightening should be done every 30,000 km, or better yet, a little earlier.
The Lada Vesta handbrake is tightened as follows:
- Raise the rear of the car so that you can manually turn the rear wheels. Fully lift and release the handbrake lever several times - this will bring the mechanism into working condition. Fully tighten the handbrake.
- Remove the plastic plug under the brake lever. Lift the rubber plug and you will see a nut on the end of the handbrake.
- Using a number 10 wrench, loosen the nut slightly and move the lever to about the second tooth.
- Tighten the nut until the rear wheels are firmly seated and cannot be turned by hand.
- Raise and lower the lever several times.
Handbrake: removal and installation
If tightening the parking brake does not solve the problem, Vesta still rolls away, you will have to resort to heavy artillery. Having prepared to remove and install the handbrake, perform the following operations:
- Drive the car onto the car lift. Release the parking brake, shift into gear, and turn off the ignition. Dismantle the tunnel in the cabin - it will be easier to work;
- Remove the wiring harness block;
- Loosen the handbrake limit nut under the plug using the “tenth” key;
- Loosen the nut that regulates the degree of tension of the cable responsible for the equation of the lever, and then remove the cable fastenings;
- Use a screwdriver and pliers to carefully remove the cable ends. Don't put them off too far;
- Carefully remove both rear wheels;
- Proceed to dismantle the body floor. To do this, remove the three nuts with head number 24 and the fasteners. Use a screwdriver (preferably a flat one) to pry up the cables and remove them from under the brackets attached to the body;
- Remove the brake pads. To do this, first remove the tension springs, guide brackets, spacer bar (only assembled with an automatic adjustment mechanism), and then the brake pads themselves. All operations must be carried out strictly in the designated order;
- Use pliers and a screwdriver to remove the cables from the levers, and then remove the cable tips from the guide holes of the brake shield;
- Remove the cables from the lever brackets and the attachment of these levers to the body;
- Take out the cables;
- Place the new cables in the brackets - instead of the old ones, in the guide holes;
- Insert the tips into the brake shields;
- Then insert the tips into the tunnel into the corresponding holes, and secure the cables themselves under the brackets that are attached to the body;
- Put the pads back in place. To do this, clean the drums from dirt. Apply lithol to the threads of the spacer strip;
- Place the brake pads on the brake shield, and then the tension springs. Using pliers and a screwdriver, install the guide pad brackets. Then spread the brake pads with pliers, place a spacer bar between them and set the outer diameter of the pads using the spacer bar nut;
- Place the drum, then press the brake pedal about 10 times, bringing the mechanism into working position;
- Put the wheels in place;
- Connect the cables to the equalizer of the hand brake lever;
- Perform adjustment (“tightening”) of the parking brake lever;
- Check the operation of the parking brake system. After this, you can install the tunnel and plugs.
Preparatory part
Before you begin adjusting the degree of tension of the handbrake cable, you will need to stock up on the following tools and materials:
- a ratchet and an open-end wrench (usually 13, but this depends on the specific design);
- WD-40 type lubricant;
- an extension cord with a lamp if the illumination of the underbody of the car is insufficient.
The work should be carried out on a lift/overpass; an inspection pit, which many garages are equipped with, is also suitable. As a last resort, you can jack up the rear of the car and put it on blocks.
Note that for some car models, the handbrake adjustment is made directly from the passenger compartment, so this point should be clarified.
If access to the bottom of the car is provided, you should make sure that the inoperability of the CT is not caused by jamming of the cable due to dirt and other objects getting on its surface. In this case, it is enough to simply clean the cable and then lubricate it.
And one more nuance: you can start adjusting only if the technical condition of the cable, pads and drive mechanism is in satisfactory (working) condition.
Lada Vesta: adjusting the handbrake correctly
Late activation of the handbrake on any car does not lead to anything good. The handbrake on the Lada Vesta is not too different in design from other VAZ models, and the brake mechanisms themselves are almost identical to the brake mechanism on the Renault Logan. However, Vesta has features that need to be taken into account when it comes time to tighten the parking brake. How to adjust the handbrake on Vesta correctly, what the manufacturer says, when adjustment is necessary and whether it is possible to do the work yourself in a garage, we’ll figure it out right now.
Design features
The adjustment instructions are meaningless if you are not familiar with the parking brake.
Often, when self-adjusting, we are talking about units that are based on a cable and a mechanical drive. With an electronic handbrake, it is better to seek help from a car service center.
The classic handbrake is found on a variety of cars, including:
- Lada Granta;
- Gazelle;
- Opel Zafira;
- Lada Kalina;
- Renault Logan;
- Lada Vesta;
- Chevrolet Lacetti;
- Renault Duster;
- VAZ 2110;
- VAZ 2107;
- Opel Vectra, etc.
Each automaker uses its own components to create the unit responsible for the handbrake.
At the same time, the structural elements are approximately the same everywhere. This allows the suspension a certain line under the bulk of vehicles in the matter of adjusting the handbrake.
As for these same design elements of the parking brake, I would like to highlight 3 main components.
- Lever arm. Serves to turn the handbrake on and off. Located in the vehicle interior, usually in close proximity to the driver, under the right arm;
- Adjustment unit. It includes rods, an equalizer, a fixing and adjusting nut, as well as a rubber boot;
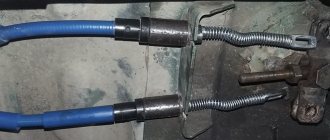
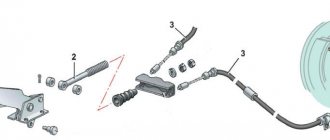
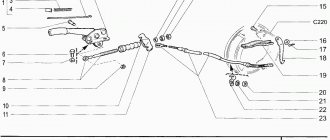
- Drive cable. This is a steel cable located inside a flexible twisted winding. Connects the adjusting unit and the rear brakes on the car.
The rear wheels also contain some braking elements to ensure that the parking handbrake is functional.
Handbrake Lada Vesta. Device and maintenance regulations
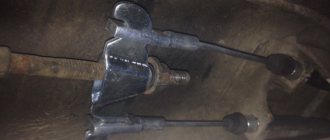
The parking brake on the Lada Vesta is adjusted in the same way as on most cars with mechanically driven rear brake pads - the handbrake lever moves the intermediate equalizing cable, to which two wheel cables are hinged. Each one attaches to the rear brake assembly and spreads the pads using a simple lever mechanism. With the help of an automatic pad lining system, the cable tension must be constantly maintained in working condition until the friction linings wear out. The peculiarity of the Vesta brake is that the mechanism for automatically tensioning the handbrake cable does not always work.
Brake mechanism of the rear wheels of Lada Vesta
The factory recommends tightening the parking brake cable once every 30 thousand mileage . To do this, it is enough to tighten the adjusting nut directly from the passenger compartment, in contrast to adjusting the handbrake on the Grant, where all this is done from under the car. If the operation is successful, the handbrake lever will again block the rear wheels in its legal 3-4 clicks. In practice, it turns out that the factory instructions do not always work. The nut can be tightened all the way, but this has no effect. It's all about a non-working or soured rear pad self-adjustment mechanism .
Be that as it may, the task of the handbrake is to hold the car securely while parking. In this case, the handbrake lever should not block the rear wheels in more than 3-4 clicks, and the car should be held with the wheels locked on a slope of 23-25% . In the case when we cannot get the pads to block the drum, or they are blocked at the sixth or seventh click, but we are sure that the friction linings are normal, we have to use plan B, which we will discuss below.
HANDBRAKE CABLE REPLACEMENT PROCEDURE
The moving parts of the brake system tend to wear out. The working condition of such parts must be diligently monitored, since brakes are an extremely important part of the car. Timely repairs and diagnostics will help protect yourself and your car from unforeseen situations. The most unpleasant breakdown is a broken parking brake cable.
If the cable breaks, it must be replaced immediately. We'll look at how to replace the handbrake cable below.
As in any other case, DIY repairs require some tools. First, you need to find a car overpass or a hole (as a last resort, you can use a jack, which we will need anyway). You also need to prepare certain tools, such as thirteen wrenches (preferably 2), pliers, a hammer, plastic clamps and gloves. And the actual new hand brake cable for the VAZ.
When everything you need is prepared, you can start working. Replacing the handbrake of a vase takes place in stages:
- First of all, we put the car on an overpass or a pit, or jack it up and climb under the car;
- By removing the muffler can from the mounts, we will greatly simplify our work. If this is not done, it will be difficult to unscrew the cable tension nut;
- Unscrew the locknut and the adjusting nut of the handbrake. This concludes the work on the overpass for now;
- We drive the car onto a flat surface and jack up the rear;
- Remove the wheels;
- We knock down the locking pins from the pads;
- Remove the brake pads;
- Now you need to disconnect the cable ends from the equalizer. This is where pliers come in handy; you can use them to remove the clamps;
- You need to remove the cable loops from the hooks of the spacer lever;
- Unscrew the bolt securing the cable sheath and remove it;
- You can pull out the parking brake cable of the VAZ 2114.
We recommend: Self-repair of VAZ-2103 engine
Pulling a new cable will no longer be a problem. Similar to the removal procedure, we do everything in reverse order. We start by pulling through the washers and loops on the hooks of the lever, and finish by tightening the handbrake in the cabin. The cable sheath also needs to be replaced sometimes, as it is also subject to wear. You can secure it after replacement with ordinary plastic clamps. This is how the VAZ 2114 parking brake cable is replaced.
Replacement is carried out in a similar way on VAZ 2115 and VAZ 2113 cars. These models have an absolutely identical brake system, so there can be no differences in repairs. An exception may be “amateur tuning” or unscrupulous repairs inherited from the previous owner.
How to tighten the hand brake cable on a Lada Vesta. Standard technology
In order to tighten the handbrake cable, or more precisely, to force the equalizer to tighten the cables more, you just need to tighten the thrust nut until the brake operates on the third click. To do this, we will need a flat-head screwdriver, a 10mm tall head (or a 10mm tubular wrench). It is advisable to carry out the work on a lift or use a jack and two stands to hang the rear wheels of the car. But before hanging the rear wheels, you need to handbrake drive lever several times until it stops and then lower it again Next we do this:
- After hanging the wheels, make sure that they rotate freely.
- Remove the plastic trim on the center tunnel near the parking brake lever using a flat-head screwdriver.
conclusions
The cable on the Lada Kalina must be tightened every 40,000 km in accordance with the service data. But, as practice shows, this can be done earlier. For example, one or two trips with the handbrake and the cable will have to be tightened, and in the worst case, replaced.
According to motorists, it is necessary to tighten the handbrake every 30 thousand km.
The first batch of Lada Vesta, in principle, as expected, turned out to be a mess in the sense that it still needs to be improved, which is what Vesta’s designers are doing.
We have already mentioned creaks in the front suspension on bumps; it was the stabilizer bushing that creaked. Also, many car owners were bothered by noise and rear impacts on bumps: the reason was the rubber of the strut rod, it hit the body. The solution turned out to be simple, add washers (more details).
If, after completing the operation with the struts, you still have extraneous noise on the bumps, then try to pay attention to the fastening of the handbrake cable. To do this, you will need to drive the car onto an overpass or try to lift it on a jack.
The bottom line is that the handbrake cable is simply not secured in its place, and it dangles on the bumps, hitting the metal bracket. Getting rid of noise in this case is simple: we need a piece of cut silicone tube. We put this silicone tube on the handbrake cable and press it into our bracket, as shown in the figure. Home page
Adjusting the parking brake on Vesta. Plan b
As we said above, now our task is to figure out the mechanism for automatically lining the pads with little effort, without removing the brake drums. And this is quite possible. To manually adjust the pads and make the handbrake work normally, proceed as follows:
- We hang the rear wheels, having previously removed the mounting bolts.
- We remove the wheels.
- Install the hole for the bolt with right side by about 11 o'clock , and with left on 13 hours .
From the left side - Using a well-tucked flat-head screwdriver, rotate the gap adjuster between the pads and the drum through the hole. down up , counterclock-wise. Not entirely convenient, but quite possible if you illuminate it with a flashlight.
- Rotate the auto liner adjusting nut until the drum lightly touches the pads.
- We do the same on the right side , but here you need to rotate top down .
On the right side
The handbrake lever must be lowered completely.
We attach the wheels and check the operation of the handbrake. If necessary, tighten the cable as described using standard technology, using an adjusting nut from the interior. As a result, we get excellent performance of the rear brake mechanisms and an iron handbrake that confidently holds on the second or third click.
Source
Adjusting photos and videos
Incorrect operation of the handbrake can cause an accident or some other serious incident.
Introduction
For example, even with the simplest job of replacing a broken tire, you must put the car on the handbrake, otherwise you risk “putting” the car on the bumper as a result of the car “driving” forward. And this is not the worst thing that can happen! You may cause yourself serious physical harm.
Toyota BB was dropped on the asphalt
The same Toyota
Classic fell off the jack
A necessary tool for tightening the handbrake.
Head 8 for ratchet
Set of keys for 13
Partner (preferably the coolest car mechanic)
- Two keys for 13. It is advisable that one of them be a socket.
- Head 8.
- A partner, but you can do without him. The truth is it’s more difficult without him.
The principle of adjusting the handbrake
- Fully lower the handbrake lever in the cabin.
Lower the handbrake handle
Remove the muffler from its mounting to the body
Using a ratchet, unscrew the 4 bolts securing the protection of the handbrake adjustment mechanism (protective screen).
Remove and set aside the protective screen
Next, you can either remove the protective screen, but it seems to me that it is easier to move it forward behind the muffler, which will free up space that is enough for free work.
The mechanism looks like this
Loosen the first nut with a 13mm wrench.
- By tightening the adjusting nut, tighten the handbrake cable that comes out of the passenger compartment.
- Ask a partner to check the stroke of the lever handle, or check it yourself.
- As soon as the handbrake moves 3-4 clicks, tighten the lock nut.
- Before the final stage of work, it is necessary to check the functionality of the brake mechanism. To do this, hang the rear wheels and watch how they rotate with the hand brake off. They also check how the wheels grip when the handbrake is raised.
- Next, return the protective screen to its place, screw it onto the seats and put rubber fasteners on the resonator.