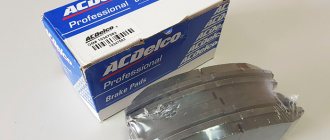
Replacing the rear brake pads of a VAZ 2109
There can be many reasons for replacing brake pads on the rear wheels of a VAZ 2109, but most often this is caused by wear of the friction linings.
The work process is not complicated, but requires care, since the car will be hung on a jack if you do not have the opportunity to lift it on a lift. Content:
When to change brake pads on the rear wheels
There are no clear regulations for replacing brake pads on the rear wheels of a VAZ 2109, because the frequency of their replacement depends on many factors:
- quality of friction linings;
- driving style;
- operating conditions;
- the material from which the pads are made.
First of all, brake pad wear appears during active braking, when the car stops maintaining its trajectory. This indicates rather a problem in the brake system, but the possibility of uneven wear of the pads on the right and left wheels cannot be ruled out.
Preparatory work
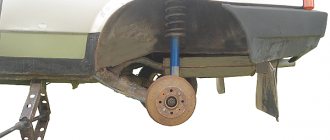
Replacing the rear brake pads of a VAZ 2109 begins with placing the car on a level surface. Since you will have to jack up the car, you should carefully secure the car. The situation is further complicated by the fact that you will have to release the handbrake. Therefore, it is necessary to place wheel chocks, or simply wooden blocks, under the front wheels and put the car in first gear. You need to take this seriously, because many operations will have to be performed under the machine.
For the work, we will prepare the necessary tool, which should be at hand during the process:
- wheel wrench;
- pliers;
- standard set of keys;
- wooden block;
- set of heads with extensions.
Removing the rear pads
The operation of replacing the pads begins with removing the wheel, so before putting the car on a jack, you need to remove the wheel bolts with a wheel wrench. Only after this can you put the car on a jack and remove the wheel.
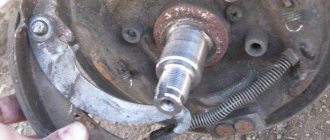
- Using a socket or a 12-mm open-end wrench, remove the two guide pins from the hub.
- The brake drum should come off easily, but there are times when it sticks to the hub, in which case it should be helped with a wooden block. To avoid damaging the brake drum, it is not recommended to use a hammer. The drum may crack or become deformed. If this does not help, then take the guide pins and screw them into the other two threaded holes. Thus, the pin will rest against the hub and press out the drum. The pins must be tightened evenly to avoid distortion.
- After this operation, you can gain direct access to the brake pads.
- Loosen the handbrake cable. We can only gain access to the compensator by removing the resonator. In order not to disassemble the muffler, you need to assemble an extension from a set of heads of sufficient length so that you can unscrew it with a 13mm head and a wrench. It is better to use a wrench with a ratcheting mechanism, this will simplify work in tight spaces.
- We unscrew the locknut with a 13mm wrench, and then with the assembled extension we release the handbrake tension cable as much as possible.
- To remove the pads, you must disconnect the handbrake drive. We remove the cotter pin from the fixing pin and press the pin so that it does not interfere with the removal of the mechanism.
- Carefully remove the spring from below using pliers, then remove the limit spring from the front block.
- Remove the upper spring with pliers and remove the front pad.
- Remove the spacer bar.
- We take out the lever that sets the pads in motion, freeing it from the cable.
- Remove the rear block, freeing it from the lateral movement limiter.
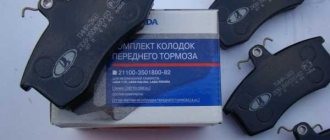
Installing new pads
To install new brake pads, you need to connect them with the upper tension spring and install a spacer bar. Install the pads on the caliper, and then reassemble in reverse order.
After assembling the unit and installing the wheel, do not forget to tighten the handbrake cable. In the normal position of the body, when it is not loaded, the handbrake should lock the rear wheels in 3-4 clicks.
Some tips from the professionals
- When new rear pads are installed, it is very important to carefully inspect the drum. The performance of the entire brake system of the VAZ 21099 depends on the degree of wear not only of the linings, but also the condition of the drum. When it is badly worn, it is impossible to get good braking;
- if the springs are weakened, it is better to replace them;
- Before installation, you need to carefully inspect the brake cylinder. The seals must be dry; even the slightest drip of brake fluid is strictly prohibited. Damaged anthers must be replaced;
- After installing the pads, the wheel does not need to be lowered to the ground immediately. First, the parking brake cable is adjusted. The nut on the equalizer is tightened. We pull the handle while counting the clicks. If their number is more than 8, repeat the tightening. The number of clicks should be in the range of 2-7. With this adjustment you need to achieve complete fixation of the wheels when the handbrake lever is raised. When done correctly, the wheel cannot be turned by hand;
- When the car is moving, when the handbrake is completely lowered, the pads should not touch the surface of the drum. Otherwise, it will become very hot, possibly causing it to jam.
When and why to change
Why, of course, is a rhetorical question. No motorist wants to be left without brakes. Possible complications will only lead to higher repair costs:
- one of the wheels will jam while driving;
- due to extreme wear, brake fluid will leak;
- the caliper will break.
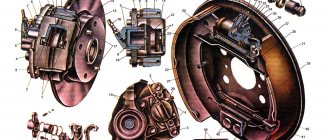
Rear wheel brake mechanism: 1 - brake shield, 2 - wheel cylinder, 3 - upper tension spring of the pads, 4 - brake pad, 5 - pad lining, 6 - brake drum, 7 - dowel pin, 8 - guide spring, 9 - lower tension spring
The question of “when” is directly affected by driving style and the quality of the pads. There are average indicators: for the front axle - 15-20 thousand km, for the rear axle (drum) - up to 100 thousand km. But this does not exempt you from regular checks.
Front wheel brake mechanism: 1 - brake disc, 2 - pad guide, 3 - caliper, 4 - brake pads, 5 - cylinder, 6 - piston, 7 - pad wear indicator (inspection window), 8 - o-ring, 9 - protective guide pin cover, 10 - guide pin, 11 - protective cover
When replacement is required
It should be said right away that the plant manufacturing the above-mentioned vehicle did not indicate the frequency of replacing brake pads. The thing is that their service life depends on a number of objective factors, including:
- driving style;
- Terms of Use;
- the quality of the friction linings and the material from which they were made.
The strongest indication of pad wear is when the car skids during heavy braking. However, this symptom is observed not only in the case of uneven abrasion, but also in the incorrect operation of the entire system.
Required Tools
You will need radically different tool sets for the front and rear axles. Let's start with something simple. To replace the front disc brake pads you will need:
- flat screwdriver;
- open-end wrenches for 13 and 17;
- metal brush.
If you don't have WD-40, you can use kerosene. Spray it from a disposable spray bottle
The following list for replacing the rear linings of a VAZ 2109 (21099) may not be all you need, but you need to be prepared for difficulties. Full recommended list:
- hammer (preferably a larger one);
- pliers;
- flat screwdriver and metal brush;
- WD-40 lubricant;
- wooden block or board;
- two open-end wrenches for 13;
- 13mm head with extensions.
We put on gloves and get to work.
Assembly Features
In order to correctly change the brake linings of a VAZ 21099, you need to adhere to a certain sequence, on which the normal functioning of the entire brake system depends.
- First, the rear trim is installed;
- The handbrake cable is connected. The lever is put on the finger;
- a special spacer washer is installed and the structure is secured with a cotter pin;
- tension springs are tensioned.
Important! When the drum is assembled, to establish the correct position of the linings, you need to depress the brake pedal two or three times.
How to change the front ones yourself
Compared to the previous procedure, replacing the front pads will seem very easy. The wheel, of course, will also have to be removed. After which you can verify the need for repairs through a special “window”. The thickness of the friction material should not be less than 2 mm, otherwise you risk being left without brakes at any time.
Measure the thickness with a ruler; it’s better not to do such calculations by eye.
- There is a single bolt at the top of the caliper, held in place by a lock washer. It is necessary to straighten it using a flat screwdriver.
Use a long, thin, flat-blade screwdriver
Secure the mechanism with the second anti-rotation key
Remove the brake hose
Remove worn pads
This is where a metal brush comes in handy.
Complete the installation by snapping the washer stop and securing the brake hose.
How experienced car owners do it (video)
Additional recommendations
- If you cannot depress the brake cylinders, open the cap of the brake fluid reservoir to reduce the pressure.
- If the pads wear unevenly, pay attention to the caliper. Most likely it will need repairs.
- When replacing the rear pads, change all the springs as well. They are inexpensive, but they will protect you from possible failures until the next replacement.
- The front caliper guides can be lubricated with graphite grease for smoother operation.
Replacing the pads on the front axle will not cause problems even for “dummies” of automotive repair. But from the back it’s not so simple. Assess your strengths and capabilities in advance: can you reach the handbrake cable and cope with a stuck brake drum? If yes, then everything will definitely work out.
VAZ 2109 replacement of rear brake pads
Warnings
- Loosen and tighten wheel bolts only with the vehicle on the ground. The tightening torque of the bolts is 65–95 N m (6.5–9.5 kgf m).
- The use of gasoline, diesel fuel or any other mineral solvents for cleaning brakes is unacceptable.
- When installing old pads, replacing the front and rear pads with each other, as well as between the left and right wheels, is unacceptable. This may result in uneven braking.
- Brake pad sets must be replaced on both sides of the vehicle at the same time.
- If the brake fluid level in the reservoir is at or close to the “MAX” mark, pump out some of the fluid from the reservoir. Otherwise, it will overflow when installing new pads.
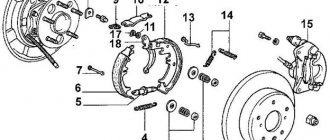
When replacing pads, also inspect the brake drum. Measure the diameter of the working surface of the drum with a caliper. The maximum permissible drum diameter is 201.5 mm. If the diameter is equal to or greater than the maximum permissible, replace the drum. If there are scratches, the drum can be bored to a diameter of 201 mm. It is recommended to replace the drums on both sides at the same time.
Work order
1. Engage first gear and install thrust blocks under the front wheels. Raise and support the rear of the vehicle. Remove the wheel.
2. Wash with detergent and dry the brake mechanism.
3. Unscrew the two guide pins.
4. Remove the brake drum. If you have difficulty removing, screw two M8 bolts into the threaded holes of the drum and, screwing them in evenly, press the drum.
5. Remove the upper tension spring using a punch or pliers.
6. Remove the lower tension spring using a punch or pliers.
7. Remove the front pad guide spring and.
8. . remove the front pad.
9. Remove the expansion bar.
10. Remove the rear shoe guide spring.
11. Remove the rear shoe by disconnecting the drive lever from the parking brake cable end.
12. Remove the cotter pin from the rear block.
13. Remove the support washer.
14. Press down on the pin and remove the drive lever from the block. Remove your finger from the block.
15. Check the thickness and condition of the friction linings of the brake pads.
16. Install new pads in reverse order. When installing, insert the upper toes of the pads into the grooves of the piston.
17. Before installing the drum, bring together the brake pads using two pry bars and install the drum in the reverse order of removal.
18. Install the wheel and lower the vehicle to the ground. Then press the brake pedal several times to set the piston to the working position. Check the brake fluid level in the reservoir and add up to normal if necessary.
Replacement process
The principle of operation of the brake system is the same on all “nines”. Therefore, the installation of new parts is carried out in the same sequence.
- First the rear wheel is removed.
- The guide pins are unscrewed.
- To remove the drum, special bolts are screwed in.
- Then you need to remove the upper and lower springs.
- To remove the front part, remove the spring located in the center of the part.
- The front cover is removed first.
- The expansion block is removed.
- The rear pad spring (located in the center) is removed.
- The handbrake clamp is removed together with the block.
- The fixing pin is removed.
- The washers are removed.
- The block is released from the locking pin.
How to replace the rear brake pads on a VAZ 2109 yourself
Before starting to replace the brake pads on the VAZ 2109, we install support bars under the front wheels. Remove the rear wheel. The parking brake lever must be pushed down all the way. We clean the brake mechanism from dirt.
The minimum permissible thickness of the friction linings of the pads is 1.5 mm. It is prohibited to use gasoline, diesel fuel or any other mineral solvents to clean brakes. The pads are replaced on both sides of the car. It is not permissible to replace the front and rear pads between each other, as well as between the left and right wheels.
Unscrew the two guide pins.
Remove the brake drum. If there are difficulties with removal, screw two M8 bolts into the threaded holes of the drum and compress it, screwing the bolts in evenly.
Remove the upper tension spring using pliers.
We also remove the lower tension spring.
Remove the front pad guide spring.
Remove the front pad.
Pull out the expansion bar.
Remove the rear shoe guide spring.
Remove the rear shoe by disconnecting the drive lever from the end of the parking brake cable.
We also remove the rear shoe cotter pin.
and a support washer.
By pressing on your finger, remove the drive lever from the block. Remove the finger from the block.
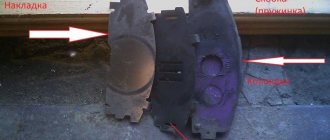
We check the condition of the friction linings of the brake pads.
We replace them in the following cases:
- lining thickness less than 1.5 mm;
- the surface of the linings is oily;
- the friction lining is not firmly connected to the base.
The linings should not have deep grooves or chips.
We install new pads in the reverse order of removal. When installing, insert the upper toes of the pads into the grooves of the piston.
Before installing the drum, we bring the brake pads together with two pry bars in order to move the pistons to the center of the cylinder.
Replacing rear pads - logbook Lada 2109 2001 on DRIVE2
Welcome, friends, to the DIY VAZ car repair website. The brake system is one of the main parts of the car, so it must be treated with all responsibility.
Timely replacement of brake pads can protect you from various troubles, such as traffic accidents.
Replacing rear brake pads on a VAZ 2109 Replacing rear brake pads on a VAZ 2109
Of course, it’s up to you to choose whether to change the pads yourself or go to a service station, but if you decide to save a little on repairs, then you can do the replacement yourself, especially since it’s not as difficult as it seems.
Replacing the rear brake pads of a VAZ 2109, VAZ 2110, VAZ 2114, VAZ 2115 does not make any differences, so these detailed instructions are suitable for any of these car brands.
First you need to decide when to replace the pads and what to pay attention to.
How to find out the wear of the rear brake pads: 1. The car has a long mileage, 99% is worn out. 2. The hand brake does not hold, and there is no way to tighten it further. 3. Creaking, knocking, grinding in the brake drum. 4. The brake fluid in the reservoir is significantly below the level (possibly due to wear on the pads).
5.When removed, the thickness of the brake pad is less than 1.5 millimeters.
These are, so to speak, the main prerequisites by which you can determine the wear of the pads, without removing the brake drum. Also read the article why brake pads squeak.
Replacing the rear brake pads of a VAZ 2109
Any car owner can change the rear brake pads, the main thing, as they say, is to have hands that grow from where they need to and the necessary tools.
Necessary tools: • Set of keys. • Screwdriver • Pliers.
•Jack.
First of all, you need to drive onto a pit or overpass and release the handbrake; this will allow you to easily remove and put on the brake drum in the future.
Next we jack up and remove the wheel, after which we need to remove the brake drum, which is held on by two guide bolts, they will need to be unscrewed (photo 1).
After removing the drum, use a screwdriver or a punch to remove the upper and lower tension springs.
Next, take pliers and remove the guide spring that holds the block from horizontal movement (photo 2).
zamena-zadnix-tormoznyx-kolodok
Now you can remove the front block, pull out the expansion bar, and then remove the spring, which is located in the center of the rear block.
And finally, you can also pull out the rear shoe; it is removed together with the handbrake lever.
New pads are usually sold without the parking brake lever, so it must be replaced from the old pads to the new ones.
This is done as follows: the cotter pin is unbent and pulled out, the washer is removed and the handbrake drive pin is removed. At this point, the removal of the pads is considered complete.
Attention! If you replace brake pads on one side, then you need to change them on the other, that is, the change is made on both sides.
Assembly is carried out in reverse order. After installing the brake pads, they must be compressed with two pry bars.