Audi A6 1997, engine Gasoline 2.4 liter., 150 hp, Front drive, Manual - DIY
Comments 6
I read somewhere that the officials spend 10-15 minutes replacing the CV joint. everything is much simpler, it may be convenient to change it on the table, but it will take a lot of time to unscrew the bolts from the gearbox cup. It’s easier to sit next to the car for 10 minutes. www.drive2.ru/l/3308273/
I changed the CV joint this way many times, but today I decided to do everything better, since there is not enough space under the arch to turn around. )) What is the part number for your boot?
It was a very good idea to change the CV joint on the workbench! But I haven’t had the Mail CV joints for more than 2 years. The boot is torn!
I was assembling the CV joint and didn’t even think about the fact that you shouldn’t smear the connections between the boot and the grenade.
In my opinion, the clumsy ring is somehow “not very good”. And it’s very convenient to apply lubricant from a bag after installing the CV joint on the shaft through the hole for the hub bolt (naturally, you tighten the clamp after so that there is still an outlet for air). And yes, it’s much more convenient than poking around in the dirt under the car).
Source
Personal experience: Audi 80 B3 vs Audi 80 B4
04.22.2009 by Uncle Edik in FAQ
My personal comparison based on the operation of an Audi 80 V3 1.8 carburetor and an Audi 80 V4 2.0 injector:
advantages of B4: the trunk has become normal (and a station wagon has also appeared), the appearance is more impressive, if desired, it is easier to find a packaged version, after 94. The door upholstery has become better (there is no fabric right up to the glass, which likes to get greasy in this place), the presence of wheel arch liners on all wheels, the standard suspension may be a little softer than in the B3, but not significantly.
disadvantages of B4: the weight and, accordingly, fuel consumption increased (less than 10 liters in the city, no matter how it works, I couldn’t even get less than 11-11.5 on the Avant with climate control).
advantages of B3: easier with all the consequences (my consumption even in winter did not exceed 9 liters, people with mono-injection, if desired, fit into 8 liters (exactly approx. Audi 80 | Replacing the thermostat | Audi 80. Uncle Edik)), the body seemed all right to me a little stronger than in B4.
cons of B3: well, a very small trunk, the vast majority of copies are in poor configuration, and of course, age….
It felt like my B3 1.8 carburetor accelerated to hundreds at least as well as the B4 Avant 2.0 injector, but in the B3 the gears were much longer, which is a big plus for me (at 100 km/h about 2200 rpm, and in the B4 at the same speed it turned out to be 3000 rpm), but at speeds higher the B4 gains more confidence (apparently the influence of mass is less affected, and power is more significant).
IMHO, if you already have a normal B3 that suits you, then changing it to B4 doesn’t make much sense. Replacing the thermostat on Audi 80 b3. In fact, Audi tuning provides wide scope for the implementation of any ideas. And if you look for a machine from scratch, then even a B4 is very difficult to find a normal one, but with a B3 it’s generally a one in a million chance.
Removing the drive shaft and replacing the CV joint of the Audi A6 C5
Symptoms of a faulty constant velocity joint ( CV joint ) are mainly a terrible crunching sound when you press the accelerator pedal when the steering wheel is turned in any direction. If these symptoms appear on your car, we recommend that you immediately begin replacing this part, since a damaged CV joint may simply fall out, which will lead to loss of vehicle speed. This photo report shows in detail how to replace a CV joint on an Audi A6 C5 with your own hands .
- Garage;
- Jack;
- The most common set of tools;
- Vise;
- CV joint lubrication;
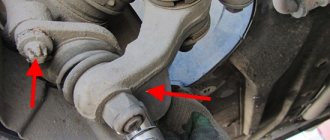
First of all, with the car standing, loosen the hub bolt. Next, jack up and remove the wheel.
We place the car on a reliable support. Unscrew the three bolts (asterisk) and remove the top shield.
We put the car in gear (park), then thoroughly clean the bolt heads and unscrew the bolts securing the inner CV joint.
Unscrew and knock out the bolt of the upper arms, remove the upper arms. We unscrew the steering wheel and pull out the axle shaft.
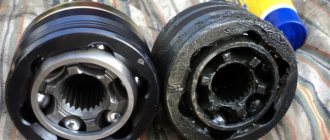
The image shows a crack in the rubber band. (Old CV joint).
What is needed to install a new CV joint
The CV joint, despite its strength, has parts that can wear out over time or if used incorrectly. Often, CV joint replacement occurs due to damage to the boots - during driving, cracks and holes appear that become clogged with dirt, water and dust. This way you can drive hundreds, or even thousands of kilometers, which will finally finish off the mechanism. Boot problems are expressed in a crackling sound when turning the wheels (when turning to the right, the left wheel cracks, when turning to the left, the right wheel cracks). Sometimes the CV joint has to be replaced due to incorrect actions by the driver. Acceleration of the engine with slipping, starting on the wheels turned out, braking by the transmission - often the cause of the malfunction lies in this.
Play in the ball joint has a negative effect on the CV joint. It occurs when the support itself is already severely worn out. If this problem is not identified in time, it will have a very negative impact on the CV joint. Thus, driving at high speed can tear out the support pin, which can cause the grenade to break.
It is extremely rare that CV joint failures are caused by factory defects in the mechanism parts or initially incorrect installation. Coupled with a worn boot, the problem can reach unimaginable proportions. Many reviews on automotive forums mentioned the poor quality of some parts - both basic functional elements and additional little things, like clamps.
Regardless of the source of the problem, a grenade that is not working properly will require replacement. Machine manufacturers claim that when parts wear out, the entire mechanism must be replaced, even those elements that were not damaged by failure. Considering the high quality of materials, the repair will cost quite a lot. In this regard, the car owner tries to replace the CV joint with his own hands. What will the driver need?
- pit or lift;
- hammer, screwdriver, pliers, jack;
- a set of keys or heads;
- bench vice;
- new clamps, lubricant (CV joint-4, for example), hub nut with stopper.
The latter (consumables) are often provided with a new grenade. All of the above are suitable for replacing outer and inner CV joints.
Sensitivity to pollution
Despite their fairly high reliability, CV joints have a significant drawback - sensitivity to contamination. Even a small amount of dust and dirt that gets inside the hinge leads to accelerated wear of the working surfaces.
And despite the presence of a boot that protects the CV joint, dirt often penetrates into the unit, since the rubber element is easily damaged.
If a crunching noise appears, the hinge on the Audi A6 C5 can be washed, put new lubricant in it and change the boot, but these measures will only help extend the life of the unit.
It will not be possible to restore the hinge more radically, since it is not repairable. Therefore, in the end, a crunchy CV joint will have to be replaced.
Tools and equipment
Replacing an external CV joint on an Audi A6 C5 is not a technologically difficult operation, so you can do it yourself.
The designers have worked out the design of the drive quite well, so when replacing the external hinges, no specific tools are required.
The front suspension of the car looks like this.
To replace it yourself you only need:
- Jack;
- Safety supports (a wooden block of suitable size will do);
- A set of keys and sockets (required - a 27 socket head);
- Pliers for tightening clamps;
- Rags;
- Detergents (you can use gasoline or kerosene instead);
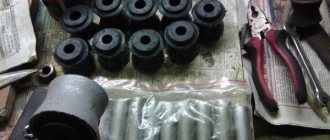
You will also need a new hinge and its accompanying components - lubricant, thrust and retaining rings, plastic bushing, CV joint bolt in the hub, boot, clamps (all this usually comes in one set with the unit).
Replacement methods
There are two methods for replacing the external CV joint on an Audi A6 C5 with your own hands - with disconnecting the suspension arms from the steering knuckle and without this operation.
With detachable levers
We will consider replacing hinges with preliminary disconnection of the levers using the example of the left outer CV joint.
- We park the car on a level surface, engage the handbrake and engage first gear at the gearbox. Additionally, you can put wheel chocks under the rear wheels;
- We remove the cap and using a 27 socket with a wrench, we tear off the bolt securing the drive to the hub, and also loosen the wheel fasteners;
- We tear off 5 disk bolts;
- Use a jack to lift the front of the car on the left side and remove the wheel;
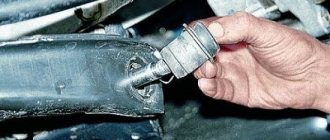
- Completely unscrew the drive mounting bolt;
- Turn the steering wheel to the left all the way;
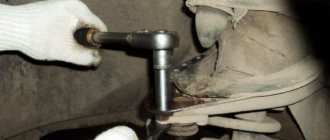
- We clean the steering knuckle mounting bolt from the upper suspension arms, unscrew it (you will need two 16mm wrenches) and knock it out;
- Carefully remove the tips of the levers from the fist, causing the latter to move to the side;
- Having “bent” the hinge all the way, we remove it from the hub. Do not forget to turn the steering wheel to the right (when replacing the left CV joint);
- We remove (cut) the clamps. We pull the boot together or simply cut it off;
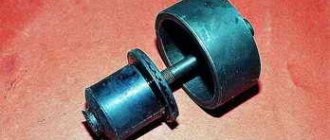
- We align the CV joint end cap relative to the shaft (so that they are located on the same axis);
- We pull the joint off the shaft. To do this, install the mounting bolt back and tighten it with a wrench until it stops. Then we turn on the gear to lock the CV joint and further screw in the bolt until the unit “comes off” from the retaining ring located on the shaft;
- Remove the retaining ring, bushing and thrust ring;
- We thoroughly wash the shaft and wipe it with a rag;
- We put a clamp on the drive shaft;
- We do the same with the new boot;
- Next, we put the first washer on the shaft (with its bottom towards the engine);
- Install the second plastic washer;
- We install the retaining ring last;
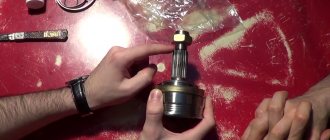
- We put lubricant in the hinge. There are new CV joints for the Audi A6 C5 already filled with grease, which is very convenient;
- We also put lubricant in the boot;
- We put the new CV joint on the shaft splines, and then seat it all the way, using a hammer and a wooden adapter (we seat it carefully so that dust does not get into the lubricant). Next, take the old bolt, screw it into the hub and use a hammer to push the CV joint onto the shaft. You can check whether the hinge is completely seated by looking at the plastic bushing - it should be almost completely “hidden” inside the unit;
- We put the boot on the outer ring. To do this, you will have to use a screwdriver and remove the car from the gear. We fix the rubber element with clamps, clamping them with pliers;
- Then we do everything in reverse order. We install the drive in the hub and attach the mounting bolt;
- We reconnect the steering knuckle to the suspension arms and secure everything with fasteners;
- We put the wheel in place, lower the car from the jack;
- Tighten the drive and wheel fasteners.
Checking the condition of the CV joint
Experienced motorists know that there are external and internal CV joints. There are differences between them. Let's take a closer look at them.
- External (external) CV joints - two pieces, located on the hubs, transmit torque to the wheels. The steering angle is significantly higher than that of an internal CV joint. They also take on more load. Accordingly, they break down more often and require regular inspection and replacement if necessary. They have a smaller size.
- There are two internal CV joints that make the axle shaft move; they are located in the gearbox, one on each side. They are larger in size. They are less subject to stress and, accordingly, can work longer.
You can assess the condition of the CV joint yourself. The easiest way to inspect the external one is to turn the steering wheel all the way (to the right or left) and quietly move away. If there is a problem, a cracking or crunching sound will appear. The more damage is done to the CV joint parts, the louder the sound will be.
If problems with the external grenade are accompanied by a crash when turning, then problems with the internal grenade are accompanied by a crack when moving straight. The sound will intensify if you drive off-road - every bump, hole or ditch will clearly remind you of the problem. If you notice a crunching sound, carry out repairs immediately - problems with the internal CV joint are very dangerous. It's a little more difficult to inspect:
- We put the car on the lift.
- We turn on first gear, the wheels should rotate slowly (the car should be slightly raised).
- The presence of a distinct crunching sound is evidence of problems.
If you hear a cracking sound while driving - when turning, when overcoming off-road obstacles, or sudden acceleration - immediately fix the problem. Timely inspection and repair will help the car owner remain a driver and not a pedestrian. In addition, a problem detected in time will help to avoid critical situations on the road.