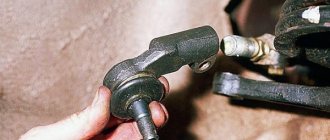
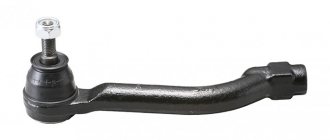
When carrying out repairs to the chassis and steering, there is almost always a need to remove ball joints or tie rod ends.
The peculiarity of these structural elements is that the support pin or tip has a conical shape, with which it fits into the seat.
During operation, the fit density increases so much that the surfaces of this joint practically stick to each other.
Additionally, moisture can get between the finger and the socket, causing pockets of corrosion that further seal the connection.
Therefore, to remove ball joints or tips, special pullers are used that allow you to press out the pin with minimal effort.
Types of pullers
The auto tools market offers a wide selection of such removable mechanisms, which can be divided into two types:
Screw pullers are considered universal and are suitable for working with almost any car.
The force in them is created by screwing the bolt into the puller body. The housing itself is put on the support eye, and when tightened, the bolt rests against the support pin and presses it out of the socket.
Lever removable mechanisms are no less effective, but they are larger in size, so they may not be suitable for every car.
For example, with such a puller on a VAZ-2107 you can still remove the upper ball joint, but you won’t be able to get to the lower one due to very limited space.
For these purposes, a special puller is used.
The essence of a lever puller comes down to the presence of two levers connected in the middle.
On the one hand, holes are made in them and a coupling bolt is installed.
To press out, one lever is installed between the eye and the support, while the second lever is placed under the finger.
When the bolt is unscrewed, due to the existing connecting axis, the ends of the levers begin to converge and the pin is pushed out.
But it is not necessary to purchase a removable mechanism; it can easily be made at home from improvised materials.
Next, we’ll look at several types of ball joint and steering wheel pullers that you can make yourself.
Description
This element is located in the front part of the car's suspension, on the front arms.
Ball joint location
In addition to the fact that during vertical movements of the wheels, the ball joints must ensure their fixed position in the horizontal plane, the support pin must have a certain degree of freedom to rotate in the bowl bushing and at the same time could move at a slight angle to the sides.
Finger movement directions
Symptoms of a problem
While operating the vehicle, it is necessary to periodically “listen” to the operation of its suspension.
It is especially worth paying attention to the following symptoms of support failure:
- The steering wheel began to rotate a little tighter or an extraneous sound (creaking) appeared when turning;
- At low speeds, when overcoming minor obstacles (tram tracks, paving stones), a knock is heard in the front of the car;
- Slight runout of the front wheels when moving straight;
- Uneven tread wear, with the side of the tire wearing out more.
Reasons for failure
The root causes of failure are impacts and friction. Factors leading to a sad result:
- Driving through seemingly small obstacles at “indecent” speeds (tram rails, potholes);
- Lack of lubrication. The lubricant simply dries out or freezes, losing its properties;
- Destruction of the support boots and, as a result, water and dirt getting into the gap between the pin and the plastic liner.
Puller type - WEDGE
The simplest puller is the so-called “wedge”. It does not belong to any type of removable mechanism, but at the same time it is a fairly effective device for pressing out.
To make it, you only need an angle grinder (“grinder”), you can also use a machine with an abrasive wheel.
The blank will be a metal plate the size of a matchbox.
First, it is necessary to give the workpiece a wedge shape, for which we grind the metal with a grinder or machine so that the profile of the plate looks like a triangle. Then, using the same “grinder”, we make a cut in the middle 2/3 of the length of the workpiece from the side of the apex of the triangle, that is, from the thin side of the wedge. The width of the cut should be slightly larger than the thickness of the support pin, that is, you should get a kind of bracket.
If desired, you can weld a metal rod to the bracket, which will make it easier to work with the wedge in the future.
Pressing out a finger with a wedge is very simple. It is installed in the gap between the eye and the support body. And then the wedge is simply driven in with a hammer, which leads to the finger popping out of the socket.
The disadvantage of the wedge is that the boot will be damaged during the pressing process. Therefore, the wedge can only be used when replacing supports or tips.
If the suspension and steering mechanism are being repaired, which does not involve replacing the ball elements, it is better not to use a wedge.
Lada Granta suspension diagnostics
To identify and eliminate the cause of the rattling, I decided to inspect the entire suspension of the Lada Grant for the presence of play and “tired” elements (bushings, rubber bands, etc.), since I thought that the problem lay somewhere there. So, let's begin.
Checking the front struts
The first thing I did was check the front struts. While rocking the car from side to side, I simultaneously kept one hand on one of the racks. If the knocks were coming from the front shock absorbers, I would have felt them. However, there were no knocks.
Photo 2: Is there a knocking noise in the front struts of the Lada Granta?
I also looked under the front wheel arches to make a visual inspection of the front shock absorbers - I didn’t see anything special there, the struts were dry.
Photo 3: A-pillars are “dry”.
Checking the tie rod ends
An examination of the steering tips also showed that everything is normal: the anthers are intact, there is no play in the body (checked with a pry bar).
Photo 4: Checking the play of the Lada Granta steering tips
And when driving on uneven roads, when rattling appeared, there was no “recoil” in the steering wheel. As a rule, if the steering tip is broken, then on bumps a muffled knock can be felt directly on the steering wheel. I especially listened when I was driving on a dirt road, but I didn’t feel any characteristic knocks “through the steering wheel.” Well, let's look further.
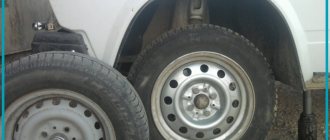
Checking wheel bearings
To check the condition of the wheel bearings on my Grant, I alternately jacked up the right and left sides of the front to spin the wheels. When the hub bearings fail, mechanical noise appears during wheel rotation (humming, crunching, clicking, etc.). Also, when the bearing wears out, the wheel may “dangle” on the hub, and the greater the wear, the greater the play. You can easily feel the play if you rock the wheel from side to side, as if trying to turn it left or right with your hands. In this case, the wheel must be suspended and rotate freely. In my case, the hub bearings were in good condition.
Screw release mechanism
The second type of removable mechanism, which can be made from improvised means, is a screw release mechanism. It is perfect for replacing ball joints of classic VAZ models.
A special feature of the suspension design of these cars is that the upper and lower supports are located symmetrically to each other and the distance between them is not large.
It can be made at home only if you have a drilling machine, or you will have to go to a lathe. This puller consists of only two parts.
To make it, you will need a square or hexagonal rod with 17 or 19 key edges, the length of which is 7 cm. Using a drilling machine, we make a hole in this rod and cut a thread for a bolt of 8. Screw in the bolt and that’s it - the puller is ready.
How to replace the ball on a grant?
If you experience knocking noises from the front suspension, especially when driving on an uneven road with small holes or potholes, you should pay attention to the condition of the ball joints. On a Grant, factory ball joints can easily travel more than 100,000 km during normal operation, but there are also cases when this has to be done much more often. It is for such cases that this article will be written.
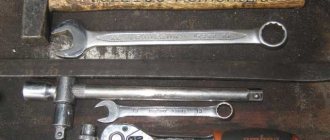
In order to replace the ball joints on the Grant, we will need the following tool:
- Hammer
- Mount
- Puller
- Key for 17 and 19
- Torx head e12
- Ratchet or crank
Photo report on replacing ball joints on Lada Granta
The first thing you need to do is put the car on a lift or jack up the front of it. After this, remove the wheel to gain access to the front suspension elements.
Then unscrew the two bolts securing the support to the steering knuckle, as shown in the photo below:
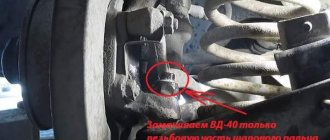
Then, using a 19mm wrench, we tear off, but do not completely unscrew the lower nut attaching to the front suspension arm of the Grant:
And now you can use a special puller to press the ball joint pin out of the lever, or use a hammer and pry bar for this purpose.
After removing the finger, you can remove the support completely, move the lever to the side:
If it is not possible to move the lever to the side using a pry bar, then you can use a jack and a brick, as is clearly shown in the photo below.
We take a new ball, remove the boot and thoroughly push it inside with lubricant, such as Litol. After which you can install the new ball in its place. Of course, you will have to suffer quite a bit until the support gets into place, but if you have a jack and pry bars, everything can be done without any problems.
We tighten all the bolts and nuts to the required torque and put all the other parts in their places. With this, we can consider this repair of the Lada Granta complete. The price of a new ball joint is no more than 400 rubles for the original product from AvtoVAZ. There are cheaper options, but in this case you can save on both price and quality!
Read more: Replacing the gazelle next cummins clutch
review on replacing ball joints on Grant
For those who are too lazy to understand photo reports, everything can be shown clearly and easily using the example of a video review, which was taken from open sources.
This concludes this repair report.
Good evening everyone!
A month ago I got scared of the entire chassis (on a mileage of 31,000 km) The following were installed: - Steering ends (Zavod / BelMAG in AvtoVAZ packaging) - Ball joints (BZAK / Belebey) - Rods and stabilizer struts (Balakovo) - Daisies (Balakovo)
— Rear wheel bearings (Vologda)
After the replacement, I felt as if I was driving a different car. The music didn't play for long, and the guy didn't dance for long. Not long ago, strange clicks appeared when turning the steering wheel, as well as when leaving the car, that is, swaying the suspension.
I sinned on balls; it often happens that they have virtually no lubrication from the factory. I spent a lot of time on Drive, on YouTube. I decided to change it and ordered TRW
(JBJ156), since twice (I remind you, the mileage is currently almost 35 thousand km) I installed BelMAG balls, that is, the original, factory ones, I installed Belebey (BZAK), I often encounter unflattering reviews on the Track. I wanted to try something new that I hadn’t held in my hands, and maybe it was more like it, at least I hope so.
Replacing a ball joint on a Lada Granta is a fairly simple operation that you can do yourself with a minimal set of tools. At the same time, it is important not only to carry out the installation correctly, but also to know what is the best auto parts to purchase for repairs.
Article number and price for the original ball joint
The original ball joint for the Lada Granta has article number 11180-2904192-00. Its cost is about 500 rubles.
The service life of the original product varies widely, since the quality of ball joints varies from batch to batch. Therefore, buying a branded product, according to reviews from car owners, is a kind of lottery.
Article number and cost of analogues of original ball joints
The lack of stable quality of original ball joints forces car owners to search for good analogues from third-party manufacturers. At the moment, the market is filled with a lot of alternative spare parts options. The price for non-original supports is comparable to the original. The best brands of balls are presented in the table below.
Read more: Cars on a purple background
Table - Recommended alternatives to ball joint 11180-2904192-00.
ManufacturerArticle Approximate cost, ruble
| BelMag | BM.0033 | 370-400 |
| Hofer | HF815503 | 300-350 |
| Pilenga | TS-P 3142 | 380-420 |
| Stellox | 52-00840A-SX | 400-430 |
Diagnostics of the ball joint condition
The car owner can learn about the need for diagnostics by the following symptoms of a ball joint malfunction:
- driving over small humps and pits is accompanied by extraneous sounds emanating from the front suspension;
- There is a knocking sound in the wheel arches when entering a turn at speeds over 35 km/h;
- it becomes more difficult to turn the steering wheel and a creaking and grinding noise appears;
- decreased level of control over the car when cornering;
- partial loss of vehicle control while driving on uneven road surfaces.
To indirectly check the condition of the ball joint, you must use the method below.
- Hang the wheel on the side where the ball joint is expected to fail.
- Firmly grasp the tire with one hand from below and the other from above.
- Shake the wheel rim. If this is successful, then more accurate diagnostics of the suspension is required. Play can indicate not only a malfunction of the ball joint, but is also often a consequence of excessive wear of the stabilizer struts or steering tips.
You can more accurately identify a faulty ball joint if you gain access to the car from the bottom. To do this, you need to use an overpass, inspection hole or lift.
- Insert the mounting bracket between the lever and the ball.
- Shake the mount.
- The presence of noticeable play is unacceptable, as it is a sign of the need to replace the support.
Having gained access from below the machine, you should visually inspect the boot. It should not show any mechanical damage, such as cracks or tears. Seeing grease is also a reason to pay attention to the ball joint.
The most accurate diagnosis of the ball can be carried out by dismantling it. The support must be clamped in a vice and the axial and radial movement of the pin must be checked. It should not move due to hand effort. The presence of any play indicates that the ball joint must be replaced.
Screw L-shaped
The third type of removable mechanism, which you can make yourself, is also a screw mechanism, but it has shown itself to be excellent and allows you to work on any car.
To make it you will need a round metal rod with a diameter of at least 10 mm and a length of 15-17 cm.
From it you need to make an L-shaped blank with a shoulder length of 5 cm. That is, we take a rod, measure 5 cm on it, clamp it in a vice and use a hammer to bend it 90 degrees.
We cut a thread on the long part of the workpiece and select a nut.
All that remains is to make the thrust bar. It can be made in the likeness of the wedge described above. That is, we take a plate, but 0.5 cm thick. On one side we make a cut for the support pin.
If necessary, you can reduce the thickness of the plate on the cut side by grinding off the metal layer. The main thing is that the plate fits into the gap between the support body and the eye, but it is not too thin, otherwise it will bend during the pressing process.
On the other hand, from the cut we make a hole for the L-shaped workpiece. All that remains is to put the plate on the long part of the rod. If the thread is not long enough to squeeze out the finger, you can place several washers under the nut.
This puller works like this: Unscrew the nut almost completely, install the plate in the gap between the support and the eye, and turn the rod so that the short arm rests against the finger.
Then we simply tighten the nut, while the plate will act as a stop, and the short arm of the rod will squeeze out the finger.
Malfunctions
The ball is not particularly friendly with dirt, so getting it on the part can lead to unpleasant consequences. To protect against contamination, the design of the element includes a boot, with the help of which dirt and sand practically do not penetrate inside.
Actually, it is the boot that is the weakest point of the ball joint, due to which it is often necessary to completely replace it. This is all due to the poor quality of the material from which the boot is made and the harsh operating conditions. As a result, the boot cracks, bursts, dirt gets inside, and the support fails.
Worn element
Verification methods
To determine that the ball joint is the culprit for your car’s slightly “inappropriate” behavior on the road, you need to check this point.
To do this, there are three main verification methods, each of which has its own characteristics.
| Way | Actions |
| The car is being jacked up | In this case, firmly grasp the wheel and wobble it. If there is noticeable play, the ball is worn out and requires replacement. |
| Place the car on the inspection pit | A pry bar is inserted into the gap between the suspension arm and the ball from below. By the movement of the wheel, you can immediately notice the presence of play. Replacement required |
| Send your car to a service center | Specialists using the appropriate equipment will conduct diagnostics, determine the degree of wear of the support, and come to the appropriate conclusion about the need for replacement. You can change it there too |
https://youtube.com/watch?v=B6zdKgkjvvk
Why is replacement required?
Operating a vehicle with a faulty ball joint can not only reduce ride comfort, but also seriously affect the safety of the driver, his passengers and other road users.
Initially, a faulty ball joint only makes unpleasant knocking noises, but at any moment you can simply lose the wheel. You understand what consequences this can lead to if you drive at high speed.
If you find signs of a suspension malfunction, immediately go to a service station or look for the cause and fix it yourself.
Spare part selection
So, to start replacing the ball joint on your VAZ 2110, you will first need to purchase a new part. This is not difficult to do, since the current range is very diverse and wide.
Although it is this diversity that often becomes the reason for difficult choices. Among so many options, you need to settle on just one. But your task is to find the highest quality and reliable spare part that can serve for more than one season.
In this regard, we invite you to familiarize yourself with the principles for choosing a high-quality ball in our table.
| Element | Requirement |
| Frame | The ball body is welded in two parts. Moreover, on one side the seam should be noticeable, and on the other - not |
| Finger | Inspect the ball pin. It should be hardened, gray in color with scale. Make sure there are no traces of paint on the part. On quality parts, rolled threads are used |
| Scrolling | When scrolling, you need to apply a lot of force and watch for the absence of snagging. This is a sign of a quality part. It is not uncommon that turning by hand is too difficult and requires a wrench. This is normal and even good |
| Equipment | In addition to the ball itself, responsible manufacturers include a nut and boot in the packaging. If these elements are not available, you should refuse to purchase. |
| Brand | In fact, there are many good manufacturers, but most VAZ 2110 owners choose supports manufactured by Trial-Lux, BelMag, and the most popular ones are Trek |
Which of the options on the market is better is up to you to decide. But be sure to focus on the selection criteria presented above.
Screw made from angle
Another screw puller can be made from a metal angle and a welding machine.
To do this, take a corner with sides 7-8 cm and the same length, and a thickness of 0.3-0.5 cm.
We make a cut in one of the sides to secure the mechanism to the eye. From sheet metal 0.3 cm thick we cut out two triangles that will act as braces. They need to be welded on the sides to the corner. This will significantly increase the strength of the structure.
We take a 17 nut and a long bolt for it. We weld the nut itself perpendicular to the cut so that its hole faces the cut.
So that in the future the bolt can be easily positioned on the same axis with the pin, before securing the nut by welding, a spacer must first be welded onto the corner.
All that remains is to screw in the bolt and the puller can be used.
These are the simplest types of removable mechanisms that you can make yourself.
In general, there are a lot of options, and with a little imagination and basic knowledge of plumbing, you can easily come up with and make your own puller.
We offer some drawings for viewing.
Tool for unscrewing the support
We will consider another type, which is used not for pressing out the finger, but for removing the support itself.
The fact is that on a number of cars (Peugeot, Citroen) the ball joint is screwed into the lever. Over time, the threaded connection sours, and it is quite difficult to unscrew this suspension element without a special tool.
But you can make the necessary puller yourself, rather than spending money on a factory one.
It is made from a 2" thick-walled pipe 8-9 cm long.
At the end of this pipe it is necessary to make 4 spikes with a width of 5 mm and a height of 7 mm, located at an angle of 90 degrees relative to each other.
That is, you should get 4 protrusions at the end of the pipe, evenly distributed around the circumference. This can be done using a hacksaw and a file, or with a grinder.
From the other end we make slits to a depth of 3 cm, dividing the circumference of the pipe into 8 parts.
Then we bend these petals to the center using a hammer, significantly reducing the diameter.
Reasons for failure
There are several reasons why a ball joint may fall out. Let's consider the main ones:
- Wear . The most common malfunction that occurs on cars.
- Insufficient lubrication in the boot leads to the fact that the finger begins to creak and may eventually simply break.
- The penetration of dirt and water into the ball contributes to the development of corrosion, which can affect the operation of the vehicle. At best, a wedge and the inability to turn the wheels; at worst, the car will fall onto the asphalt.
Alternative method
Finally, we note that it is possible to press out the support pin or tip even if it is not possible to make a removable mechanism. But this method should be used only in extreme cases. To remove the finger you will need a pry bar and a hammer.
The pry bar is used as a lever and must be installed in such a way as to create a force to press the support or tip, for example, place it between the steering rod and the rack eye.
After creating force with the mount, it is necessary to apply powerful blows to the body of the eye with a hammer. If everything is done correctly, then after 2-3 hits the finger will pop out.
The disadvantage of this method is that the eye can be damaged due to shock loads, so it is advisable to use pullers rather than knock out the support.
When repairing the steering system and chassis of a car, owners are often faced with the situation of dismantling ball joints and rod ends. These structural parts cannot be removed without a special tool. This is a puller for ball joints. The device can greatly simplify the process of pressing out parts.
Purchasing this tool is not difficult - just go to the nearest auto parts store and select a suitable puller there. You can also make the device yourself. Let's look at the types of pullers, and also talk about choosing these tools.
The modern market for tools for car maintenance and repair offers the widest selection of different pullers, including several types of tools for dismantling ball joints and steering rods.
The first devices are considered a more universal solution. They are suitable for servicing any car.
How to change the ball on a grant?
March 15, 2022 Lada.Online 17,645
According to the maintenance regulations for Lada Granta, Lada Kalina and Lada Priora cars, the technical condition of the front suspension parts must be checked every 15,000 km. mileage You can determine the causes of knocks and squeaks in the suspension using self-diagnosis.
Layout of front suspension parts
1 — anti-roll bar; 2 — rubber-metal joint of the transverse arm; 3 — shock absorber strut; 4 - stretching; 5 — extension bracket; 6 — nut for fastening the extension to the bracket; 7 — ball support of the shock absorber strut; 8 — joint of the anti-roll bar; 9 — wishbone; 10 — bracket for securing the stabilizer bar.
How to check the front suspension
Checking the front suspension should be carried out in the engine compartment and from below the car, mounted on an inspection ditch or supports (with the front wheels hanging out).
The condition of the protective covers of the suspension ball joints (they should not be mechanically damaged) should be checked during each maintenance and repair of the vehicle.
Check the condition of the rubber-to-metal joints, rubber cushions, suspension ball joints and the condition of the upper suspension strut mounts.
Rubber-metal hinges and rubber cushions must be replaced in case of ruptures and one-sided bulging of rubber, as well as when their end surfaces are trimmed.
Suspensions on rubber parts are not allowed:
- signs of rubber aging;
- mechanical damage.
Pay special attention to mechanical damage (deformations, cracks, traces of contact with road obstacles, etc.) of suspension elements, especially levers.
Procedure
:
1. Check the tightness of the shock absorber rod mounting nut.
2. Check the tightness of the nuts securing the upper strut support to the body. Similarly, check the fastenings of the rod and the upper support of the second rack.
3. Check the condition of the protective covers of the ball joints. If the boots are damaged, replace the ball joints.
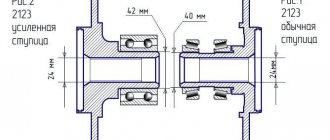
4. Check the ball joints for play. To do this, measure the distance H (see Fig. 7.1) between the transverse arm 17 and the brake disc 21. Insert the mounting blade A (see photo) between the steering knuckle and the suspension arm and, leaning on the lever, try to swing the steering knuckle. If this distance changes by more than 0.8 mm when the suspension is rocked, replace the ball joint.
5. If the ball joints are in good condition, rock the wheels in a vertical plane and make sure there is no play in the hub bearings. The maximum permissible axial clearance is no more than 0.015 mm. If the gap is greater than the specified value, replace the bearings.
Advice
: When swinging the suspended front wheel, it is difficult to distinguish play in the hub bearings and ball joints. Ask an assistant to press the brake pedal: if you feel play in this case, then the ball joints are faulty.
6. Check the rubber-to-metal joints in the places where the transverse arm is attached to the body bracket for play.
7. To do this, insert a mounting spudger or a large screwdriver into the gap between the lever and the bracket and try to rock the lever. If there is significant play, it is recommended to replace the lever assembly with hinges.
8. Check the rubber-metal hinges for attaching the stabilizer struts for play. To do this, insert the mounting blade between the wishbone and the stabilizer bar and rock the bar. If necessary, replace the stabilizer links.
9. Check the tightness of the nuts securing the brace to the lever...
10. ...and to the extension bracket.
11. Check the tightness of the nut securing the stabilizer link to the front suspension arm. Replace the racks whose hinges have noticeable play.
12. Check the condition of the rubber cushions where the stabilizer bar is attached to the body.
Causes of malfunctions in the front suspension
Cause of malfunction Method of elimination Noise (knock) in the suspension when the car is moving Leakage of fluid from the strut Frequent “breakdowns” of the suspension Insufficient resistance of the suspension strut during the recoil stroke Increased clearance in the ball joint Car pulls away from straight-line motion Increased wear of the tire tread Uneven wear of the tire tread
| Telescopic suspension struts are faulty | Replace the racks |
| The bolts holding the stabilizer bar to the body are loose. Wear of rubber cushions of guy wires or barbells | Tighten the bolts, replace worn cushions |
| The fastening of the upper support of the suspension strut to the body is loose | Tighten the upper support mounting nuts |
| Settlement, destruction of the rubber element of the strut support | Replace the rubber element of the strut support |
| Wear of rubber-metal hinges of suspension arms, braces or stabilizer bar struts | Replace the hinges |
| Wear of the ball joint of the suspension arm | Replace the ball joint |
| Settlement or breakage of the suspension spring | Replace the spring |
| Destruction of compression progress buffer | Replace buffer |
| Increased wheel imbalance | Balance the wheels |
| Wear or destruction of the rod seal; nicks, scuffs on the rod, damage to the chrome coating; shrinkage or damage to the strut housing O-ring (shock absorber reservoir) | Replace the shock absorber strut |
| Suspension spring draft | Replace the spring |
| Shock absorber not working | Replace the shock absorber strut |
| Leaking recoil valve or bypass valve; insufficient amount of fluid due to leakage; scoring on the cylinder and piston ring; wear or damage to the fluoroplastic layer of the guide bushing; recoil valve spring settlement; the presence of foreign impurities in the liquid | Replace the shock absorber strut |
| Compression valve leaking; insufficient amount of fluid due to leakage; rod wear or damage to the fluoroplastic layer of the guide bushing; the presence of foreign impurities in the liquid; wear, deformation or destruction of compression valve discs | Replace the shock absorber strut |
| Wear of the rubbing surfaces of the ball joint parts as a result of contamination caused by leaks or damage to the cover | Replace the ball joint |
| Different tire pressures | Set normal pressure |
| Violation of wheel alignment angles | Adjust wheel alignment |
| Destruction of the rubber element of one of the suspension strut supports | Replace the rubber element of the strut support |
| Uneven elasticity of suspension springs | Replace the spring that has lost its elasticity |
| Significant difference in tire wear | Replace worn tires |
| Increased front wheel imbalance | Balance the wheels |
| Excessive acceleration with wheel slipping | Avoid hard acceleration |
| Frequent use of wheel locking brakes | When braking, do not allow the wheels to lock |
| Wheel alignment angles are incorrect | Adjust wheel alignment |
| Vehicle overload | Do not exceed the permissible loads specified in the instruction manual |
| Increased speed when cornering | Reduce speed when turning |
| Extensive wear on ball joints of suspension arms and rubber-to-metal joints | Repair the suspension |
| Wheel imbalance | Balance the wheels |
Lever
A lever puller for ball joints is no less effective. However, these instruments are large in size. Therefore, they are not suitable for every car. For example, using a lever tool on a VAZ-2107 you can dismantle the upper ball joint, but removing the lower one will no longer work - the working space is too limited. To do this, it is best to use a special tool.
You don’t have to purchase such a device - it’s easy to make a ball joint remover with your own hands. It is assembled from improvised means. Let's look at other tools that you can either buy or make yourself.
This is the simplest and yet quite effective puller. It cannot be classified as any type of mechanism, but in matters of pressing out it is a good choice. To make it, you only need a grinder or a machine with an abrasive wheel. The blank is a metal plate, the dimensions of which are similar to a box of matches.
Then a rod is welded to this bracket. This will allow you to use a ball joint remover. Working with a wedge is quite simple. It is installed in the gap that exists between the eyelet and the body of the ball pore. Then, using a hammer, the wedge is driven in, which leads to the pin being pressed out.
But there is a significant drawback when working with this tool. During the process of pressing out the support, the boot is damaged. That is why the wedge is used only when replacing tips or supports. It is better to avoid repairs using such a device.
Lada Granta: preparing the chassis and transmission for winter
October 29, 2013
We check the chassis and transmission every 15 thousand kilometers.
Holding the wheel in a vertical plane, we alternately sharply pull the upper part of the wheel toward ourselves, and the lower part away from us, and vice versa.
We make sure there is no play (knock). If there is a knock on the front wheel, ask an assistant to press the brake pedal. If the knocking noise disappears, it means the wheel bearing is faulty, and if the knocking noise remains, then the ball joint is most likely worn out.
The hub bearings of the front and rear wheels are not adjustable and must be replaced if there is play.
To check the serviceability of the ball joint, insert a mounting blade between the suspension arm and the ball joint housing. Be careful not to damage the ball joint boot.
While pressing the lever with a mounting blade, we monitor the movement of the lever head relative to the ball joint housing.
If there is play in the connection, replace the ball joint.
We check the condition of the protective covers of the ball joints.
We replace ball joints with torn or cracked covers.
To check the silent block of the front suspension arm...
...insert the mounting blade between the body bracket and the lever head...
...and we try to move the lever along its axis and along the axis of the bolt. If the lever moves freely, without effort, it means that the silent block of the lever is badly worn or damaged and needs to be replaced. Tearing, cracking and bulging of the rubber bushing of the silent block are unacceptable.
We check the condition of the silent blocks of the front and rear ends of the guy wires.
Tearing, cracking and bulging of rubber silent blocks are unacceptable.
We inspect the anti-roll bar cushions and the rubber bushings of the stabilizer struts.
If ruptures, cracks or severe deformation are detected on the rubber pads and bushings, they must be replaced.
Lifting the rear wheels one by one, we check the condition of the rear wheel hub bearings. The wheel should rotate evenly by hand, without jamming or knocking.
To check the condition of the silent blocks of the rear suspension arms...
...we insert the mounting blade between the suspension arm bracket and the arm head and try to move the arm in different directions.
If the lever moves freely, without effort, it means that the silent block of the lever is badly worn or damaged and needs to be replaced.
We check the condition of the springs, telescopic struts and shock absorbers of the front and rear suspensions.
The suspension springs must not be damaged. Tearing, cracking and severe deformation of rubber bushings, cushions and compression buffers of shock absorbers are unacceptable.
Liquid leakage from shock absorbers is not allowed. A slight “fogging” of the shock absorber in its upper part, while maintaining the characteristics, is not a malfunction.
If the rubber element of the upper support of the front suspension telescopic strut settles or is destroyed, the support must be replaced.
We check the condition of the hinges and the protective cover of the gear shift rod and jet rod.
Alternately rotating and turning the front wheels (with the front of the car hanging out)…
...we inspect the protective covers of the outer... ...and inner joints of the front wheel drives, checking the reliability of their fastening with clamps.
Covers that are cracked, torn or have lost elasticity must be replaced.
We check that there is no oil leakage from the gearbox through the seals of the internal drive joints. If there is a leak, replace the seals.
- Continuation:
- check the steering
- checking the brake system
- More information about the design, maintenance and repair of Lada Granta can be found in our Wikipedia (link)
Error in the text? Select it with your mouse! And press: Ctrl + Enter Unnamed
Advantages:
Inexpensive, reliable, economical, unpretentious car
Flaws:
Noisiness, windiness, quality of individual components, demonstrative disrespect on the road
Source: https://www.zr.ru/content/articles/585471-lada-granta-gotovim-k-zime-xodovuyu-i-transmissiyu/
Screw release mechanisms
This is another option that you can make yourself. It has proven itself well as a VAZ ball joint remover (applies to classic models). The design features of the suspension system of these machines are such that both the upper and lower supports are installed symmetrically to each other. There is not much distance between them.
Let's take a look at how this ball joint remover works. VAZ-2107 can also be repaired with it. To dismantle the upper support, unscrew the lock nut, but not completely. Then a puller is installed between the fingers with the bolt fully tightened. Next, use two keys to hold the device. Unscrew the bolt until the finger comes out of the socket. After the upper support is replaced, the same operation is performed on the lower one.
Which ball joints are better for the VAZ-2110: reviews, articles
As often happens, the most popular spare parts are produced by all and sundry, to the detriment of quality and in favor of price.
The service life of a VAZ-2110 ball joint rarely exceeds the hundred thousand mark, so there is always a demand for this part. And since there is demand, there is more than enough supply on the market.
In order not to throw money away and not experiment with your car and safety, let’s look at the issues of buying a ball for tens in more detail.
Features of ball joints on the VAZ-2110
Structurally, the support, as one of the main elements of the suspension, bears a huge load.
Not the same as in the classic double-wishbone suspension, but even in the MacPherson suspension it gets a lot of mileage.
The main purpose of the unit is to transfer force to the steering knuckle without losing the possibility of angular movements in all planes.
The simplest technological solution for this was a design based on a threaded ball pin, rolled into the body through plastic inserts.
Ball circuit.
As can be seen from the diagram, it is almost impossible to spoil anything in the simplest design. However, some manufacturers and artisanal cooperative enterprises manage to mess up here too.
Differences between a good ball and a low quality fake
Fortunately, we know how to distinguish a good support for a VAZ-2110 from a cheap fake, not only by brand (more on them later), but also visually:
- Let's look at the finger . The thread on it cannot under any circumstances be cut on a machine. It should only be forged or rolled. Pay attention to the color, it should be ashy with scale. This indicates the correct production technology and heat treatment of the finger.
- Frame . On dozens, the body is ball-welded, but we should see the welding points only on one of the halves. The halves fit neatly, distortions are excluded. The top cover should have a slot in the form of a neat hemisphere, but not an oval or other shape. It is important that the top cover must be made of hardened metal. This can be checked easily - two or three movements with a needle file, and a damp, low-quality lid will give itself away. The lower part of the body must be strictly cylindrical, and a cadmium-plated grease fitting is screwed into the lower part
- There is also a hemisphere on the finger, which should also be made of hardened metal.
- Support work . We take the ball in our hands, hold the body and rotate the finger, swaying it from side to side. It is strictly unacceptable for the finger to get jammed - it must turn with a uniform, slight force. If the effort is uneven, it turns with jamming, we immediately look for another option, it’s a fake. If the finger is stuck to the liners and does not give in, we also leave this support, we can do without broken lower arms.
- Boot and fasteners . The boot is made of elastic but durable rubber; it has a metal ring at the bottom for pressing onto the body. Correct supports are sold with fasteners - the nut should be cadmium plated, with a light plastic insert.
Reinforced ball joint BZAK.
Options
As you can see, the quality and durability of a ball joint for any car is built on these important details. And for the VAZ-2110, the support should have the following parameters, if you can check them:
- finger angle - minimum 50°;
- finger swing moment - 0.4-0.8 kGs/m ;
- moment of finger scrolling - 0.4-0.8 kGs/m ;
- the force of destruction of the top cover (pulling out a finger) is 2900 kgf .
Article numbers of ball joints for VAZ-2110
The article number for the tenth ball joint according to the catalog is 2110-2904192.
Some manufacturers give it its own article number, and in addition, it has enhanced modifications: 2110-2904192-82, 2110-2904192-86, 2110-2904192-00 . The ball price for 2022 ranges from 500 to 700 rubles per piece, depending on the manufacturer.
L-shaped screw puller
What vehicles can this ball joint remover be used for? 2107, 2105 and 2106 - these are the VAZ cars for which it is best suited. The tool is quite versatile. To make it, you will need a metal rod - its diameter must be at least 10 mm, and its length - 15-17 cm. An L-shaped blank is made from this rod, the arm length of which must be at least 5 cm. So, take a rod, measure 5 cm on it, clamp it in a vice and bend it at a right angle. A thread is cut on the long part of the element. Find a suitable nut.
Now you need to make a thrust bar. It is made according to the wedge principle. A plate with a thickness of at least 5 mm is suitable for the workpiece. On one side of the plate a slot is made that fits the support pin. On the other hand, they make a hole for the diameter of the rod. Next, put the plate on the long part of the rod and clamp it with a hook.
Angle screw puller
This steering ball joint remover is made from angle iron by welding. How to make it? Take a corner whose length is 7-8 cm. The thickness of the metal can be 3-5 mm. A cut is made in one of the sides of this corner. With its help the mechanism will be held on the eye. Two triangular parts are cut out of a 3 mm thick steel sheet. They are welded on the sides to the corner blank to increase the strength of the structure.
Make or buy?
Ball joint end pullers for domestic cars cost no more than 1000 rubles. You can purchase the device at any store. This means that the instrument is easier and easier to acquire. To make even the simplest tool, you need blanks, special nuts and bolts with a large thread pitch.
It is easier to purchase a ready-made tool because it saves time. You won't have to do unnecessary things. Perhaps purchasing a device will cost a little more, but then there is no need to waste time and effort on making the tool.
Good day to all!
In this article I would like to share with you a very good homemade product, namely a ball joint and steering wheel end remover. I don’t know if it will fit on other cars, but it will definitely fit on a VAZ!
Not long ago I changed the ball joint using the “old-fashioned” method using a hammer, I’ll tell you it’s not very convenient and fast. After looking on the Internet, I found how to make a puller easily and without cost; on the Internet I looked at prices from 500 rubles and above! This homemade product will take about 30-60 minutes if you have everything you need.
And we need:
- A pipe with an internal diameter of 45-50mm, and a thickness of at least 2 mm, more is possible!
- Two thick washers to fit the diameter of the pipe, or you can cut them out of thick metal.
- Bolt and nut, I used a 24mm wrench bolt, maybe smaller.
Practical advice
When purchasing a new product, it is necessary to test the technical condition of the purchase, namely the rigidity of the finger stroke and the presence of a protective cover included with the product. However, the video for replacing ball “tens” allows you to see all this. If a cover is not available, it should be purchased separately, as well as technical grease.
More than half of the boot should not be filled with lubricant, otherwise it will put pressure on the walls of the boot, which can lead to defects and damage to the integrity of the rubber body.
To increase the service life of the ball joint, careful monitoring of the tightness of the protective cover of the product is required; if it is damaged, it is recommended to immediately replace the cover with a new product without defects.
Every driver wants his journey from point A to point B to be as comfortable and safe as possible. This is also helped by the car’s suspension, which helps the driver take turns, smoothes out bumps on the road and performs many other functions.
However, any mechanism can become unusable. And today we will analyze such a malfunction as the breakdown of ball joints on a VAZ 2110.
In general, a ball joint is used when there is a need to secure a part that can rotate in a vertical plane. A ball joint is a very simple and reliable mechanism, but, like everything else, it sometimes fails.