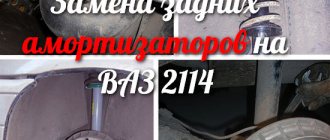
On a VAZ-2109 car, replacing the rear struts is necessary in case of excessive wear or damage. If we compare the suspension of the “nine” with the “classic”, then it is more advanced, higher efficiency, and the design is a little simpler. Although there are still common features - the design has springs and shock absorbers.
Only on the “nines” they are assembled into a single unit, and on the “classics” they are installed independently of each other. Repair and maintenance of the suspension on a VAZ-2109 car can be done independently, you just need to know the general design of the car and be able to use the tool.
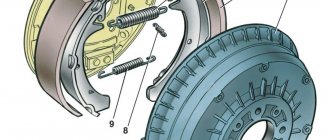
Rear suspension design
The basis of the entire structure is a shock-absorbing strut, which dampens body vibrations when driving on uneven surfaces. The rear struts of a VAZ-2109 are replaced without dismantling other components of the vehicle's suspension. The rear shock absorber strut consists of:
- shock absorber;
- metal plates under a spring;
- springs;
- rubber cushions;
- fastening elements - nuts and bolts.
All these elements are connected into a single unit and installed on both sides of the car. It turns out that the design dampens the vibrations that the entire rear part of the car produces when driving on an uneven road.
Shock absorber life, replacement conditions
But, like any part and mechanism of a car, shock absorbers have their own exhaustive resource. The average is from 30 to 50 thousand kilometers of a car, and they rarely serve beyond that. In fact, a lot depends on the shock absorber manufacturer, workmanship, and driving style. To check them, it is recommended to either contact service workers or perform a number of simple steps yourself.
The struts must be replaced if you find oil leaks on them or knocking noises in the suspension when driving (provided that all other suspension parts are normal). You can also carry out the following test: rock the car and make sure that the shock absorbers dampen vibrations. True, the last steps can only reveal completely non-working parts.
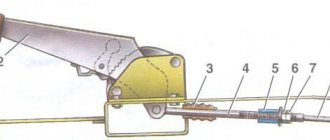
What does a shock absorber consist of?
In addition, the shock absorber itself includes many smaller elements. The basis is a system similar in some ways to a hand pump. Only instead of air it pumps oil. Some shock absorbers can be repaired - it is enough to completely disassemble them and replace all components that have become unusable. You will also need to add oil, and exactly as much as indicated in the technical specifications for a particular model.
To independently check the serviceability of the shock absorber, simply lower the body as low as possible. In this case, its rod should enter as much as possible. After this, the body is abruptly released. If the shock absorber is working properly, the body will make 1-3 oscillations and then stop. But if the device is faulty, the body will oscillate much longer. The reason for this behavior is most likely that the oil has completely leaked out of the housing or the rubber sealing rings have been destroyed.
How to check a shock absorber
To make sure it works, you will need to do the following:
- it is clamped in a vertical position;
- raise to the maximum;
- quickly lowered.
This procedure must be repeated several times.
The following signs indicate failure of this part:
- presence of sounds during the above procedure;
- jamming;
- failure.
This shock absorber is replaced with a new one.
However, before doing this, it is better to make sure that any individual element is not damaged. If this is the case, then only what is broken is replaced. The procedure is as follows:
- the rod is pulled out to the maximum;
- the nut is unscrewed;
- take out the fixing elements and the rod itself;
- remove the working cylinder;
- every detail is inspected.
If defects are found, they are replaced. Assembly is carried out in reverse order.
After installing the compression valve, you need to make sure that its discs move smoothly. Jamming is not acceptable.
Finally, it’s worth telling that on average in Russia a new rack will cost approximately 3 thousand rubles. As you can see, the price is quite serious, and therefore it makes sense to treat the car more carefully and regularly care for it.
To fully familiarize yourself with the process, we recommend watching the video below:
What tools are needed to replace struts?
When replacing the silent block of the rear pillar of a VAZ-2109, it is advisable to install the car on an inspection hole or overpass. In this situation, repairs occur much faster, because there are more amenities. To make the repair yourself, you will need:
- Jack – preferably hydraulic.
- Body supports.
- Wheel chocks – installed under the front wheels.
- A set of keys.
- Spring puller.
- Steel wire.
Wire may be required to secure the spring in a compressed state. But you can use thick copper or aluminum instead of steel. Only these metals are much softer and under the influence of elastic force the springs can stretch.
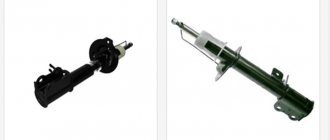
Models
Now let's name several of the most popular, popular models of shock absorbers that are in demand among VAZ 2109 owners. This, perhaps, will allow you to decide which struts are best for you.
Peculiarities
A hybrid stand with many positive reviews. Moderately hard, the ride is quite soft. With active use they will last 1-1.5 years. With rare use the car will last for years
Preparatory work
Before starting work on replacing rubber bands on the rear pillars of the VAZ-2109 or dismantling elements, it is necessary to thoroughly prepare. To do this, before starting repairs, treat all threaded connections in advance with penetrating lubricant such as WD-40. The lubricant must remain on the metal for at least half an hour to completely clean the threads of rust and dirt.
There are only two mounting points at the rear pillar of the nine - the top one inside the trunk and the bottom one on the beam. To remove the shock absorber, you need to unscrew the nuts and bolts. But before this, you must compress the spring as much as possible and fix its position with steel wire or some kind of rigid staples. The main thing is to prevent the spring from relaxing during the repair process.
Installing a new part
- A compression buffer is placed on the rod.
- The part is installed on the lower seat.
- A bolt lubricated with lithol is inserted.
- The nut is tightened too much.
- By slightly extending the rod, install the thrust washer, together with the lower cushion. To make it easier to remove the rod, you need to screw the nut on top.
- An insulating gasket is inserted above the spring. She is tied with a thin rope.
- The spring is installed on the rack. Its coil must fit into the groove of the cup.
- To fix the rod, you need to compress the spring. To do this, you need to raise the rear beam. The rod should fit into the hole.
- All removed parts are put on it.
- The nut is tightened.
- The jack is lowered.
- The top nut is tightened tightly.
After installation, the functionality of the new part is checked.
Important! Replacement of the shock absorber must be carried out simultaneously on each side. After 100 km it is necessary to re-stretch the connections.
Source
How to remove the rear strut on the "nine"?
To dismantle the rear pillar on a VAZ-2109, you will need to perform a few simple steps:
- Loosen the wheel bolts on the side to be repaired.
- Raise the rear of the car on a jack.
- Remove the wheel completely.
- Place a support under the body and lower the car onto it.
- Check how well the spring is compressed with a puller.
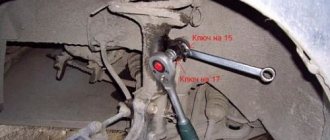
- Open the trunk, remove the rubber plug covering the place where the shock absorber rod is attached.
- Using a long tubular wrench size 17 or a special tool, unscrew the nut from the rod.
- Unscrew the lower mounting of the shock absorber strut.
- Pull out the entire rack assembly.
That's all, now you can repair or replace the rear struts of the VAZ-2109 with your own hands.
Checking Rack Parts
Inspect all components of the rack:
- Shock absorber. If it has oil leaks or deformation, replace it with a new one.
- Compression buffer. If it is deformed or torn, it needs to be replaced.
- Protective case. Since it protects the shock absorber from contamination, a torn cover will significantly reduce its service life. Therefore, the cover must be intact, otherwise, replace it.
- Gaskets. If they are torn, they need to be replaced.
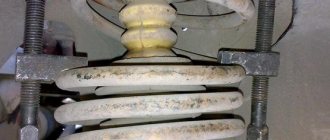
- Spring. Check if there are any cracks on it. Also check the settlement of the removed spring using a special device if you have one.
Repair or change?
Some motorists are faced with a completely reasonable question: shouldn’t they try to restore the old struts themselves, since the cost of new ones is quite high? The cheapest ones of unknown production and quality will cost no less than 1,500 rubles apiece. If you decide to repair them yourself, it will be at least three times cheaper. But there are several pitfalls:
- If the life of the old racks is already decent, then there may be strong wear on the rod, due to which it is sometimes impossible to achieve perfect sealing.
- It is unlikely that you will be able to fill the shock absorber with as much oil as is necessary for proper operation. If you make a mistake of a couple of grams on the smaller side, the shock absorber will not work. If you pour more than normal, the seals will break.
And the quality of the elements in repair kits often leaves much to be desired. Therefore, replacing the rack assemblies will be much more effective. Their resource will be much higher than that of restored ones.
Causes of failure
There are two main reasons why rear shock absorbers begin to misbehave:
- When driving, the rear wheel can gradually wear out the locker, made of plastic. It serves to protect the rack. Over time, the wheel gets closer and closer to the stand;
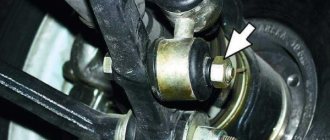
- If the breakage occurs along the lower silent block, the culprit is the bolt holding it in place. It was simply not tightened to the required load.
Worn out old shock absorbers
When changing the strut, pay special attention to this bolt. If you make the same mistake again, you will soon have to make repairs again.
Symptoms of a problem
Pay attention to the telltale signs that tell you that you need to take action to correct problems with your rear struts.
| Sign | Peculiarities |
| The silent block has changed | Cracks, various kinds of defects, and flaws may appear on this element. This indicates wear, so the shock absorber should be replaced. |
| The gaskets and boot have lost their elasticity | While these elements are working, they are clearly limp in appearance. This is a serious signal that the rubber components will soon break and this will lead to sad, expensive consequences. |
| The compression buffer is damaged or deformed | Everything in the system operates under high pressure. And if the gasket doesn't do its job properly, pressure is applied to the buffer and it breaks. |
| The spring has cracks | Everything here is more than logical and understandable. If signs of spring deformation appear, it must be replaced. At the same time, you can check the condition of the remaining nodes |
Silent block
Assembly of the rear pillar "nine"
And now a few words about how to properly replace the rear struts of a VAZ-2109. Many motorists change only the shock absorber and cushions and do not attach much importance to the springs. And it’s worth paying attention to them. As they wear out, they sag, and the length of all turns becomes less than necessary. As a result, the entire suspension will not work properly.
When assembling, you should adhere to the following rules:
- Install a compressed spring onto the strut.
- Secure the rubber pads on the last coil of the spring using insulating tape.
- Carefully, being careful not to move the spring relative to the shock absorber, install the strut in place.
- Install the nut on the top of the shock absorber rod.
- Install the bottom of the post onto the beam. Secure with a bolt.
Tighten all threaded connections after completing assembly and remove the puller from the spring. After this, you can replace the wheel and begin repairing the second side - it is done in exactly the same way. After repairs, it is advisable to make the final tightening of the nuts after installing the car on the wheels. And after 20-30 kilometers, check the tightness of all connections - sometimes the nuts get loose after driving. Try to use nuts with plastic locks on the threads.
Replacement procedure
For such work you need the following devices and tools:
- screwdriver set;
- a set of keys;
- jack;
- container for draining shock-absorbing fluid.
The procedure is as follows:
- at the gearbox, switch the lever to first speed;
- lift the rear of the car with a jack (both wheels must be in the air);
- provide reliable support;
- take away the jack;
- dismantle the old racks.
If you need to completely replace them, then the disassembly process ends. When you need to repair any individual element, you should also perform the following steps:
- remove the anthers, bushings and buffer;
- make sure that there are no noticeable flaws;
- wash the shock absorber (it is its contamination that most often leads to breakdown);
- check the rear silent blocks;
- assemble the stand and install it in place.
It is very difficult for one person to complete all the actions on his own, so it is worth asking a friend for help. In particular, your partner will have to direct the rod into the glass. Further:
- install the spring;
- pull out the shock absorber rod completely;
- put on the lower ear and clamp everything with a bolt as tightly as possible.