How to check the parking brake cable
The parking brake light may illuminate, indicating a stretched cable.
It is important to determine the causes of this malfunction in order to avoid serious consequences on the road. Typically, the parking brake is diagnosed at a car service center on a special stand, but there are some ways to do it yourself. You don’t have to go to a car service center to stop the parking brake light coming on.
You don’t have to go to a car service center to stop the parking brake light coming on.
Typically, parking brake diagnostics are carried out at a car service center on a special stand, but there are some ways to do this yourself. You don’t have to go to a car service center to stop the parking brake light coming on.
Depending on the make of the car, the mounting location of the parking brake cables may vary slightly. However, the list of brake system components does not change.
The system looks similar in cars with parking brakes for the front wheels. The cables stretch during operation and need to be adjusted and lubricated.
It is recommended to check the cables every 6 months or when passing the next 10,000 km. If you suspect that the handbrake has become worse, contact a car service unscheduled, regardless of whether the light on the dashboard is on or not.
Cable wear is very serious. The cable may simply burst. In addition to the cable stretching, other parts of the system may rust and jam, which is why the parking brake does not perform its functions.
The handbrake is checked as follows: the car is positioned so that one of the rear wheels is suspended in the air. Then they activate the parking lever and try to spin the suspended wheel. If this succeeds, then the system is faulty. The cable needs to be tightened or completely replaced. In this case, the parking brake indicator remains illuminated.
There is another, more extreme method of checking the handbrake. This method may damage the brake pads and other elements of the system. Here's how this test is carried out: the car is put on the handbrake, the first gear is engaged, and then the gas is pressed to full. If everything is fine with the handbrake, the car will jerk a little and immediately stall.
Setting up the parking brake is almost identical for different car models. The handbrake can be adjusted in two ways, depending on the make of the car: from inside or under the car. For most cars, the second method is relevant, and we will dwell on it in more detail.
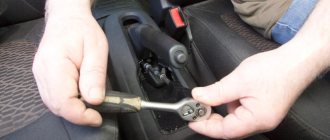
How to tighten the handbrake cable while under the car:
- Pull the handbrake up and lock it after 2 - 3 clicks (the exact number depends on the make of the car).
- Raise the car with a jack or initially place the car above the inspection hole, which is certainly more convenient.
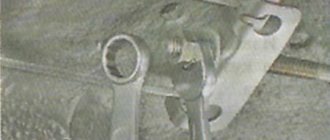
- First loosen the tightening nut on the adjustment unit. If you now begin to rotate the other nut, the cable will tighten. Check the tension of the cable against the suspended wheel. If it can no longer be turned, the parking brake operates normally.
- Now release the handbrake and check if the wheel spins. If yes, then everything is correct.
- Check the handbrake again (put it on the handbrake, spin the wheel and remove it from the handbrake). It is better to carry out such a verification test several times.
Last step: tighten the locknut. The parking brake can now be used. The indicator will stop lighting after this problem is resolved.
Video
This video shows how to change the handbrake cable.
Replacing the cable on a Nissan X-Trail car (Nissan X trail).
Adjusting the handbrake of Nissan Qashqai (Nissan Qashqai).
How does a car's parking brake work?
On this page we will consider such a topic as the correct adjustment of the handbrake. There will also be a video on this topic at the end.
While surfing the Internet, I was surprised at how people adjust the handbrake and teach others how to do it. I was even more surprised when I decided to look at what they wrote about in the Murzilkas. As it turned out, a rather strange algorithm for adjusting the handbrake is also described there.
Okay, on YouTube everyone is ripping each other off and pouring the same thing into the masses, only from different cameras and video cameras, but Murzilkas seem to be supposed to be smart books that people pay money for
I always say that you don’t need to listen to information on the Internet, you just need to listen and leave the final decision to your own brains, not to others.
Okay, enough of the rambling, let's go...
Replacing the handbrake cable on VAZ 2109 and 2110. We can do without a service station
- Jack;
- New handbrake cable;
- New repair kit for rubber bushings;
- Drum type brake pads for rear wheels;
- Automotive tool set;
- Shoes for ramp wedges.
- It is necessary to have an overpass or inspection hole, since without them we will not be able to get under the bottom of the car;
- We put the car in neutral, carefully wedge the front wheels from possible spinning;
- We make sure that the handbrake is lowered to the “off” position, climb under the bottom of the car and, using a cape, unscrew the central rod - the handbrake cable tensioner, which is located in the rear of the transmission. A characteristic distinguishing feature is a lever with two tensioners at the ends;
- After the cable is lowered from the front tensioner, we proceed to the rear part. To do this, jack up the rear wheels one by one, tear off the mounting bolts and remove the wheels;
- This frees up access to the brake block and cylinder. Using a Phillips screwdriver, unscrew the 3 screws and remove the brake module cover. We see in front of us two pads and a brake cylinder with a cable tensioner;
- Considering that we previously weakened the central rod, using pliers we disconnect the lower cable arm from the brake pad, having first removed the spring;
- Having removed the handbrake cable from one side, you can proceed to the other, having first put a new cable in place of the old one. Next, we install a modular brake complex. If necessary, the pads need to be replaced, otherwise you will have to do this only after a couple of thousand km;
- Having processed the second wheel in a similar way, all we have to do is place the second ends on the central tensioner and tighten it to the appropriate level with a nut;
- The performance test is carried out as follows: the car is placed on a slope of at least 25% with the handbrake. The number of fixations should not exceed the limits from 2 to 7;
- Next, you should get out of the car and try to move the car down using physical effort, if this does not work, then you did everything correctly, otherwise you need to tighten the handbrake cable a little;
- Fulfillment of all conditions may indicate that you can continue further and you are not afraid of any technical inspection.
AutoFlit.ru
The following two tabs change content below.
- Bio
- Latest Posts
admin1
I am a professional in the field of Auto Electrics and Auto Diagnostics. Work experience more than 10 years. I will identify and eliminate faults of any complexity. (Even with cars that Dealers and services cannot handle, as it were, of the highest class). We carry out all types of work on the installation of additional electrical equipment (xenon, multimedia system, special signals, etc.)
Procedure
As practice shows, repairing the parking brake comes down to replacing the handbrake cable, but in most cases, the operation of the unit can be restored with the help of a tensioner. If you follow clear instructions, then no problems with adjustment should arise.
Tools
To adjust the handbrake, you need to prepare the following tools:
- flat screwdriver;
- a set of keys, including a cylinder key;
- wrench with nozzle 18;
- wheel chock or other wheel supports;
- jack;
- work gloves.
Minimum required set of tools
To adjust the cable, it is advisable to use a telescopic jack to raise the car to a greater height. But if this is not the case, then a different type of jack will do, for example, a rack and pinion jack. After all the tools are prepared, you can begin to work.
Instructions
There are several requirements that must be met before making adjustments. First of all, the brake system must be fully operational and free of air. The driver must also make sure that all holders, cables and the lever itself are in good condition. Now you can get started. Below are step-by-step instructions that allow you to make adjustments in the shortest possible period of time.
Step 1. Secure the car with a wheel chock and lift the rear of it and place it on the stumps. You can use old wheels or tires.
Raise the rear of the car
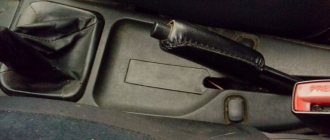
Step 2. To gain access to the handbrake adjustment mechanism, unscrew the special plastic panel (it is located between the seats). Evaluate the location of the ends of the cables and loosen them by unscrewing the fixing nut.
Remove the plastic panel
Step 3. Set up the “soldier”, that is, adjust its position. This should be done only in cases where the part has shifted in one direction or another.
Adjust the position of the “soldier”
Step 4. Change the distance between the working surface of the brake pad and the drum - this is the main principle of adjustment. To do this, you need to move the “soldier” until the minimum distance between the friction surfaces of the parts is obtained. Ideally, the brake drum should slide into place with little effort.
Set the optimal position between the drum and the pads
Step 5. After adjusting the handbrake, put the wheels in place. Then proceed to adjust the handbrake. The cables should be parallel to each other (as in the photo). Using the adjusting nut, adjust the handbrake so that you can rotate the wheel by 1 click when the handbrake is tightened, but after 3 clicks it should no longer rotate.
Install everything in reverse order
How to replace brake pads
We figured out how to check the degree of wear of parts. Now you can go directly to the procedure from the replacement. To do this you will need the following tools and devices:
- inspection hole, jack or overpass;
- balloon;
- a set of keys;
- wooden block;
- hammer or small sledgehammer;
- pliers;
- screwdriver;
- wd-40 for lubrication.
Particular attention should be paid to the fact that it is better not to undertake this work without a special device in the form of a pit or a lift. Some drivers manipulate the handbrake system without a hole, driving onto a high curb, or placing wheels under the car
But these methods are not safe, so it is better to refrain from them.
Replacement process
When all the tools are prepared, you can get to work. We perform the following actions:
- We drive the car onto the overpass and put it in first gear.
- To increase safety, it is better to install “shoes” under the front wheels. They will prevent the car from possibly rolling off the overpass.
- We remove the handbrake. We climb under the car. Remove the exhaust pipe from the rubber cushions. They are located near the handbrake tensioner.
- We remove the airbags, leaving only the one located under the trunk near the bumper.
- We loosen the handbrake. To do this, you need to loosen the tensioner bolt. The cable must be loosened as much as possible so that there are no problems with subsequent installation of the system.
- Using a wheel wrench, loosen the fastenings of both wheels.
- Place a jack under the wheel and remove it completely.
- We unscrew the bolts located on the drum using clamps or other available means.
- We try to spin the drum in any direction. When it rotates about 30 degrees, tighten the guide bolts again. This is done so that the bolts “press out” the drum. This will happen quite easily if you screw them in evenly.
- A situation may arise when the drum does not spin. In this case, you will need a hammer or sledgehammer and a handle prepared in advance. We apply the block to the drum and start knocking on it. You need to go over the entire surface of the drum with a sledgehammer. So it will soon start scrolling. The main thing is not to hit the metal with a hammer, otherwise the circle may break.
- After the drum is removed, underneath we will see the pads, brake cylinder and springs. Using pliers, remove the guide springs from the pads.
- Together with the lever, we remove the old pads. Carefully transfer it to new ones. In this case, the side grooves of the cylinder must be compressed.
- When installing new pads, make sure that they fit strictly into the grooves of the cylinder.
- We install the springs in place. We hook the cable to the drive lever.
- When the pads are installed, they need to be pressed tightly together.
- We install the drum in place.
- Install the wheel.
After all operations have been completed, the handbrake should be tightened. After this, we spin the wheel manually. It should turn freely without rubbing or extraneous squeaks. If everything was done successfully, you can take on the second wheel, doing all the steps in the same order.
Sometimes replacing handbrake pads can be accompanied by a problem such as brake drum wear. In this case, it should definitely be replaced. In addition, the handbrake cable may become jammed, which also needs to be fixed immediately, otherwise the handbrake simply will not be able to work, and it will be impossible to install the drum on the pads.
- Parking brake light stays on
- ABS on Priora caught fire - causes of malfunction
- DIY cylinder honing technology
- Replacing and repairing the clutch release fork
Steps to adjust the parking brake drive
The work of adjusting the parking brake drive involves moving the parking brake cable equalizer towards the front of the car body. For different car models, the adjustment mechanism may be located under the bottom or in the interior of the car.
The mechanisms located inside the car are adjusted through a special hatch, which is located in the central panel between the driver and front passenger seats. As an example, we will give the procedure for adjusting the parking brake drive if the adjustment mechanism is located under the bottom of the body. In this case, the car must be installed on an inspection hole or on an overpass.
Instructions for adjusting the parking brake drive:
- Using a brush with metal bristles, it is necessary to clean the threads of the adjusting rod from corrosion and contamination.
- Then you need to loosen the locknut. To unscrew/tighten the nut, two wrenches are used (one needs to fix the adjusting nut, and the other needs to unscrew the lock nut).
- To change the position of the adjusting nut, it must be tightened a certain number of turns.
- After tightening the adjusting nut, you need to tighten the lock nut (the nuts should be pressed tightly against each other).
Checking the parking brake drive adjustment is included in the mandatory vehicle inspection program. In this case, the following operations are performed:
- The handbrake should hold the car with its full curb weight on a slope of 16º - 25º (depending on the requirements for the car);
- Parking brake diagnostics are carried out on a special drum stand, which allows you to measure the braking force and the uniformity of its distribution between the braking mechanisms of the rear and front wheels.
There are several methods by which you can independently check the tension of the parking brake cable:
- by the number of clicks of the handbrake lever. In this case, it is necessary to study the manufacturer’s recommendations for a specific car model (for example, for the Matiz Daewoo the norm is 7 clicks, and for the VAZ “Six” from 2 to 4 clicks). The disadvantage of adjusting the parking brake in accordance with such requirements is that in some cases, if you immediately replace the rear pads and drums (or discs), these parts will be pressed tightly against each other. Considering this circumstance, it can be recommended that immediately after replacing the pads/drums, make a loose adjustment of the parking brake drive, and after grinding in the pads, tighten the handbrake;
- by the force with which the pads are pressed against the brake drum or disc. To adjust the degree of compression of the friction linings, you need to hang the rear wheels on a lift or using a rolling jack. Then it is necessary to tighten the parking brake drive until the brake pads lightly touch the brake disc or drum when the handbrake is released. The degree of pressure should be such that the wheel can be turned by hand without much effort, and during its rotation a barely noticeable rustle can be heard from the contact of the pads and the surface of the brake drum. If the parking brake drive is adjusted in this way after replacing the rear brake pads, then after grinding the linings in for 100-200 kilometers, the gap between them and the drum will be optimal.
Separately, it is worth noting the design feature of front-wheel drive VAZ models. In such cars, there is insufficient tension in the handbrake cable even after correctly adjusting the parking brake drive. This happens because the end of the cable limits the movement of the lever. When the handbrake is tightened, the return spring comes into contact with the limiter too early. To eliminate this problem, some car enthusiasts cut off a number of coils of the return spring. This operation should be performed very carefully so as not to deform the parking brake cable. In this case, the cut coils on both sides of the spring must have the same length.
How the system works
Note that the car has 3 data systems that activate the lock. Most often, an example of how a handbrake works is given on a model of a mechanical handbrake. We will not be an exception and will explain the principle of operation using the same example, because on this model the explanation will be more accessible. But in the process, we will analyze in detail the principles of operation of each of the systems.
If the braking force applied to the wheel is less than the driving force in it, the result is positive and causes the vehicle to move, albeit with less intensity. On the other hand, if higher braking force is applied, the result is negative, creating a couple of forces opposite to the rotation of the motor, which locks the wheel and causes drag.
The braking force must be sufficient, exceeding this does not mean that the car stops earlier, because for braking it is necessary to convert the energy of the driving force into heat. If a wheel is locked, since there is no friction between its braking elements, the kinetic energy of the displacement will no longer be heated, and therefore the vehicle will continue to move until the energy is removed in another way, the effect of tire friction on the ground.
- Mechanical type of hand brake - usually the main component is the parking brake lever, but it happens that it is replaced by a pedal, which is located not so far from the main control pedal. But we'll talk about the lever; it is connected to parts that lock the rear wheels using cables and tensioners. Most often, there is a scheme of three cables (two cables are side, they lead to the locking wheels, one cable is central, its function is to distribute forces). Certain levers are responsible for the functioning of the pads, thanks to their connection with the cables, they press the pads against the drums or brake discs when the lever is turned on.
– this is one part of the entire system (the pads reproduce braking acceleration). The condition of these pads must be carefully monitored, because... they overheat quite strongly and experience a huge load in the place where the special lining is attached to the base of the block.
Locking the wheels causes unbalanced braking. Unbalanced braking results in loss of vehicle control. If wheel locking occurs on only one of the axles, there is a loss of control over the vehicle, so if locking occurs on the rear wheels, then the resistance created in them tends to push them forward as they are braked, exhibiting the effect of kickbacks in the vehicle . If locking occurs on the front wheels, dragging on them when they are not moving forward will cause the vehicle to yaw laterally with a corresponding loss of steering control.
Hydraulic hand brake - in this system, the cables are replaced with a liquid hydraulic cylinder. The device also includes a ratchet wheel and lever
This mechanism has an important advantage: the functions of the devices are performed by hydraulics. But if the fluid leaks, the driver will lose both the main brakes and the handbrake. Electronic - in this case, all the work is done by the computer unit of the machine
After your car stalls, the system recognizes that your car is level and locks the wheels. In the event of a violation, the electronic drive will be activated, thanks to the clamping screw, the parking chocks will be activated, after which the wheels will also be blocked. The handbrake will be released when you press the gas while the car is running.
How does the handbrake work?
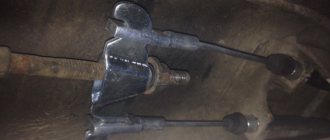
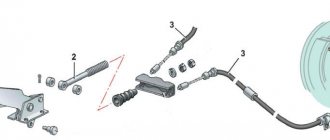
When the driver activates the handbrake, either by pulling the handle between the front seats (3) or by pressing the parking brake pedal under the dashboard, a cable (12) running to the rear of the car is pulled, applying tension to the brake pads. When the driver lowers the handle, the return spring (11) helps return the brake system to its normal configuration.
The system itself is quite simple and banal - the parking brake handle is connected to a cable in a special plastic sheath, in which it can move freely. This cable goes to the adjusting bolt, which can be loosened or tightened. Then it splits into two cables that go to the brakes on the rear wheels.
In simple words, by activating the handbrake, the cable tightens and brings the pads together, which then secure the car.
Rear wheel drive [ edit | edit code ]
On passenger cars, in most cases, the parking brake lever is connected by a flexible metal cable in a sheath to the rear drum brake mechanisms, which contain a device that operates the standard brake pads.
The driver pulls the handle, dragging along with it the cable and rocker arm laid in the sheath. The rocker equalizes the tension of the cables and through them pulls the levers in the brake devices of the right and left rear wheels, which, resting on the bars, push the brake pads in different directions. To release the brakes of the car wheels, the driver must slightly pull the handbrake handle towards himself, press the end button that releases the ratchet mechanism, then return the handle to its original position.
If a passenger car has disc brakes installed at the rear, then it is technically difficult to combine a hydraulic and mechanical drive in a disc brake. In this case, there are separate parking drum brake mechanisms.
Handbrake diagnostics
Checking the functionality of the parking brake should be carried out once a month (some automakers focus on the mileage indicator - every 20-30 thousand kilometers). If you feel that the effectiveness of securing the car with the handbrake has decreased, there is no need to wait for the recommended period for servicing the handbrake.
In this case, there are two common methods for diagnosing the condition of the handbrake:
- The first method requires placing the vehicle on a fairly steep slope (with a gradient of 15 degrees or more) and tightening the lever to the last ratchet notch. If the car is kept from spontaneous movement under the influence of gravity, everything is in order. If not, it is obvious that it has lost the braking efficiency that is required of it, and you need to immediately eliminate the cause of the incomplete operation of the handbrake with subsequent adjustment or repair of the mechanism;
- the second method does not require a slide. The check can and should be carried out on a horizontal surface. To do this, we tighten the lever towards ourselves until it stops, start the engine, engage a lower gear (strictly speaking, first) and begin to slowly and evenly release the clutch pedal. With a fully functional handbrake, the car will twitch a little, but stall. Otherwise, it will start moving, perhaps at a lower speed than usual. And then you will also have to tighten the handbrake cable.
A noticeable decrease in the effectiveness of securing the wheels with the handbrake can be caused by the following reasons:
- weakening of the tension of the brake cable (typical of long-term operation of the vehicle without servicing the vehicle, as well as abuse of the parking brake when driving the vehicle);
- brake linings are worn beyond normal limits;
- The gap between the pads and the drum has been increased.
As you can see, the responsibility for insufficient braking efficiency does not always lie with the handbrake itself.
We list the cases in which its adjustment is required:
- after each pad replacement;
- if work related to adjusting the brake pads was performed;
- when performing a disc/drum replacement operation;
- if the free play of the CT lever has increased so much that it captures all the teeth, up to the tenth;
- after replacing the cable and/or other components of the handbrake drive.
In principle, the operation of adjusting the cable tension is not difficult, and if you have neither the time nor the desire to contact a car service, you can do it yourself, even if you do not have the skills to perform such work.
True, there are also objective difficulties here. They are connected with the fact that such an operation must be carried out in compliance with safety measures, since full access to the bottom of the car is required. Before making adjustments, it would be a good idea to look at the user manual to study the design features of the parking brake in its drive part.
How to tighten the handbrake on a grant in 5 steps
Does the handbrake engage after 3-4 clicks? Stopped holding? On slopes do you have to double it with the gear engaged or turn the wheels towards the curb? It's time to find out how to tighten the handbrake on a Grant yourself.
Adjusting the Grant's handbrake
Adjusting the parking brake of a VAZ 2190 is no more difficult than on a classic or “chisels”. Let's look at the step-by-step principle, starting with inventory.
Necessary tool for tightening the handbrake
What you will need for work:
- Inspection pit, overpass, lift;
- Keys: open-end and ratchet with long head 13;
- Socket wrench or ratchet with a 10mm head;
- Possibly WD-40.
It is better to do all the work with a partner, who will check how far the lever rises from the inside of the car. Otherwise, after each tightening of the cables, you will have to climb into the cabin yourself.
The lift will make it much easier to adjust the parking brake.
So, the car is on a pit/lift, the tool is in your hands - the handbrake is loose. What to do?
Step 1: find a resonator under the bottom. We remove its mount, located closer to the front of the car. Then, using a socket wrench or a ratchet with a 10mm socket, unscrew the 4 bolts securing the heat shield.
If the bolts are rusty, you can pour WD-40 on them and try to unscrew them. If the studs still don’t work and break, you need to be prepared to replace them. Otherwise, the screen cannot be put back.
This way we get the opportunity to move the screen forward without removing it. Underneath there is access to the parking brake adjustment mechanism.
Step 2: slide the screen forward to access cable adjustment.
Remove the cushion mount 1, unscrew the bolts 2. Move the screen 3.
Step 3: holding the adjusting nut (open-end wrench size 13), loosen the lock nut (head size 13).
Step 4: Rotate the adjusting nut clockwise to tighten the cables. Periodically check from the inside how the handbrake is holding.
We do not remove the locknut! Just weaken it.
As soon as the parking brake lever reaches 3-4 clicks, tighten the locknut.
1-lock nut. 2-adjusting nut. For convenience, you can loosen the locknut and rotate them both clockwise with a long head of 13.
Step 5: return the heat shield to its place, fix the fastening screws and the rubber suspension of the resonator.
Checking work:
- the rear axle is suspended, the parking brake is removed - the rear wheels rotate freely;
- the rear axle is suspended, the brake lever is raised (to maximum tension - 3-4 clicks) - the rear wheels do not rotate even with force.
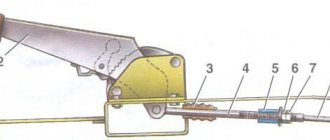
Operating principle of the Granta handbrake
When raising the handbrake lever in the passenger compartment:
- the drive brake cable is tensioned;
- through the equalizer he pulls the cables going to the rear brake pads;
- The pads are pressed against the brake drums through expansion bars, stopping the wheel from moving;
- When the tension is loosened (removed from the handbrake), the tension of the cables also weakens, and the wheels move freely.
Lever 1 pulls cables 3 through cable 2. Those, through levers 4 and strips 5, push the brake pads apart.
Why is it necessary to tighten the parking brake?
If the cable tension is loosened, there is a danger of the vehicle rolling away.
The Granta mechanical handbrake has a conventional device without self-adjustment. The same instructions apply to Lada Kalina, Priora.
This means that as the rear pads wear out, the original parking brake setting will lose effectiveness.
Crib
Instead of a conclusion, let's summarize:
- Carry out work on a lift, pit or overpass;
- Tools: open-end wrench 13, ratchet with heads 10 and 13 (preferably long);
- It is not necessary to remove the heat shield - just move it forward as the vehicle moves;
- The ideal stroke is 3-4 clicks of the handle until the rear wheels come to a complete stop.
If you've already started adjusting the brakes, maybe change the rear pads too? Detailed instructions with description and photos are here.
Have something to add to the article, share your opinion or recommend? Write in the comments!
Instructions for tensioning and replacing the drive
Since the parking brake system mechanism is located under the bottom of the car, an inspection ditch, overpass or lift is needed to perform the work. In extreme cases, you can do without them, but then you will have to hang out the back of the car and lie under it, which is not only inconvenient, but also dangerous. Before tightening the cable, securely secure the front wheels of the vehicle with wheel chocks.
Then act in the following sequence:
- Set the handbrake lever to the down position.
- Jack up any of the rear wheels.
- Armed with two open-end wrenches that fit the tensioner nuts, go down into the inspection hole.
- While holding the main nut located on the stud near the rocker arm, loosen the locknut.
- Tighten the tension nut, periodically checking the rotation of the suspended wheel by hand. To prevent the pin from spinning, it must also be held with pliers or a wrench.
- Stop tightening the cable as soon as the pads begin to grip the wheel. Make 1-2 turns of the nut back and check the operation of the handbrake. It should fire after the second click.
- Tighten the locknut, lower the jack and test the handbrake on a slope.
Replacing the cable drive will require more time, especially to disassemble the drum brake system. To hang both rear wheels, prepare wooden blocks, and to replace them, use a standard set of tools; no special devices are required. The algorithm of actions is as follows:
- Place the car on the pit and loosen the cable completely, as described above. Unscrew both nuts and remove it from the rocker arm.
- Lift the rear of the car, place it on blocks and remove the wheels.
- Remove the drums and unscrew the bolts securing the cable to the rear casing.
- Remove the brake pads and spacer bar. When you reach the lever, remove the cable loop from it. Remove it from the casing and repeat the operation on the other side.
Install the new cable drive in the reverse order, starting with the wheel mechanisms. At the end, tighten it and check the operation of the handbrake.
Parking brake, how to check its operation
The parking brake system mainly uses a mechanical brake drive, which ensures the transmission of braking force to the brake mechanism from a person. A person interacts with a foot pedal, rod or hand lever. The most common mechanism is a hand lever, which is usually located next to the seat to the right of the driver. The hand lever is equipped with a ratcheting mechanism that locks the parking brake in the applied position. The handbrake warning lamp switch is located on this lever. The lamp itself is mounted on the dashboard and turns on when the parking brake is applied.
On vehicles with disc brakes, the following designs of the parking brake mechanism are used: drum, cam and screw.
It is necessary to check the functionality of the parking brake regularly (preferably after every thirty thousand kilometers of driving), since the handbrake may be in working condition, but hold the car very weakly, which can lead to the vehicle rolling down a slope and creating an emergency situation. This is especially true for cars that have been in use for a long time.
To check the operation of the handbrake, you need to put the car on a small hill with an approximate slope of 25 percent. After this, you need to stop, pull the handbrake up all the way, engage neutral gear, while releasing the brake pedal. If the vehicle stands and does not roll down, there is no need to adjust the parking brake.
If there is no similar slope nearby, you can check the condition of the parking brake in another way. To do this, place the vehicle on a flat surface, then pull the handbrake and put the gear shift knob in the neutral position. Now get out of the car and try to push the vehicle yourself. If it moves, it means the parking brake is weak.
In addition, there is another method for checking the parking brake. To do this, you need to tighten it all the way, engage first gear and slowly release the clutch. If the device is working normally, the vehicle's engine should stop. Otherwise, the car will begin to move very slowly, which indicates the need to adjust the handbrake or replace the cable.
Why should the handbrake be in good working order?
A hand brake is an element that is part of the braking system of a vehicle. Its main task is to lock the wheels. Thus, the machine becomes motionless, and maintains this state even on a surface that has a slope.
In total, we can highlight several functions and tasks that this node performs:
- Ensures vehicle stability on the road when parking and stopping on slopes;
- Contributes to the performance of maneuvers associated with the need to brake urgently;
- If you have certain skills, it helps in entering controlled drifts;
- If the main brake breaks down, it temporarily acts as a replacement.
Never use the handles as a permanent replacement for the foot brake pedal. There is a main task from which it is not recommended to deviate.
Also, do not jerk the lever sharply while driving, since quickly raising the handbrake will cause the car to skid. Only experienced drivers and racers have the skills of controlled skidding.
Parking brake screw-nut
Such parking brake mechanisms are used in a number of foreign cars. Below is the design and operating principle of the parking brake used on Volvo cars.
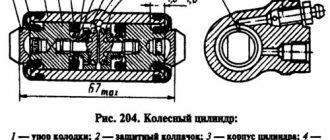
When the parking (hand) brake lever is lifted, the cable moves relative to the braid resting on the bracket 9 and, using the lever 8, turns the shaft 7 around the axis, at the other end of which there is a plate 6 with three conical sockets of variable depth. Each socket contains a ball 11. Together with the ring 10, these parts form a mechanism that, when rotated, causes the shaft 7 to move in the axial direction. The conical sockets are designed in such a way that the initially large axial movement relative to the rotational movement becomes small, thereby increasing the transmitted force. The axial movement of the shaft 7 is transmitted to the head of the screw 5, which, compressing the spring 12, through the nut 4 transmits force to the piston 3 mounted in the floating bracket 13, and together with the bracket, acting through the brake pads 2, clamps the brake disc 1.
The effect of self-regulation of the parking brake occurs due to the fact that as the “brake pads - brake disc” pair wears out, an increased gap appears and, without encountering resistance, shaft 7 turns screw 5 relative to nut 4, which leads to a decrease in the gap between the brake pads and the disc. The screw-nut pair (items 5 and 4) has play in the threaded connection, which allows the brake mechanism to release the brake disc when the parking brake is not applied.
Rice. Parking brake mechanism: 1 – brake disc; 2 – brake pads; 3 – piston; 4 – nut; 5 – screw; 6 – plate; 7 – shaft; 8 – lever; 9 – bracket; 10 – ring; 11 – ball; 12 spring; 13 – floating bracket
The parking brake is usually driven through a cable by pulling it by hand from the lever handle, but some cars may have a foot pedal control of the parking brake. An example is the Volkswagen Phaeton.
The pedal control cable drive consists of a pedal, a drum, braking and release cables, and a loop spring.
The force applied to the pedal is transmitted by a cable to an equalizer located under the bottom of the car. The equalizer distributes the drive force between two cables that operate the rear brakes.
Rice. Drum-type cable parking brake drive: 1 – parking brake pedal; 2 – drum; 3 – loop spring; 4 – fastening of the cable end; 5 – plastic spring; 6 – brake cable; 7 – brake release cable; a – inhibition; b - disinhibition
When you press the brake pedal, the loop spring is pressed against the drum, increasing the frictional forces against it and counteracting the movement of the pedal in the opposite direction when the brake is tightened. The result is virtually stepless and silent pedal locking. Pressing the brake pedal causes the drum to rotate and the brake cable to tighten.
To release the parking brake, you must press the special lever with your hand. When you press the lever of the brake release device, the tip of its cable is pulled up. As a result, the loop spring expands, releasing the drum, and the pedal returns to its original position. This principle allows for disinhibition with minimal effort.
Rice. Operating diagram of a loop spring: a – tightening the brake; b - disinhibition
Pedal control can also be of a segment type. The parking brake pedal 1 is connected to the cable through a gear rack 9. One side of the gear rack is rigidly connected to the cable 13. The gear rack runs in a guide lever 8, which is pivotally connected to the gear segment 3. The guide lever is pressed against the gear rack under the action of a pressure spring 7 and locks the rack on the parking brake pedal. This ensures a rigid connection between the pedal and the cable.
When the pedal is pressed, the parking brake cable 13 is driven. When pressed, the pedal is fixed by a ratchet 4, which engages with a toothed segment 3, fixedly connected to the pedal. The ratchet is movably mounted on the pedal bracket and is pressed against the toothed segment by a spring. When the pedal is fixed, the drive cable remains taut. Through the release mechanism, a tensioned cable presses both parking brake shoes to the brake drum and the car is held by the parking brake.
Worn brake pads
Many people believe that it is possible to drive on worn brake pads and nothing bad will happen.
After all, in fact, the car will be able to brake at the right moment, although not as quickly as we would like. This concerns the wear of the front pads. They are part of the hydraulic brake system. And if the pads are not worn down to a critical level, the car will actually be able to brake when you press the brake pedal. The service life of the front pads is approximately 10 thousand km. But under certain factors, wear may occur earlier. If you do not change the pads for a long time, they can wear out completely, and then the brake system may simply not work at one point. Their minimum thickness should be 1.5 mm. Otherwise, sudden braking may damage the brake cylinder. and this is an extremely dangerous situation.
At such moments, only the serviceability of the hand brake can save the situation. Its pads take about twice as long to wear out. But replacing them if necessary is much more difficult than in the case of a hydraulic brake. That is why the wear of the handbrake pads is eliminated by drivers when they are almost completely worn out.
You can only imagine what will happen if the front and rear parts wear out at the same time. After all, if the hydraulics fail, you can raise the handbrake and the car will slow down. If not, you will have to rely only on luck.
How is the parking brake arranged?
We have mentioned only the most common situations of using the handbrake, but there are also more exotic ones. For example, it is also used in motion, during sharp turns, since it mainly affects the rear wheels, but this is only in sports cars and exclusively within the framework of competitions. Also, if a traffic jam has formed on a road with a slope, then it is most convenient to drive off with the handbrake, so as not to run into a neighbor waiting behind you.
The parking brake design is quite simple: a mechanical drive ensures the transmission of force to the locking mechanism. This happens through the interaction of a person with a lever, foot pedal or rod. Basically, the force from the lever to the mechanism is transmitted through cables. There are different designs using one, two, but most often three cables. The parking brake cable is connected to other elements of the system using adjustable ends.