Car owners are well aware that the VAZ 21214, 21213 (Niva) fuse box is a critical detail that requires detailed study. Knowledge of the electrical circuit allows you to avoid many problems and carry out timely diagnosis of breakdowns. Since the family has existed for many decades, it has managed to go through a number of radical changes - the transition from carburetor to injection engines, for example. This did not entail a radical change in the location and content of the mounting blocks, of which there are two in the cabin and one under the hood.
Fuses for Niva 21214
Today, almost every person has a personal car, and, of course, at the moment it is difficult to imagine our life without a car.
Thanks to it, we can move around the city or highway without any restrictions. However, situations very often occur when something breaks down in a car. No matter how sad it may sound, in cars from the VAZ company various parts break very often, and sometimes you have to fix them yourself, because prices at car dealerships are quite high. This article will look at fuses on Niva 21214 cars with an injector engine, how to repair or replace them.
Fuses are one of the most important parts in any car, as it is thanks to them that the vehicle does not suffer any significant damage. In addition, fuses are precisely those elements of the Niva that, in the event of any voltage drop in the electrical circuit, take the entire blow, preventing the occurrence of serious malfunctions. A very important, however, very fragile part that very often fails, which is why it has to be replaced. The process of replacing or repairing a fuse is extremely simple and does not require special professional skills or tools.
Characteristics of faults
There are several indicators according to which one can judge whether the fuel pump on a VAZ 2114 or its components are damaged. But at the same time, be sure to check whether there really is a problem with the fuel pump, because you can spend money on purchasing another one, but in reality it turns out that the problem is not in it:
- The motor does not start, this may indicate a malfunction in the pump. First you should check the functionality of the spark plugs to see if there is a spark. The electronic control system is also subject to verification.
- It is worth checking the pressure level inside the fuel system. When the fuel pump operates without interruption, a pressure of 3.2 bar is created. Based on the type of engine, the features of the fuel pump may vary:
- If the engine volume is one and a half liters, then the most acceptable value is 285-325 kPa.
- If the engine size is 2 liters, then the optimal indicators are from 375-390 kPa.
- There is no signal that does not reach the pump. This occurs when trying to start the engine. When the system operates correctly, starting the motor causes a slight vibration of the pump. If there is no vibration, then it makes sense to check the contacts.
- Trouble in the power plant is another not obvious sign of a problem with the fuel pump. But it’s better to check, as there is a possibility that the fuel pump is to blame.
- The motor jerks. This is also observed at low speeds and at the start. In this case, the problem may be a problem with the pump itself or with the mesh that requires replacement.
Most car owners purchase a complete fuel system, including a filter, sensor, float, intake chamber and pump. This acquisition costs around 3 thousand rubles. It is more profitable to buy one pump, the price of which is less than 1 thousand rubles. It happens that if the pump breaks down, the remaining components of the fuel system remain in good working order and are ready for subsequent use.
Location of fuses in Niva 21214
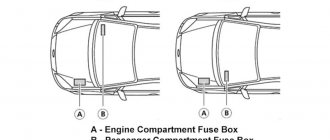
As a rule, the location of the fuses, or fuse mounting block, is located in different places in each car, so you should first find out where the fuse is located. In most cases, the safety block is located under the dashboard, where the dashboard is.
In the Niva-21214 car it is located to the right of the steering wheel, under the panel. When working with the fuse box, you should be careful, as any careless action can damage the fuse box, making subsequent repairs much more expensive.
Tuning options
The choice of options for tuning is not particularly large:
- Install a device from another car. In this case, you will need the services of a qualified electrician, since the connectors will have to be redone. You can also install a digital version of the tidy - it will be more than original.
- As a tuning option, you can install LED bulbs instead of regular ones. Many car owners choose this option because it is less expensive and the easiest to implement.
- Another tuning method is to install original instrument scales on the speedometer, tachometer and other sensors. Moreover, you can buy such scales either ready-made or make them yourself in accordance with your preferences.
1. Tidy with LED lighting
2. Digital control panel
3. Tidying with the so-called. wells
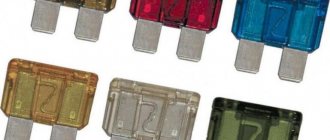
Types of fuses
Over the entire period of its existence, this segment of car elements has changed more than one type. The most common ones are:
Flat fuses are considered a relatively new type. They are used in almost all new cars. They became widespread due to their increased level of reliability and relatively low cost.
The next item will be ceramic fuses, which used to be very popular, but have lost their position due to low efficiency.
The oldest of all types of fuses are glass. They are small cones made of glass. This type of fuses is practically not used today due to the low level of reliability.
These are the most common types of fuses, however, there are others, but less popular.
Fuse arrangement in a Niva 21214 car
In Niva 21214, the fuse device has a rather non-standard appearance. There is a spare one under the main fuse box, which takes over its role if the main one breaks down. Also, this car has a slightly changed role of fuses in the chain of operation, namely in their purpose. The table shows several similar examples of fuses with descriptions.
| Fuse name | Protected circuit |
| F1 | Responsible for the operation of the dimensions, license plate, lighting of the glove compartment and luggage compartment. |
| F2 | Responsible for the steering column switch. |
| F3 | Seat heating fuse. |
| F4 | Responsible for the fog lights on the left side. |
| F5 | Fuse for power windows. |
| F6 | Responsible for portable lighting. |
| F7 | Responsible for the engine cooling fan and the operation of the sound signal. |
| F8 | Responsible for the cigarette lighter. |
| F9 | Regulates the operation of the recirculation unit and the cleaning of the windshield. |
| F10 | Backup fuse can be used to charge the battery. |
| F19 | Operation of the central locking system, alternator winding, reversing lights and brake light. |
For a more detailed study, you should familiarize yourself with a more structured diagram.
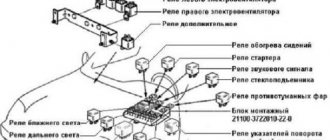
This car also has a second unit, which is located above the gas pedal and includes 4 relays responsible for: interior light, proper operation of the rear lights, rear window heating switch, wipers, high and low beam.
In addition, the car has a relay unit responsible for engine control. The elements of this block are: relay for the starter, fuel pump (fuel pump), cooling fan (right and left) and the main master relay.
Replacement
In the event of a breakdown, the fuses must be replaced in time to avoid serious problems with important components of the car in the future. The replacement process is quite simple. To do this, you simply need to remove the blown fuse and replace it with a new one.
Thus, further proper operation of the circuit for which he is responsible will be established. A very important nuance is the full compliance of the fuses (blown and new) regarding their markings and the output voltage. Otherwise, if this aspect is not taken into account, any of the elements included in the circuit that this fuse protects may burn out.
As a result, it must be said that the fuse is one of the most important parts in any car and Niva-21214 is no exception. In this regard, it is recommended to constantly monitor the condition of the mounting block and fuses. After all, if their work proceeds without any failures, then the risk of any serious electrical malfunction is reduced to almost a minimum. Thus, the key to a successful motorist is careful care of his car, and, of course, timely repair of all its components, including fuses.
Chevrolet Niva spare parts stores in Moscow
You can select the part you are interested in for Chevrolet NIVA Chevrolet NIVA cars and order and purchase spare parts in Moscow online, as well as install them in one of our service centers according to the standards of an official dealer
Specify the make, model and VIN number of the car for a more accurate selection of spare parts or select it from the garage.
Indicate the catalog numbers of spare parts or simply write down which spare parts you need in a list, and our specialist will select the correct numbers, check prices and availability.
Pay for your order online or in our offices upon receipt. Pick it up at a car dealership convenient for you in Moscow.
Fuse box VAZ 2131 injector decoding
The table and figure are taken from the manual for 21213.
Heater fan motor. Relay (winding) for headlight cleaners and electric motors for headlight cleaners in all brush positions except the initial one. Relay (coil) for turning on the heated rear window. Rear window wiper and washer motors. Windshield washer motor.
Windshield wiper relay and motor. Turn signal lamps and relay-interrupter for turn signals and hazard warning lights (in turn signal mode). Turn signal indicator lamp. Rear lights (reversing lamps). Generator field winding (when starting the engine) and battery charge indicator lamp. Differential lock warning lamp. Parking brake system warning lamp. Warning lamp for insufficient brake fluid level. Oil pressure warning lamp. Coolant temperature gauge. Fuel level indicator with reserve indicator lamp. Tachometer. Brake light switch control circuit (from 2011) Clutch pedal position switch (from 2011)
Left headlight (high beam). Indicator lamp for high beam headlights.
Right headlight (high beam).
Left headlight (low beam).
Right headlight (low beam).
Left front lamp (side light). Right rear light (side light). License plate lights. Side light indicator lamp.
Right front lamp (side light). Left rear light (side light). Instrument cluster lighting lamps. Illumination panel for heater control levers. Cigarette lighter lamps. Switch illumination lamps.
Direction indicators and relay-interrupter for direction indicators and hazard warning lights in hazard warning mode. Rear window heating element and relay (contacts) for its activation
Sound signal. Plug socket for portable lamp. Interior lighting lamps. Rear lights (brake lamps). Rear lights (fog light).
Electric motors of headlight cleaners at the moment of start-up and at the moments when the brushes pass the initial position. Relays (contacts) for headlight cleaners. Headlight washer motor.
Cigarette lighter (cars of different years of production may be on the 10th or 13th fuse).
According to the publication “On Your Own,” the rear lights (fog lights) are connected to the 13th fuse. The 13th fuse is rated 16 amps, and the 10th is rated 8 amps.
The following table and figure for 21214 are taken from the book “On Your Own.”
Electric fuel pump relay (contacts). Electric fuel pump.
Main relay. Electric fan relay (winding). Electric fuel pump relay (winding). Vehicle speed sensor. Canister solenoid valve. Oxygen sensor. Mass air flow sensor. Controller.
The text was scanned by Alex-Niva and Zhustrik, processed by ALER.
And my SUD fuses are located like this: 1 - fans 30A 2 - ch. relay, etc. 15A 3 - controller 15A 4 - fuel pump 15A I checked it directly on the car by the colors of the wires.
And from the letter: I have a 2000 car (July). By the way, alutv has a 2001 car, which means that at least until the end of 2001 the fans were on the same fuse and relay.
For fuses: 1 - electric fan No. 1 30A 2 - electric fan No. 2 30A 3 - controller 20A 4 - fuel pump 15A I looked at several more 2003 cars. release. 3 and 4 fuses are different (20 or 15A), and 1 and 2 are all 30A and are responsible separately for each fan.
From the Lead FAQ.
According to the conference, the separation of the connection of electric fans 21214 into two circuits (two relays and two fuses) occurred by the second half of 2001. For example, such a division has already been made in a car manufactured on 08.2001 (information given by Avenir99).
Addition from katzyn.
According to the ECM fuses on cars with a 7.9.7+ controller from left to right: 1. Cooling fan 30A 2. Cooling fan 30A 3. Ignition relay 15A 4. Electric fuel pump 15A
Also under the casing there is a 7.5A controller fuse taped to the harness. Probably, on machines with a 7.9.7 controller, the purpose of the fuses is similar.
On cars with controllers 17.9.7/M74 (data from the AvtoVAZ Information Letter): 1. Cooling fan 30A 2. Cooling fan 30A 3. Ignition coil, power supply for fan relay control, controller, injectors 15A 4. Mass air flow sensor, DF, heating of both DCs , KPA, DS 15A
There is also a separate 15A electric fuel pump fuse, the location of which is not specified. Voltage is supplied to fuses 3 and 4 through the ignition relay.
Addition from yonnex001
The manual says that there are 5 fuses in the ECM fuse box near the driver's left foot:
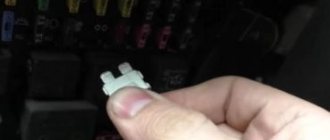
But in fact there are 4 of them:
The ECM fuse has blown. But he did not completely disappear, but moved to a new place. The ABS fuse is also adjacent to it (if the car has ABS):
Can you see it in the photo below? where they are now: under the dashboard, to the right of the steering column, above the gas pedal. The ECM fuse is located behind the ABS fuse and is not visible in the photo. For the ECM, a medium fuse of 7.5 A (brown) is used, for ABS - a maxi fuse of 40 A (orange):
After I repaired the generator, changed the silent blocks, changed the oil, adjusted the ignition and carburetor. Some procedures are not described here, such as bleeding the brake system, replacing handbrake cables, replacing the heater core, flushing the cooling system and replacing the coolant.
I wanted to go for a ride, I drove out of the gate and turned on the headlights, and then I noticed that the backlight did not light up, the headlights did not turn on (a day ago I checked everything was working), after a couple of minutes I felt a pungent smell from under the panel there was light smoke, some kind of devilry
I turn off the headlights and drive the car back.
It was in the evening and I left it as is. I thought it was something in the tidy because there was smoke coming from there. After some time (it was already before winter), I had to move the car, started up and warmed up, I saw the low fuel level indicator lamp blinking strangely, and I could hear clicks from somewhere below. Is the switch clicking or something?
, moved the car, put the handbrake on... and then bam everything on the dashboard went out, the tachometer did not show.
I started to figure it out, first of all I checked the fuses - it was as if the same 2nd fuse had melted, but why weren’t the headlights and lights on?
Another strange thing was that when the headlights were turned on, the engine stalled.
Possibly bad contacts? (block, wires)
.
I looked at the 8-pin block behind the tidy, and found that the power wire leading from the generator to the cabin had become charred (in my opinion, for the lighting) and the block itself had melted, brown came out of the hood, pink came out of the block (no photos, lost somewhere) . This wire was charred simply due to poor contact; this could be seen with the naked eye. Having examined the relay, I again found a charred wire on the low beam headlight relay, again a power wire from the generator. Now it’s clear why the backlight and headlights weren’t on
I stripped the wires, crimped them with new terminals, tinned them with a soldering iron, and connected them.
I bought terminals, wires, heat-shrinkable tubes, 12-volt LEDs (you can also use 3-volt ones, but then you need five resistance) And then that means... It was in the evening, there was nothing to do... I won’t describe the soldering process itself, following the links above, everything is there, diagrams and options how to do what. I’ll just say what I decided to do: a block with LEDs, conveniently in case of a fuse burnout it will be immediately visible. The most important thing is to decide where the plus comes and where the minus, in a standard block + comes to the lower contacts, minus from the upper contacts. In order not to confuse anything, we do the same (+ for the lower ones, - for the upper ones), respectively, solder the long contact of the LED to the lower contact (where + is), the short one to the upper one (where -).
Lada Niva (aka Lada 4x4) traces its history back to its creation in the 1970s, having managed to gain authority all over the world. A vehicle with all-terrain capability and comfort comparable to a passenger car. The car is popular not only in Russia, but also in Germany, as well as other countries in Europe and the world.
The history of the car's creation can be read here.
Fuse box - located to the left of the steering column under the instrument panel. Despite the fact that it’s 2015, and these cars have been fuel-injected for several years, they are nevertheless equipped with finger fuses.
Mounting block Lada 4×4
Location of standard wiring fuses
Stainless steel pants
Now is the time to talk about engine modifications. A new camshaft, manufactured according to LSGA calculations, was installed. Of course, a new gear is also installed along with the shaft for precise adjustment of the valve timing. The controller is also equipped with a proprietary engine control program from LSGA.
Instead of the serial production of the 4-in-1 scheme, a 4-2-1 smoker with long “pants” (they are responsible for the increase in torque) made of stainless steel is installed. In connection with the change in the exhaust system, an extended oxygen sensor cord is also installed. Instead of a standard muffler, there is a so-called silent direct-flow muffler. In addition, the cylinder head passages and valves have been modified.
For example, their locking chamfers are now at an angle of 30 degrees instead of the standard 45, and this at a certain point gives an increase in air flow and, ultimately, good “low-end” to the motor. The environmental issue of Niva LSGA did not remain behind the scenes. For an additional fee, a sports neutralizer is installed in the modified exhaust system.
There is also an economical option - moving the standard neutralizer to a new location. But it is accompanied by a slight loss of power (about 2 hp).
A set of original components for the Niva LSGA - 95. The version with a 105-horsepower engine is complemented by a further modified cylinder head. A set of original components for the Niva LSGA - 95. The version with a 105-horsepower engine is complemented by a further modified cylinder head.
As a result of a full range of modifications, the Niva LSGA engine produces 106 hp. at 5170 rpm.
Maximum torque reaches 163 N.m at 4080 rpm. Moreover, there is an increase in torque in comparison with the serial engine from the very bottom, but the largest makeweight falls precisely in the range of 3200–4800. This is what ensures such pleasant acceleration dynamics of the Niva (read: elasticity of the motor) in higher gears in a speed range where it did not exist before.
| During the modification of the cylinder head, one had to be sacrificed. It was sawn into pieces to study the channels, wall thickness, etc. During the modification of the cylinder head, one had to be sacrificed. It was sawn into pieces to study the channels, wall thickness, etc. | Nowadays it is impossible to imagine competent development without the use of a computer. So with the Niva engine they used a flow simulation program. Now it is impossible to imagine competent development without the use of a computer. So with the Niva engine they used a flow simulation program. |
| External speed characteristics of the modified versions are 105, 95, 90 hp. in comparison with the serial engine. External speed characteristics of the modified versions are 105, 95, 90 hp. in comparison with a serial motor. | Engine power of the Niva LSGA 105 against the background of the serial unit. Engine power of the Niva LSGA 105 against the background of the serial unit. | Power sells well, but torque is more important on the road. Compare the torque curves of the modified and production motor. Characteristics taken at the MAHA stand. Power sells well, but on the road torque is more important. Compare the torque curves of the modified and production motor. Characteristics taken at the MAHA stand. |
We will sequentially go down from top to bottom through the remaining stages of improvements.
Niva LSGA 95 hp — this is the listed set minus the modified cylinder head and valves. LSGA 94 hp — minus direct-flow muffler. LSGA 90 - minus the modified exhaust system.
In this option, all that remains is a new camshaft, a precision phase adjustment gear, the LSGA control program, and adjustment at the MAHA stand.
It remains to be hinted that all the developments for the Chevrolet Niva engine are quite suitable for the Lada 4x4.
Error in the text? Select it with your mouse! And press: Ctrl Enter
Diagram and location of the fuse box Niva VAZ-21213 and 21214
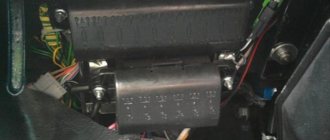
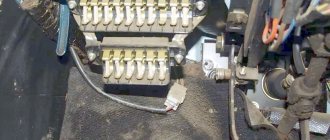
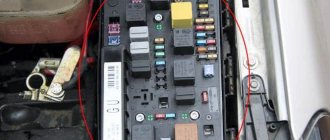
In this material we will introduce you to the Niva fuse box 21213 and 21214 , the purpose of the fuses, and the nuances of the additional VAZ-21214 fuse box, which is responsible for the injection system and is located in a separate block on the left side under the instrument panel. Externally the block looks like this:
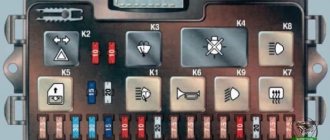
The fuse numbers in it are as follows:
And here’s what a separate injection system unit looks like; by the way, it contains the electric fan fuse , including:
Below are the assignments of the Niva fuse blocks , both the main one and the injection system:
| Number | power A | Purpose of the fuse |
| Fuse box located under the control panel | ||
| 1 | 16 | Heater fan - electric motor Headlight cleaner and headlight cleaner motor in all wiper positions except the initial position Heated rear window - on relay (winding) Rear window cleaner and washer Windshield washer |
| 2 | 8 | Turn signal, turn signal and hazard warning signal breaker relay - turn signal mode Reversing lights Windshield wiper (gear motor and relay) Generator - field winding Warning lights: brake fluid level, oil pressure, carburetor choke, parking brake Coolant temperature gauge Gauge fuel level, reserve indicator lamp Voltmeter |
| 3 | 8 | High beam - left headlight, control panel warning lamp |
| 4 | 8 | High beam - right headlight |
| 5 | 8 | Low beam - left headlight |
| 6 | 8 | Low beam - right headlight |
| 7 | 8 | |
| 8 | 8 | Side lights: right front and left rear Lights: instrument panel, cigarette lighter, switches and interior switches |
| 9 | 16 | Turn signal and relay hazard warning light interrupter Hazard warning light indicator Heated rear window: heating element and switching relay (contacts) |
| 10 | 16 | Horn Light socket Interior lighting Brake light - tail lights |
| 12 (13) | 8 | Fog lights - rear |
| 16 (15) | 16 | Cigarette lighter |
| For VAZ-21214, the injection system fuses are located in a separate block on the left side under the instrument panel. | ||
| 1 | 30 | Cooling fans |
| 2 | 15 | Electric fuel pump |
| 3 | 15 | Control block |
| 4 | 15 | Main injection relay |
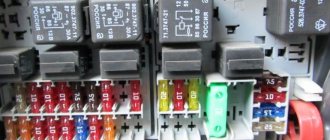
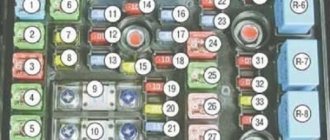
Attention, on the fields of later years of production, the connection diagram for the second, lower fuse block is slightly different. Instead of the traditionally two fuses involved, as many as four are involved. Here is a photo and diagram of the differences:
We hope that this information was useful to you if you encounter problems with the electrical equipment of NIVA. We will be glad to see you in the Niva owners club on our forum.
Mounting blocks for Lada 4×4 2022
The main and additional units are located in the cabin to the left of the steering wheel, under the instrument panel. The blocks contain fuses of the “Cylinder” size, ten and six fuses, respectively. The ratings and purpose of the fuses are indicated in Table 4 “Circuits protected by fuses”:
Fuse block of standard size “Standard”. The block is located on the left side under the upholstery and contains fuses that are designed to protect engine control system devices. The ratings and purpose of the fuses are shown in Table 5:
The fuse and relay box is located on the left side of the steering column under the instrument panel. The block contains two “Standard” size fuses, which are designed to protect the circuits of the electric fuel pump, electric windows and electric mirrors. The ratings and purpose of the fuses are shown in Table 6:
The fuse and relay box is located on the right side of the steering column under the instrument panel. The block contains one “Maxi” size fuse and two “Standard” size fuses, which are designed to protect the circuits of the hydraulic unit of the anti-lock braking system. The ratings and purpose of the fuses are shown in Table 7: