Any modern car, and the Lada Priora in particular, consists of a body as a formative platform and many units and systems specially installed in this body, which together create an individual model of the car. One such system is the ignition system.
A stable start and smooth, uninterrupted operation of the entire engine depend on its correct installation, high quality parts and sufficient compatibility with other vehicle components. After all, it is through the elements of this system - the ignition coils and spark plugs - that a high-voltage pulse is supplied in the form of a spark to ignite the fuel injected into the cylinder chamber.
How to check the Priora ignition coil
Every modern vehicle, and Priora is no exception, consists of a body part, a wheelbase and a huge number of systems built into the car and collectively creating its individuality.
One of them is ignition. Its correct installation, the high-quality condition of the parts and the necessary combination with the rest of the machine units will determine the stability of the start, the clarity and uninterrupted functioning of the motor. Content:
How to determine a breakdown
In order to determine the malfunction, you just need to take a closer look at the behavior of the car. Typical signs of problems with ignition coils are as follows:
- the engine begins to “trouble”, unstable operation of the power plant is noted, the more time passes from the moment the problem appeared, the worse the engine performs;
- The poor performance of the unit is especially noticeable at sub-zero temperatures; the situation more or less normalizes only after the engine warms up. In addition, the problem may occur frequently if the machine is located in an area of high humidity;
- when you sharply press the gas pedal on the engine;
- There is a special indicator on the instrument panel, the so-called Check Engine. It signals to the car owner that there is some kind of malfunction in the car’s power circuit. You can decipher the indicator readings using the instruction manual that came with the car upon purchase.
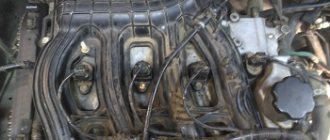
Diagnosing a failure of an element is not difficult; it is more difficult to identify which part is not working. Each cylinder in the Priora has an individual coil installed; there is no ignition module on the car. Therefore, you will have to call each of them with a multimeter, check each tip
Special attention should be paid to the caps, because if a problem happens to them, you won’t have to change the part. To identify the problem, you just need to remove the element and clamp it with pliers
If the silicone from which the part is made begins to wrinkle, then the tip needs to be replaced. If, when compressed, it remains even and smooth, then the problem lies in something else.
What is an ignition coil (IC)
The system on Priora differs from the well-known scheme installed on carburetor cars. On previous machines, a coil was mounted, the pulse signals were distributed by a distributor that had the necessary settings. Models with an injector, which have an electronic fuel injection system, have a separate coil installed on each cylinder, which supplies a spark only to its spark plug.
The entire process is controlled by an on-board electrical device, whose signal is immediately sent to the coil. To competently manage the process, the ECU uses certain data:
- The crankshaft position sensor transmits pulse signals to the ECU;
- phase - gives a signal about the position of the camshaft. Experts call it a synchronizing sensor;
- tachometer – gives signals about the crankshaft speed;
- Mass air flow sensor - measures air flow, provides a load value to the motor at a set time interval;
- DTOZH – motor temperature indicator;
- DT – knock sensor.
If the conditions are standard, then the ECU controls the operation of the cylinders in mode 1 – 3 – 4 – 2. Simply put, a pulse appears in those cylinders where compression is completed, before the valve opens, fuel is supplied and a discharge arrives, detonation occurs and the work cycle continues. Let's try to figure out how to check the ignition coil on a Priora.
What to do
If the engine jerks at idle, the cause should initially be determined. Then replace the damaged unit.
For carburetor models, the primary diagnosis begins with the throttle and the combustible mixture formation unit itself. Usually on old foreign cars and VAZs the root of evil is located here.
If the problem arose on a modern VAZ 2114/15 or on an “exotic” model like 1JZ-GE. The source of the problem may be inside the sensors. First of all, the DPKV, temperature sensor, temperature control system and others are checked. If everything is in order, you need to move on. High-voltage wires, spark plugs, and the ECM are diagnosed, and the ECU is checked last.
The car jerks at idle and when driving
If the problem occurs not only while parked, but also while driving, it is necessary to check the ignition, carburetor, and serviceability of the throttle valve.
For the injector, diagnostics of the fuel rail, its pressure, tightness, and the condition of the injectors are appropriate.
Also in both cases, the electronic part is diagnosed: control units, distributor, wiring, spark plugs.
The malfunction is caused by a failure, incorrect operation, of one of the vehicle systems.
The injector jerks
Main reasons:
- injectors or individual fuel supply elements are clogged;
- ignition coils are not working properly;
- The ECU and sensors are not functioning correctly.
The carburetor jerks
Everything is simpler with a carburetor. Here's what you should check:
- throttle valve condition;
- filters;
- spark plugs;
- distributor;
- Is the fuel pump working correctly?
At idle the car jerks and stalls
If the engine does not idle during a cold start in winter, there is nothing terrible - the block will warm up and everything will return to normal. However, if there is a failure after warming up, there may be several reasons for the breakdown.
- Idle air control failure.
- Clogged, throttle malfunction.
- The carburetor and jets are clogged (the injectors are checked for the injector).
- The fuel supply pump is faulty.
- The air/fuel filter is worn out.
- Failure of the electronic sensor MRV, TPS, DPKV.
The car shakes at idle
If vibration is transmitted to the car body, the first step is to check the wear of the power plant mounts. Squashed cushions do not reliably hold the engine in place, which causes severe shaking, deviation of the internal combustion engine from the nominal position and, as a result, vibration.
Other causes of shaking are described above.
The car shakes and jerks at idle
The process of engine tripping is a consequence of the malfunction of one or more cylinders. A similar breakdown is caused by a failure of the spark plug or a breakdown of the high-voltage wire.
- With the engine running, remove the spark plug cap from the first cylinder.
- After 3-4 seconds, install the element in place.
- Consistently repeat the procedure for all boilers.
During the check, you must listen to the sound of the engine. If the growling gets worse (the system doubles), the compartment is fine. If the result is neutral (nothing has changed), it is worth checking the line completely for serviceability.
The primary source of failure may be the following reasons:
- incorrect mixture setting - the cylinder floods;
- spark plug or wiring is of poor quality;
- occurrence of rings;
- piston wear.
Diesel car jerks at idle
There can be only three reasons here.
- The cylinder compression has dropped. As a rule, this occurs due to burnout of the cylinder head gasket and wear of the piston group elements.
- Injector problems - poor mixture supply, blockages, intake failure.
- Malfunction of the injection pump.
The car on gas jerks at idle
If a breakdown is detected, it is strictly not recommended to interfere with the unit yourself. You must contact a qualified gas fitter.
Interruptions on a cold engine
If the engine stalls at idle and then levels out after warming up, don’t worry too much. When cold, the power plant does not have normal clearances and can operate unstably. After reaching the design temperature, the motor stabilizes and stops twitching.
If the vibrations are strong and prolonged
When vibration in the engine does not disappear, but persists for a long time, this may indicate problems:
- wear of the piston group;
- violation of internal combustion engine fasteners;
- incorrect operation of the fuel system;
- ignition problems.
Diagnostic devices for VAZ-based cars: procedure for checking short circuits
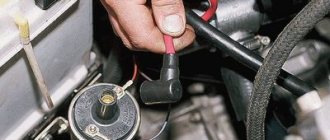
To begin with, the coil is carefully inspected. Its plastic surface must be smooth and free of deformations and cracks. If there are any, it means that the coil was overheated and, which is quite likely, failed.
To check, you will need a multimeter that switches to the mode for studying resistance readings.
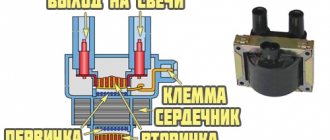
Then we touch contacts numbered 1 and 3 simultaneously to determine the resistance. Normally, the value should be within 0.5 Ohm, if the instrument error does not fail. Then the secondary winding is checked, for which you need to touch the spring located in the cap with a red probe, and connect the black one to pin 2.
The resistance should be about 340 kOhm. If the parameters do not match, the coil should be replaced. If the check has confirmed that the short circuit is in working order, the insulation in it should be strengthened. To do this, take a special thermal tube, cut it to the required size, heat it up and put it on the reel. In addition, the ignition coil can be checked using special devices MD-1 or AZ-1. They are inserted into the place of the switch and determined what could have failed. As you can see, now you can do without a service station computer; everything is done at home. Moreover, the cost of each device ranges from one hundred to two hundred rubles.
The procedure for checking the short circuit
So, there are signs of a malfunction, you should check it.
First of all, the coil must be dismantled. For this you will need:
- prepare a ten-point socket wrench;
- disconnect the terminals on the battery;
- open the protective casing covering the motor;
- press the locking device out of the plastic, disconnect the wiring from the coil terminal;
- remove the fastening bolt;
- pull out the ignition coil.
An inspection is now underway. It should not show any cracks, melts or leaks on the caps and body parts. Only slight smokedness is allowed. Electrics can be checked in several ways. Having installed a working spark plug, we check the device for the presence of a “spark” on the car body. If there is no spark from the coil, then it is quite possible that the short circuit has lost its functionality. In such a situation, you should check the gap in the spark plugs. All work should be performed with rubberized gloves to completely prevent contact of the body or tool with the car body or engine. The fact is that the coil is capable of generating voltage in the range of 20 - 40 kV. Another option is to remove the coil and install it on a good cylinder on another car to perform a drive test. If the short circuit is faulty, it will immediately appear. The third method is instrumental.
The main reasons why the ignition coil breaks are considered to be high temperatures or overheating, which contribute to the formation of cracks. There is a high probability of short circuit failure due to the accumulation of moisture or the formation of corrosion, frequent switching on of the ignition without subsequent starting of the engine, prolonged overloads when an unsuccessful attempt to start the engine.
How to distinguish a simulator from a real short circuit
There are plenty of counterfeit goods on the markets. First of all, you should focus on cost. A short circuit for the fuel system of Priora cars should cost from 1,200 rubles in retail sales. The original product must have a plastic casing under the protective casing.
The mounting axle box should have a lightning bolt symbol to indicate high voltage. The plug surface is finished perfectly, the letters are clear and laser-etched. The serial number must be taken in the oval. The coils of the spring are tight. Experts advise cleaning the short circuit attachment points as often as possible, removing dust accumulations and moisture from them, checking the tightness of the wiring fasteners, first of all, high-voltage wiring, and replacing the short circuit as soon as the warranty period expires.
Hall sensor and system diagnostics
A Hall sensor is a device needed to measure the magnetic field, current, and resistance in conductors. Currently, there are two types of such devices: analog and digital. The latter can determine where there is and where there is no magnetic field. That is, it can be used if the spark in the VAZ-2112 car is lost. It is also used during diagnostics of the ignition systems of VAZ and other cars. The main advantage is that the sensor has a non-contact effect. Therefore, there is no likelihood that a short circuit will appear in the circuit.
An analog Hall sensor converts field induction into voltage. The magnitude it shows depends entirely on the polarity of the field, as well as its strength.
About an individual ignition coil
In modern cars, individual ignition coils (ICO) are used to supply a spark to the cylinder. Older cars use ignition modules, meaning one module is entirely responsible for firing all cylinders. An individual ignition coil is responsible only for the operation of one cylinder in which it is installed.
IKZ began to be installed on VAZ cars, starting with the Lada Priora car on the 126th engine. An ignition module is still installed on 8-valve VAZ engines. The car's on-board network uses low-voltage voltage, which is not capable of itself forming a powerful spark necessary for engine operation. Therefore, ignition coils are used to supply high voltage voltage.
Signs of Engine Cylinder Failure
When driving, the engine begins to pull poorly. Work intermittently. However, at idle it seems to run smoothly. At speeds, if the neutral gear is engaged, there are no interruptions either. But as soon as you start moving, the engine shakes. Speed is gained pl
The electronic injection system is designed in this way. That it will compensate for the lack of operation of one cylinder. If you are supposed to maintain a certain number at idle. Even if the cylinder is not working, the electronic unit will give a command to increase the speed. And compensates for the loss of one cylinder. Also, as the speed increases, the injectors will begin to supply more fuel to the remaining cylinders than usual. The absence of one cylinder will not be noticeable. It's worth starting to move. The electronic control unit will also equalize engine speed by increasing the fuel supply to the working cylinders. But the loss of power will already be visible. Three cylinders are not four. The engine will choke. The sound of the engine will change. And there will be no pleasant acceleration like when 4 cylinders are running. Diagnostics involving a tester is expensive. Moreover, a faulty coil can be detected directly on the car.
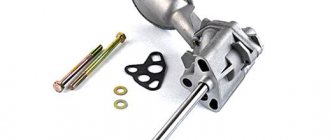
IKZ device
The Priora coil consists of a primary and secondary winding, between which a core is placed. To contact the spark plug, a spring is used, which is placed in a rubber tip. The IKZ also has a metal screen that protects the coil from high temperatures, because IKZ is installed in the well of the cylinder head, then the temperature conditions there are simply enormous.
The primary winding is wound from thin copper wire with a number of turns of 10,000-15,000.
The secondary winding of the coil consists of 100-150 turns of thick copper wire.
The connection between the coils is electromagnetic.
Possible causes of failure
The weak point of the ignition coils and modules is the secondary winding, which generates a high voltage pulse. A coil break or breakdown may occur in it. The following factors lead to this phenomenon:
- use of low-quality or unsuitable candles;
- operation with non-functioning high voltage wires;
- frequent attempts to check the spark.
Often, a module malfunction occurs when the integrity of poor-quality factory soldering of wires going to the switch elements is violated. This happens from vibration. Also, the cause of non-working coils can be a banal contact failure in the incoming connector. Another factor leading to a malfunction of the ignition unit is often moisture that gets on the device during washing or driving in unusual conditions.
Symptoms of a bad coil
There are many symptoms of coil failure and sometimes it is very difficult to determine that the coil is to blame. If such symptoms appear in your car, then you should pay attention to the ICD.
Signs of coil failure:
- One of the cylinders does not work;
- The car does not develop power;
- Jerking when pressing the gas pedal sharply;
- The engine shakes at idle;
- Increased vibration at idle;
- Floating speed;
It should also be noted that if the ignition coil is faulty, misfires will appear in the cylinders, as a result of which the ECU will turn off the operation of the faulty cylinder and signal this by turning on the “Cheek Engine” lamp. When “Cheek Engine” appears on the car, it is necessary to diagnose the system. If there are misfires, the ECU will display errors 0301, 0302, 0303, 0304. Where the last digits of the codes are the cylinder number.
It is not recommended to operate a car with a faulty ignition coil; this can lead to failure of the catalyst.
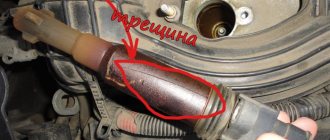
Tip repair
High-quality coils for a Priora car can withstand from 50 to 100,000 km. To increase the life of the coils, you need to prevent engine oil from coming into contact with them.
A cracked ignition coil tip is a common problem. However, you can return the coil to working condition by making repairs on your own, provided that the coil itself has not burned out. This will require a degreasing wipe, a silicone ignition coil O-ring (new), a new tip and silicone sealant. The whole procedure will take a couple of minutes.
Remove the old tip. If the o-ring is damaged, remove it too. To install the tip, its skirt is turned inside out. We take the previously prepared sealant and apply it to the lower part of the tip with a cotton swab. We do this slowly so that there is no excess sealant left around the edges. We put the tip on until it stops.
We wait a while for the sealant to fix the part. We wipe the entire coil with a degreasing cloth, which is now brought back to life. Pay attention to the contact spring; it should move freely in the tip cavity. The necessary parts for the job can be purchased at car markets and online stores. Good luck!
Checking the ignition coil
There are two reliable ways to check IKZ: visual inspection and checking with a multimeter.
It should be noted that the IKZ check is similar for all Lada cars with a 16-valve engine, i.e. the check on cars such as LADA Vesta and X-ray will be the same.
In order to check the ignition coil, it must be removed from the car.
Removing IKZ:
- Disconnect the negative terminal from the battery.
- Remove the decorative plastic trim.
- We unscrew the coil we need with a “10” or Torx E8 head.
- Remove the coil plug and remove it.
Visual inspection
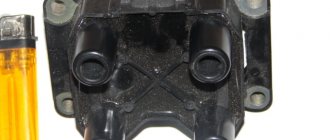
After the coil is removed, it must be carefully inspected. The rubber tip should not have tears or cracks. The plastic part must not be melted or cracked. The contact spring must be in the correct shape without oxidation or rust.
Cracks in the coils or tears in the rubber cap will direct the spark to the engine body, therefore, no current will be supplied to the spark plug, which will lead to misfires.
If such visual faults are detected, the coil must be replaced.
Checking with a multimeter
Testing with a multimeter is divided into two stages. Checking the resistance of the IKZ itself and checking the control voltage of the IKZ (checking the voltage on the IKZ power supply block).
Let's start by checking the voltage at the IKZ power supply.
To do this, set the switch on the multimiter to constant voltage.
Turn on the car ignition
On the block in connector number 3 we take a measurement (we connect one multimeter probe to the motor body and the other to pin number 3) the voltage should be at least 12 volts. If the voltage is less, this means that the battery is discharged or the ECU controller is faulty.
Checking the IKZ resistance
In order to check the resistance of the IKZ, you need to use a multimeter. It should be noted that resistance measurements must be carried out on a cold engine, because The resistance of the coil windings strongly depends on its temperature.
To check the resistance, it is necessary to check two windings, the secondary and the primary.
Checking the primary winding of the IKZ
When checking the primary winding of the IKZ, it is necessary to set the resistance readings on the multimeter, namely 200 Ohms. Since the resistance readings on the primary winding are not large, and the error of the device is possible, you first need to find out the error of the multimeter. In order to find out the error, you need to close the probes together, the value that will be reflected on the multimeter screen will be the error.
Next, we connect the multimeter probes to contacts 1 and 3 (the outermost contacts of the IKZ) and obtain resistance readings. From these readings we subtract the multimeter error and get the true value of the resistance of the primary winding.
Ideally, the resistance of the primary winding should be about 1 Ohm, or better yet 0.
In this example, the reading is 1.1 Ohm without taking into account the error; from 1.1 Ohm we subtract 0.7 Ohm to get 0.4 Ohm. Verdict: the primary winding of this IKZ is in working condition.
Checking the secondary winding of the IKZ
In order to check the secondary winding of the IKZ, set the multimeter to 2000 kOhm.
We connect the red multimeter probe to the spring, and the black one to the middle contact on the IKZ (pin 2). We look at the readings of the device; on a working coil, the resistance of the secondary winding should be in the range of 300-400 kOhm.
As we see, the readings of the secondary winding are also within the normal range. It follows that this IKZ is working.
If the readings are too high, you can try removing the rubber cap and spring from the coil and cleaning the contact patch, then measure the resistance directly again without the spring. If the resistance reading still does not decrease, you should think about replacing the ICP.
The easiest method to detect a faulty ignition coil, without any devices or instruments. This is a reversal of the IKZ.
Checking the ICP with a spark gap
Procedure
:
- Disconnect the IKZ from the spark plug.
- Install a spark gap on the IKZ.
- Apply ground (from the battery terminal) to the spark gap using a wire.
- Turn the crankshaft with the starter.
- If there is a spark, then the IKZ is working.
Let us remind you that you can find a problem in engine operation by independently measuring the pressure in the fuel rail, or by checking the compression in the cylinders.
Keywords: Lada Vesta engine | lada xray engine | Lada Largus engine | Lada Granta engine | Lada Kalina engine | Lada Priora engine | ignition system for Lada Vesta | ignition system lada xray | ignition system Lada Largus | ignition system for Lada Granta | ignition system for Lada Kalina | ignition system for Lada Priora | universal article
9
Found an error? Select it and press Ctrl+Enter..
How to check the ignition coil (IKZ) with your own hands
The car jerks, there is no traction, vibration is felt, or the engine is rough; all these are symptoms of improper operation of the individual ignition coil (IIC). Other signs of a faulty ignition coil are the presence of errors 0301, 0302, 0303 and 0304, indicating misfire in one of the cylinders. Let's look at a few simple ways to check the ignition coil with your own hands.
It is worth noting that the process of checking IKZ on modern Lada cars (XRAY, Vesta, Largus, Granta, Kalina and Priora) does not have significant differences. All actions are performed in the same way.
Signs of faulty spark plugs
The Check Engine Light can also be a sign of faulty spark plugs.
If the spark plugs do not work correctly, for example, they periodically miss a spark or do not create the required voltage discharge, problems arise in the engine due to insufficient fuel combustion.
As a result of this, the driver notices the following changes in engine operation:
- Reduced engine power and at the same time increased fuel consumption.
- Dips in power when pressing hard on the gas.
- Engine stops at high speeds.
- Long engine start.
- Uneven engine operation, even during quiet driving.
- Engine tripping.
It is important to note that some of the symptoms listed only appear under specific conditions. However, their absence does not indicate the normal condition of the spark plugs.
A worn-out spark plug may be just one of the signs.
Experienced motorists also know that similar signs of malfunction can signal other problems. The problem may be in the ignition coil, high-voltage wiring, power system and other systems that keep the engine running. Therefore, when faced with one or more symptoms, you need to correctly diagnose the ignition unit.
Visual inspection of the IKZ
Remove the ignition coils from the engine using a 10mm or Torx E8 socket wrench (depending on the powertrain model). Carefully inspect the removed coils. There should be no cracks, damage to the rubber cap, melting or leakage of plastic. The spring located inside the coil must be in the correct position.
Stories from our readers
“Fucking basin. "
Hi all! My name is Mikhail, now I’ll tell you a story about how I managed to exchange my two-wheeler for a 2010 Camry. It all started with the fact that I began to be wildly irritated by the breakdowns of the two-wheeler, it seemed like nothing serious was broken, but damn it, there were so many little things that really started to irritate me. This is where the idea arose that it was time to change the car to a foreign car. The choice fell on the melting Camry of the tenth years.
Yes, I had matured morally, but financially I just couldn’t handle it. I’ll say right away that I am against loans and taking a car, especially not a new one, on credit is unreasonable. My salary is 24k a month, so collecting 600-700 thousand is almost impossible for me. I started looking for different ways to make money on the Internet. You can’t imagine how many scams there are, what I haven’t tried: sports betting, network marketing, and even the volcano casino, where I successfully lost about 10 thousand ((The only direction in which it seemed to me that I could make money was currency trading on the stock exchange, they call it Forex. But when I started delving into it, I realized that it was very difficult for me. I continued to dig further and came across binary options. The essence is the same as in Forex, but it’s much easier to understand. I started reading forums, studying trading strategies. I tried it on a demo account, then opened a real account. To be honest, I didn’t manage to start earning money right away, until I understood all the mechanics of options, I lost about 3,000 rubles, but as it turned out, it was a precious experience. Now I earn 5-7 thousand rubles a day. I managed to get the car buy after half a year, but in my opinion this is a good result, and it’s not about the car, my life has changed, I naturally quit my job, I have more free time for myself and my family. You’ll laugh, but I work directly on the phone)) If If you want to change your life like me, then here’s what I advise you to do right now: 1. Register on the site 2. Practice on a Demo account (it’s free). 3. As soon as you get something on the Demo account, top up your REAL ACCOUNT and go to REAL MONEY! I also advise you to download the application to your phone, it’s much more convenient to work from your phone. Download here.
Method No. 2: Spark piezoelectric probe (for example, Test-M) or lighter.
If you don’t have a ready-made device at hand, you can use an element from a piezo lighter instead. The principle of testing is similar: we connect the device to the upper contact of the spark plug and to the body. The button is pressed, if a spark jumps, then the spark plug is working; if it drips or is missing, then it is broken. Details in the video:
Method number 3: Use a multimeter. You should check the electrical circuit of the central electrode by setting the device to 20 kOhm.
If there is “contact” between the central electrode and the tip (shows resistance), then the reason for the lack of a spark may be damage to the insulator. Video example:
Each type of candle must have its own resistance. This verification method is less accurate.
These methods work, but they cannot determine the serviceability of the spark plug 100%. For example, a spark plug installed in an engine has a bad spark, but when checked it will look like it is fully working. Why? In open air, the voltage required to form a spark is much less than in a cylinder. In the combustion chamber of an engine, a spark appears in the presence of a compressed air-combustible mixture.
Checking the ignition coil with a multimeter
Checking the voltage at the terminal block of the wires
:
- Disconnect the block with wires from the ignition coil (on the H4M engine, to access the coils of cylinders 1 and 2, remove the intake pipe).
- Turn on the ignition and measure the voltage at terminal 3 of the wiring harness block (the numbering of the terminals is on the ignition coil).
- The voltage at the terminal must be at least 12 V. If it is less or absent, it means the battery is discharged, there is a fault in the power circuit, or the engine control unit (ECU) is faulty.
- Turn off the ignition.
How to check ignition coil resistance
:
- We set the switch on the multimeter to the 200 Ohm position and close the probes (the instrument error will be displayed on the screen, which will need to be subtracted from the readings during testing).
- We check the primary winding of the ignition coil by connecting the probes of the device to the contacts.
- The resistance between pins 1 and 3 should be close to zero (about 1 ohm).
- The resistance between pins 1-2 and 2-3 should be high (tend to infinity).
- Set the switch on the multimeter to the 2000 kOhm (or 2 MOhm) position.
- We check the secondary winding of the coil by connecting the red probe to the spring inside the rubber cap, and the black probe to pin 2.
- For good contact, it is best to remove the rubber cap from the coil and connect the probe directly to the coil contact, having first cleaned it of deposits.
- The resistance should be about 300-400 kOhm.
Attention! The resistance of the secondary winding of the ignition coil is highly dependent on its temperature. Carry out the test when the coil is completely cool. Compare the resistance of all four ignition coils to each other. A faulty ignition coil can be identified by very different values, provided that all coils are from the same manufacturer.
The process is also shown in the video:
Which reel to buy
Many car enthusiasts advise buying the cheapest devices. Why is that? It is believed that the coils burn primarily due to a poor-quality spark plug. Of course, it would be useful to make sure that all the spark plugs are in good working order, but even if there are no problems, but the coil still burns out, it is recommended to replace the spark plug in the cylinder where the malfunction occurred. At the same time, not all car owners are ready to trust the most budget reels, and such an opinion also has a right to life.
Experienced car enthusiasts advise purchasing products from one of two brands:
- Bosch.
- Omega.
Please note right away that the cost of devices can be quite high. For example, one Bosch coil costs about 700 rubles
Taking into account the fact that 4 parts are needed to replace at once, this amounts to a considerable amount. Which option will be best for you is up to you to decide.