On any passenger car with a gasoline engine, the gas pump serves to supply fuel under pressure from the fuel tank to the metering device - depending on the modification of the engine on VAZ cars, the fuel system can be carburetor or injection.
The VAZ 2110 fuel pump can be mechanical or electric, its type depends on the type of fuel system installed on the engine.
The fuel pump (BN) on carburetor internal combustion engines of the 2110 car is located behind the valve cover, next to the distributor-distributor; on a car with an injection engine, it is located in the fuel tank (submersible type). If the BN begins to malfunction, the engine does not pull or develop speed, and in many cases the engine cannot be started at all.
Fuel pump circuit (electric)
The design of the electric fuel pump 2110 itself is quite simple - the unit is an electric motor, which is supplied with 12 Volt power. The BN is mounted in a housing, and a mesh is installed at its inlet - a coarse filter. The filter element prevents dirt particles from penetrating into the pump housing, thereby protecting the device from clogging and possible breakdown.
The electrical circuit of the VAZ fuel pump contains the following elements:
- ignition;
- fuse;
- relay;
- wiring;
- the engine control unit.
When you turn the ignition key, power is supplied through the relay to the BN terminals, and the pump begins to pump gasoline. After the input line of the fuel line is filled with gasoline, the ECU (control unit) through a relay gives a command to turn off the voltage - the fuel system is ready to start the engine, all that remains is to crank the engine with the starter.
Types of mounting blocks
VAZ 2110 has 2 types of mounting blocks:
- basic;
- additional.
The first contains most of the fuses and relays in the vehicle's power supply circuit. The second one houses the devices responsible for the motor power supply circuits. Over time, the main block experienced a number of transformations and modernizations - there were three in total. The main difference between them is the number of relays. From the first models to today, it has grown from six to eight.
New mounting block
The area required updating with each modification of the VAZ 2110. It was necessary to correct some design flaws that were noticeable from the very beginning. The fog lamp fuse did not have a circuit board and was hanging on a bundle of cables next to the mounting block itself.
The first change in the layout of the main mounting block occurred precisely in connection with the placement of a fog lamp fuse in it, as well as an increase in the number of relays. In the updated modification of the latter there are not 6 or 7, but 8.
Particular variability in new block modifications is associated with the presence or absence of the K1 front light relay: some models have only legs and jumpers that require cutting when installing K1 yourself, or just the legs, without jumpers. In other modern units they also install the relay itself.
Old style mounting block
There are six relays and 20 fuses. Its location is the same as that of modern models. Over time, another relay was added, responsible for the front light. Otherwise, its design is no fundamentally different from subsequent ones.
Fuel pump relay VAZ 2110
A relay in any electrical circuit is designed to close and open a circuit; its main role is to protect the elements of the electrical circuit from high inrush current. When starting an internal combustion engine, the current required to crank the starter reaches 80-300 Amps, and if the relay is not installed, any element of the electrical circuit may be damaged.
The VAZ 2110 fuel pump relay is a standard type; inside the plastic case there is an electromagnetic coil with a core; when voltage is applied, the contacts are closed due to the electromagnetic field. Relay 2110 is a four-pin relay, rated for a current of 30 Amps.
Principle of operation
VAZ 2110 stalls, the fuel pump relay clicks
The operating principle is as follows:
- the relay uses a classic contact closure circuit;
- the relay core is represented by a classic coil;
- manual supply of the closing and opening signal is also involved.
Today, a modern European car is almost completely automated and the concept of “a car won’t start” is practically not found in economically developed countries. This phenomenon is primarily explained by the automation of the relay operation. In particular, the frequency of contact closure controls the built-in on-board control system, plus the material from which the wiring is made has increased electrically conductive properties. This, in turn, allows for more economical and efficient use of material and technical capabilities:
- Firstly, relay wiring from European manufacturers consists of high-tech alloys, this in turn allows you to avoid such phenomena as wiring burnout as a result of electrical short circuits.
- Secondly, the speed of current conduction is quite high, which ensures almost instantaneous transmission of an electrical impulse from point A to the final conditional point B.
Note. Despite the multiple advantages of relays from European manufacturers, from a practical point of view they are inaccessible to the average motorist. Due to the narrow technical range of compatibility and fairly high price.
Design features of relays from national manufacturers
VAZ 2110 how to check the fuel pump relay
Almost all relays of the national automobile industry are identical to each other, since they are produced according to the general principle, which was developed back in the 70-80s. So, the relay usually consists of 4-5 five terminals. The peculiarity of the structure of a 4-pin relay is the absence of a central terminal. The relay is connected to the electrical network using a special plug made of dense plastic. Inside, this plug contains special openings for wires, which are popularly referred to as “decoys”. Inside the relay itself, there is a coil that is attached to the core.
VAZ 2110 fuel pump switch relay
So:
- When voltage is applied, the core of the electric coil is automatically magnetized, thereby attracting the movable contact to itself, thus closing the electrical contacts, as a result of which a spark is actually formed. The moving contact itself is well fixed in a certain position by a spring. The movement of the contacts depends entirely on the electromagnetic activity of the core.
- Inside the relay there are two moving and two fixed contacts. If the relay has 4 contacts, then it works exclusively for closing; if it has 5 contacts, then it operates in two main modes: closing and opening. Modern relays are equipped with 5 contacts, since in this case, the efficiency and reliability of operation increases significantly.
Note. You should always pay attention to the numbers that are located on the back of the outer surface of the relay, as they indicate which contact is connected to which internal element of the relay. If you connect the plus or minus wire to the wrong contact, then the relay cannot be avoided.
Where is the fuel pump relay for VAZ 2110 injector?
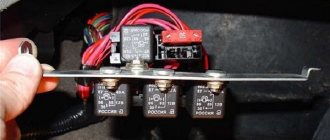
Often, due to a relay failure, the engine stops starting; to fix the problem, it is necessary to replace the faulty part. The fuel pump relay (RB) of the VAZ 2110 injector is located in the car interior, under the instrument panel, next to the center console. To get to the pump, you need to unscrew the two screws of the protective plastic casing and dismantle it - of the three elements located here, the “relay” responsible for the operation of the pump will be located in the center (in the figure below, number 5).
Checking the fuel pump fuse
Before starting the test, it is advisable to study the location of fuses in the blocks of various cars. This can be done using the operating instructions for a specific vehicle, on specialized auto forums, etc. Having decided which fuse is responsible for the fuel pump and where the specified element is located, you can begin to look for the problem.
- To check and replace the fuel pump fuse yourself, you will need a special clamp or tweezers. First you need to remove the cover from the fuse box, which is usually secured with latches. Next, we find the element itself responsible for the operation of the fuel pump. For example, in Priora the solution is designated F13 and passes a current of 15A.
- Now we remove the element using a clamp, pliers or tweezers. If the fuse is blown, then you should carry out an in-depth diagnosis of the wiring condition and check the contacts on the fuel pump itself, after which the faulty element in the pump circuit is replaced with a new one.
If the fuel pump fuse is intact, then the pump relay and the fuel pump itself are checked. The terminals tend to oxidize over time, the pump relay sticks, electrical circuit breaks may occur, etc.
Note that on the VAZ 2110 and Priora the pump fuse is located next to the relay. It is enough to lightly knock on the relay itself, which often allows you to restore its functionality.
Gasoline pump VAZ 2110 injector price
Electric fuel pumps 2110 are produced by various manufacturers; they can be sold either assembled with a housing, or the electric motors themselves can be sold separately. It makes sense to change the BN assembly only when the bulb (body) of the device is damaged; more often than not, only the fuel pump motor itself requires replacement, since it basically stops working.
Main manufacturers of fuel pumps 2110-2112:
- Weber;
- HOFER (Germany);
- Bosch;
- SEPO (Saratov);
- Pekar (Russia).
For VAZ 2110 injector fuel pumps, the cost may vary; on average, BN can be purchased at a price from 700 to 4500 rubles. The most inexpensive products are produced by Hofer and Pekar; the average price of an electric fuel pump (motor) complete with a Pekar mesh filter is about 800 rubles. The most expensive are Bosch BNs; the cost of the assembled device is 4300-4600 rubles.
Reasons for failure and replacement
VAZ 2110 connecting an electric fuel pump
Fuel pump failure occurs for several reasons:
- driving with an empty gas tank;
- failure to replace the fuel filter on time and much more.
Due to non-compliance with such simple rules, the electric fuel pump wears out. Therefore, malfunctions in the fuel system occur prematurely.
Note: it is necessary to change fuel filters on time, especially when filling with low-quality gasoline. Follow the main rule: the gas tank should always be more than half full.
Preparation for repair
Before starting repairs and replacing the electric fuel pump, you must:
- disconnect the negative terminal on the battery;
- remove the cap from the gas tank to prevent the creation of rarefied vapors;
- check the fuel level, it should be at the middle level in the gas tank, but no more;
- You should also place a fire extinguisher nearby, just check its expiration date in advance.
To relieve pressure in the pipeline, you must start the engine and leave it running until it stops completely.
Note: work must be carried out using a lamp with a protective cap. You need to prepare clean rags and plastic containers in advance for the fuel pump to be removed, as there will be residual fuel in it.
After completing the preparatory work, recline the rear seat and remove the protective cap of the gas tank.
Replacement
VAZ 2110 electric fuel pump diagram
Carry out work carefully, legibly and consistently:
- disconnect the gas tank connector;
- loosen the clamp;
- unscrew the tubes using special wrenches;
- remove the rubber gaskets;
- unscrew the eight bolts on the body;
- remove the sealing ring;
- remove the fuel pump.
Note: replace the rubber gaskets on both pipeline fittings using a repair kit. The fuel pump must be placed on a pre-prepared rag or in a plastic container.
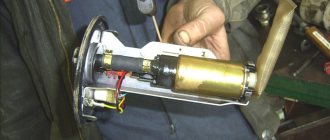
VAZ 2110 electric fuel pump and its removal
The pump is gradually pulled up and tilted towards the backs of the seats to avoid deformation of the float. Remaining gasoline may spill during this work. The last thing is to remove the rubber gasket. When replacing not the entire module, but only the fuel pump, you will have to spend time and effort:
- remove the locking spring from one guide;
- compress the fixation plates;
- disconnect the module;
- remove the fence mesh;
- disconnect the terminals from the pump and fuel level sensor;
- remove the polypropylene fuel pipe, it is connected securely, so you will need to act carefully, but with effort;
- remove and replace the pump.
Note: replacing the fuel pump must be done with replacing the fuel filter.
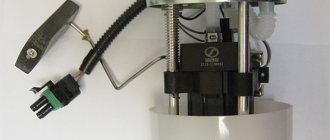
Assembly
VAZ 2110 fuel pump wiring diagram
VAZ 21102 electric fuel pump
The operation of the new fuel pump is checked. The engine starts, you need to let it run at low speeds. Drive through the territory using different modes, increasing the speed, decreasing it, within the limits allowed by the space. Return to the garage. On site, check the tightness of the disconnected parts again.
Note: all repair work must be carried out in compliance with fire safety measures.
Replacing an electric fuel pump with your own hands is not difficult. You just need to carefully study the instructions and be patient and attentive. Before carrying out this work, you need to view the video and photographs. Photos can also be used during work. Place them in the required sequence. The price of a fuel pump, repair kit, fuel filter is within 2000 rubles. Carrying out work on replacing a fuel pump does not require great qualifications. Therefore, a motorist of any category can handle it. After completing the work, all rags must be collected and disposed of. Old cuffs and pads must also be disposed of.
Replacing the fuel pump mesh for VAZ 2110 injector
Russian fuel does not always meet quality requirements, and over time, due to poor gasoline, dirt accumulates in the gas tank in the form of sediment. The debris also clogs the filter screen of the electric fuel pump; due to the accumulated dirt, the fuel does not fully enter the fuel line, causing interruptions in the operation of the internal combustion engine. To eliminate the malfunction, it is necessary to clean or replace the coarse filter, but to get to the mesh, you need to remove the BN.
Before starting disassembly, you should reduce the pressure in the fuel system, otherwise, when unscrewing the fuel line fittings, gasoline may escape in a stream and flood the entire interior of the car. To relieve the pressure, remove the fuse responsible for the operation of the BN, start the engine and wait until it stalls. We replace the VAZ 2110 injector fuel pump mesh as follows:
- turn off the ignition;
- in the back seat in the cabin we find hinges, and by pulling them, we fold the lower “seats” forward (right and left);
- there is a hatch on the bottom under the seat, it is secured with two self-tapping screws;
- unscrew the screws and dismantle the hatch;
- disconnect the plug from the wires that supply power to the electric fuel pump; to do this, bend the latch and forcefully pull the parts of the connector away from each other;
- unscrew the fittings of the fuel pipes - main supply and return (17 mm wrench);
- unscrew the nuts of the pressure plate of the used pump (there are 8 fasteners here, 7 mm wrench);
- The nuts are small, it is better to put them in some kind of jar so as not to lose them. Remove the plate and remove the pump assembly from the gas tank. You need to remove the fuel pump together with the rubber sealing ring and lift the pump carefully so as not to damage the fuel level sensor. When removing the BN housing, it is necessary to tilt it, otherwise it will not come out of the tank;
- remove the screen from the fuel pump and install a new part;
- We install the electric fuel pump in place. Here it is important to put the housing in the old places - if you move the used pump, it will be impossible to tighten the fuel line fittings.
What do the measurement results say?
If the pressure is too low or rises very slowly, it is necessary to find out the reason. The culprit may be either a worn fuel pump, a dirty fuel filter or a pressure regulator. To remove suspicion from the latter, you need to clamp the fuel drain line with a clamp. If the pressure increases, then the regulator is faulty.
If the pressure in the system is too high, it is necessary to disconnect the drain pipe and direct it into any suitable container. A drop in pressure indicates that the return line is clogged; if it does not change, the regulator is faulty.
After starting the engine, the pressure in the fuel rail should decrease by 0.5 MPa due to the fact that vacuum is applied to the pressure regulator. When you press the gas pedal sharply, it should remain unchanged.
Then you need to briefly clamp the fuel drain line or adapter hose after the pressure gauge. In this case, the pressure should double - this is the maximum that a working fuel pump is capable of.
If the pressure does not increase when clamped, and the operating pressure is within normal limits, this indicates that fuel does not pass through the fuel drain line, and the pump is worn out to such an extent that it is not able to overpower the fuel pressure regulator valve, or there is a fuel leak in the supply hose inside the tank. Other possible causes - low supply voltage and leaks in the fuel line - were noted at the first stage of diagnosis.
Next, you need to pay attention to the behavior of the pressure gauge needle when the engine is idling. Normally it should tremble a little
If the needle fluctuates greatly, the fuel pump screen is most likely clogged. The problem can be solved by washing or replacing. Sometimes the pressure regulator is to blame (this happens quite rarely).
Continue checking the fuel pump as follows. The ignition is turned off. The engine stalls, but the pressure should remain unchanged (in this case, the diagnosis is completed). If it drops, this indicates a malfunction of the pump check valve, a breakdown of the fuel pressure regulator, or a leak in one or more injectors.
To determine the cause, the engine is started again and turned off again, while the fuel supply line is pinched. If the pressure does not decrease, the problem is in the regulator; if it decreases, the problem is in the injectors.
The last thing you can check is the performance of the fuel pump and compare it with the nameplate values. To do this, you need to disconnect the fuel line at any convenient place after the fuel filter, turn on the pump for 1 minute and direct a stream of fuel into a measuring vessel. If the amount of fuel is less than the specified amount, either the fuel pump or the filter is to blame. To clear things up, you need to disconnect the fuel filter and check the performance again.
Malfunctions of the electric fuel pump 2110
If the pump stops working, there may be several reasons for the malfunction:
- electrical wiring is damaged;
- fuse burned out;
- the relay stopped working;
- BN motor burned out;
- The engine control unit has failed.
When a driver in a car with a VAZ 2110-12 injection engine turns on the ignition, the electric motor starts working - a characteristic buzzing sound is heard. If no sounds are noted, it means that the BN is not pumping fuel.
The easiest way is to check the electric fuel pump fuse, which is located almost in the same place as the relay, located to the left of the RB.
If the fuse is blown, it must be replaced. It often happens that when replacing a fuse, it immediately blows. The main reasons for the malfunction of this phenomenon:
- the fuel pump itself “shorts”;
- There is a short circuit in the electrical wiring.
Another characteristic malfunction of the electric fuel pump is that fuel is pumped, but the operation is accompanied by loud noise. A noisy fuel pump is a sure sign that this device will not “live” for long and will soon fail.
Common reasons leading to relay failure:
- Significantly exceeding the operational life of the element.
- Poor quality of relay coil materials, as well as the contacts themselves.
- Incorrect relay wiring connection.
There are many reasons why the BN relay may not work, but they all have the same outcome - the car engine will not start. In this case, there are two possible options: a malfunction of either the BN or the relay itself.
You can determine that the relay is in good condition by the electrical sound that will be heard when you try to start the car engine. Given this scenario, it is time to conclude that the BN does not work.
How to test a relay
If the electric fuel pump does not show any signs of life when the ignition is turned on, this does not mean that it has burned out. The cause of the malfunction may also be a relay. The easiest way to check the RB by ear is that when you turn on the ignition, the relay should click. If you don’t hear a click, there is a high probability that the “relay” is faulty.
But not everything is so simple - the problem can be “tricky”, for example, the car does not start the first time. The cause of the malfunction may be hidden in burnt relay contacts. It’s quite simple to check the functionality of the pump itself; proceed as follows:
- remove the protective casing, under which there is a block with relays and fuses;
- we unscrew the fastenings of the block, remove it, it remains attached to the wires;
- we pull the RB out of the block, place a jumper between two opposite contacts, thus directly supplying power to the BN;
- If, with such a connection, the electric motor of the pump begins to make noise, it means that the BN itself is working, most likely, the malfunction is hidden in the relay.
If there is no voltage on any of the contacts on the RB block, you should look for a break in the wiring; there may also be poor contact at the place where the wire is attached to the terminal.
How to remove and change the fuel pump on a Priora
To remove the fuel pump on a Priora car, you will have to do a lot of preparation. Since the system is quite complex, when dismantling it you will have to interact with many parts of the machine. You should start by disconnecting the negative terminal from the battery. Replacing the device for supplying fuel to the engine is carried out as part of dismantling the fuel module:
Open the back door. Look under the sofa cushion for plastic plugs. Remove them by pressing lightly. You will see the sofa fasteners. Unscrew the nut with a “10” socket wrench. Pull the fastener towards you. Do the same action on the other side. Pull out the sofa cushion. If necessary, remove the backrests, although they will not interfere much. Place a basin or other container on the floor of the body. Find a black square metal hatch that is covered with sound insulation. Fold back the fabric and begin dismantling the hatch. Use a Phillips screwdriver to unscrew the screws. Remove the hatch. You will see the top of the fuel module and some wires on top of it. Press the latch that holds the harness and disconnect the wires from the module. There are also two small hoses connected to the fuel supply system cover. One is responsible for supplying gasoline, the other for shipping. Hold the hose directly near the place where it is attached to the module, and then turn it until you see the green inserts on top - these are the clamps. Clamping them, pull the hose towards you. Drain the fuel into a container. Unscrew the fastening nuts that hold the pressure plate using a “10” socket wrench. Remove the pressure plate. Now comes the careful process of dismantling the module
Please note that in the immediate vicinity there is a part of the fuel sensor that should not be touched. Therefore, when removing the fuel supply system assembly, try to make your movements as smooth as possible. Immediately point the module over the container - gasoline will drain from it.
Next, in order to release the fuel module, do the following:
- Disconnect the negative wire from the fuel pressure regulator. Disconnect the harness by pressing the latch.
- Disconnect the wires from the pump.
- Press out the clamps that hold the fuel sensor in one position.
- Slide the flammable substance sensor along the grooves and then remove it.
Before replacing, you should check the fuel supply system assembly.
How to check the fuel pump on a Priora car
According to AvtoVAZ, a standard pump for a VAZ-2170 should pump 60 liters of gasoline per hour. To check it on your car, do the following:
- Turn the key in the lock, turning on the ignition.
- Remove the fuel pump relay using a gentle movement.
- Place a jumper between pins 30 and 87.
- Listen for the familiar sound of fuel pumping. If you hear that pumping is proceeding normally, you can turn the key back. To “fix” the car, change the fuse.
If the engine fuel supply does not stop, do the following:
- Check the voltage at the pump connector using a multimeter.
- Check the ground supply to the pump chip.
- Clean the fuel module from gasoline (it’s even worth wiping it with a rag!), then apply +12 V to it. This is a “direct” test of its performance.
Fuel check valve
The electric fuel pump of the VAZ “Ten” has good performance, but it creates too much pressure in the fuel system. In order to bring the pressure back to normal, a VAZ 2110 fuel pump valve is built into the fuel line; it is located in the “outlet” fitting of the BN housing. On the “tens”, a pressure regulator is also installed, which is located behind the fuel rail.
A valve malfunction involves a ball sticking in the open position, and the fuel pressure in the system may drop to zero. If such a problem occurs, the car is very difficult to start, since all the gasoline from the fuel lines goes back into the gas tank when the ignition is turned off. Is it possible to somehow repair the valve?
Drivers of 2110 cars claim that you can try knocking on the fitting in the BN flask so that the shut-off ball falls into place. If the malfunction cannot be eliminated in this way, the electric fuel pump bulb must be replaced, since this housing itself is non-separable.
2.3.2. Main injection relay and fuel pump relay
Where is the Gazelle Fuel Pump Fuse
? Checking the main relay (1988-89)
| 1, 2, 3, 4. Contacts |
Checking the main relay
(after 1990)
| 1, 2, 3, 4. Contacts |
Examination
Checking the fuel pump relay
| 1. Fuel pump relay 2. Kneecap 3. Sidewall |
| EXECUTION ORDER |
| 1. Two relays are included in the electrical circuit of the fuel system. First check for battery voltage at the main relay and then at the fuel pump relay. |
| 2. Disconnect the main relay from the connector, then turn on the ignition (do not start the engine) and check for voltage from the battery. |
| 3. If there is voltage from the battery, then replace the main relay and check for voltage from the battery at the fuel pump relay. The relay is located on the driver's side wheel well mudguard. |
| 4. If battery voltage is present on both relays, then check the relays themselves. |
MAIN RELAY Checking the main relay with contacts energized (1988-89)
| 1, 2, 3, 4. Contacts 1. Ohmmeter |
Checking the main relay with contacts energized (after 1990)
| 1. Ohmmeter 2. Battery |
| EXECUTION ORDER |
| 1. Using an ohmmeter, check the continuity of the circuit between contacts 1 and 3 (see fig.). The ohmmeter should show a gap between pins 2 and 4. |
| 2. Apply battery voltage to terminals 1 and 3. |
| 3. There should be a closed circuit between pins 2 and 4. |
| 4. If the test results differ, replace the relay. |
TURNING ON THE FUEL PUMP
| EXECUTION ORDER | |
| 1. Using an ohmmeter (1), check the continuity of the circuit (2) between terminals +B1 and FPR and +B2 and FP. | |
| 2. The ohmmeter should show a gap between the +B and PR contacts. | |
| 3. Apply battery voltage to terminals +B1 and FPR. | |
| 4. There should now be a closed circuit between the +B and FP pins. If the test results differ, replace the relay. |
FUEL PUMP RELAY (1996) Checking the fuel pump relay with coil energized
| 1. Ohmmeter 2. Closed circuit 3. Battery |
Checking the fuel pump relay (1996)
| 1, 2, 3, 4, 5, 6. Contacts 1. Open circuit 2. Closed circuit |
| EXECUTION ORDER |
| 1. There must be a closed circuit between pins 3 and 5 (see fig.). |
| 2. Between pins 3 and 5, the ohmmeter should show a resistance of 80 ohms. |
| 3. Apply battery voltage to terminals 1 and 5. |
| 4. There should be battery voltage between pins 1 and 2, and a closed circuit between pins 3 and 5. |
| 5. If the test results differ, replace the relay. |
FUEL PUMP CIRCUIT RELAY (1988-94) Checking the fuel pump circuit relay with coil energized (1988-94)
| 1. Ohmmeter 2. Closed circuit 3. Battery |
| EXECUTION ORDER |
| 1. Check for continuity between pins ST and E1 (see Fig.), as well as between pins +B and FC. |
| 2. The ohmmeter should show a gap between the +B and FP terminals. |
| 3. Apply battery voltage to terminals ST and E1. |
| 4. There must be a closed circuit between the +B and FP terminals. If the test results differ, replace the relay. |
FUEL PUMP CIRCUIT RELAY (1995)
The checking procedure is similar to checking the main relay (see).
PUMP RESISTOR RESISTANCE
| EXECUTION ORDER | |
| 1. The pump resistor should be 0.73 ohms at normal temperature. | |
| 2. Otherwise, replace the resistor. |
| previous page5.2.3.1. Checking the fuel pressure regulator | next page 5.2.4. Fuel lines and joints |
Mechanical fuel pump "tens" VAZ
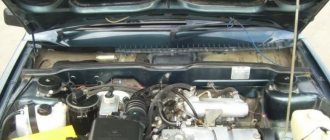
The VAZ 2110 (Lada-110) car has been produced at AvtoVAZ since 1995, and the first engines on this model came with carburetors. Eight-valve VAZ 2110 engines with a power of 72 hp. With. were set to “tens” until 2000, and the fuel pumps on these internal combustion engines, accordingly, were mechanical.
The 2110 mechanical fuel pump consists of parts:
- metal case (two halves);
- top cover;
- pusher with diaphragm;
- two valves;
- return spring.
Gasoline is pumped from the fuel tank by oscillating the diaphragm and opening and closing valves. The diaphragm with a pusher is driven by the camshaft eccentric; on the lower BN housing there is a manual pumping lever for gasoline.
Description of fuses on a VAZ 2112 car: location
Unlike previous generations of VAZ, the 2112 uses fuses (hereinafter referred to as modules). The total quantity is 20 pieces, which is 4 more than the VAZ 2110. And also, 8 relays - breakers.
Cylindrical type modules are not installed on new VAZ and Lada models due to the outdated design.
Where is it located: the standard location of the main mounting block is under the dashboard on the left side. To provide access to the power supply, you need to press the plastic lock - lever, lower the power supply down, carry out maintenance, and install in the reverse order.
Mechanical fuel pump malfunctions
All parts of a car engine are subject to wear and aging, and the life of a mechanical fuel pump also depletes over time. Main malfunctions of the mechanical device:
- warping of hulls;
- cracking of the diaphragm;
- valve failures.
If the diaphragm allows air to pass through, the pump may stop pumping gasoline into the carburetor; through the torn diaphragm, fuel enters the crankcase and mixes with the engine oil. When gasoline gets into the oil, fuel consumption increases sharply, and the engine itself starts poorly, especially when warm. Checking the presence of gasoline in the crankcase is quite simple - if you light the oil dipstick with a lighter, a fire will occur, and a gasoline smell will come from the oil crankcase.
A common defect that occurs in mechanical gasoline pumps is warping of the surface at the point where the pump is attached to the body of the auxiliary units. If the surface is deformed, engine oil begins to leak at the joint between the planes.
Features of relay operation with car alarms
In cars that have an alarm system with an ignition blocking function, there are sometimes situations where the alarm is the cause of the relay malfunction. Most anti-theft systems block the operation of the fuel pump, so that fuel does not enter the system and the car does not drive. If the system was not installed correctly, it is possible that the alarm is preventing the relay from operating. Part repairs are not always necessary in this case. Sometimes it is enough to disconnect the output to the pump or reconnect it.
It is necessary to trust the installation of car alarms only to professionals, since a violation of the technology can lead to a decrease in the functionality of the equipment and damage to various vehicle systems.
Fuel pump VAZ 2110 carburetor price
Unlike electric fuel pumps, mechanical fuel pumps are generally cheaper; the price largely depends on the manufacturer. The most famous companies producing gasoline pumps:
- BAKER;
- DAAZ.
The cost of the device ranges from 350 to 850 rubles; repair kits are also sold for used mechanical pumps; the kit contains a diaphragm, rod, and valves. The repair kit is quite cheap - from 70 to 200 rubles, but it does not always make sense to carry out repairs, since the pump assembly itself is inexpensive.
An interesting fact is that the fuel pump for carburetor engines for the VAZ “ten” is suitable for the VAZ 2108-09-099 models, as well as for the Zhiguli VAZ-classic 2101-07. The “Classic” BN differs only in a slightly different arrangement of fuel fittings, and in order to install the pump from the “Classic” on a car 2110, it is necessary to use longer fuel hoses.
Related articles:
- Methods for checking a car ignition coil During the operation of a car, various problems occur with the engine; the engine may stall, not develop speed, or stall at idle. In some cases, the internal combustion engine does not […]
- How to eliminate an oil leak from under the valve cover Oil leakage from under the valve cover is a fairly common occurrence, but the reasons for leakage can be different, and the valve cover gasket is not always to blame. This article will […]
- Replacing the wheel hub of a Ford Focus 2 Replacing the wheel bearing (HS) on a Ford Focus-2 is not very difficult; if you wish and have certain skills, you can do the work yourself. In this article we will look at how […]
Signs of a faulty fuel pump
Of course, in order to make a correct diagnosis, it is necessary to compare several symptoms. They may not appear all together, but the presence of several already suggests that the problem lies in the fuel pump.
Changing the sound of the engine. The engine runs smoothly, without any extraneous sounds, and does not stall, but the tonality of the sound changes. This phenomenon may occur periodically, for example, when warming up, and then the sound becomes normal again, or the motor suddenly starts working in a different tone, and the sound tone does not change again until it stops working. This is one of the first signs that the fuel pump deserves more attention. The engine does not develop the required power. This phenomenon becomes especially noticeable in situations where you need to quickly overtake another car, or when driving uphill (the engine begins to “tighten”). Often this symptom occurs after a major overhaul of the power unit, due to an incorrectly set ignition or due to low-quality gasoline poured at an accidental gas station. The engine is difficult to start. It is not always possible to start the engine on the first try; you have to run the starter for a long time. This symptom in itself may well indicate a faulty starter or weak battery. And these are the easiest places to start checking.
It is also worth paying attention to the ambient temperature, since an old or weak battery can quite easily cope with its task in the summer and fail at the first frost.
An important sign is how easy it is to restart an already warmed-up engine. If it starts easily after warming up, then the problem is most likely not in the fuel pump.
Video instructions for replacement
In this short article you will learn about the VAZ 2110 fuel pump relay. Such a device can be found not only on tens, but also on nines (injection), as well as more modern Priors and Grants. But why is this relay needed and what to do if it fails? This is what we will now try to figure out. But it’s worth starting with the principle of operation of the fuel supply system of the VAZ 2110 car.
Pinout BN VAZ 2108, 2109, 21099
The fuel pump activation relay (2) is shown by an arrow.
1 — nozzles; 2 — spark plugs; 3 — ignition module; 4 — diagnostic block; 5 - controller; 6 — block connected to the instrument panel harness; 7 - main relay; 8 - main relay fuse; 9 — electric fan relay; 10 — controller power supply fuse; 11- electric fuel pump relay; 12 — fuel pump power circuit fuse; 13 — mass air flow sensor; 14 — throttle position sensor; 15 — coolant temperature sensor; 16 — idle speed regulator; 17 — knock sensor; 18 — crankshaft position sensor; 19- oxygen sensor; 20- APS control unit; 21 — APS status indicator; 22 — speed sensor; 23 — electric fuel pump with fuel level sensor; 24 — solenoid valve for purge of the adsorber; 25 — block connected to the ignition system harness; 26 — instrument cluster; 27 — ignition relay; 28 — ignition switch; 29 — mounting block; 30 — electric fan of the cooling system;
A - to terminal “B+” of the generator; B - block connected to block K of the ignition system harness; C - block connected to block L of the ignition system harness; D - wire connected to the interior lamp switch; E - wire connected to the white and black wires disconnected from the interior lamp switch; F - to the “+” terminal of the battery; G1, G2 - grounding points; K - block connected to block B of the front harness; L — block connected to block C of the front harness.
Removing the pumping unit
Before starting work, you must disconnect the terminal from the battery. This will prevent damage to electrical equipment. In addition, replacing the fuel pump may cause a fire.
Let's prepare tools and materials. To remove the VAZ-2110 fuel pump, you need the following:
- Screwdriver.
- 10mm socket wrench.
- Collar.
- Open-end wrench 13.
- Rags.
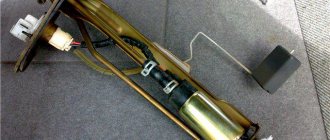
The device itself is located under the rear seat cushion. To get to the installation location of the fuel pump 2110, you need to remove the seat. Under the casing we find a hatch. We unscrew the hatch. Disconnect the electrical drive connector.
Using an open-end wrench, unscrew the tips of the fuel pipes. We pull off the pipes. Using a spanner, unscrew the 8 nuts around the perimeter of the clamping ring. Release the flange.
There is a gasket under the pressure ring of the fuel pump 2110. The gasket is removed. It is better to change worn tires.
Then we raise the VAZ fuel pump together with the float. Gasoline will leak from the body. To avoid staining the interior, place a rag. There will be up to 1 liter of gasoline left in the old building. Drain it into the tank.
Assembly is carried out in reverse order. There is an arrow on the top of the cover. It should point towards the trunk. This is the correct pump position.
When replacing, do not forget to remove the float and level sensor.
These spare parts are installed on the new structure.
All operations, including preparation, will take less than an hour. After replacement, perform a test. Start the engine. Finally, you should check the fuel pump, make sure the connections are tight and there are no leaks.
Schematic electrical diagrams, connecting devices and pinouts of connectors
The fuel pump on a car is designed to supply fuel to the combustion chamber. Its operation is controlled using a relay. On a VAZ (depending on the model), the fuel supply unit can be electrical or mechanical - it all depends on the fuel supply system. On a fuel-injected car, the fuel pump is located in the tank. When the ignition is turned on, voltage is supplied to the terminals of the unit and it begins to pump fuel. If the required pressure is created in the system, the relay automatically turns off the fuel pump - the engine is ready to start.
Checking the electrical circuit
Unlike a carburetor engine, where the fuel pump is mechanically driven, on the injection VAZ 2110/2112 a special relay and fuse are responsible for the operation of this device. Therefore, before moving on to diagnosing the pump itself, it is necessary to check the indicated elements. If any one of them is faulty, the pump will not work at all.
Turn on the ignition without starting the engine and listen. When the fuel pump is running, it emits a characteristic “whistle” when started. If it is not there, it means that either the pump itself has failed, or one of the elements of its power supply circuit has failed.
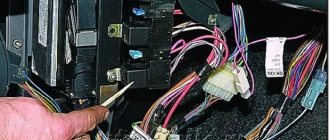
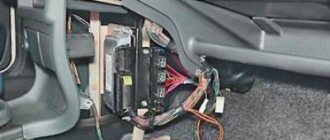
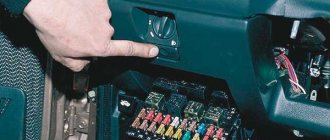
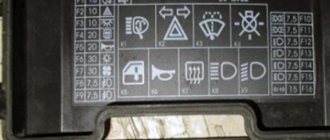
The pump relay and fuse are located in an additional mounting block located inside the vehicle's center console. It can be accessed by removing the plastic trim (near the front passenger's left foot). It is secured with several screws. Under the cover you will find three relays and three fuses. Typically, the fuel pump circuit protection elements are located centrally.
The relay and fuse are located in an additional mounting block under the cladding
To check the fuse, remove it from its socket and “ring” it with a tester. If necessary, replace it, observing the rating (15 A). It is unlikely that it will be possible to check the relay for functionality without special equipment. But you can take another relay, for example, the radiator fan (far left), and install it in place of the one being diagnosed. Turn on the ignition and listen to see if the fuel pump starts working. If yes, buy and install a new relay. If the problem persists, continue diagnostics.
To check the fuel pump relay, you can install the radiator cooling fan relay in its place.
Performance check
Checking its performance will help make sure that the fuel pump has failed. For this you will need:
- screwdriver with Phillips bit;
- a piece of gas-resistant hose (50–80 cm) with a clamp;
- key to 17;
- empty 2 liter plastic bottle;
- a piece of insulated wire;
- stopwatch.
Performance testing is carried out as follows:
- We remove the back seat. We lift the carpet and find the gas tank hatch under it. Unscrew the two screws (diagonally).
- Once you remove the hatch, you will see the top of the fuel module. Using a 17 wrench, unscrew the nut of the outlet fitting. We put a hose on it and secure the connection with a clamp. We lower the other end of the hose into an empty bottle.
- Disconnect the pump power connector. Using a piece of wire, we supply power to the positive contact of the device from the corresponding battery terminal. We connect the negative one to ground.
- We begin counting the time from the moment the pump starts.
A working fuel injection pump for a VAZ 2110/2112 should pump 1.5 liters of fuel in one minute. If this indicator is lower, the pump must be replaced.