It's no secret that you can't get far in a car without gasoline. Therefore, for the engine to operate, it is simply necessary that the entire fuel system functions in optimal mode.
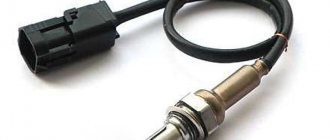
In many ways, the fuel pump is responsible for supplying fuel to the engine, which the VAZ 2114 model is not without, of course. To solve a problem with a faulty fuel pump, you need to make sure it is at fault.
Models of fuel pumps for VAZ 2114/2115 cars
VAZ 2114/2115 cars are equipped with 1.5 cm3 and 1.6 cm3 gasoline engines with a distributed injection system. A submersible electric fuel pump is used to supply fuel. It is part of the fuel module installed at the top of the gas tank (under the rear seat). In addition to the pump, the module includes a fuel accumulator (cup), a coarse filter and a fuel level sensor with a float.
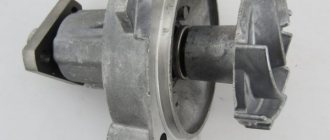
To supply fuel in VAZ 2114/2115 cars, a submersible electric fuel pump is used
The VAZ 2114/2115 fuel pump is a conventional DC electric motor in a sealed housing with a one-way valve at the outlet. An impeller of a special shape is located on the electric motor shaft. Its rotation ensures the fuel supply.
The fuel module includes a fuel pump, a fuel accumulator, a coarse filter and a fuel level sensor
The fuel pump is powered from the vehicle's on-board network. The electrical circuit of the pump, protected by a fuse, is closed using a separate relay.
Electric fuel pumps for VAZ cars are produced by both domestic (Utes, SAAZ, Pekar) and foreign companies. The latest modifications of the VAZ 2114/2115 are equipped with BOSH pumps, which are distinguished by their high reliability, long service life and relatively low price.
Design of the electric fuel pump VAZ 2114/2115
Catalog numbers of standard fuel pumps for VAZ 2114/2115:
- 2112–1139009–12 — for engines with a volume of 1.5 cm3;
- 2112–1139009–01 — for engines with a volume of 1.6 cm3;
- 580453453 (BOSH) - for engines with a volume of 1.5 and 1.6 cm3.
These models differ in operating pressure. The former are capable of creating a pressure of 2.8–3.2 kPa in the fuel system, the latter - 3.7–3.9 kPa. BOSH fuel pumps are rated at 3.5 kPa.
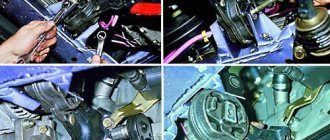
Removing, installing and replacing the fuel pump
The first thing to keep in mind is that all work on the car’s fuel system must be carried out with the negative terminal of the battery disconnected. It would also be a good idea to do this with an empty fuel tank, especially since with the fuel module removed it becomes possible to clean the bottom of the gas tank from sediment.
The second thing it is advisable to do is to remove the pressure inside the fuel lines so as not to get a stream of gasoline in your face or into the interior of the car. This can be done using a measuring nipple on the fuel rail and a thin screwdriver.
To work you should prepare:
- curved and flat screwdrivers
- key for 17
- head for 7
- rags
Sequence of work
- Raise the rear sofa.
- We unscrew the two screws that hold the cover that blocks access to the fuel module, and disconnect the electrical connector from it.
- Using a 17mm wrench, unscrew the two fuel lines connected to the pump, being careful not to lose the O-rings, and move them to the sides.
- Newer models have clips on the pump; to remove them, press them and pull the tubes towards you.
- Using a 10mm socket, unscrew the 8 nuts that secure the pressure plate in a circle, holding the entire fuel module.
- Carefully remove it through the hole in the gas tank, having first released the fuel level sensor float.
If there is a new assembled module in stock, install it in the reverse order. If it is necessary to replace individual components: the fuel pump itself, the level sensor or the primary filter mesh, we do this by disassembling the fuel module housing and removing the corresponding parts.
This procedure is unlikely to cause any difficulties - everything is quite obvious.
For a new type of fuel pump, you need a 10mm socket and a ratchet, similarly unscrew the ring in a circle and press out the fuel line clamps.
We recommend: How to determine whether the automatic transmission oil needs to be changed?
Symptoms of a problem
A malfunction of the fuel pump of VAZ 2114/2115 cars can be diagnosed by the following symptoms:
- when the ignition is turned on, there is no sound of the pump running;
- the engine does not start or starts with difficulty;
- the power unit is unstable at idle, the speed “floats”;
- “dips” appeared during acceleration;
- the motor has lost power.
The same signs also appear when other elements of the fuel system malfunction.
Before you begin diagnosing or replacing the fuel pump, you should make sure that:
- the fine fuel filter is not clogged (it is changed every 7 thousand kilometers);
- the injectors and fuel pressure regulator are operating normally;
- The sensors for mass air flow, throttle position, and oxygen quantity are working properly.
If the detected malfunction is accompanied by the lighting of the “CHECK” lamp on the dashboard, you should set the error code and decipher it.
Wiring contacts
The wiring system goes to the fuel pump in the number of three wires: positive, negative and gasoline level indicator. The cause of a fuel pump failure may be a simple power failure in the wiring. If everything is normal with the pressure, then we check the contacts.
We take a simple 12 V light bulb and attach its wires to the positive and negative contacts on the external connector of the fuel pump, respectively. We turn the ignition: the light blinks, there is contact. Then you need to dig deeper - look at internal contacts.
An external problem with the wiring if the light does not light up: alternately connect the positive and negative contacts removed from the fuel pump connector to the ground of the fuel pump, and then to the snout. Negative contact on ground, turn on the ignition, the light blinks - the contact is not working, the light does not blink - the positive contact is not working. When the contact is on the snout and the light comes on, the wire is damaged in the area from the fuel pump to the snout.
Checking the electrical circuit
At the beginning of the diagnosis, you should check the electrical circuit of the fuel pump. To do this you will need:
- car tester (multimeter);
- crosshead screwdriver;
- two pieces of wire about 2 m long.
Checking the electrical circuit is carried out in the following order:
- Turn on the ignition without starting the engine. When the key is in the first position, a click should be heard, characteristic of turning on the relay, followed by a slight whirring of the pump electric motor. If there is no click, the relay is faulty or is not receiving power. If there is a click, but no buzzing, the wiring coming from the relay or the pump motor itself is faulty.
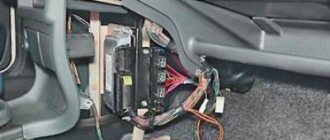
- Under the glove compartment, find an additional mounting block consisting of three relays and three fuses. The pump relay is located in the middle, and the fuse is located to the left of it. Remove the fuse from its socket, test it with a multimeter, and if the result is negative, replace it. When replacing the fuse, please note that it is rated for a maximum of 15 A.
The relay and fuse for the fuel pump on the VAZ 2114/2115 are located in the mounting block under the glove compartment.
- Set your multimeter to voltmeter mode. Connect one probe of the device to the relay terminal to which the pink wire fits, and the second to the car body. Turn on the ignition. The device should show the on-board network voltage in the range of 11.7–12.4 V. If there is no voltage, the problem may be a broken wiring or a malfunction of the ignition contact group. In this case, it is better to contact an auto electrician. If power is supplied, check that the relay is working. With the ignition on, use a screwdriver or a piece of wire to close the contacts to which the pink and gray wires go. This closes the circuit bypassing the relay. If the fuel pump works, replace the relay.
- Be sure to check the connection of the pump's negative wire to ground. Often it is the lack of “ground” that causes interruptions in the operation of the fuel pump. Remove the plastic trim from the center console near the parking brake handle. Under it there is a “negative” wire of the pump, screwed to the body with a self-tapping screw. Unscrew it, clean the contacts, screw it back and repeat the test.
The ground wires of the fuel pump are attached to the body with a self-tapping screw
- Then check the fuel module. Remove the rear seat, peel back the carpet and sound insulation. Unscrew the two screws securing the gas tank flap and disconnect the electrical connector on the fuel module cover. Using two wires, supply power to the pump directly from the battery. If the pump works, the wiring is faulty; if it doesn’t work, the pump itself is faulty.
Selecting and replacing the fuel pump
Russian car owners prefer BOSH fuel pumps. You should only buy a new pump in specialized stores. The original product must be packaged in thick plastic film filled with special preservative oil. At the same time, a branded BOSH pump cannot cost less than 2 thousand rubles.
To replace the electric fuel pump on a VAZ 2114/2115 you will need:
- screwdriver with Phillips bit;
- thin slotted screwdriver;
- key or head 7;
- key to 10;
- key to 17.
The sequence of actions is as follows:
- Using a 10mm wrench, remove the negative terminal from the battery.
- Open the gas tank cap to reduce the pressure in it.
- Remove the rear seat cushion and peel back the carpet and sound insulation.
The fuel module hatch is located under the rear seat
- Using a screwdriver, unscrew the two screws securing the fuel module hatch and remove it.
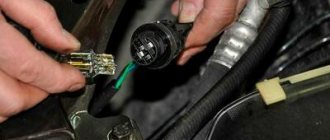
- Disconnect the power connector.
Disconnecting the electrical connector from the fuel module
- Using a 17mm wrench, unscrew the nuts on the fuel pipes. We disconnect the tubes from the fittings and move them apart.
Using a 17 wrench, unscrew the nuts on the fuel pipes
- Using a 7 socket, unscrew the eight nuts securing the fuel module cover.
Using a socket 7, unscrew the eight nuts securing the module cover
- Remove the pressure ring and remove the fuel module.
Removing the fuel module from the gas tank
- Use a thin slotted screwdriver to disconnect the coarse fuel filter.
- Using the same screwdriver, remove the retaining rings on the glass guides.
Using a screwdriver, remove the retaining rings from the guides
- Disconnect the fuel pipes from the cap fittings.
Fuel pipes will be easier to disconnect if they are heated
- Disconnect the electrical connector.
- Remove the glass from the guides.
After disconnecting the tubes and wires, remove the glass from the guides
- Using a slotted screwdriver, move the latches securing the electric fuel pump to the sides and remove it.
To remove the fuel pump, you need to move the latches apart
- Install a new pump.
- Repeat all operations in reverse order.
We recommend: The quietest and softest summer tires
If, when disassembling the fuel module, it is discovered that the coarse filter is clogged, it should be replaced. The fuel level sensor with a float must also be replaced if the readings on the front panel do not correspond to reality.
Thus, diagnosing and replacing the fuel pump of a VAZ 2114/2115 car is quite simple. And in order for the pump to serve for a long time, always refuel only with high-quality gasoline.
Pressure check
If the pump is working properly, but the engine begins to operate intermittently, you should check the fuel pressure in the system. For this you will need:
- pressure gauge (can be a tire gauge with a measurement limit of 5–7 kPa);
- petrol-resistant hose with a diameter of 10–12 mm and a length of 50–80 cm;
- two clamps for a hose of the appropriate diameter;
- Phillips screwdriver;
- nipple cap;
- dry rag.
In addition, the presence of an assistant is desirable.
The verification procedure is as follows:
- In the engine compartment on the engine fuel rail, locate the pressure measuring fitting (on the right side).
- Remove the plastic cap (plug) from the fitting.
Find the pressure fitting and remove the cap from it
- Using the nipple cap, unscrew the spool valve from the fitting. When unscrewing the spool valve, fuel may spray out of the fitting. To remove it, use a dry cloth.
When unscrewing the spool valve, fuel may spray out of the fitting.
- Place one end of a gas-resistant hose onto the fitting and secure the connection with a clamp. Connect the other end of the hose to the pressure gauge fitting and also tighten the clamp.
Connect the pressure gauge to the fitting using a hose and clamps
- Ask an assistant to turn on the ignition. Wait a few seconds and watch the meter readings. If the pump is working properly, the pressure gauge should show a pressure of 2.8–3.2 kPa for engines with a volume of 1.5 cm3 and 3.7–3.9 kPa for engines of 1.6 cm3. If the pressure is noticeably higher, the pump is faulty.
The cost of this repair at a car service
The fuel pump on a VAZ 2114 (injector, 8 valves) is easy to change. Many car owners do not want to spend their personal time on such work. The car is sent to a car service center, where experienced technicians will perform the replacement themselves. The average cost of the service in Russia ranges from 800 to 1500 rubles. When replacing the fuel module yourself, you need to show maximum attention and be consistent. To extend the life of your vehicle's fuel system, do not forget to refuel with high-quality fuel and carry out maintenance on time.
Source
Missing plus
The main reasons for the lack of a plus may be:
- Fuse or relay faulty. How to check was described above. If these parts fail, it is enough to simply replace them;
- Contacts are oxidized or damaged. You can see this with the naked eye. After cleaning from contaminants, the fuel pump should start working;
- Broken wiring. It is necessary to find the location of the break and eliminate it;
- The engine control unit blocks the fuel pump. There may be various errors on the on-board computer or during diagnostics with a scanner, as well as other symptoms of incorrect operation;
- The car alarm is not working properly and blocks the pump.
Most problems are easy to detect and fix yourself. But the last two require the intervention of a competent auto electrician. DIY repairs will only make the problem worse.
Source
Missing mass
Mass may be missing for various reasons. It needs to be checked this way:
- Remove the protective cover near the handbrake;
- Remove the mass and clean the contacts;
- Put.
The mass is often damaged or moved out of place by the driver himself when using the handbrake. It may also disappear due to vibrations. You need to unscrew the ground wire, clean the contacts and tighten it tightly.
It would be a good idea to clean the contacts near the gas tank flap as well. If after this the pump does not work, you need to look for a break in the wiring by ringing with a tester. Sometimes the break point is visible even upon inspection. In order for the pump to work again, the wiring damage must be repaired.
Fuse
One of the final stages of checking a malfunctioning fuel pump is its fuse. Like the relay, the fuse can be seen from the inside. Or you can climb in from the outside, through the hood. Under the hood, closer to the windshield, there will be a dark box, right on the electronic control unit. You need to open it and find the topmost fuse with a current of 15 A and the English inscription fuel pump. We take it out and look at the insides: the contact is not damaged - the fuse is alive. The contact is damaged (blown) - you need to install a new fuse. As with the price of the relay issue, buying and replacing a fuse will not be a big waste of money and time.
Not every master's hands grow from the right place. For this reason. The reason that the fuel pump does not pump can be simple stupid shortcomings of simple tuning.
For example, the alarm was installed in such a way that all the contacts were mixed up, and power simply does not go to the fuel pump. Not because the alarm should not be on the car, or the wiring system is acting up, it’s just that the person who installed it didn’t have enough brains and practice. Check all connections carefully if you decide to add some style to your little one.