The engine control system circuits are protected by three fuses.
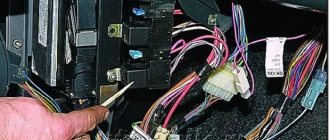
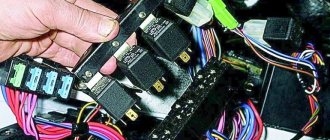
Location of relays and fuses for the engine management system under the instrument panel console
Note. The right trim of the instrument panel console has been removed (see “Instrument panel - removal”).
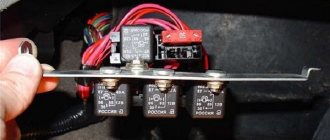
Engine management system relays and fuses:
1,2 and 6 – fuses (see table 8.4.3); 3 – main relay; 4 – relay for turning on the electric fan of the engine cooling system; 5 – fuel pump activation relay
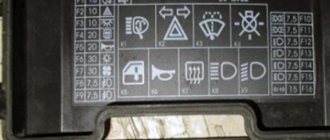
Table 8.4.3. Engine control system fuses
| Position in the photo | Current strength, A | Protected Circuits |
| 1 | 7,5* | Electronic control unit (ECU), ignition module |
| 2 | 7,5* | Coil of the cooling system electric fan relay, canister purge valve, air flow sensor, speed sensor, oxygen concentration sensor |
| 6 | 15 | Fuel pump |
* On cars of the first years of production, 15 A fuses were installed.
The fuse and relay mounting block contains tweezers for removing fuses (see “Fuse and Relay Mounting Block”).
A faulty fuse can be identified by a blown thread.
Recommendation: Sometimes the fuse thread remains intact, while its connection inside the fuse is broken. It is impossible to visually determine such a malfunction. In this case, you can assess the condition of the fuse using an ohmmeter.
Warning! Before replacing the fuse, the cause of the blown fuse must be determined and eliminated. To avoid failure of elements of the engine control system, do not install fuses with an increased rating or homemade ones.
Buying a fourteenth fret is a young thing that does not require a large budget, both for the car itself and for spare parts. If you compare the VAZ 2114 with any foreign car of the same class, you will get a decent price difference in favor of the Lada. And even if a foreign car costs more, and servicing it is not more expensive than a Lada, then spare parts from the Russian automobile industry will be much easier to find in any of the most remote areas of our country.
Whatever you say, any car wears out and requires attention and care. So let's talk about a common problem with the fourteenth - the fuel pump does not pump.
Gasoline pump VAZ 2114
You're driving, and suddenly you stall. You start it, the engine growls, the starter turns, it starts moving and again there is a stupor. Or the ignition does not respond at all, you have to push it to start. This also includes the case when the engine responds every once in a while if you slow down for a couple of minutes and go to nitral. The battery is ok. We're sinning at the fuel pump.
Symptoms of a problem
- The first sign indicating a breakdown of the fuel pump will be a banal refusal of the engine to start. Of course, such an indicator as an unstarted car is very general. In this case, it is worth checking the spark plugs, which may become oily and not produce a spark and the ECU.
- The second point is the pressure of the fuel system. If the fuel pump is OK, it creates a pressure of 3.2 bar. The fuel rail is characterized by the following indicators:
- for a volume of 1.5 l – from 285 to 325 kPa,
- for a volume of 1.6 l - from 375 to 390 kPa.
- A very common problem is when the signal does not reach the fuel pump after ignition. When you turn the key, you usually hear a slight vibration from the fuel pump, but here it doesn’t happen. Most likely the wiring has failed. We'll have to call her and figure out what's what.
- The engine is tripping. Like reason number one, this indicator is not a benchmark. It is believed that the signs of a malfunction of the VAZ 2114 fuel pump are represented by other obvious causes of malfunctions. However, if the fuel pump is not working properly, the engine begins to jerk (which is natural, fuel combustion in the cylinders occurs incorrectly), and operate intermittently out of the blue.
- The engine may jerk even before starting or at low speeds. This reason is closer to the truth: either the fuel pump or its mesh – a low-purity filter – is not working.
The fuel module, which includes the pump itself, is expensive - from 2,000 to 3,000 rubles. The inept owners of the fourteenth buy it entirely (together with the filter, fuel level sensor, float and intake chamber) and install it to replace the deceased. In fact, the price of a VAZ 2114 fuel pump is only 700-1000 rubles, you only need to take and install it, the rest of the module almost always remains intact.
Just don’t immediately run to the spare parts store and buy a new one! There are plenty of reasons for the breakdown, including those that may lie in the power system. Here are the main ones:
- Fuel pump fuse VAZ 2114
- Fuel pump relay VAZ 2114
- Poorly secured mass of the VAZ 2114 fuel pump
- Fuel pump motor VAZ 2114
- Contacts of the fuel pump system VAZ 2114
- The fuel pump itself
Tips for motorists
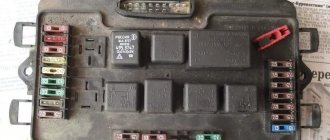
The electric fuel pump on a VAZ-2114 passenger car is located in the fuel tank, and after the ignition is turned on, voltage is supplied to its terminals through a 15 amp fuse F3 and relay R2, located under the panel on the passenger side in the car interior.
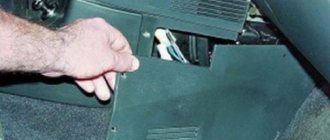
The first thing the driver of the “fourteenth” does after the fuel pump fails is to unscrew the two screws that secure the cover on the right side of the console under the panel, covering three relays and three fuses, and check the integrity of fuse F3, which is located next to two relays located one behind the other and the state of the contacts where the fuse is inserted. If it is intact, you need to check the fuel pump relay (you can replace it), which is located next to the fuse (it is the middle one among the relays available there).
If everything is in order with the fuse and relay, then the driver’s next action will be to get to the fuel pump terminals. To do this, you will have to lift the rear seat cushion and remove the cover at the bottom of the car body by unscrewing the screws that secure it. In the opened hatch you will see three terminals, one of them is negative, and two are positive (gray and black wires), which supply voltage to the fuel pump and fuel level indicator. You have to check whether voltage is supplied to the positive terminal of the fuel pump motor. This can be done using a control lamp. When you turn on the ignition, it should light up for 3-5 seconds (this is the time it takes to pump gasoline from the tank into the fuel rail before turning on the starter).
If the light comes on and the fuel pump does not work, this means that voltage is supplied and you need to check its value using a tester, since if the voltage is below 10 volts, the electric motor of the fuel pump will not start. The voltage drop occurs due to oxidation of the contacts, so you will have to check the condition of the contacts of both the negative and positive wires. You can also check the serviceability of the fuel pump by applying voltage to its terminals directly from the battery using two long wires. If the above actions do not help, then the fuel pump will have to be removed from the fuel tank and either replaced with a new one, or disassembled and looked for a fault inside it (for example, the brushes are stuck or worn out).
Pressure system
The gasoline pump creates pressure in the fuel rail for normal gasoline supply functionality. Let's measure the pressure and we'll understand a lot right away.
Normal parameters of atmospheres in the system are as follows:
- Idle – 2.5
- Ignition – from 3
- Without pressure regulator tube – 3.3
- With pinched drain – 7
- We press on the gas - from 3 to 2.5.
We will measure in these five states with a pressure gauge with a small range of atmospheres (up to 7, to reduce the error to a minimum). Under the hood we found a pressure fitting (just unscrew the cap in advance), attached a pressure gauge (hose) to the fitting and off we went. The ignition is turned on, the pressure gauge is zero: the fuel pressure regulator is broken. We press on the gas, the pressure gauge goes to zero: the fuel pump itself is broken (now you can do some shopping at a spare parts store). There may still be a situation. When the pressure gauge needle lazily rises, look at the condition of the fuel filter.
By the way, if you don’t have a pressure gauge, it’s sad and sad, because it’s an expensive pleasure. Similar diagnostics in the service will cost half as much.
Wiring contacts
The wiring system goes to the fuel pump in the number of three wires: positive, negative and gasoline level indicator. The cause of a fuel pump failure may be a simple power failure in the wiring. If everything is normal with the pressure, then we check the contacts.
We take a simple 12 V light bulb and attach its wires to the positive and negative contacts on the external connector of the fuel pump, respectively. We turn the ignition: the light blinks, there is contact. Then you need to dig deeper - look at internal contacts.
An external problem with the wiring if the light does not light up: alternately connect the positive and negative contacts removed from the fuel pump connector to the ground of the fuel pump, and then to the snout. Negative contact on ground, turn on the ignition, the light blinks - the contact is not working, the light does not blink - the positive contact is not working. When the contact is on the snout and the light comes on, the wire is damaged in the area from the fuel pump to the snout.
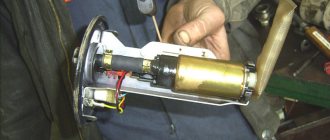
Motor
Fuel pump motor VAZ 2114
We checked the pressure and wiring, everything works like clockwork, but the engine stalls. The fuel pump may not pump due to a breakdown of the motor - the main element that drives fuel. We check its functionality with the same light bulb: attach its wires to any terminal of the motor, turn the ignition. The lamp blinked - it was time to throw out the motor. And again, run to the store for a brand new motor.
The terminals may oxidize and not make contact, as a result of which the fuel pump will not pump. The motor in this case may be normal. And the terminals just need cleaning (possibly re-soldering). There is an opinion that the terminals are oxidized due to low-quality fuel (the octane number does not match the declared one).
The fuel pump does not work, the relay turns on.
Checking relay power.
In the case when the fuel pump relay turns on when the ignition is turned on, but the pump itself does not work, you need to check the power at terminal 87 of the fuel pump relay. To do this, touch terminal 87 of the relay socket with the output of the control lamp connected to the vehicle ground, and the lamp should light up. If the lamp does not light, it means the fuse has blown or there is a break in the wire.
If there is power at terminal 87, you should remove the relay from the socket, and instead place a jumper between pins 87 and 30. In this case, if the pump and connecting wires are working properly, the pump should start working and if this happens, the relay should be changed. If the pump does not start working, then, without removing the jumper, you need to touch the power wire on the fuel pump with a test lamp connected to the vehicle ground.
Checking the fuel pump power circuit.
If a submersible pump is installed on the car as part of the fuel module, you need to remove the connecting connector and touch one of the thick wires. When you touch one of them, the indicator lamp should light up. If the lamp does not light up on any of the wires, then it is necessary to eliminate the break in the wire from the fuel pump relay to the module connector or the pump itself, if the pump is of a remote type. One of the reasons for the break may be the anti-theft blocking of an installed non-standard alarm system.
Fuse
Fuse 15 A
One of the final stages of checking a malfunctioning fuel pump is its fuse. Like the relay, the fuse can be seen from the inside. Or you can climb in from the outside, through the hood. Under the hood, closer to the windshield, there will be a dark box, right on the electronic control unit. You need to open it and find the topmost fuse with a current of 15 A and the English inscription fuel pump. We take it out and look at the insides: the contact is not damaged - the fuse is alive. The contact is damaged (blown) - you need to install a new fuse. As with the price of the relay issue, buying and replacing a fuse will not be a big waste of money and time.
Not every master's hands grow from the right place. For this reason. The reason that the fuel pump does not pump can be simple stupid shortcomings of simple tuning.
For example, the alarm was installed in such a way that all the contacts were mixed up, and power simply does not go to the fuel pump. Not because the alarm should not be on the car, or the wiring system is acting up, it’s just that the person who installed it didn’t have enough brains and practice. Check all connections carefully if you decide to add some style to your little one.
Or anti-theft. The button is placed in such a way that it interrupts the integrity of the fuel pump ground contact system, and almost always fails. By the way, if you have such a lotion, I don’t think it will be very effective in the absence of a signal. And if there is a signaling system, then anti-theft is not needed at all.
In any case, remember: in any situation where a VAZ breaks down, the point is not that it is a VAZ, and it was made poorly. It’s just that the Russian auto industry is a little more delicate than the foreign one, it requires a little more attention and your ingenuity.
If the fuel system on a VAZ-2114 begins to malfunction, then experienced specialists warn that the problem may lie in the fuel pump fuse. Where is this part located? What functions does the fuel pump fuse perform? What are the reasons for its breakdowns? Answers to such questions can be found in this article.
Fuel pump fuse and its functions
The fuel pump safety device, not only on the VAZ-2114, but also on other passenger cars, is just a small element in the vehicle’s fuel system. It has a relatively small size, but carries an important functional load.
The main function of this element to protect the functions of the fuel pump is to open the conductive circuit of the automobile fuel system. This need arises in case of overload of electrical circuits. As soon as such an overload occurs, the fuse element melts as a result of the high temperature, and the electrical circuit becomes open.
Where is the fuel pump fuse on the VAZ-2114
In modern passenger cars, the manufacturer installs several special safety blocks in the current-carrying circuit at once in case of unforeseen situations that could damage the vehicle. This is done to reduce the risk of fire. Such fuses localize the entire electrical circuit to key areas where short circuits are most likely. Any vehicle has instructions that contain detailed diagrams of the location of all parts.
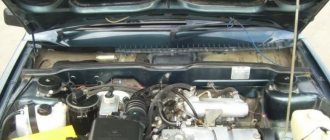
The VAZ-2114 also has a fuel pump safety device located under the hood. More precise location of this part:
- open the hood;
- look towards the windshield;
- there is a plastic box on the ECU;
- This box contains the fuse we need.
On the VAZ-2114 the fuse is marked as follows - Fuel Pump 15A.
We study the signs of a fuel pump failure if it does not pump fuel
The non-pump is one of the key components of the VAZ 2114 fuel module. The gasoline pump helps ensure that gasoline is supplied to the engine at the required level of pressure.
Fuel pump for VAZ 2114
Any guarantees from the manufacturer with the actual service life of the fuel pump have little in common, since its durability directly depends on the operating conditions - even the highest quality VAZ fuel pump can quickly fail due to bad gasoline.
Checking the fuel pump fuse on a VAZ-2114
Experts recommend regularly checking the fuel pump safety device on the VAZ-2114. The easiest way to get to this part is from under the hood, that is, from the outside of the vehicle. To do this, you must follow the following step-by-step instructions:
- Open the hood lid.
- Find the plastic box on the engine control unit.
- Open the small unit, which opens and closes with latches.
- Find the appropriately marked safety device (located at the top).
- Remove the safety element:
- for this you will need forceps, tweezers or a clamp;
- grab the safety device with a tool;
- pull the fuse towards you;
- remove from the nest.
- Perform a visual inspection of this device:
- cracks and chips on the body;
- burnt fusible materials inside;
- carbon deposits on the internal plates;
- contacts are damaged.
If the contacts of the safety device are intact, then it can still function. But in such cases it is not worth the risk; it is best to replace the damaged part with a new one.
If there are obvious signs of combustion on the fuel pump safety device, replacing it will not be enough. You will also need to check other details:
- the entire section of the current-carrying circuit for breaks in it;
- pump relay (may stick);
- fuel pump contacts (terminals may oxidize);
- the fuel pump itself.
According to the marking, the safety element accepts a current of 15 A; you can find a similar one for sale in specialized stores without much difficulty.
Experts warn that if the breakdown problem lies not in a blown fuse, but in another part or in the wiring itself, replacing it will not be enough. It is necessary to determine the reason why this element failed. If this is not done, the new fuel pump fuse will burn out in the same way as the previous one.
Diagnostics
A malfunction of the VAZ 2114/2115 fuel pump can be caused by:
- malfunctions in the device’s power supply circuit;
- failure of starting and protection elements (relay and fuse);
- wear of electric motor parts.
Checking the electrical circuit
At the beginning of the diagnosis, you should check the electrical circuit of the fuel pump. To do this you will need:
- car tester (multimeter);
- crosshead screwdriver;
- two pieces of wire about 2 m long.
Checking the electrical circuit is carried out in the following order:
- Turn on the ignition without starting the engine. When the key is in the first position, a click should be heard, characteristic of turning on the relay, followed by a slight whirring of the pump electric motor. If there is no click, the relay is faulty or is not receiving power. If there is a click, but no buzzing, the wiring coming from the relay or the pump motor itself is faulty.
- Under the glove compartment, find an additional mounting block consisting of three relays and three fuses. The pump relay is located in the middle, and the fuse is located to the left of it. Remove the fuse from its socket, test it with a multimeter, and if the result is negative, replace it. When replacing the fuse, please note that it is rated for a maximum of 15 A.
- Set your multimeter to voltmeter mode. Connect one probe of the device to the relay terminal to which the pink wire fits, and the second to the car body. Turn on the ignition. The device should show the on-board network voltage in the range of 11.7–12.4 V. If there is no voltage, the problem may be a broken wiring or a malfunction of the ignition contact group. In this case, it is better to contact an auto electrician. If power is supplied, check that the relay is working. With the ignition on, use a screwdriver or a piece of wire to close the contacts to which the pink and gray wires go. This closes the circuit bypassing the relay. If the fuel pump works, replace the relay.
- Be sure to check the connection of the pump's negative wire to ground. Often it is the lack of “ground” that causes interruptions in the operation of the fuel pump. Remove the plastic trim from the center console near the parking brake handle. Under it there is a “negative” wire of the pump, screwed to the body with a self-tapping screw. Unscrew it, clean the contacts, screw it back and repeat the test.
- Then check the fuel module. Remove the rear seat, peel back the carpet and sound insulation. Unscrew the two screws securing the gas tank flap and disconnect the electrical connector on the fuel module cover. Using two wires, supply power to the pump directly from the battery. If the pump works, the wiring is faulty; if it doesn’t work, the pump itself is faulty.
Pressure check
If the pump is working properly, but the engine begins to operate intermittently, you should check the fuel pressure in the system. For this you will need:
- pressure gauge (can be a tire gauge with a measurement limit of 5–7 kPa);
- petrol-resistant hose with a diameter of 10–12 mm and a length of 50–80 cm;
- two clamps for a hose of the appropriate diameter;
- Phillips screwdriver;
- nipple cap;
- dry rag.
The verification procedure is as follows:
- In the engine compartment on the engine fuel rail, locate the pressure measuring fitting (on the right side).
- Remove the plastic cap (plug) from the fitting.
- Using the nipple cap, unscrew the spool valve from the fitting. When unscrewing the spool valve, fuel may spray out of the fitting. To remove it, use a dry cloth.
- Place one end of a gas-resistant hose onto the fitting and secure the connection with a clamp. Connect the other end of the hose to the pressure gauge fitting and also tighten the clamp.
- Ask an assistant to turn on the ignition. Wait a few seconds and watch the meter readings. With a working pump, the pressure gauge should show a pressure of 2.8–3.2 kPa for engines with a volume of 1.5 cm3 and 3.7–3.9 kPa for engines of 1.6 cm3. If the pressure is noticeably higher, the pump is faulty.