Automatic tension cable
The design of the clutch cable with automatic tension differs from the usual one only in the tip attached to the pedal. Otherwise, the entire structure remains unchanged. Installation of a tip with auto tension first appeared in 2007 on the Lada Priora. Subsequently, such a cable was borrowed by Niva, Grant, Kalina and Vesta cars.
The principle of operation of such a tip is based on a ratcheting mechanism; over time, when the cable is stretched, the spring of the tip automatically jumps over the “tooth” on the ratchet mechanism, thereby producing tension.
This design principle allows the car owner not to resort to adjustments for a very long time.
The cost of the cable in stores starts from 400 rubles and above, depending on the manufacturer and store.
Flaws
The main disadvantage of the cable is the increased noise level. According to reviews from owners of cars with an automatic clutch tension adjustment mechanism, the cable can make cracking and grinding noises when pressing the pedal.
Correctly adjusting the cable or replacing it with a new one will help get rid of this symptom.
Clutch cable adjustment
Before making adjustments, you need to prepare the car. For convenience, it is recommended to remove the air filter housing.
- Pull out the clutch cable with force and hold it in this position.
- We measure the distance with a caliper or a ruler between the plastic nut of the clutch guide and the release bearing drive fork. The distance should be exactly 27 mm.
- When taking measurements, there is very little space in the engine compartment and it is quite difficult to measure accurately, so it is recommended to prepare a 27 mm stick in advance and measure using it.
- Adjustment is carried out by tightening or unscrewing the plastic nut of the leash, depending on the distance between the parts.
- After completing the work, you must press the clutch pedal several times. This is necessary for the auto-adjustment mechanism to select the correct cable tension.
When adjusted correctly, the leash will fit snugly against the fork, and the clutch pedal will be 20 cm from the floor or at the level of the brake pedal
Source
Self-diagnosis
Most often, problems with clutch operation are associated with the pedal. The pedal is loose, squeaks, or is too tight. A tight clutch can also be mitigated by adjustment.
But the problems that occur during operation of the lever already relate to the mechanism itself: clutch disc, basket, fork. The sensor is in between and rarely shows the real problem. If the problems inside are more serious and the best solution is a trip to the service center, then we can correct the symptoms of the pedal ourselves.
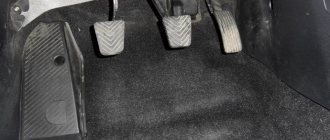
Adjustment begins with inspection. We take a regular ruler and measure:
- Cable clamp and fork. There should be a standard 27 millimeters between them. Plus or minus 2 millimeters. If the distance does not match, then you need to adjust
- Pedal travel. We rest one edge of the ruler against the floor, under the pedal assembly, and with the other we measure the distance to the pedal while parked. Here she should be from 12.5 to 13.5 centimeters. Ideally, it should be flush with the brake assembly. Permissible overshoot - up to 16 centimeters (160 millimeters)
If your pedal assembly or engine compartment elements do not correspond to these numbers, then you need to make adjustments. Let's talk about it further.
Peculiarities
On Lada Priora, Kalina and Granta cars, the clutch cable is the same as on the VAZ of previous years. On new cars, the only difference is the presence of an auto-adjustment mechanism at the end of the cable. This mechanism is designed to automatically adjust when clutch parts wear out and when the cable is pulled out. That is, so that the owner does not adjust the clutch while operating the car.
Video “How to properly remove the cable for replacement”
User Sergei Spiridonov created and posted a video on the Internet that shows the process of removing the cable in a Lada Priora car for its subsequent replacement.
Do you have any questions? Specialists and readers of the AUTODVIG website will help you ask a question
Was this article helpful?
Thank you for your opinion!
The article was useful. Please share the information with your friends.
Yes (100.00%)
No
X
Please write what is wrong and leave recommendations on the article
Cancel reply
Rate this article: ( 2 votes, average: 5.00 out of 5)
Discuss the article:
Clutch cable adjustment
Pull the cable forward (in the direction of travel) by its end, overcoming the force of the clutch pedal spring. Holding it in this position:
- Measure the distance from the end of the plastic guide to the clutch fork lever. The distance should be exactly 27mm. There is not enough space in the engine compartment, so it is recommended to prepare a twig or wire 27 mm long in advance and adjust it along it.
- If this value is different, then adjust it by rotating the leash.
- After releasing the clutch cable, the leader should be adjacent to the fork lever without play.
- Press the clutch pedal three times to activate the automatic cable length adjustment mechanism.
- Check the full travel of the clutch pedal; it should not exceed 146 mm.
The process is also explained in the video:
According to reviews from Lada car owners, the auto-adjustment mechanism can make cracking and clicking noises when pressing the clutch pedal. Some manage to get rid of the problem by changing the recommended length (27 mm) up or down. Finding a suitable distance is determined by the selection method.
Mechanics
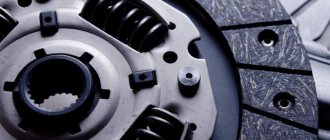
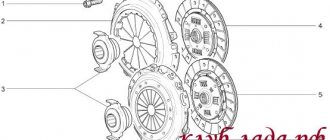
Mechanically, the clutch operation process is extremely simple. Let's analyze it from the moment the movement begins. After starting the engine, the car is in neutral gear (starting the engine in gear is bad manners). The clutch is depressed all the way - this means that it is turned off, the driven and pressure plates have separated, that is, a moment is created to change gear. The gearshift lever is moved to position 1, and first gear is engaged.
The pedal is smoothly released (the clutch is engaged), at this moment the most important thing happens: the distance between the pressure plate and the driven one is constantly decreasing, and the force transmitted by the engine has already set one disk in motion, which makes the moment of “collision” of the two disks become difficult. If the pedal is released abruptly, they will quickly touch, which means that the disc will pause (imagine walking and tripping over a stone - much the same thing happens with an engine).
The engine may stall, or in the best case, the car will simply “bite.” At such moments, the “petals” on the driven disk suffer greatly - the more “flattened” they become, the closer the time for replacing the “hitch” is. If the discs come into contact smoothly and the driven disc is slowly set in motion, the car starts from a standstill.
Features of the Lada Priora clutch
Any motorist interested in how to adjust the clutch on a Priora should know about the presence of the drive cable auto-adjustment function. That is, VAZ designers took care of the owner and saved him from the need to constantly adjust the clutch drive mechanism during operation. The same ratchet-type system is installed on Kalina , but both there and on Priora it is impossible to do without periodic adjustments. This factor has been proven by practice and forum discussion pages.
How does an automatic cable tensioner work?
In the release drive on the VAZ 2170, there are no gaps as a concept, hence the name - backlash-free clutch. The ratchet mechanism serves to compensate for the working length of the cable as the driven disk linings wear out. To understand the process, it is important to accept the following data:
- During operation, the driven disk wears out and its linings become thinner - as a result, the release bearing and basket springs shift towards the gearbox.
- Accordingly, the fork at the place where the cable is attached moves towards the radiator.
- The spring located on the bushing of the adjusting mechanism is compressed at this time and tightens the clamps of the cable tip.
- As a result, the tip is pulled out of the driver, due to which the wear of the disc linings is compensated.
For those who don’t yet know how to adjust the clutch on a Priora themselves, it is important to take into account the moment when the linings are new. In this case, when releasing the pedal, the ratchet bushing will only lightly touch the bracket without releasing the clamps. Therefore, the toothed tip of the cable will not move relative to the housing. Only as the linings wear out does the spacer sleeve release the spring-loaded clamps and the cable tip extends to the amount necessary to balance the worn parts.
When is adjustment of the clutch drive mechanism necessary?
Despite the presence of innovative ideas in the field of transmission control, Togliatti automakers still recommend checking the condition of the ratchet mechanism at every maintenance. In addition, it would be a good idea to pay attention to the signs that indicate problems with the clutch control system:
- Loss of traction due to unreliable connection between the flywheel and the disk.
- “Sagging” of the clutch pedal.
- Difficulty changing gears.
- Extraneous sounds when using the clutch pedal.
The symptoms are generally identical to those when the drive needs to be adjusted on a VAZ 2110 , i.e. their identification should not cause any problems. It should not be forgotten that the automatic tensioner has its own compensation limits. The working stroke of 27 mm is the same stroke of the compensator.
In other words, during the operation of the disk, the fork moves precisely by this length. Therefore, the problem of how to adjust the clutch on a Priora car can practically be solved in an elementary way. Even if you want to, you won’t be able to overload the release bearing.
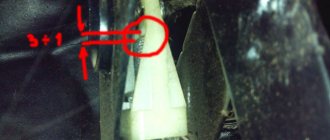
How to check the clutch drive parameters of a VAZ 2170?
A few simple steps will help you make sure that the drive needs to be configured:
- Open the engine compartment hood.
- Disconnect the MAF sensor and remove the air filter.
- Just below the battery, find a cable with a plastic clip.
- Pull the mechanism clamp forward in the direction of travel.
- Holding the tip in an extended position, measure the distance L (in the photo), the norm corresponds to 27 mm.
It wouldn't hurt to know
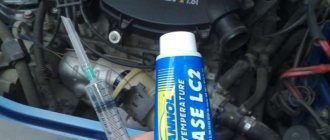
What do most owners of new Lada Priora do? Naturally, they treat the body with Movil or something similar against corrosion; they don’t have any more problems at the initial level. However, there were complaints about squeaking when pressing the clutch pedal; sometimes it was present when the engine was warm, sometimes only when it was cold - the essence is that there is a problem.
Of course, everyone immediately starts reading the “primer book” on how to correctly adjust the clutch on their Priora, which sometimes helps, but the fact of the matter is that sometimes. After this, owners can try several more methods, after which the squeak may disappear:
- Replace the drive cable, some drivers praise the “tenth”.
- Check the presence of a spring in the automatic tension mechanism; sometimes the effect can be achieved after replacing the standard part with a spring with greater elasticity.
- A certain percentage of car enthusiasts get rid of the crackling noise by lubricating the fork and the plastic cable nut.
- Lubricate the installation site of the plastic bushing on the pedal bracket with lithol.
- Remove the boot from the fork lever and lubricate the gearbox input shaft with graphite grease from a can.
It is worth considering another effective method, shown in the video, which is used by experienced car enthusiasts. Its essence is as follows:
- Disconnect the mass air flow sensor and remove the air filter.
- Remove the clutch release rod plug.
- Release the cable from the clutch fork.
- Pour 30-40 ml of gear oil from a syringe.
- Move the fork back and forth 10-15 times.
- Reinstall the cable, plugs and filter.
Using the example of the second part of the article, it becomes clear that adjusting the clutch drive does not always bring the desired effect in the fight for acoustic comfort. Although, from a technical point of view, the procedure is necessary, since it ensures productive operation of the car.
Source
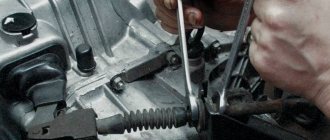
Removal process
First of all, you will need to dismantle the air filter:
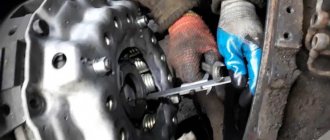
- remove the cable itself, using a leash to remove it from the fork of the drive that disengages the clutch;
- using 17 keys (2 pieces), partially unscrew the two nuts holding its shell on the gearbox crater bracket and pull it out;
- under the dashboard, located directly in the car interior, tighten the nut with an 8mm wrench from the pedal itself.
You just have to remember that getting to the place where the lower part of the cable is attached to the pedal will be quite difficult.
Access is hampered on one side by the engine compartment partition, and on the other by the lower edge of the instrument panel. The work space is significantly limited. But performing the required operation is quite simple - using a flat-head screwdriver that fits the length.
It will be much more difficult to remove the staple. To make it easier to operate, the pedal is raised as high as possible. Ideally, the bracket should appear above the opening. The main thing is to remove the fastening from the cable itself. In the future, it is easy to put on the bracket either using pliers with long lips, or from the side of the power unit with your hands.
Next you will need:
- remove the expansion tank of the engine cooling system;
- dismantle the thermal insulation of the engine on the left side;
- Unscrew the bolts and remove the fastening brackets holding the rubber boot in place (both on the left and on the right) and remove it completely;
- Using a screwdriver, carefully remove the retaining bracket from the fastening axis of the cable guide;
- the latter, in turn, is removed from the foot drive finger.
It is important not to lose the plastic sleeve installed there. Without it, the cable cannot be attached. If it becomes unusable, you need to put a new one on your finger.
Finally, all that remains is to pull out the mat holders (there are 2 of them). This must be done carefully, since they are plastic and break easily.
After this, you need to remove the rubber cover installed in the partition of the engine compartment and finally pull out the damaged cable.
Priora clutch adjustment: detailed description of settings
Carrying out such an operation as adjusting the clutch on a Priora is of interest to many novice motorists. The fact is that this technical problem occurs quite often when operating a car. Clicking noises may be heard while driving. The cause of the sounds is a malfunction of the clutch drive. It is not difficult to get rid of this problem with your own hands.
Causes of breakdowns and solutions to problems
Domestic automakers are not particularly reliable and durable in their parts and assemblies. It is not surprising that many car components quickly fail and are no longer suitable for further use. All this causes many car owners to have characteristic problems in the operation of the clutch mechanism on their car. However, you should not blame only car manufacturers for all the problems that arise, since many malfunctions are the result of careless operation of the car by the car owner himself.
| Cause |
Solution
The cable should be adjusted as often as possible. The fact is that such preventive work helps to avoid a number of problems and, accordingly, allows you to save a considerable share of the financial resources of car owners. Normal operation of the clutch mechanism is the key to safe operation of the vehicle.
Removing clutch pedal clicks
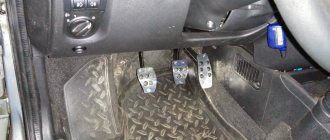
How to adjust the clutch? If the clicking becomes constant, then you can get rid of this problem in a simple way, showing a little ingenuity, and you need to use an ordinary ruler. As a rule, clicking sounds come from the clutch control unit. You need to do the following: open the hood of the car and inspect the area to the left of the battery. This is where the clutch cable goes into the fork. To inspect it you will need to pull it out of the plug.
Using a ruler, measure the distance from the base of the cable to the adjusting screw. The distance must be exactly 27 mm. The main factor in adjusting the Priora clutch is accuracy. It should be noted that this indicator should in no way increase or, conversely, decrease with a deviation of even one millimeter.
Otherwise, the pedal will continue its annoying clicking. Now you need to put the cable back. After adjusting the distance, you need to depress the clutch pedal several times. Having eliminated this problem, the softer operation of the clutch release pedal will immediately become noticeable, compared to how it worked before the adjustment.
Basic principles
Replacing the clutch cable on a Priora involves subsequent adjustment of this unit. Auto mechanics know how to adjust the clutch. If the Lada is a front-wheel drive car, then the clutch pedal should be at the same level as the corresponding element of the brake system. In this case, the full stroke of the first device should fluctuate between 125-135 mm. Oscillations up to 160 mm are allowed.
Clutch adjustment involves loosening the 1st clutch cable adjusting locknut. It is located in the engine compartment on a bracket. By tightening the 2nd locknut, the pedal travel is adjusted. In this way the desired value is achieved. Upon completion of this procedure, the 1st locknut is tightened.
If complications occur, you will need to seek help from specialists. Often, adjusting the cable does not solve the existing problem. It should be noted that after installation, the gearbox is mounted manually (on weight and without various devices). When performing this work, a slight misalignment of the first shaft is allowed. But this factor can lead to breakage of the cermet bushing and loss of the driven disk.