The gasoline pump is an integral part of the power system of a gasoline engine. In order for the pump in the Lada Kalina model to function uninterruptedly, there must be a working fuel pump relay in its electrical supply circuit.
The pump takes in a portion of fuel, which is traditionally located in the tank. In Lada Kalina, this container with gasoline is located in the rear of the body. There are special pipelines as lines that transport fuel not only to the ramp with injectors, but also back to the tank. Using a pump, a certain amount of pressure is generated in the fuel rail, which allows the injectors to spray gasoline in the form of a torch (the so-called “fog”). The fuel pump fuse also plays an important role.
Checking the fuel pump relay yourself
At the beginning of the test, you need to get to the following elements: the pump fuse and its relay.
Having decided which relay is responsible for the fuel pump, you should also inspect the fuse. Additionally, you need to check the fuse because the fuel pump relay heats up and then does not respond in a timely manner or does not operate at all due to a malfunction of the specified fuse. The easiest way to check is to install a known working device. Also in the list of general ways to check a fuel pump relay with your own hands, you can highlight one when a test lamp is connected instead of a relay. After turning on the ignition, the light should light up. You can also place a jumper on the terminals during diagnostics. If after turning the ignition key the fuel pump starts to work, then this indicates a malfunction in the fuel pump control device.
Now let's look at another available way to check using the example of a VAZ 2110 car. The fuel pump relay itself in this model is located near the fuse.
To check, you will need a multimeter or a test light of no more than 0.25 A. Next, you should alternately measure the voltage at the control terminals of the device, simultaneously fixing the contact to ground
This method allows you to accurately determine whether the fuel pump relay needs to be replaced. If the warning light does not light up, the pump fuse is working or replaced with a known working one, then attention should be paid to the wiring from the relay to the computer. At the same time, the possibility of malfunctions in the engine control unit should not be ruled out.
Finally, we add that the element may also refuse to work or stick after failures or unqualified installation of a car alarm/immobilizer. The fact is that security and anti-theft systems with an engine start blocking function are often based on interrupting the power supply to the fuel pump. In this case, these systems must be diagnosed separately.
The fuel pump does not pump: causes and diagnostics
VAZ 2110 fuel pump pinout
Let's start with the fact that if the gas tank is full, the battery is charged, the spark plugs are dry and there is a spark, the starter turns the engine normally, but the engine does not seize, then you should pay attention to the gas pump. A common problem is that there is no power to the fuel pump after the ignition is turned on.
In a similar way, the malfunction manifests itself in motion, when the power to the fuel pump is lost and the engine suddenly stalls.
An equally important point is how much the fuel pump pumps. In other words, the pump may hum and buzz (power is being supplied), but not create the required pressure in the fuel line. The pressure in the fuel system with a working fuel pump must be more than 3 bar (which depends on the specific car model). The indicated pressure is accumulated in the fuel rail and has an indicator of 300 kPa and above.
To check, you need to measure the pressure in the fuel rail with a pressure gauge, taking into account the indicators that are the norm for a specific car model. Using the example of injection VAZs, the pressure when the ignition is turned on is 3 atmospheres, at idle the figure is 2.5 atmospheres, when you press the gas 2.5-3 atmospheres. This method will help you accurately determine:
- malfunction of the fuel pressure regulator in the rail;
- breakdown of the fuel pump or a noticeable decrease in its performance due to wear;
- severe contamination of filters (fuel filter and/or fuel pump mesh);
In the second case, when you press the gas, the pressure does not increase; in the latter case, the pressure gauge needle rises, but very slowly or jerkily.
A decrease in pressure below the norm will lead to the fact that the engine may not start or start with difficulty, stall, jerk, operate unstably and with failures. If this happens due to the fault of the pump and not the fuel filter, then there is a high probability that the coarse filter screen of the fuel pump is clogged. In this case, there is no need to change the fuel pump itself, since it will be enough to replace or even clean the mesh.
If you suspect that there is no voltage to the fuel pump, there is a quick way to check. It is enough to turn the ignition key and listen, as when you turn the key you should hear a slight hum from the fuel pump. If such a buzzing noise is not heard, it means there is no power to the fuel pump, there are problems with the wiring, etc.
Also in the general list of possible reasons why the fuel pump does not pump, the following are noted:
- failure of the fuel pump fuse;
- fuel pump relay failure;
- problems with the ground of the fuel pump;
- malfunction of the electric motor of the fuel pump;
- oxidation or damage to fuel pump contacts and terminals;
- the fuel pump itself is faulty;
Wiring to the fuel pump
On most cars, the wiring to the fuel pump consists of three wires: “plus”, “minus”, and also a wire for indicating the amount of fuel in the gas tank. If the fuel pump does not pump, then the cause may be a lack of power.
To check the power to the fuel pump, just take a 12-volt light bulb and supply it with power from the external connector of the fuel pump. After turning the ignition, the control lamp should light up. If this does not happen, then the problem is in the external circuits. If the lamp comes on, it will indicate the need to check the internal contacts of the fuel pump.
Lada Kalina Hatchback 2010, 81 l. With. breaking
YouTube pranks and fuses for Lada Largus
Lada Kalina, 2010
Comments 12
Who can tell me that after replacing the fuel level sensor, the full tank is constantly on, although in reality it’s not like that, what could be the problem? And does the binzo nasmos work every other time?
Hello everyone, I have a current question, I heard that this is a pump relay for two people with a lambda probe, is this true? If so, then it could be that if the relay fails, the lambda probe switches off
The problem is solved))))) all fuses and relays were in good working order. (voltage appeared at the fuel pump terminal when the pink and black, or pink and brown wires were shorted). I removed the fuel pump, washed it with gasoline, one contact was oxidized (the contact in the place where the terminal goes into the fuel pump body), replaced the mesh (it was not very dirty). Assembled and connected everything. ready)) And lo and behold, it started))) Thanks AIVM
for your help)))))
Thanks for the tip, I had exactly the same thing: www.drive2.ru/l/10494136/
The problem is solved))))) all fuses and relays were in good working order. (voltage appeared at the fuel pump terminal when the pink and black, or pink and brown wires were shorted). I removed the fuel pump, washed it with gasoline, one contact was oxidized (the contact in the place where the terminal goes into the fuel pump body), replaced the mesh (it was not very dirty). Assembled and connected everything. ready)) And lo and behold, it started))) Thanks AIVM
for your help)))))
Hi, where exactly did you close the wires?
Hello. It was a long time ago. I do not remember.
PS the starter turns, the battery is not dead, there is gasoline.
For viburnum, the fuel pump is included in the so-called kit. “fuel module”, which is immersed in the gas tank. It’s easy to check the presence of voltage on the pump: lift the rear seat cushions, bend the carpet and insulation (there will be a cutout, just between the cushions) and there you will see a screwed-on steel hatch, the module is located under it, remove the terminal from it and use a multimeter to check the voltage, the ignition should be turned on, it’s not bad if you try to start the engine. You can also simply check the pressure in the fuel rail. If there is no voltage, look at the relays and fuses. It’s also a good idea to check the ECM for antifreeze (a childhood disease in most viburnums). In general, check and post the results.
I don’t have a multimeter, and unfortunately I don’t know how to use it. I removed this hatch under the seat, pulled out the terminal, there are 4 wires on it (pink, black, gray, and brown) I tried checking with a light bulb, with the ignition on, it doesn’t light up, it’s shorted to pink and black wires. The switches, which are located in the air duct of the front passenger's feet, click. There are 4 of them and a 50A fuse, which one is for what? There is no pressure in the fuel rail, because... when you remove the hoses from the fuel pump, gasoline does not flow out of them. The ECM is not filled with tasol, when I took it off and looked at it, it was completely dry and a little dusty.
In front of the gearbox there is a plastic hatch with a picture of the engine, remove the cover, there will be three fuses. F1 15A: Main relay circuits (cooling system electric fan relay winding, canister purge valve, air flow sensor, speed sensor, oxygen concentration sensor, ignition coil) F2, 15A: Fuel pump F3, 15A: Electronic control unit (constant power circuit). The fuel pump relay is in the front passenger footwell air duct, next to the 50A fuse. The 50A fuse controls the electric fan of the cooling system. Relays from right to left of the fuel pump relay: cooling system electric fan relay (low speed), main relay, cooling system electric fan relay (high speed). If I’m not mistaken, the fuel pump power supply is gray and black wires, pink is the wire from the fuel level sensor.
Troubleshooting pumps
Now let's move on to consider the situation when the reason lies directly in the fuel pump itself. Replacing a unit is a drastic measure that can be avoided in almost the vast majority of cases.
Scheme
- To check the LADA Kalina pump, you will need to dismantle it.
- Access to the device location is provided through the rear of the cabin. To do this, you will need to remove the rear seat cushion.
- The pump module is closed with a special cover; when removing it, you will need to remove the fixing fasteners.
- When the ignition is turned on, the pump may not pump at all or supply fuel intermittently. If this is present, the device requires maintenance or replacement.
- The further dismantling process involves removing the cover and disconnecting the pipes.
- Now you can unscrew the locking ring, after which you need to carefully remove the pump from the cavity of the fuel tank.
- We carefully inspect the dismantled unit for clogging of the filter present in its module, which is made in the form of a mesh. If it is not very clogged, then it can be washed, but when there are breaks and a high degree of contamination, then no alternative replacement is required.
List of contact relays
Removing the instrument panel assembly with heater Lada Kalina
If we open the main fuse box of Kalina 2, we will see a set of electrical relay housings. There are no other blocks containing relays in the car. We list the elements used in the “Lux” package (21927/21947):
- K1: radiator fan relay;
- K2: relay switching on door locks;
- K3: additional starter relay;
- K4: additional relay (switches current 50A);
- K6: wiper relay;
- K7: relay that turns on the high beam;
- K8: signal relay;
- K9: relay that turns on the low beam;
- K10: rear window heater relay;
- K11: main ignition relay;
- K12: relay turning on the fuel pump;
- K13: additional relay;
- K14: radiator fan relay 3;
- K15: windshield heater relay 1;
- K16: windshield heater relay 2;
- K17: relay that turns on the air conditioning compressor.
You can compare the layout of elements in “Lux” and in “Norm/Standard”:
This is how the relays are located in different configurations, 21927 and 21925
Let's consider the data relevant for the “Normal/Standard” configurations:
- K1-K12: as above;
- K13: radiator fan relay 3;
- K14: windshield heater relay 1;
- K15: windshield heater relay 2;
- K16: air conditioning compressor relay.
The last list is also relevant for Kalina Cross Norma. And in more expensive trim levels of the crossover, the “Lux” scheme will probably be used.
Decoding the fuses on Kalina 1
| Marking on the diagram | Current strength, A | Protected elements of the electrical network |
| F-1 | 10 | Turn signals, reverse signal, immobilizer, instrument panel |
| F-2 | 30 | Electric door windows |
| F-3 | 10 | Emergency Signal |
| F-4 | 20 | Windshield wipers and washer, turning off heated rear view glass |
| F-5 | 25 | Interior heater engine (heater) |
| F-6 | 20 | Sound signal (beep) |
| F-7 | 10 | Car interior lights, brake lights |
| F-8 | 20 | Heated rear view glass |
| F-9 | 5 | Right dimensions, glove compartment lamp |
| F-10 | 5 | Left dimensions, external rear license plate illumination |
| F-11 | 7,5 | Rear fog lights |
| F-12 | 7,5 | Right low beam, low beam position control for right headlight |
| F-13 | 7,5 | Left low beam, low beam lamp position corrector for left headlight |
| F-14 | 10 | Right high beam |
| F-15 | 10 | Left high beam |
| F-16 | 10 | Right front fog lights |
| F-17 | 10 | Left front fog lights |
| F-18 | 15 | Seat heating |
| F-19 | 10 | ABS brake system |
| F-20 | 15 | Cigarette lighter |
| F-21 | 10 | Reverse fuse "Kalina" (limiter on the gearbox) |
| F-22 | 15 | Security alarm |
| F-23, F-24, F-25 | Stock | |
| F-26 | 25 | ABS |
| F-27 | 50 | Electric power steering |
| F-28 | 50 | ABS |
| Marking on the diagram | What is he responsible for? |
| K-1 | Headlight washer and brushes |
| K-2 | Power windows |
| K-3 | Starter |
| K-4 | Backup relay |
| K-5 | Turn signals, hazard signal |
| K-6 | Windshield wipers |
| K-7 | High beam |
| K-8 | Sound signal (beep) |
| K-9 | Fog lights |
| K-10 | Heated rear window |
| K-11 | Heated seats |
| Designation on the diagram | Current strength, A | Protected elements of the electrical network |
| F-1 | 15 | Main relay fuse, which is responsible for the engine cooling fan, canister purge, mass air flow sensor (MAF), speed sensor, oxygen sensor and ignition coil |
| F-2 | 15 | Fuel pump |
| F-3 | 15 | Electronic engine control unit (ECU), or in common parlance “brains” |
| Designation | Protected elements of the electrical network |
| F-1 | Kalina cooling fan fuse |
| P-1 | Engine cooling fan second speed relay |
| P-2 | Main relay |
| P-3 | Engine cooling fan first speed relay |
| P-4 | Fuel pump relay |
Starter fuse for Lada Granta
Tips for motorists
The electric fuel pump, located in the gas tank of a Lada Kalina passenger car, can be considered the heart of the fuel injection engine power system. It is he who creates the necessary pressure in the ramp, the magnitude of which determines the operation of the electromagnetic injectors. The controller controls turning the fuel pump on and off. When the driver turns the key to the “ignition on” position, voltage is supplied to the fuel pump terminals for 3-5 seconds through the main relay. And as soon as the engine crankshaft begins to rotate, then, based on the signal from the DPKV sensor, the controller turns on the fuel pump relay and the voltage to its terminals goes through the contacts of this relay.
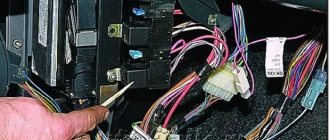
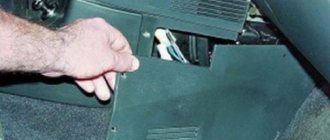
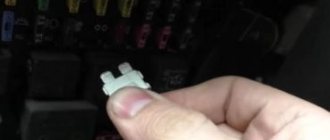
As you know, all electrical circuits in a car’s electrical wiring are protected by fuses, and if the fuel pump does not want to turn on, then they are the first to be checked. You can find a fifteen-amp fuse that protects the fuel pump circuit in the additional mounting block located next to the cigarette lighter. In order to open its cover, you will need a flat-head screwdriver. This block has four fuse slots. If they are in the first, second and third sockets, then you will need to check the middle fuse, since it is the one that protects the fuel pump circuit.
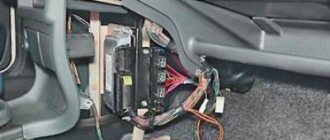
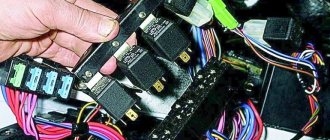
Having found out that this fuse is intact, the next step is to check the fuel pump relay. It is located behind the air duct cover located at the front passenger's feet. To remove it, you will have to unscrew one screw. Next, unscrew the nut securing the L-shaped metal plate and pull it out along with the four relays attached to it. The fuel pump relay is attached to the bottom of the plate, and the middle one of the three that is on the top of the plate is called the main relay. We check the functionality of the relay by replacing it with a known-good relay.
If checking the fuse and relay did not give the desired results, then by applying voltage directly from the battery terminals to the fuel pump terminals (gray wire plus, black wire minus) we check whether the fuel pump will work. If it turns on, then the fault will need to be looked for either in the absence of contact in the wire going to ground, or in a break in the wire going from the fuel pump relay to its block. A break in the gray wire is possible at the feet of the rear passengers, since the harness of 4 wires to the fuel pump block goes under the carpet, in the middle of the cabin.
The fuses and relays for the fuel pump and engine cooling fan are not located where the main fuses are, but in another place, or rather even in two. One is located near the gear lever under the ashtray.
The lid opens easily and simply, you just need to pry it with a flat screwdriver.
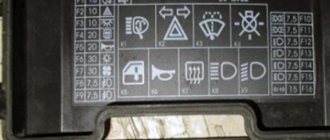
Let's take a closer look at what each element looks like.
Number 1 is the power circuit of the main relay, number 2 is the fuel pump, 3 is the constant power supply circuit of the ECU, 4 is the connector for ECM diagnostics.
If one of the fuses fails, you need to remove it and insert a new one. The battery must be disconnected.
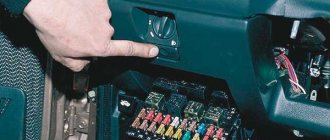
The next fuse box is located on the right side of the panel near the heater duct. More details can be seen in the picture.
First, unscrew the self-tapping screw, it is located in the corner on the right, and then remove the cover.
In order to remove the relay block, you need to use a 10mm socket or open-end wrench.
Then carefully move the wires and pull out the fuse box. I would like to note right away that it is not very convenient to pull it out; the wires get in the way; after removal it looks like it is shown in the picture.
In this mounting block, number 1 is the switch on of the engine cooling fan (low speed), number 2 is the main relay, number 3 is the switch on the engine cooling fan (high speed), number 4 is the fan fuse, number 5 is the fuel pump switch relay. .
If one of the fuses or relays fails, replace it with a new one. We reassemble in reverse order.
About work culture and regulations
The fuel system of LADA Kalina (and not only) requires cleanliness of both the gasoline itself and the components involved in its supply to the engine. All dismantled parts of the system must be perfectly cleaned and washed before reinstallation. When replacing the mesh, we also recommend replacing the filter used for fine fuel purification. Where is this filter located? It is located inside the right stern wheel arch near the jack stand cup. According to the regulations, this element requires replacement no less than after 30 thousand kilometers.
Note that there are two more mesh filters along the fuel path in the circuit, one of which is installed in front of the fuel pressure regulator, and the second directly in front of the injectors. These filters “take over” fuel that has already been practically purified in the preliminary stages, so the need to replace them is extremely rare.
How to replace the fuel pump Lada Kalina Blog
In order to get to the location of the fuel pump on the Lada Kalina, you must first recline the rear seats and remove the insulating trim on the floor.
We find the lace between the rear seat belt buckles and pull it up, raising both seats. Below I will tell you what tools may be needed for this repair:
- Phillips and flathead screwdrivers
- Hammer
- Pliers
Removing and installing the fuel pump Lada Kalina:
Under the floor covering there will be a metal cover, black, as shown in the photo below. You need to unscrew 4 bolts on it:
Next, when all the screws are unscrewed, you can safely remove it with a slight movement of your hand:
After which the following picture opens, where we see the upper part of the Kalina fuel pump and all the fittings that are connected to it:
Now you can begin to remove the wires and hoses and the fuel pump. First, disconnect the power plug, which is located on the left side. Push the plastic lock up a little and pull the plug to the side.
Disconnect the fittings one by one. The lower one is removed as follows: with one hand we press on the metal locking clamp, and with the other hand or pliers we pull the fitting to the side:
The top one is removed in the same way, only there is a slightly different latch - green. You need to press on it with one hand and pull the tip to the side with the other.
- It is advisable to clean everything around the fuel pump thoroughly so that when dismantling, no dust, dirt or other debris gets inside the tank.
- Next, you can begin to remove the large metal ring that secures the pump. The factory uses a special puller for these purposes, but you can do without unnecessary devices. Simply place a flat-head screwdriver on the end of the ring and slowly tap it in a counterclockwise direction with a hammer until the ring comes out of the mounting grooves.
The Jonnesway screwdriver coped well with this test, its body remained intact and undamaged after numerous hammer blows! After the clip has popped out, it can be removed:
Now you can start removing the fuel pump. Take it by the top and gently lift it up. You should be very careful not to bend the structure on which the float is attached. To do this, while lifting the pump (closer to the very top), tilt its upper part slightly towards the right rear door. And take it out, as if diagonally, so as not to catch the float.
The photo below shows the result of the work done to remove the Kalina fuel pump:
If this part needs to be replaced, then install a new pump and perform the installation in the reverse order. Be sure to wipe the rubber and around the seat dry before doing this so that no debris gets into the tank.
Kalina fuse box
| Electrical problems with Kalina occur just like with any other car. Finding out the causes of malfunctions is usually done by checking fuses and relays. |
Mounting block Kalina
| F1(10) | Immobilizer, warning lights and arrow indicators of the instrument cluster, switch circuits and reverse lamps, turn signal circuits |
| F2 (30) | Power window circuits |
| F3 (10) | Alarm circuits |
| F4 (20) | Windshield Wiper, Rear Window Defogger Switch Circuit |
| F5 (25) | Heater motor, electric power steering control unit, windshield washer |
| F6 (20) | Sound signal |
| F7 (10) | LCD instrument cluster indicator, brake switch and lamps, interior lighting |
| F8 (20) | Rear window heating element |
| F9 (5) | Side light lamps in the right headlight and right headlight, glove box lighting lamp |
| F10 (5) | Side light lamps in the left block headlight and left lamp, outdoor lighting indicator in the instrument cluster, license plate lamps |
| F11 (7.5) | Rear fog lamp circuits |
| F12 (7.5) | Low beam lamp (right headlight), gear motor for right headlight corrector |
| F13 (7.5) | Low beam lamp (left headlight), gear motor for light corrector of the left headlight |
| F14 (10) | High beam lamp (right headlight), high beam indicator in the instrument cluster |
| F15 (10) | High beam lamp (left headlight) |
| F16, 17 (10) | Fog lamps (optional) |
| F18 (15) | Seat heating elements (optional) |
| F19 (10) | ABS electrical circuits (optional) |
| F20 (15) | Cigarette lighter heating element |
| F21(10) | Transmission reverse lock chain |
| F22 (15) | Security alarm control unit |
| F23 | Reserve |
| F24 | Reserve |
| F25 | Reserve |
| F26 (25) | ABS electrical circuits (optional) |
| F27 (5) | Spare |
| F28 (7.5) | Spare |
| F29 (10) | Spare |
| F30 (20) | Spare |
| F31(50) | Electric power steering |
| K1 (optional) | Headlight washer relay | Headlight washer motor |
| K2 | Power window relay | Power window motors |
| short circuit | Starter relay | Starter traction relay |
| K4 | Additional relay | Rear window defroster switch and relay coil, heater motor switch, windshield wiper and washer switch |
| K5 | Relay-breaker for direction indicators and hazard warning lights | Turn signal and hazard warning lamps |
| K6 | Windshield wiper relay | Windshield wiper motor |
| K7 | High beam headlight relay | High beam lamps for headlights |
| K8 | Horn relay | Sound signal |
| K9 (optional) | Fog light relay | Fog lamps |
| K10 | Heated rear window relay | Rear window heating element |
| K11 (optional) | Seat heating relay | Seat heating elements |
| K12 (reserve) | — | — |
Main fuse box Lada Kalina
- diagnostic connector;
- main relay power circuit fuse;
- electric fuel pump relay power circuit fuse;
- controller DC fuse
Additional mounting block Lada Kalina
- Unscrew the relay block mounting nut using a socket wrench.
- Pull the bar.
- Remove the system relay block from under the console.
Control system relay block:
- cooling system electric fan relay;
- electric fuel pump relay;
- fuse (50 A) for the electric cooling fan;
- main relay
| A new relay or fuse should be installed in place of a failed one only after the cause of the malfunction has been determined and eliminated. Only standard fuses designed for a certain rated current may be used. The use of homemade fuses or fuses of increased rating can lead to failure of electrical equipment elements, and possibly to a fire. |
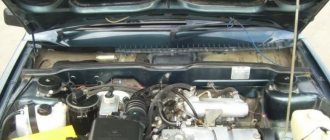
Block under the hood
It is located next to the battery.
Photo - diagram
p, blockquote 23,0,0,0,0 —>
- 30A Low beam headlights or main relay, circuits protected by fuses F1 and F21 of the mounting block in the passenger compartment 50A Windshield heater
- 60A Generator
- 60A Generator
- 30/40A Heater fan (heater fuse grants)
- 50A Electromechanical power steering
- 60A ABS block
Guide to replacing the fuse box on Lada Kalina, explanation
The Lada Kalina has earned a reputation as a comfortable and reliable car. But, like all vehicles, it is not immune to various types of breakdowns. Quite often one or another electrical equipment fails. Some breakdowns are not critical, for example, the cigarette lighter does not work, but there are also those that can completely render your vehicle immobile.
This is, first of all, the failure of such an important component as the fuel pump. It is not always necessary to change the consumer in order to restore its functionality; very often it is enough to replace the fuse and the relay responsible for it to restore its functionality
Car Lada Kalina
Let's say right away that on the Lada Kalina car the electrical circuits are protected by electrical fuses and relays located in several compartments. For example, the fuse for the cigarette lighter is located in the main compartment under the panel, and the fuel pump is located in the additional compartment.
All blocks with electrical fuses are installed in easily accessible and convenient places, so changing and checking protective elements will not cause difficulties even for a novice car enthusiast.
Where is the fuse box?
The largest compartment, which houses most of the fuses and relays, is located on the left side of the instrument panel and is covered with a cover. The second, in which the elements responsible for the power unit control systems are located, is located in the lining of the floor tunnel. This is where the fuel pump fuse is located.
Location of the fuse and relay box on the Lada Kalina
Removal and replacement instructions
Replacing and identifying an unusable element in both the first and second blocks occurs in approximately the same way, so let’s consider the replacement process using the example of the one installed to the left of the dashboard.
Diagram on the back of the cover
Preparation
Be sure to remember that before you carry out work on electrical equipment, it doesn’t matter whether the cigarette lighter or the fuel pump has failed, the first thing you need to do is turn off the power to the system. To do this, turn off the engine and remove the negative terminal of the battery.
This video shows how you can quickly solve a problem with blown fuses on a Lada Kalina.
Steps
- We find the location of the block, it’s not difficult - the designers placed it on the left side of the dashboard under the cover.
- Open the lid.
- Using the diagram and table, we establish the location of the protective element we need.
- The block contains tweezers, with the help of which we extract the required element.
- Let's examine it.
- We check with an ohmmeter or lamp.
- If the spiral is burnt out, install a new one of equal value.
- We connect the removed battery terminal.
- We start the car.
- Let's see whether our consumer has earned money or not.
- If everything is in order, then the work is finished. If the consumer does not work or the electrical fuse has blown again, then everything is more serious. It may be necessary to check the circuit or dismantle the consumer and check it.
Layout of relays and electrical fuses
Explanation of the diagram shown in the photo.
Work with the block, which contains the element protecting the fuel pump and other elements responsible for the operation of the engine, is carried out in a similar way.
The protective element designed for 15 amperes, responsible for the fuel pump of the Lada Kalina, is designated F2 in the photo. To remove it, you need tweezers. All other work is carried out in the same way as in the large compartment.
Recommendations for use
- If you are a responsible car owner, then be sure to carry with you a set of electrical fuses of various ratings. Perhaps they will help you out at some point.
- Under no circumstances should you install wires or bugs. This can lead not only to failure of the electrical consumer, but also to a fire.
- Replacement only with an element of the same value is acceptable.
- Before work, do not forget to turn off the power to the system.
Video “Consequences of using low-quality electrical fuses”
This video shows what danger awaits the driver if he decides to save money and install a cheap Chinese electrical fuse. When a short circuit occurs, the conductive part in it does not burn out, but it simply begins to smoke. Such savings can lead to fire. Buy components and consumables only from reputable stores, otherwise you risk losing your car.
Procedure for servicing the fuel pump, possible malfunctions
You should not always resort to immediate replacement of the Kalina fuel pump, because first you can repair it. But for this you need to select the right tool in advance.
For this device, two parameters are usually monitored: operating pressure and operating performance. After removing the device, you can check the current consumption at rated and full load. But for such measurements you will need a specialized stand.
The initial point of control will be the voltage of the connector that supplies the fuel pump from the vehicle’s on-board power system. Not only should it be equal to 12 V or even slightly exceed this value, but also when the machine is operating, the noise of the operating device should be clearly audible.
The disadvantage of this control method is the inability to detect unreliable contact in the electrical circuit on the way to the connector. Any loose connection in the fuse box, fuel pump relay, will result in the 12 V received at the terminals upstream of the pump showing the same 12 V. But a working pump will receive only a few volts and will not be able to work normally.
Also, a malfunction in such a situation may be a breakdown of the fuel pump relay. This malfunction is easy to diagnose, since special symbols are displayed on the instrument panel, which allows the driver to see an error in the operation of this part.
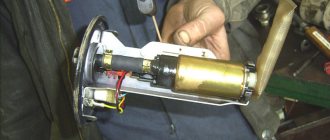
Fuel pump parts disassembled
Checking the pressure created consists of monitoring this parameter in the pump pumping mode, when it turns on after turning the key for 1.5-2 seconds to add fuel to the pipeline system. For Lada Kalina this figure is 0.8-1.2 kgf/cm2. If the pressure turns out to be underestimated, then you should look for the cause of this phenomenon, checking each link in turn: filter, mesh, fuel pump. Ultimately, the part that prevents the pressure from quickly building up to normal will be replaced.
One of the malfunctions of the fuel pump is the rapid loss of pressure in the fuel line after stopping the engine. Moreover, this malfunction should also be diagnosed correctly, because there may be several reasons for the pressure drop. This is a weak nozzle of the power system, and a check valve of the pump, and the pressure regulator itself.
Rapidly falling pressure will cause uncertain or long engine starting, which is especially important at sub-zero temperatures. Despite a generally serviceable power supply and ignition system, starting the engine in cold weather may simply discharge your battery or prevent the engine from starting at all.
So, if it is nevertheless determined that the fuel pump is not working or the fuel filter needs to be replaced (the work operations are largely the same), then the necessary work must be carried out in the following order:
Relieve pressure in the fuel line. To do this, simply let the car sit for 30 minutes after the last start. To be more sure, after turning off the power to the fuel pump, you need to briefly start the engine to exhaust the gasoline in the fuel line. Be sure to turn off the power to the car by disconnecting the negative terminal on the battery. Provide access to the gas tank hatch
To do this, recline the rear seats and, having unscrewed 4 self-tapping screws with a Phillips screwdriver, carefully open the hatch, preventing possible contaminants from entering the tank. Disconnect the electrical connector from the plastic fuel module cover and
The process of removing an electric fuel pump with your own hands
fuel pipes from the cover. Work should be carried out without applying unnecessary force to avoid breaking the plastic parts of the cover. Remove the retaining ring, which will require a special puller. If you use a handy tool, you need to be patient.
You can begin dismantling the pump block by carefully lifting the structure up. Care must be taken as the float can easily be damaged. When removing, you need to tilt the entire block slightly, pulling it diagonally. If the fuel pump does not work and needs to be replaced, installing the new mechanism should be done in the reverse order. Before installing a new pump, it is advisable to fill it with fuel, since a dry fluid supercharger may not be able to pump fuel to start the pump. The fuel pump is not a suction device, but only a pressure device.
About the reasons for the failure of the fuel supply system
As noted, in the Lada Kalina model the fuel pump is equipped with an electric drive. This provides a number of specific and important benefits. Here the priority is simplicity in design and reliability, allowing the device to have an impressive service life. We also note the high safety when the fuel supply system stops functioning when the engine is stopped. In order for the pump to “live for a long time”, it requires high-quality gasoline, which also serves as a coolant for the device.
So, more about the main reasons:
- Fuel with quality standards that do not meet standards. This leads to gradual clogging of the filter and incorrect operation of the gasoline supply unit.
- Open circuit in the electrical power supply circuit of the pump. Here the culprit may be not only the fuel pump fuse, which, by the way, should be checked as a priority, but also the fuel pump relay. Also among the reasons may be oxidized contacts of the pump power supply or broken supply wires, which happens much less frequently.
In any case, if the pump does not work, then a thorough diagnosis of the entire fuel supply circuit will be required; you must check the pump fuse, as well as the fuel pump relay.
Where is the fuel pump relay located?
To answer the question of where the fuel pump relay is located, you need to know exactly the make and model of the car. The installation location on different cars is the area near the injection control unit; the solution can be installed under the dashboard near the fuse box, etc.
Often, if they need to make their own repairs, car enthusiasts are interested in where the fuel pump relay for the VAZ 2110 injector is located. On this model, the fuel pump relay is located near the passenger's left foot under the dashboard. It should be added that the fuel pump fuse is also installed nearby.
Let's sum it up
The fuel system in LADA Kalina is a capricious mechanism that places increased demands on the quality of gasoline and the timeliness of routine maintenance. The uninterrupted functioning of all components in the system is possible only if these two main conditions are met. Let us remind you that owners should replace fine filters no later than after a mileage interval of 30 thousand km, and you now know the pump grid after every 50 thousandth mark, where each component is located.