The transition to using an electric heater tap on Gazelle commercial vehicles has had its obvious advantages. Management has become more convenient, modern and efficient.
But this unit can still fail for one reason or another. To restore the system to its previous functionality, you need to dismantle the old element and install a new Gazelle stove faucet with the appropriate characteristics.
Car owners should know about the features of the electric crane and its varieties used on Gazelles. This will give you the opportunity to make an informed choice, as well as independently carry out all the necessary repair and restoration work.
What is an electric heater valve?
Electric heater valve (heater control valve with electric drive, heater valve) is a component of the vehicle interior/cabin heating system;
a tap or valve to control the supply of coolant from the engine cooling system to the heater radiator (heat exchanger). An electrically operated faucet is similar to a mechanical faucet, but is driven by a built-in electric motor or solenoid. This solution made it possible to abandon the cable drive and implement control of the heater using a button. Electric cranes make it possible to implement various schemes for heating the interior and operating the engine cooling system, while they are easy to use, reliable in operation and have a simple design.
How to dismantle the stove without removing the panels
Most often, dismantling the GAZ 3110 stove involves removing the panel in the cabin. However, removing the panel is not so much a labor-intensive process as it is a lengthy one. In addition, installing the panel in place when installing a new stove cannot always be done correctly: the slightest gap or deviation from the norm can lead to incorrect airflow. Therefore, most often, amateurs remove the stove without removing the panels.
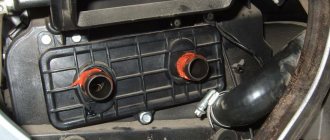
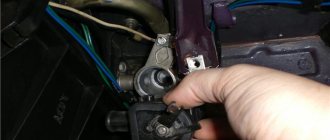
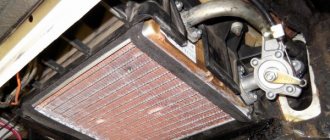
I’ll add a little more, because I’ve just been doing this procedure. You drain the coolant and unscrew the heater valve under the hood and remove the two pipes from the radiator fittings. Everything under the hood. Then you remove the lower shelf in the cabin by unscrewing three screws. Next, unscrew the glove compartment using two screws, then remove the side panel that covers the ECU, then remove the strut cover using three screws. Then you unscrew the panel, one screw on the bottom right and four screws on the top: they are located under the decorative trims that cover the windshield blower nozzles. After this, the panel can be pulled back a little. Next, you unscrew the lower right half of the heater, it has 7 screws, 6 in a circle and one in the center. Unscrewing them is not easy, and screwing them back is even more difficult. Then you pull back the panel and pull out first the lower part of the heater, then the radiator. It’s better to do it together: it’s more convenient. Reassemble in reverse order.
Andrey82
https://forum.allgaz.ru/showthread.php?t=71433
What tools will you need for the job?
To correctly, quickly and safely remove the stove and replace it with a new one, you will need a standard set of tools. As a rule, in the garage of every car enthusiast you can find:
set of wrenches;
a flat blade screwdriver;
a Phillips-blade screwdriver;
a capacity of at least 10 liters for draining coolant;
Drivers often purchase standard tool kits to always have the necessary screwdriver or pliers on hand.
The first step, even before working with electrical devices, is to protect yourself - remove the wire from the negative terminal of the battery. In this way, electronic devices and systems are de-energized.
After this, you will need to drain the antifreeze from the cooling system:
Open the heating radiator tap all the way to the right.
description of the cooling system on the Volga GAZ 31105 car
Gazelle business wiring diagram
download photo to mobile phone
description of the car Volga GAZ 31105 maintenance and repair manual
section 5
cooling system of the ZMZ 406 engine of the Volga GAZ 31105 car. Diagram of the cooling system of the Volga GAZ 31105 car 1 - drain valve of the engine cylinder block; 2 — heater radiator; 3 — heater valve; 4 - engine; 5 — throttle assembly; 6 — thermostat; 7 — temperature indicator sensor; 8 — coolant overheat warning lamp sensor; 9 — electric fan; 10 — sensor for turning on the electric fan; 11 — engine radiator; 12 — expansion tank plug; 13 — expansion tank; 14 — radiator drain plug; 15 — coolant pump; 16 — main thermostat valve; 17 — thermostat bypass valve;
A - thermostat is closed; B - thermostat open
| The cooling system is liquid, closed type, with forced circulation. The cooling system of the Volga GAZ 31105 car consists of a pump, engine radiator, fan, thermostat, expansion tank, cooling jacket (ducts in the block and channels in the cylinder head of the ZMZ 406 engine), connecting hoses and tubes, as well as a radiator and heater tap. The coolant pump is a centrifugal type, installed in the front part of the cylinder block and driven from the crankshaft pulley by a poly-V-belt. The pump provides a constant flow of coolant to the engine. The thermal regime of the ZMZ 406 engine is set by the parameters of the thermostat and the radiator fan switching sensor. The distribution of liquid flows is controlled by a thermostat with two valves; main and bypass. On a cold engine, the main valve is closed, and all the coolant circulates in a small circle - through the cooling jacket of the block and cylinder head, bypassing the engine radiator and immediately returning to the pump. This speeds up warming up of a cold engine. At a temperature of 80-84°C, the main thermostat valve begins to open, allowing part of the liquid to pass through a large circle, and the thermostat bypass valve closes. | At a temperature of 94°C, the main thermostat valve is fully open, and the bypass valve is closed and all liquid circulates through the cooling jacket, then through the main thermostat valve and the engine radiator, forming a large circulation circle. The coolant, passing through the radiator, is cooled, giving off some of the heat to the surrounding air. The radiator is a tubular-tape radiator with side plastic tanks. The tanks are connected to the radiator frame through rubber sealing gaskets by pressing the support plates along the flanges of the tanks. On the plates of the radiator frame there are brackets for attaching the radiator to the body of the GAZ 31105 car, as well as for attaching the fan casing to the radiator. The fan has a six-bladed plastic impeller. Driven by an electric motor. The electric motor is turned on at the command of a sensor installed in the left radiator tank at a coolant temperature of 92 °C. The heater radiator is included in the small circle of the cooling system. The amount of coolant passing through the heater core is independent of the thermostat and is controlled only by the heater valve. Since 2005, a heater valve with a pneumatic drive has been installed on Volga GAZ 31105 cars (see “Heating and ventilation system”). | The expansion tank is plastic, mounted on brackets above the vacuum brake booster. The expansion tank is connected by steam removal hoses to the branch pipe of the left radiator tank (at the top) and to the fitting in the thermostat housing cover, as well as the filling hose to the pump through a tee installed in the lower radiator hose. There is a MAX mark on the expansion tank, indicating the upper level of coolant in the expansion tank. The expansion tank is closed with a screw plug. The tightness of the system is ensured by valves in the expansion tank plug. The exhaust valve maintains excess pressure in the system when the engine is hot (due to this, the boiling point of the liquid increases to 115°C and its evaporation losses are reduced). The intake valve opens when the pressure in the cooling system decreases (on a cooling engine). The cooling system is filled with 10.5 liters of antifreeze liquid “Tosol”. To drain the coolant, there is a drain hole in the lower part of the right radiator tank, closed with a screw plug, and a drain valve is provided on the left side of the cylinder block. |
car brands When using site materials, an active link to car-exotic.com is required! car-exotic.com
do the cooling of the internal combustion engine 406 correctly. It doesn’t boil and isn’t cold.
Varieties
Depending on the shut-off element used, the drive and the number of circuits, there are two types of electrically controlled valves. Moreover, both options can be used on Gazelle cars.
Depending on the number of circuits and the number of pipes, devices are divided into the following categories:
- single-circuit or double-pipe;
- double-circuit or three-pipe.
In the first case, this is a regular tap that only opens or closes the flow of liquid in the system. Two-pipe devices provide for one inlet and one outlet pipe, between which there is a shut-off element. Typically, such taps are used in the interior heating system. They are mounted between the outlet (pipe) of the internal combustion engine cooling system and the inlet on the heater radiator. This allows the driver to control the flow of hot coolant.
The second option is a three-way valve. It is capable of redirecting fluid flows into two pipelines. It uses one inlet pipe and two outlet pipes at once. The shut-off element is made in such a way as to direct the coolant flow into one exhaust pipe, while simultaneously blocking the second. It has found quite wide application in interior heating systems of cars, including Gazelle.
Depending on the shut-off element and the drive, the stove taps are divided into gate valves with an electric motor and shut-off valves with a solenoid drive.
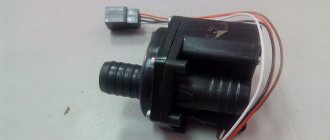
Gate models are structurally quite simple. They are made in the form of a molded plastic case with pipes. There is a rotating plate inside. On the body there is a small electric motor with a gear reducer, which ensures the rotation of the plate.
Models with electric drive work slightly differently. When the stove in the Gazelle is turned off, a plate inside the tap is located between the nozzles, shutting off the flow of liquid. This prevents hot coolant from entering the stove radiator. Thus, the heating in the cabin stops working. If you need to turn on the stove, the driver presses a special button on the Gazelle panel, and the electric motor receives current, turns the plate and allows the liquid to pass through the radiator. To turn off the heating in the Gazelle, just press the button again, and the process will begin to occur in reverse order.
The situation with solenoid valves is different. They are also made of a plastic body, but inside there is a cone-shaped lift gate. When closed, this valve is located on its seat, thereby blocking the flow of hot cooling liquid. The shutter is connected through a rod to the solenoid armature mounted on the body of the electric crane. If no voltage is applied to the solenoid, the channel is in the open position. When starting the engine, the solenoid receives a charge and the valve closes. When you turn on the stove, the solenoid is de-energized, thereby opening the valve and hot liquid flows to the radiator. When turning off the stove, a displacement occurs through the voltage on the solenoid, and the electric valve closes.
Modern furnace equipment on most domestic and foreign cars has switched to the use of electric cranes. They have almost completely replaced the old mechanical devices. These are expected changes, since the current controls on the Gazelle are more convenient and functional.
Repair
Where is the fuel pump relay located Gazelle Business
Repair of the control unit will directly depend on the cause of the malfunction:
- If the power check shows that there is no “+” on the gear motor, then there is a malfunction in the heater control system. It needs to be dismantled and either repaired or replaced with a new one. For repairs, it is better to use the services of specialists, and if you have experience in this work, you can try to solve the problem yourself. To dismantle it is necessary: remove the top drawer for documents; unscrew the front panel (two screws on top and two on bottom); remove the decorative trim; pull out the entire panel so that all terminals can be numbered; disconnect the terminals; then take out the control element itself. Then reassemble everything in reverse order.
- To replace the resistor, you need to either remove the entire dashboard, or cut a hole under the box for documents, after first removing the box itself. To replace the fan, it is necessary to dismantle the entire instrument panel along with the stove. Then disconnect the stove from the dashboard, “halve” it and remove the resistor. If there is no power to the fan block, then the reason must be sought in the heater control system. To do this, you need to check it with a multimeter. Pinout of contacts of the Gazelle Business heater control unit:
- reserve;
- motor-gearbox (MR) feedback, heat-cold;
- access to the BRS;
- reserve;
- 5V, power supply for external temperature sensor;
- tap closing signal;
- tap opening signal;
- coolant heating sensor input;
- external temperature input;
- interior temperature sensor input;
- reserve;
- external temperature sensor housing;
- feedback, MR, glass - legs;
- MP heat – cold “+”;
- MP heat – cold “-”;
- MP recirculation “+”;
- MP recirculation “-”;
- MR glass – chest “+”;
- MR glass – chest “-”;
- MR glass – legs “+”;
- MR glass – legs “-”;
- feedback MR glass – legs 1;
- output of the heated glass and mirrors relay “+”;
- air conditioning relay output “-”;
- frame;
- feedback MR heat – cold 2;
- on-board network.
- To repair the display, you need to dismantle the entire heater adjustment element (as described in point No. 1) and repair or replace the entire assembly unit. If you repair it yourself, you can change the handle illumination diodes to a different color or change the brightness.
Repair of the Daewoo Nexia heater control unit PART 1 The heater is a very important element in the car. It affects not only the driver’s comfort, but also the safety of driving (since if the windows fog up in cold weather, driving becomes difficult). And it’s better to do all the work in a warm garage or parking lot than to do it on the road.
Problems with the control unit
A typical problem directly related to the heater control unit on the GAZ 31105 is the situation when the stove turns on for heating, but cold air blows out of it. Moreover, at first a hot flow may flow, but after some time it switches back to cold mode.
The Volga 31105 uses far from the simplest heater. Electronics became responsible for controlling the temperature in the cabin. Therefore, the problem will have to be looked for among electronic sensors that may short out or simply fail.
It would be a good idea to learn about the nuances of controlling the climate control unit. If the driver needs to switch from cold airflow to hot airflow, or in the opposite direction, the left one first turns all the way, and then returns to the desired position opposite the required number.
The temperature in the cabin on the Volga 31105 is monitored by a temperature sensor, which is placed directly on the control unit panel. It transmits commands to the actuators of the air dampers, which will direct flows through the heater radiator, or bypass. Plus the heater valve opens. If your faucet and dampers work well, which is clearly audible when the engine is turned off, then you need to look and probably change the sensor.
According to the instructions described above, remove the heater control unit and gain access to the board. Below it you can see a picture where on top of the sensor lies an impressive thickness of noise from dust, dirt or soot. This layer conducts current perfectly, and therefore the legs of the sensor can easily be short-circuited under favorable circumstances. Also look at the screw heads of the electronic board, which block the conductive path of the printed circuit board. There is also a possibility of a short circuit here.
The wiring from the fan on the GAZ 31105 is twisted into a bundle, which will have to be checked and, if necessary, called. Even a visual inspection sometimes makes it clear what is wrong with this unit.
If there are no other suspicions, start with regular cleaning of the sensor and board. First, get rid of dirt, then treat the surfaces with alcohol. The bare legs of the sensor themselves, sections of the board and wires can be insulated. Clear varnish is perfect for such tasks. It is recommended to place washers made of insulating material under the screw heads.
When a block burns out, it can be completely replaced. But finding it is not so easy, plus the cost of a new unit is quite high. Some save money and refuse full-fledged electronics. As a result, motorists and owners of GAZ 31105 cars are switching to alternative manual control. To organize it, take a couple of keys from the electric windows, as well as a couple of light bulbs. According to the diagram, they are connected and placed in the most convenient place for the driver.
In such a situation, it is enough to open or close the stove tap by pressing the desired key and waiting for the light to light up.
The air damper will be controlled by the second button. And to obtain an intermediate position, short inclusions are used.
Whether it makes sense to switch from electronic control to manual control is a rather controversial issue. But since many people follow this path, such a decision obviously makes sense.
Heater Gazelle business troubleshooting.
What to do if something in the heater does not work? Due to the design of the heater, diagnostics in case of failure of its parts is difficult. Initially, as always, you need to check the fuse.
Checking the heater tap.
When operating the Gazelle Business heater, a problem may arise in the supply of hot air when the ventilation is turned on, or, conversely, cold air when the heater is turned on. The reason is that the heater tap does not work. It does not open or shut off the coolant flow to the heater core. The design of the crane is quite simple and at the same time somewhat more complex than the similar crane installed on the Gazelle restyling. It's all about the built-in crane control unit,
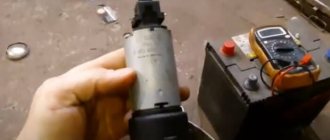
To find the cause of a heater tap failure, you will need a piece of copper wire and a test lamp. No special knowledge or skills are needed to determine the malfunction.
First you need to check the presence of plus and minus on the connector connected to the tap. This is done with a test lamp by connecting its probes (wires) to the black and white wires of the connector. If the warning light does not light, then move the wire connected to the black wire to a metal part of the engine where there is a good minus. If the lamp lights up, repair the break in the black wire or clean its attachment to the body. If the lamp does not light up in this case, then you need to check fuse F13 and the serviceability of the wire from it to the connector.
Read more: KN block on starline keychain
If there is a plus and minus on the connector, use a small piece of copper wire to alternately connect the black wire with the brown and green wires. If the heater valve gearbox is in good working order, the characteristic sound of its operation will be heard. If nothing happens, the tap needs to be replaced.
Checking gearmotors.
Checking the gear motors of the windshield blower dampers and deflectors can be checked without completely removing the panels. It is enough to remove its lower part. The main damper motor is accessible from the driver's side. To check gearmotors, you need to disconnect the connector of its electric motor, the connector with a lock, and connect a tester to it in voltmeter mode or a test lamp. With the ignition and heater on, you must press the button that controls this damper. The control lamp should light up. If the lamp is on and the gearmotor does not work, it must be replaced.
If you are on the road and do not have the opportunity to replace the damper drive with window defroster, you can remove the rod from the damper lever on the driver’s side and turn it manually, locking it in the open position. To open the damper on the passenger side, you will need to unscrew the screws securing the gearmotor and, by turning its housing, secure it in the same way.
Checking the electric motor and speed controller.
To check the heater fan motor and the cause of its failure if the fan does not work, you will need to remove the air intake in the engine compartment. Inside the window that opens, two wires with a connector will be visible. To check the power supply, connect a test lamp to the connector terminals and, with the ignition on, turn the heater speed control toward maximum speed. The control lamp should light brightly. When turning the handle towards the minimum speed, the brightness of the lamp should decrease. This indicates that the speed controller is working properly.
If the control lamp is on and the fan does not rotate, then its electric motor is faulty. To check, measure the resistance between the motor terminals in the connector. Motor malfunction may be caused by stuck brushes. In this case, you can try knocking on the heater body. In this case, the operation of the fan can be restored before the next time it is turned off, possibly longer, but you can still get to the service center in a warm place.
If the control lamp does not light up when checking the power supply, the speed controller is faulty. If the speed controller malfunctions, you can temporarily connect the positive wire on the connector to the fuse near the battery with a wire. This will allow you to get to the garage or service station in winter.
It is not possible to describe how to remove the Gazelle business heater and disassemble it due to its high labor intensity, but you can download detailed instructions with photographs from the “Gazelle Heater” file hosting service.
Below is a schematic electrical diagram for connecting the Gazelle business heater and ventilation.
Replacing wiring
Wiring for a Gazelle 406 engine with pinout of ECU connector terminals.
Changing all the electrical wiring of a Gazelle when replacing an engine from 402 to 406 is of course not impractical.
The fact is that on newer versions of Gazelles, the connection diagram of certain devices also changed:
- Gazelle 406 wiring is integrated into the standard electrical system in the engine compartment;
- electronic components and control devices are connected using terminals;
- The voltage and correct connection are checked using testers.
After assembling the wiring into a single whole, its functionality is checked. Subsequently, the operation of the power unit is adjusted.
Conclusions: Replacing the power unit inevitably affects the change in the standard electrical wiring of the car
That is why it is important to have a visual aid at hand when carrying out such an operation, and the Gazelle’s factory wiring diagram will allow you to avoid mistakes
How the stove works in Gazelle Business
For correct diagnostics and repairs, it is necessary to know the structure and operating principle of the heater in order to diagnose a breakdown or carry out repairs at the first sign of a malfunction, preventing failure of the entire unit as a whole. Most faults can be predicted by indirect signs and their progression can be prevented. To do this, you need to know and understand what each element is responsible for and what the principle of its operation is.
Car cooling system
In Gazelle Business the stove is an integral part of the engine cooling system. When the engine operates, a large amount of heat is generated that must be removed. Heat is released due to fuel combustion and from rubbing surfaces. If the heat is not removed, the engine will heat up very quickly and fail. The cooling system has two circuits (small and large circle), they are separated by a thermostat. When the liquid is cold, it circulates in a small circle, and when it warms up, it circulates in a large circle. This allows you to quickly reach operating temperature and not overheat. During the warm season, heat is released into the atmosphere, and when cold weather sets in, part of the heat is spent on heating the cabin.
Heating
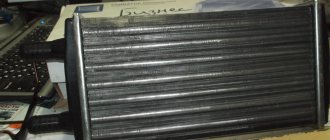
After we have figured out how the cooling system works, we can move on to heating the interior. The heater circuit on a Gazelle car is identical to the heaters of other cars that have a liquid-cooled engine. Fluid can circulate through the heater core whether the thermostat is open or not. For better heating, the heater fluid comes from the hottest part of the engine (the cylinder head). Therefore, on an engine that has not yet reached operating temperature, warm air still comes out of the deflectors. The heater has a valve in its design that either allows liquid to flow into the radiator or dumps it back. And the temperature of the air leaving the deflectors depends on how much it is open. The valve position is adjusted from the heater control panel. The faucet is equipped with an electric drive that changes the position of the valve. It is also possible to change the blowing intensity and direction from the control panel. The intensity is controlled by a motor with an impeller, the rotation speed of which changes the intensity of the airflow.
Changing the position of the dampers changes the direction of the airflow (to the face, to the legs, to the chest, to the glass). The heated coolant from the engine enters the heater radiator through the highways, causing it to heat up. At this time, air blown by a fan passes through it. Then it passes through air ducts, the dampers of which are open. The hot air then enters the car interior and heats it. To repair or diagnose a malfunction of this equipment, there is an electrical diagram that shows all the components of the electrical devices. And in case of breakdowns or incorrect operation of devices, it is necessary to read it in detail in order to understand where it is powered from and how the failed device is regulated.
When you know the principle of operation and the device, it is much easier to navigate in case of breakdowns
After all, to successfully carry out repairs, it is important to understand the cause of the malfunction, otherwise the repair will not be completed successfully. For correct diagnosis, it is also important to understand the algorithm of operation of the entire mechanism as a whole.
Currently, a driver does not have to know how to repair a car; there are service stations that can handle repairs of any complexity. But it happens that a breakdown catches you on the road, and there is no opportunity to use the services of specialists. This is when knowledge of the structure of a car and its mechanisms comes in handy. When you know how the Gazelle stove works, then if a malfunction occurs on another car, it will be easier to navigate when repairing or diagnosing, since in all cars they are almost the same, with the exception of small nuances. And you can easily diagnose the problem.
Fresh questions for auto repair shops (replacing the radiator of the Volga 31105 heater) in Moscow
How much does it cost to replace a heater radiator on a Saab 9-5 2 3
I want to write a review about this service. I am repairing my Zafira there, the most important thing is that there is no deception there, they don’t impose anything, they don’t scam me. Vice versa! Warn against unnecessary spending! About the quality, I can say something about what they did.
Good afternoon do you have a vibration stand?
Hello! I need to replace the rear brake pads on a Peugeot Partner Teepee. Is it possible to do this at your place and what is the price for such work? Thank you.
❶ Heater radiator Volga 3102,3110,31105 3110-8101060
System modernization
The main problem that causes electronics to fail is moisture. And in the tap the liquid circulates constantly, even when the shutter is closed. And when the oil seal leaks, liquid floods the entire electrical part, and it fails.
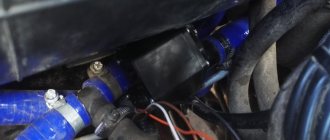
Installation of shut-off valves
To avoid this, you can install conventional shut-off valves, fitting them to the outlets of the cooling system. But in order to open or close the supply of hot liquid, you need to move the tap to the desired position manually. And since it is installed under the hood (in a regular place), it is not possible to do this while driving. But this mechanism has a much greater resource.
Read more: Ssangyong actyon rear view camera
Pre-sealing
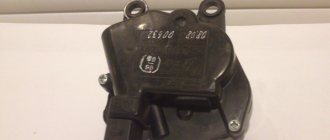
Before installing a new electric faucet, you need to disassemble it and fill the electronic board with hot glue to avoid moisture getting on it, coat all joints with sealant. This method can only prolong performance, because if liquid gets into the electronic part, the electric motor will be damaged, without which the mechanism will not be able to function correctly.
Selection of similar equipment
Installation of a tap with a similar arrangement of fittings from other car brands. This method is the most effective, since imported manufacturers of this equipment have a much higher resource than domestic ones. The main thing is to choose the most similar copy. And after installation, check its operation on the car.
The above diagnostic and repair methods will help you quickly identify the cause of the malfunction and replace or repair faulty equipment. Repairing and installing a heater tap on a Gazelle Business UMZ 4216 will not cause you any particular difficulties. This type of repair does not require extensive experience. It can be done on the road with a minimum set of tools.
At first glance, it may seem that the GAZelle Business heater is not much different from its imported counterparts. The heater is controlled using buttons and levers of the electronic unit located on the control panel. Through the grilles under the windshield, air is sucked in by an electric fan and enters the cabin through air ducts. The GAZelle Business heater valve operates on an electric drive and supplies coolant to the radiator. This valve differs from its predecessors by the presence of an additional fitting. Depending on the selected temperature, the valve is controlled by an automatic system, and if it is closed, the cooler is directed back into the cooling system. In addition, the air temperature in the cabin is regulated by the electric valve of the GAZelle heater by the position of the damper, which determines the direction of the air: the air can pass both through the radiator and bypass it. In addition to the main damper, there are secondary, regulating and redistributing air flows.
If in previous versions of heaters cables were used to adjust the position of the dampers, now this function is performed by gear motors. The electric fan is located at the bottom of the structure and in order to get to it, it is necessary to disassemble the entire heater. For this reason, even the fact that the engine in the heater is imported does not compensate for the general disadvantage with the placement of the fan.
Dismantling works
In the vast majority of cases, when the stove control unit fails, it has to be removed.
But complete dismantling is not as simple as it might seem. To begin with, you should take into account that the procedure for removing the element differs depending on the year of manufacture of your GAZ 31105.
To dismantle the unit, first remove the control handles. This is done manually, or you can help yourself a little by prying them off with a flat screwdriver. Just don't break the plastic. Next, the block itself with the board is carefully removed. To disassemble it, simply press out the antennae of the cover, and you gain access to the interior of the control unit.
But you can go further by dismantling the entire assembly with connectors, cables, etc. Here, the official instruction manual suggests the following sequence of actions:
- disconnect the negative terminal from the battery to de-energize the car;
- unscrew a couple of screws and remove the trim from the dashboard;
- remove the rotary knobs on the control unit by pulling them towards you with your hands;
- on the control unit cover, unscrew the fixing screws, pull the cover a little and disconnect the connectors;
- unscrew a couple more screws that secure the control unit;
- remove the unit and disconnect the multi-contact wiring harness;
- remove the fan switch from the unit itself;
- using a screwdriver, bend the tabs and remove the cover from the board;
- cut the cable fastening clamps;
- release the cables from the toothed belt and pull them out.
For reassembly, the same procedures are performed, only in a mirror sequence.
Removing the control unit
While disassembling the unit, you can simultaneously check it, test it with a multimeter or other device, and also replace failed components.
You get the gist of the dismantling work. Now you need to understand potential malfunctions and the features of their elimination.
Since an electronic control circuit for the GAZ 31105 stove is already used here, we will have to touch upon the issue of the board and some electronic elements.
There is nothing difficult in removing and replacing the same cables, knobs and switches. Simply remove broken components from their seats and replace them with similar new ones.
It is much more problematic if the heating does not work due to a failure or malfunction in the electronics. Then the control unit will have to be disassembled, checked and searched for what is the reason and how to eliminate the malfunction.
Diagnostics
If signs of malfunction or malfunction are detected, it is necessary to carry out diagnostics to identify the causes of the breakdown. One of the reasons why the heater begins to heat worse, or when very cold air comes out of it, is the valve of the Gazelle stove. It either does not open completely or is completely closed. If any of these signs occur, you must first check the correct operation of the electric crane.
- With the engine warm, touch the pipes before and after the electric valve. In the extreme hot position of the temperature adjustment handle, the pipe before and after the electric tap should be the same temperature.
- Check the power supply to the electric valve when switching temperatures.
- If there is no power, check the fuse and replace if necessary.
- Check the strainer on the inlet pipe; liquid should flow freely through the holes.
- When the tap is removed and the power is connected, you need to look into it through the light. When changing the position of the temperature regulator (from minimum to maximum), ensure that the shutter is fully opened when the handle is in the hottest position.
Read more: I drove through a flashing green light at an intersection
Good schemes
Details: do-it-yourself business gazelle heater tap repair from a real master for the olenord website. If signs of malfunction or malfunction are detected, it is necessary to carry out diagnostics to identify the causes of the breakdown. One of the reasons why the heater begins to heat worse, or when very cold air comes out of it, is the valve of the Gazelle stove. It either does not open completely or is completely closed. If any of these signs occur, you must first check the correct operation of the electric crane. Once it has been determined that the electric crane is faulty, it must be dismantled. For this:. The main problem that causes electronics to fail is moisture.
Price list; GAZ GAZelle stove faucet; Electrical diagram of Gazelle. Connection diagram for the control key of the damper or heater tap.
Design of the cooling system for UMZ-4213 and UMZ-4216 engines on UAZ and GAZelle vehicles.
To increase energy performance, improve fuel efficiency, reduce toxicity and noise, models with an integrated microprocessor fuel injection and ignition control system were developed on the basis of the UMZ-421 carburetor engine: the UMZ-4213 engine for UAZ cars and the UMZ-4216 engine for GAZelle cars. The design of the cooling system on the UMZ-4213 and UMZ-4216 is somewhat different, since it has differences in the connection diagram of the expansion tanks and heating radiators.
The cooling system is liquid, closed, with forced circulation of liquid and an expansion tank, with liquid supply to the cylinder block. Includes a water pump, thermostat, water jackets in the cylinder block and cylinder head, radiator, expansion tank, fan, connecting pipes, as well as body heating radiators.
For normal operation of the UMZ-4213 and UMZ-4216 engines, the coolant temperature must be maintained within plus 80-90 degrees. It is permissible to operate the engine for a short time at a coolant temperature of 105 degrees. This mode can occur in the hot season when driving a car with a full load on long climbs or in urban driving conditions with frequent accelerations and stops.
Replacing the stove valve VAZ 2105, 2106, 2107
One of the elements of the Zhiguli heating system is the heater tap, with which the air temperature in the cabin is regulated. Over time, the normal functioning of the tap is disrupted due to certain problems. If a problem occurs, the part needs to be dismantled and subsequently repaired or replaced. In most cases, the faucet is not repaired, but replaced with a new one.
What is it responsible for and where is the stove valve located?
The VAZ 2105–07 interior is heated by means of a coolant (antifreeze, antifreeze), which circulates through the cooling system of the power unit. Heat is removed from the stove radiator, which is connected to the system through two pipes. Thanks to the operation of the heater fan, air is forced through the heat exchanger, heated and supplied to the vehicle interior. However, heat is not always required. So, in the summer, sometimes you have to turn on the window defrost to prevent them from fogging up. In this case, heating will be unnecessary. To be able to regulate the supply of warm air, the heating system has a stove tap. This unit is used to regulate the supply of hot coolant (coolant) to the heater radiator or completely shut it off. As a result, the fan does not heat or heat the interior when it is not required.