Fuses and relays VAZ 2110 / 2111 / 2112
This article will be useful both to ordinary car enthusiasts, owners of VAZ 2110, 2111 and VAZ 2112 cars, and to auto electricians. Here we will analyze the location of fuses and relays of the VAZ 2110. Several types of mounting blocks were installed. They can be distinguished visually by the location of the relays and fuses.
This fuse box is located under the steering wheel, near the driver's left foot.
Mounting block (fuse block) 2110-3722010
Mounting block (fuse block) 2110-3722010-01
Mounting block (fuse block) 2110-3722010-08
In the first two blocks, the location of the fuses is no different, but in the third type of blocks you should be more careful and pay attention to the markings of the fuses.
These blocks may also differ in the presence of resistors inside the block. Resistors are needed to excite the generator, and the presence of a resistor can be recognized by the presence of a contact in Ш4 - contact 9. Resistors are used on old devices; without resistors, excitation will occur only during re-gassing.
Location of the relay in the fuse box (Mounting block) VAZ 2110 / 2111 / 2112
| Relay number | Relay purpose |
| K1 | Lamp health monitoring relay |
| K2 | Windshield wiper relay |
| K3 | Turn signal or hazard warning relay |
| K4 | Low beam relay |
| K5 | High beam relay |
| K6 | Additional relay (Relay that supplies power after the ignition is turned on) |
| K7 | Heated rear window relay |
| K8 | Backup relay |
| Fuse No. | Fuse Rating A (Ampere) | Circuits protected by a fuse |
| F1 | 5 | Front and rear left side light lamps, side-light indicator lamp, instrument lighting lamps, trunk light lamp, license plate light |
| F2 | 7.5 | Low beam (left headlight) |
| F3 | 10 | High beam (left headlight) |
| F4 | 10 | Front right fog lamp |
| F5 | 30 | Door window lifters |
| F6 | 15 | On some cars - VAZ 2110 cigarette lighter fuse and portable lamp |
| F7 | 20 | VAZ 2110 cooling fan fuse , sound signal |
| F8 | 20 | Relay (contact relay) for turning on the heated rear window, heated rear window |
| F9 | 20 | Windshield and headlight cleaner and washer. Recirculation valve. Coil of the rear window heating relay. |
| F10 | 20 | Spare |
| F11 | 5 | Front and rear right side lamps |
| F12 | 7.5 | Low beam (right headlight) |
| F13 | 10 | High beam (right headlight), high beam indicator on the dashboard |
| F14 | 10 | Left fog lamp |
| F15 | 20 | Trunk lock fuse VAZ 2110, Electric seat heating |
| F16 | 10 | Fuse relay-breaker for direction indicators and hazard warning lights (in hazard warning mode). Hazard warning lamp |
| F17 | 7.5 | VAZ 2110 interior lamp fuse, brake lights, clock and trip computer |
| F18 | 25 | On some vehicles : Cigarette lighter fuse, heater controller and glove compartment light |
| F19 | 10 | Relay for monitoring the health of the side lamps and brake lights, direction indicators and their indicator lamps, generator excitation winding, instrument cluster, clock, door locks, reverse lamps |
| F20 | 7.5 | Rear fog lights |
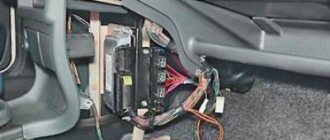
There are also fuses responsible for starting the engine. They are located under the center console. You can get to them by unscrewing the panel near the passenger's left foot.
This block houses the fuses and relays responsible for the fuel pump, electronic control unit and cooling fan.
1 — ignition module, electronic control unit; 2 — canister purge valve, vehicle speed sensor, oxygen concentration sensor (sensor heating), mass air flow sensor (mass air flow sensor pinout HFM5 VAZ); 3 - fuel pump relay, fuel pump fuse, fuel injector fuse.
Additional relays: 4 - electric fan relay; 5 - fuel pump relay, 6 - main relay (ignition relay)
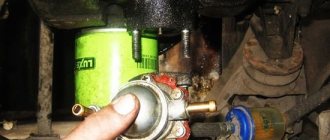
Finding the fuel pump relay and troubleshooting
As you know, in order to start any process, be it mechanical or electrical, you need a source of energy. And the relay thus represents a kind of trigger mechanism, because its work is to connect the contacts located inside, which close when exposed to electric current.
If we personally consider the VAZ-2112 fuel pump relay, then there are certain specifics in its operation. It also happens that many car enthusiasts simply do not know where exactly this relay is located, and how to correct the malfunction when it fails.
Principle of operation
Almost all relays that are mounted on Russian cars are identical. For the most part, they differ in the number of contacts with five versus four, and the latter, as a rule, does not have a central input.
The current strength, measured in Amperes, is also almost the same and is about 30 - 40A.
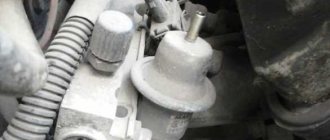
The relay in the photo is 30 Ampere.
The relay is connected to the network using a plastic block (plug - approx.), and when the electric current reaches the coil inside the relay and the magnetization process begins, it then closes and the circuit is connected.
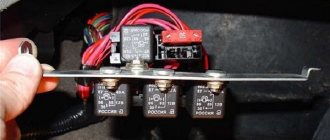
Relay in additional fuse box
Location of the additional relay unit inside the car
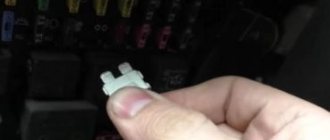
The fuel pump relay is located on the left side of the front passenger's feet, where three relays and three fuses are located next to each other.
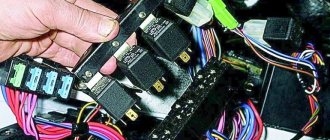
After dismantling, we put it aside
The fuel pump relay is located exactly in the middle under the number “ 5 ”. Nearby, there is also a fuse numbered “ 3 ”.
Functionality check
In order to check the fuel pump fuse, you just need to inspect it and, if necessary, replace it with a known working one.
There are several methods to check the fuel pump relay:
- The easiest way is to replace the old relay with a known good one .
- If you don’t have one at hand, you can use a regular multimeter .
Principle of operation
VAZ 2110 stalls, the fuel pump relay clicks
The operating principle is as follows:
- the relay uses a classic contact closure circuit;
- the relay core is represented by a classic coil;
- manual supply of the closing and opening signal is also involved.
Today, a modern European car is almost completely automated and the concept of “a car won’t start” is practically not found in economically developed countries. This phenomenon is primarily explained by the automation of the relay operation. In particular, the frequency of contact closure controls the built-in on-board control system, plus the material from which the wiring is made has increased electrically conductive properties. This, in turn, allows for more economical and efficient use of material and technical capabilities:
- Firstly, relay wiring from European manufacturers consists of high-tech alloys, this in turn allows you to avoid such phenomena as wiring burnout as a result of electrical short circuits.
- Secondly, the speed of current conduction is quite high, which ensures almost instantaneous transmission of an electrical impulse from point A to the final conditional point B.
Note. Despite the multiple advantages of relays from European manufacturers, from a practical point of view they are inaccessible to the average motorist. Due to the narrow technical range of compatibility and fairly high price.
The fuel pump does not work, the relay turns on.
Checking relay power.
Priora immobilizer blocks engine starting
In the case when the fuel pump relay turns on when the ignition is turned on, but the pump itself does not work, you need to check the power at terminal 87 of the fuel pump relay. To do this, touch terminal 87 of the relay socket with the output of the control lamp connected to the vehicle ground, and the lamp should light up. If the lamp does not light, it means the fuse has blown or there is a break in the wire.
If there is power at terminal 87, you should remove the relay from the socket, and instead place a jumper between pins 87 and 30. In this case, if the pump and connecting wires are working properly, the pump should start working and if this happens, the relay should be changed. If the pump does not start working, then, without removing the jumper, you need to touch the power wire on the fuel pump with a test lamp connected to the vehicle ground.
Checking the fuel pump power circuit.
If a submersible pump is installed on the car as part of the fuel module, you need to remove the connecting connector and touch one of the thick wires. When you touch one of them, the indicator lamp should light up. If the lamp does not light up on any of the wires, then it is necessary to eliminate the break in the wire from the fuel pump relay to the module connector or the pump itself, if the pump is of a remote type. One of the reasons for the break may be the anti-theft blocking of an installed non-standard alarm system.
In the case when the test lamp lights up on one of the thick wires of the connector or one of the terminals of the remote pump, you need to connect these terminals with a test lamp to each other. In this case, the control lamp should light up. If the lamp does not light, it is necessary to eliminate a break or poor contact in the wire connecting the pump to the vehicle ground.
If, when checking the wires and relay for turning on the fuel pump, no malfunction is detected, the electric motor of the fuel pump or its connection to the module connector is faulty. It is not difficult to find the cause by removing the fuel pump module from the tank. If there is poor contact with the connector, melting of the plugs will be visible. If melting is not noticed, then to check the pump itself, you can connect it to the battery. It should be taken into account that operating a submersible pump without liquid will damage the pump. A faulty pump should be replaced.
Additional fuses and relays are located to the right of the center panel. Unscrew the screws and remove the cover:
How to repair a fuel pump on a VAZ 2112?
Note! Before you say with certainty that it is the pump that has become unusable, you should check whether your fuel filter is dirty and not the pump but the filter itself needs to be replaced, or due to dirty injectors, in principle, all the same symptoms may occur, so to If the pump is more likely to be at fault, first check the pressure in the power system and finally, thanks to this check, you will be able to identify the malfunction! (You can learn about how to check the pressure in the article called: “Checking the pressure in the fuel rail on a VAZ”
Disassembly: 1) Before you begin disassembling, you will need to remove the pump itself; for this you will need wrenches and one screwdriver; for more detailed instructions on how to remove this pump, see the article: “Replacing the fuel pump on VAZ cars”!
Note! Don’t forget to look into the car’s tank when you remove the pump, there is just a storage cup at the very bottom of it, you can still see it in the large photo below, it can be disconnected from the pump module and remains in the tank, so you will need to remove it from there and install it back on the pump in its place (It is held on by clamps), but you are going to disassemble the pump, so you do not need to install it, and if it remains on it, then by pulling it down, disconnect it and thereby remove it!
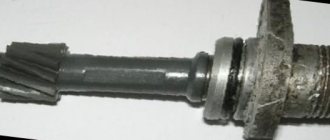
2) Now that the pump is removed, take the screwdriver in your hand again and use it to unscrew the two side screws (Indicated by arrows in the photo below) that secure the fuel level sensor to the pump module. After unscrewing, you can remove the sensor from the module and put it aside. (A float is installed at the end of the sensor; you can see it in the small photo below, so take a look at this float; it must be intact and free of wear, otherwise, for example, if there is a hole in it, then this sensor will no longer correctly indicate the fuel level will be and you will have to replace it with a new one)
Note! Also, do not deform the sensor itself and be careful with the rod that holds the float, because if it breaks, the fuel will also not be displayed, and if it bends, the fuel level will not be displayed correctly, so be careful with the sensor!
What is a starter relay
The mechanism is designed to supply power to the electric starter motor. At this moment, charge is transferred from the battery. Simultaneously with the supply of energy, it performs the function of pushing out the bendix, while the element engages the flywheel. The starter relay on the VAZ-2112 determines whether the main mechanism will start and the engine will fire or not. If suddenly this device fails and does not turn on, you need to diagnose and repair it. To do this, you should study the detailed operating instructions and find out where the starter relay is located on the VAZ-2112.
Fuse blown
Sometimes the device does not need to be replaced. It is enough to change the fuse located inside the device itself. The procedure is carried out as follows.
- Open the hood and remove the negative terminal from the battery. You can also remove the fuse from the mounting block that is responsible for the cigarette lighter of the VAZ 2110.
- We unscrew the four fasteners of the tunnel covering and remove both parts of the lining.
- Disconnect the three-pin plug going to the cigarette lighter.
- Remove the lining under the handbrake lever.
- Remove the gearshift lever cover.
- We move the seats back, and then unscrew the three fastenings of the upper part of the tunnel and remove it.
- Pull out the cartridge.
- Use a flat-head screwdriver to pry the cigarette lighter latch so that it comes out of the seat.
- We remove the nest from the cladding for subsequent repairs.
Inside the cigarette lighter is a miniature mica plate. It is a semiconductor that sometimes breaks and melts. It needs to be removed. After this, it is worth assembling the unit and then checking the functionality of the device.
The video shows all the stages of diagnosing a fuel pump.
Video example: taking power from the main relay connector
If it doesn’t show correctly about + - 3 liters, then this is an error, but it’s better to install an on-board computer, it gives more accurate indicators, there’s no need to immediately go into the weeds.
My fuel pump stopped working when the engine control unit failed)).
I'm already tired of this little motor. I turn on the ignition, the relay clicks, the pump does not pump. I put my hand in the passenger’s legs, move the wires, it doesn’t help. I use a screwdriver and tap the relay. After these actions, the pump starts pumping when the ignition is turned on again.
It gets worse, now the pump fails when driving!
I searched everything there, swapped relays, fuses, felt how many wires go under the panel, nothing!
I'm so sick of this car already! It also stalls when you pull up to a traffic light at speed 3 and pull out the gear, the engine can’t hold the speed and stalls! I changed the TPS, XX, cleaned the throttle, etc., etc., the problem is not solved!
On the Drive2Ru forum, I started talking, they assured me that I’m not the only one, there are thousands like me! and no one can find the reason why the engine doesn’t keep the low speed bar and fails.
just like vibration at 100 km/h in the steering wheel.
and balanced the wheels in different service stations and changed the rims and mortars. bearings and brakes wheels, completely changed the entire suspension, the problem was NOT SOLVED! It hit the steering wheel for 100 km and continues to do so!
But the sensors are a separate issue! I constantly drove with a burning check. I'm tired of paying 450 rubles for a computer. diagnostics I bought BC ORION 10. Now it gives me errors. either low voltage at the TPS, or a knock sensor, etc. what kind of sensors are these that work so little and you need to run for a new one?
In the morning you start it, the speed is xx 1500 and rises to 2000 by itself! turned it off, started it, and it was fine. warmed up, drove off, stopped somewhere at an intersection, rpm 1300-1500 at 90C!
and this is ALWAYS the case, something is always preventing you from just driving, these little things are already infuriating!
The tire got a flat, I took it to the service station, they fixed it, pumped it up and drove on. Everything is clear here. and this electrician, it dried up the whole brain, how raw and unfit for use everything was.
some old Toyota, from the 80s, with an archaic injector does not cause such problems, everything works like a clock.
and VAZ is a car from Hell and for devils.
Check the mass air flow sensor. I had this on a viburnum and it didn’t work correctly. The voltage on it should be about.96-1.01, but mine showed 1.06. I changed it and the stalling stopped.
For me, on the contrary, I turn on the ignition, the pump works and does not turn off, I turn off the ignition, it turns off after 30 seconds.
When the ignition is turned on, the fuel pump does not work, the relays and fuses are fine. Could there be a reason for the lock? Or phase sensor - error 0343? Thank you!
- VAZ 21102 won’t start – 16 answers
- VAZ 2110 starter does not work - 7 answers
- Engine 2111 stalls immediately after starting - 5 answers
- VAZ 2110 won’t start with the key – 5 answers
- A hot VAZ 2110 engine does not start - 4 answers
This is how your error is deciphered:
P0343 Camshaft sensor signal high.
But the fuel pump should operate already at the stage of turning on the ignition, regardless of this sensor. Most likely the fuel pump itself died. Is the starter turning or what?
Replacing the fuse
One of the most common causes of breakdown is failure of the protective element. A clue that the fuse for the cigarette lighter has blown will be a non-working VAZ 2110 stove or a faulty glove compartment illumination lamp. To carry out repairs, it is necessary to replace the blown fuse in the mounting block.
To get to the box, press the button in the front panel to the left of the steering wheel. The fuse to be checked is number F18, rated for a current of 25 amperes. It is convenient to use tweezers for replacement.
A fuse of the recommended rating should be installed. Otherwise, there is a high risk of insulation melting, short circuit, and fire. After repair, you cannot connect powerful devices to the cigarette lighter socket. The maximum power is 300 watts. Calculated using the formula P=I*A, where I is the network voltage (12 volts), and A is the amperage (25 amperes).
Where is the fuse box
A separate section of the chain is protected by a special element.
The current strength is calculated for certain values. Due to a short circuit in the cigarette lighter, this parameter may be outside the acceptable range. To prevent wire melting or fire, a thin metal bridge in the fuse blows. Therefore, replacement with a working element is required. Evidence that the fuse on the VAZ has blown will be the failure of not only the cigarette lighter, but also additional devices. This element is part of the circuit going to the stove, radio and glove compartment lamp. If all these devices fail, you should get to the mounting block and replace them.
Electrical diagram of the VAZ-21104 ECM with controller 21124-1411020-30/31/32
1 — block of the ignition coil wiring harness to the ignition system harness; 2 — block of the ignition system harness to the ignition coil wiring harness; 3 — ignition coils; 4 — immobilizer warning sensor; 5 — immobilizer control unit; 6 — spark plugs; 7 — nozzles; 8 — diagnostic block; 9 — block of the ignition system harness to the ABS cabin group harness; 10 - controller; 11 — electric fuel pump; 12 — block of the ignition system harness to the fuel level sensor harness; 13 — block of the fuel level sensor harness to the ignition system harness; 14 — block of the ignition system harness to the injector harness; 15 — injector harness block to the ignition system harness; 16 — block of the ignition system harness to the side door harness; 17 — speed sensor; 18 — idle speed regulator; 19 — throttle position sensor; 20 — coolant temperature sensor; 21 — mass air flow sensor; 22 — oil pressure warning lamp sensor; 23 - phase sensor; 24 — oxygen sensor; 25 — crankshaft position sensor; 26 — knock sensor; 27 — solenoid valve for purge of the adsorber; 28 — oil level sensor; 29 — coolant temperature indicator sensor; 30 — block of the ignition system harness to the instrument panel harness; 31 — block of the instrument panel harness to the ignition system harness; 32 — ignition relay; 33 - ignition relay fuse; 34 — fuse for the electric fuel pump power supply circuit; 35 — electric fuel pump relay; 36 — electric fan relay; 37 — controller power supply fuse; 38 — ignition system harness block to the air conditioner connector; 39 — instrument cluster; 40 — ignition switch; 41 — electric fan of the cooling system; 42 — on-board control system unit; 43 — starter relay; 44 — contacts of the 8-terminal blocks of the instrument panel harness and the front harness; 45 — contacts of the 21-terminal blocks of the instrument panel harness and the rear harness; 46 — trip computer; 47 - diagnostic connector.