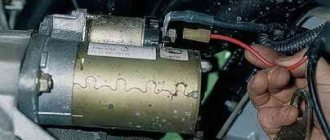
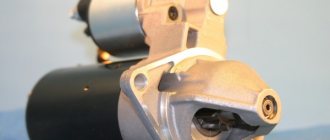
The starter is an electromechanical DC motor, which is combined with an electromagnetic traction arm.
On VAZ 2106 cars it is supposed to install two brands of starters: on early models of the car there was ST-221, and on cars of later production - 35.3708. In terms of their technical characteristics, they are almost identical, so both are interchangeable.
The ST-221 starter with a cylindrical commutator differs from the 35.3708 starter in the design of the rear part and the starter rewind, which consists of two pairs of coils (two shunt and two service). And for starter 35.3708, the winding design includes one shunt and one series.
How to Remove Starter VAZ 2106 Without Pit
Removing and installing a VAZ 2106 starter
The starter from a VAZ 2106 car is removed for repair or replacement, also during disassembly
The main malfunctions in which the starter must be taken off for inspection and repair:
1. When starting the starter:
2. Unusual starting noise when the armature rotates.
Before removing the starter, make sure that the above faults are not caused by other reasons (discharged battery, oxidation of terminals, terminals, faulty electrical connections, etc.).
To remove the starter from a VAZ 2106 you will need: keys “10”, “13”, screwdriver, extension cord, socket “10”.
Remove the starter on a lift or in a ditch.
The starter 1 is installed on the engine to the right from the rear side downwards under the air absorber 3 and the heat insulating screen 2 ( and
.
view from above; b
. bottom view).
1. Release the cuff and remove the absorber hose from the air filter housing.
2. Release the clamp and remove the hose from the air absorber.
3. Loosen the lower air absorber mounting nut two to three turns.
4. Remove the upper air absorber mounting nut.
as a take-off starter for VAZ classic 2101-2107
as a remove the VAZ starter
-classic, you need a third mounting bolt
for the starter
, tips in the process. VK Group.
Remove the starter, do you need a third starter bolt?
Subscribe to my channel “My Leisure” where I publish various videos about my own life and much more.
5. Remove the air intake.
6. Remove the two nuts that secure the heat shield.
7. From the bottom of the VAZ 2106, use extension cable 2 and the socket head to unscrew bolt 1, which secures the screen to the right engine mount bracket.
8. Remove the heat shield.
9. Remove the lower mounting bolt of the starter from the bottom of the VAZ 2106.
10. Remove the two upper starter mounting bolts.
11. Slide the starter forward for easy access to the cable clamps on the starter pull relay.
12. Remove the socket from the starter traction relay output.
13. Remove the nut and cable from the upper traction relay.
14. Lift the starter upwards.
15. Install a new VAZ 2106 starter and remove the parts in reverse order.
To facilitate installation and, if necessary, remove the heat shield, change the mounting method to the desired bracket.
Select a 14-1bmm bolt with the same diameter and thread pitch as a regular valve mounting bolt, matching nut and washer.
Screw the bolt into the welded nut on the right engine mounting bracket in front of the VAZ 2106 so that.
. fix it like a stud on the shield (after installing the exhaust manifold on the studs).
Payment via WebMoney
After selecting payment via WebMoney, the payment system will launch, where you need to select the payment method: bank card or WebMoney wallet.
If you already have a WebMoney wallet, then you need to log into it and make a payment.
If you do not have a WebMoney wallet and you want to pay in another way, you need to select any of the methods that WebMoney offers and make the payment
After specifying payment details and confirming payment, payment for the goods will occur.
Official website of the WebMoney payment system https://www.webmoney.ru/
VAZ 2106 starter repair
The starter design requires the presence of many parts, and if one element of the starter fails, difficulties arise in starting the car engine. Repairing the VAZ 2106 starter on your own helps eliminate the problem. In most cases, a complete replacement of the starter is not required - it is enough to just repair or replace the failed part.
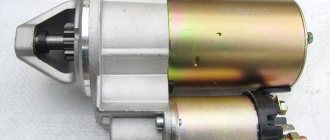
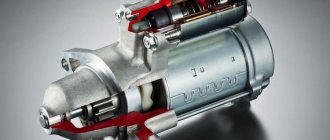
Gear starter StartVolt LSt 0101 for VAZ 2106.
The six is equipped with a starter with a face-type commutator model 35. 3708. Sometimes cars are equipped with German Bosch or KZATE starters with similar technical properties. Bosch starters have a higher cost and service life.
When the starter does not turn when you turn the ignition key, you need to exclude the possibility of a discharged battery.
Often the cause of the malfunction is a low battery charge and repair of the starter is not required.
Symptoms of a problem
If checking the Vaz 2106 electronics does not reveal any problems, you need to look for a breakdown in the starter. By the manifestation of the problem, you can understand which part has failed.
- The starter spins but does not start the engine. In most cases, the starter brushes need to be replaced.
- Clicking sound when turning the key. Repairing the starter solenoid relay should resolve the problem.
- Frequent clicking sounds when trying to start the engine. The probable cause of the malfunction is in the starter bendix.
- The starter continues to operate after the engine has started. There may be problems with the traction relay - the contacts have stuck together or the mechanism has jammed. It is necessary to prevent the starter from being skewed and the drive lever sticking. Check the return spring - it is located on the ignition switch.
- Loud noise when the starter is running. Check the starter mounting. If the fastening is normal, the bushings need to be replaced.
These symptoms most often occur on Lada 2106.
Diagnostics
Turn on the starter and take instrument readings: with a working traction relay, the ammeter should show no more than 23A, the voltmeter should show no more than 9V. Exceeding the indicators indicates the presence of a short circuit in the wiring.
You can diagnose the wear of starter parts at home only after removing and disassembling the starter. Parts are checked for signs of wear and compliance with standards.
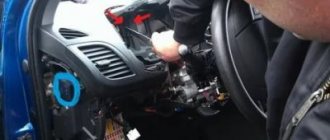
How to remove
It is more convenient to remove the starter in an inspection hole or overpass. Before the operation, you must remove the “-” terminal from the battery.
- Loosen the clamp and remove the hose from the air filter.
- Unscrew the lower and upper bolts securing the air intake housing.
- Remove the air filter housing.
- Unscrew 1 lower and 2 upper bolts securing the starter to the gearbox. You will need a key for 13.
- Disconnect all wires from the starter.
- Get the starter.
It is better to perform the procedure while wearing work gloves.
How to disassemble
Before disassembling, it is necessary to prepare boxes for storing small starter parts.
Photo of disassembling the starter housing.
- Unscrew the nut from the bottom bolt.
- Remove the wires and 2 washers.
- Unscrew the 3 lower bolts securing the solenoid relay. The relay should pull out.
- Remove the solenoid relay. When removing the relay, you need to hold the anchor.
- Remove the spring from the armature.
- Pull the anchor up and move it to the side. The anchor is off.
- Unscrew the 2 bolts from the upper starter protection and remove it.
- Use a flat-head screwdriver to pry up the rotor shaft retaining ring and remove it.
- Unscrew the two coupling bolts of the cover with the housing and remove it together with the stator. To unscrew the tie bolts you will need a size 10 wrench.
- Use a screwdriver to unscrew the bolts connecting the wires and windings of the starter.
- Remove the housing with the stator from the starter cover.
- Remove the starter brushes along with the springs using a screwdriver.
- The rear bearing is pressed out of the starter cover using a mandrel. The diameter of the mandrel must correspond to the connector from which the bearing is pressed out.
- Remove the cotter pin from the front cover. You will need a screwdriver and pliers.
- Remove the starter drive lever shaft.
- Remove the anchor with the fork. They are located under a rubber plug.
- Press out the front bearing.
- Move the washer and remove the retaining ring. This way you get the bendinx.
It is important not to lose details. Otherwise, after repair it will be impossible to assemble the structure.
troubleshooting
At this stage, the condition of the Zhiguli 2106 starter parts is checked.
Starter brushes
The main indicator of the condition of the brushes is their height. A standard caliper is used for measurement. The height of working brushes must be at least 12 mm.
Starter windings
The starter windings are checked for burns and insulation damage.
Starter armature
First of all, the fit of the shaft end and the lower part of the starter is checked. Minimal play is allowed. The burnt surface of the starter armature is cleaned with sandpaper.
Checking the solenoid relay
Lada 2114 Milky Way is Samara Logbook Replacing the fuel pump mesh
Checking the functionality of this element is not so difficult. Moreover, you can check it even without removing the starter from the car. For example, let's take a VAZ-2110 car.
So, the starter on this car does not work. First you need to check the wiring going to it for a break.
If everything is in order with the wiring, you need to find out whether the traction relay works at all.
To do this, you can ask someone to turn the ignition key, and listen for yourself to see if there is a click. If it is missing, it is faulty and needs to be replaced.
If there is an actuating click, but the starter itself does not turn, it is possible that the relay does not operate due to burnt contact plates.
You can check whether this is true using a regular screwdriver. The terminal coming from the ignition switch is disconnected from the relay.
Next, a screwdriver is used to close the terminal coming from the battery with the terminal going to the starter - this results in a direct transfer of electricity to the electric motor, bypassing the relay. If it works, you need to look for the cause in the relay.
You can check the voltage going to the starter with a multimeter, but this will most likely make it clear whether the problem is in the starter or in the wiring and battery.
To do this, a multimeter is connected to the positive terminal of the solenoid relay, to which voltage from the battery is supplied. Connect the other negative wire of the multimeter to ground.
Next, someone must turn the ignition key to the start position. The voltage on the multimeter display should correspond to 12 V.
If it is lower, perhaps the battery is simply discharged and its energy is not enough to start the engine, but at the same time its charge is enough to operate the relay, but there is not enough energy to rotate the rotor.
Repair of the VAZ 2106 starter is best done at a car service center
Many motorists are familiar with the situation when, instead of the smooth sound of a running engine that appears after turning on the starter, from under the hood of a VAZ 2106 there is either an unpleasant clicking sound from the retractor relay, or nothing at all. Also, two or three turns of the crankshaft may occur and then everything will stop. Alternatively, there may be a faulty battery, but often the cause is a failed starter. Repairing a VAZ 2106 starter is quite a complex matter, requiring highly qualified performers, and special tools and equipment will also be required.
In principle, repair of VAZ starters is the same for all models, and the faults are typical for them as well. Here are the main problems that will require mandatory repairs:
- The starter turns on, but the retractor relay does not operate and the armature does not spin. This happens for the following reasons:
- the battery is completely discharged;
- the battery terminals have oxidized or the wire tips have oxidized;
- insufficient tightening of tips;
- the wires of the VAZ 2106 starter retractor yard are broken;
- possible short circuit of the solenoid relay winding;
- armature jamming, short circuit to negative.
- After turning on the starter, the relay is activated, but the armature does not spin, or it spins, but very slowly. This happens for the following reasons:
- The battery is dead;
- the leads have oxidized;
- the bolts on the solenoid relay have become loose;
- the brushes are worn out or simply “stuck”;
- there is a break in the winding;
- short circuit of the collector plates, burning.
- The starter armature rotates, but the crankshaft does not rotate. The reasons are:
- the freewheel slips;
- the axis of the switching lever slips;
- The buffer spring is faulty.
- The engine starts, but the starter continues to rotate. This can happen due to sticking of the lever, sticking of relay contacts, malfunction of the return spring, or misalignment of the starter. If this repeats regularly, you should definitely repair the VAZ 2106 starter , because it will simply burn out, and in this case the repair will not help, you will have to change it.
- When the starter is operating, extraneous sounds are heard and the noise level is high. This may be due to excessive wear on the bushings on which the armature rotates, loosening of the starter’s attachment to the engine casing, or breakage of one or more gear teeth.
But all the same, before starting repairs, the VAZ 2106 starter must be removed from the engine. After removal, you need to check the functionality of the solenoid relay and the integrity of the armature and rotor windings. Before this, it is advisable to clean the starter from dirt, wash it, and only then proceed to disassembly and repair. It’s better to do this at a car service center
If burrs and scratches are found on the moving parts of the starter, they must be removed using sandpaper or a fine file. If the wear of the parts is not too great, then you can try to eliminate it by installing gaskets, although this is a temporary measure - it is better to immediately replace the worn parts. But if the degree of wear exceeds the values allowed by the manufacturer or technical specifications, then it is better to replace them immediately. You also need to check the insulation and replace it if damaged. Worn or loose commutator plates cannot be repaired either.
Damaged or torn threads can be cut again; if this fails, screws must be installed.
In principle, repair the VAZ 2106 starter yourself, but it’s still better to go to a car service center. After all, it often happens that without special tools it is not possible to determine the malfunction, but you can also use computer diagnostics of the car and identify all the problems.
Removal and installation
Installing a new device is carried out in the reverse order.
Repairing a VAZ 2106 starter is a long and thankless task. Moreover, you can buy a brand new device in the store for a small fee. Therefore, we advise you not to waste your precious time and, in case of a breakdown, simply install a new one. But if you still want to tinker, we suggest watching the video tutorial.
If there are doubts about the efficiency of the starter, remove it (see “Removing and installing the starter”) and check it on a stand. The electrical connection diagram for testing the starter on the stand is shown in Fig. 9.9. The connecting wires to the current source, ammeter and contact bolt of the starter traction relay must have a cross-sectional area of at least 16 mm. sq. The starter must be powered from a fully charged 6ST-55 battery or from a special current source, the voltage drop characteristic of which under load corresponds to the voltage drop characteristic of the 6ST-55 battery. During checks, the starter temperature should be (25±5) °C, and the brushes should be well ground to the commutator. To check functionality
, closing switch 5 (see Fig. 9.9) at a current source voltage of 12 V, turn on the starter three times with different braking conditions, for example, at braking torques 2;
6 and 10 N.m (0.2; 0.6 and 1 kgf.m). The duration of each starter activation should be no more than 5 s, and the intervals between activations should be no less than 5 s. If the starter does not rotate the ring gear of the stand or its operation is accompanied by abnormal noise, then disassemble the starter (see “Starter repair - (disassembly, troubleshooting and assembly”) and check its parts. When testing in full braking mode,
brake the ring gear of the stand, turn on the starter and measure the current, voltage and braking torque that should be for the starter 35.3708
respectively, no more than 550 A, no more than 7.5 V and no less than 13.7 N.m (1.4 kgf.m). For the ST-221 starter, the current should be no more than 500 A, and the voltage should be no more than 6.5 V. If the braking torque is lower and the current strength is higher than the specified values, then the reason for this may be an interturn short circuit in the stator and armature windings or a short circuit in the windings to "mass". If the braking torque and current consumption are below the above values, then the cause may be oxidation and contamination of the commutator, severe wear of the brushes or a decrease in the elasticity of their springs, hanging of the brushes in the brush holders, loosening of the stator winding terminals, oxidation or burning of the contact bolts of the traction relay. During full braking, the starter armature should not turn; If this happens, the freewheel is faulty. To troubleshoot, disassemble the starter and replace or repair damaged parts. When tested at idle speed
remove the gear ring of the stand from engagement with the starter gear. Turn on the starter and measure the current consumed by it and the rotation speed of the starter armature, which should be respectively no more than 60 A (35 A for the ST-221 starter) and (5000 ± 1000) min at a voltage at the starter terminals of 11.5-12 V. If If the current strength and rotation speed of the armature shaft differ from the specified values, then the reasons may be the same as in the previous test.
To check the traction relay
install a 12.8 mm thick gasket between restrictive ring 3 (see Fig. 9.7) and the gear and turn on the relay.
For a single-winding relay, check the current consumption, which should be no more than 23 A. For a two-winding relay, check the relay switching voltage, which should be no more than 9 V at an ambient temperature of (20+5) °C. If the voltage is higher, this indicates a faulty relay or drive. To check the mechanical data,
use a dynamometer to determine the pressure force of the springs on the brushes, which for new brushes should be (9.8 ± 0.98) N or (1 ± 0.1) kgf. If the brushes are worn to a height of 12 mm, then replace them by first rubbing them into the commutator. The axial free play of the armature shaft should be no more than 0.5 mm (0.07-0.7 mm for the ST-221 starter). If it is not within this limit, then disassemble the starter and select the thickness and number of shims. The starter drive must move freely, without noticeable jamming, along the splined end of the armature shaft and return from the operating position to the original position under the action of the relay armature return spring. When the drive gear is turned in the direction of rotation of the armature, the armature should not rotate. The gear must rotate relative to the armature shaft under a torque of no more than 27.4 N.cm (2.8 kgf.cm).
Rice. 9.9. Connection diagram for testing the starter on a stand
: 1 - starter; 2 - voltmeter with a scale limit of at least 15 V; 3 - rheostat 800 A; 4 - ammeter with a 1000 A shunt; 5 - switch; 6 - battery
VAZ 2106: DIY starter repair
Modern cars use internal combustion engines. VAZ 2106 is no exception. To operate this vehicle, the ignition system must work perfectly. If the starter malfunctions, this system does not work and, accordingly, the car does not drive, since it provides a spark when the ignition key is turned. This article will describe the repair of this unit.
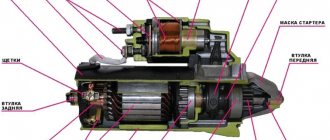
The VAZ 2106 starter consists of a housing with windings, an armature with a drive, covers and a relay. The part is an electric motor with four brushes and poles.
- 1. Dead battery or non-working starter. This phenomenon occurs if the ignition key is turned and the starter does not make any movement. If the electronics of the car are in working order, but the engine does not start, then the problem is in this device, namely the relay, that is, the contacts are stuck;
- 2. Wear of the shield. If the starter turns, but the engine does not start, then its malfunction is precisely due to this reason;
- 3. Faulty relay. When you turn the key in the ignition switch, a click is heard, but no further action occurs due to the relay;
- 4. Malfunction of the gear that engages the flywheel. When turning the ignition key, several clicks are heard;
- 5. Starter jammed. The cause of this malfunction may be: exhausted bearing life, misalignment due to the formation of wear on the shaft and in the housing. If these breakdowns are noticed, then the starter needs to be replaced. The entire repair process will be described below.
Payment via PayPal
After selecting payment via PayPal, the PayPal payment system will launch, where you need to select the payment method: bank card or PayPal account.
If you already have a PayPal account, then you need to log into it and make a payment.
If you do not have a PayPal account and you want to pay using a bank card via PayPal, you need to click on the “Create an Account” button - shown with an arrow in the picture.
PayPal will then prompt you to select your country and provide your credit card information.
After specifying the information required to make the payment, you must click on the “Pay Now” button.
Official website of the PayPal payment system https://www.paypal.com
How to check the VAZ 2106 starter
Content
- Removing the starter from a VAZ 2106
- Functionality check
Starter failure is a nuisance that “visits” the domestic VAZ 2106 not so rarely. However, before rushing to the store for a new part, it makes sense to inspect the old unit to determine the reason for its inoperability.
Slow cranking of the crankshaft, frequent clicks of the retractor relay, or complete “silence” in response to an attempt to start the engine - all this can cause a starter malfunction. However, before removing this “spare part” from the car, you need to make sure that this is the problem; those. All wiring to the starter is good and the battery is well charged. If this is the case, you can begin to dismantle the part to check its functionality.
Removing the starter from a VAZ 2106
Remove the positive terminal from the battery. Disconnect the hose connecting the air filter housing and the carburetor, unscrew the 3 nuts securing the air filter cover, and then the 4 nuts securing its housing (key “8”). If there is a heat-insulating shield with a hose, you will have to remove it too. In the next step, disconnect the connector connecting the solenoid relay and the car wiring. At the same time, unscrew the nut from the starter that connects the main power wire coming from the battery. Now you need to unscrew the 3 nuts securing the starter (socket wrench set to “13”), one of them from the bottom; It is more convenient to unscrew it under the car, for which the latter can be placed on a jack and stand. Next, move the starter back towards the radiator, and then pull it out and lift it up.
Functionality check
Clean the “spare part” from dirt and dust. Use a thick wire to connect the starter housing to the negative terminal of the battery. Take a thinner conductor and connect terminal “50” (the solenoid relay) to the battery positive. At the moment of contact, a click should be heard: the drive gear will appear in the starter window. This indicates that the part is working properly. If there is no click, then you need to purchase another solenoid relay, which is much cheaper than buying a new starter. There is another option when there is a click, but the gear does not pop out; this indicates a malfunction of the retractor mechanism. At home, without experience, it is unlikely that it will be possible to restore it - you will have to take it to a workshop.
To carry out further testing you will need an ohmmeter. Remove the starter rear cover to access the brush assembly. You will see the ends of the windings attached to the brushes. Place one ohmmeter probe on the body of the part, and touch the contacts connected to the brushes with the second one in turn. The device readings should be in the region of 10 kOhm. If this value is significantly less, it means that there is an interturn short circuit in the stator winding. If, on the contrary, the ohmmeter needle shows “infinity,” it means there is a break. In any case, you will have to buy a new starter.
Downloading a book
After successfully completing the payment (by any method) and returning to the KrutilVertel store from the payment system website, you will be taken to the successful payment page:
On this page you need to indicate your e-mail, where access to download the book will be sent.
If you are already registered on our website, then simply follow the link to your personal account.
The book you purchased will be in your personal account, from where you can always download it.
Please note that after making the payment, you need to return back from the payment system website to the KrutilVertel website.
If for some reason you did not return back to the site and closed the payment system tab with a message about the successful completion of the payment, please let us know - we will send you a letter indicating access to download the book.
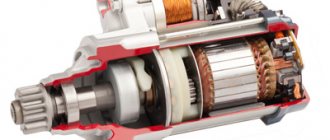
Self-repair of VAZ 2106 starter
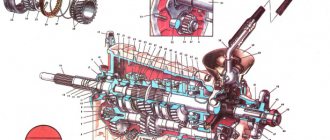
Starter VAZ 2106 cross-section
As you know, in order to drive a car, you need it to start. And with a broken starter, this is extremely difficult to do, so the question often arises about repairing the starter on VAZ 2106 cars. What could be the reasons for the inoperative state of the VAZ 2106 starter? How to repair it yourself? This repair manual will answer these and other questions and everything will immediately fall into place!
Signs of starter malfunction and possible causes
Let's look at some signs of a non-working starter, and what could cause a breakdown with this symptom. So:
- When turning the ignition key there is no movement of the starter. This symptom can characterize either a dead battery or a non-working starter. If all the electronics of the car work, but it does not start, the problem is in the starter.
- In this case, it means that the contacts in the solenoid relay are stuck and do not work.
- Another sign is that the starter turns, but does not start. The cause of this malfunction may be significant wear of the starter brushes.
- One more thing - when you turn the ignition key, a click is heard, and then nothing happens. Again, this indicates that the solenoid relay is not working properly.
- When trying to start the engine, multiple clicks are heard from under the hood. This is a sign that the bendix - the gear for engagement with the flywheel - has failed.
- The starter is stuck. This is already more serious, because in this case the cause may be wear on the starter shaft or in the housing - misalignment occurs and the teeth catch the wedge. There may be another option - faulty bearings. It's better and cheaper!
Payment via Portmone
After selecting payment through Portmone, the payment system will launch, where you need to select the payment method: bank card or Portmone account.
The price in the Portmone payment system is converted into dollars at the exchange rate of the Central Bank of the country where you are located.
If you have a bank card in a currency other than the dollar, then the money will be debited from the card at the rate of the Central Bank of your country at the time of the purchase.
After specifying payment details and confirming payment, payment for the goods will occur.
Official website of the Portmone payment system https://www.portmone.com
Injection engine control unit diagram
Electrical connection diagram for the injection engine control system:
1. — Controller connector. 2. — Mass air flow sensor. 3. — Coolant temperature sensor. 4. — Crankshaft position sensor. 5. — Throttle position sensor. 6. — Oxygen concentration sensor. 7. — Speed sensor. 8. — Ignition module. 9. — Electromagnetic valve for purge of the adsorber. 10. — Electric fan relay. 11. — Electric fuel pump relay. 12. — Main relay. 13. — Fuse protecting the power circuit of the electric fuel pump relay. 14. — Fuse protecting the power circuits of the main relay. 15. — Fuse link. 16 - Fuse protecting the constant power supply circuit of the controller. 17. — Diode. 18. — Idle speed regulator. 19. — Injectors. X1. — Diagnostic block. X2. — Connection block to the vehicle electrical system.
Schemes of individual six units
Generator connection diagram
1 — battery VAZ-2106; 2 — “six” generator set; 3 - regulatory device designed to control the operating voltage parameter; 4 - lock; 5 — plastic module with safety elements; 6 - control light indicator that determines the battery charge; 7 - relay that protects the power line of the battery charge indicator light.