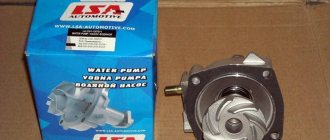
Fuel pump VAZ 2107 injector
The injection “seven” has a number of fundamental differences from the carburetor version of the car. This difference relates primarily to the fuel supply system. In the design of the VAZ 2107, the injector does not have a carburetor, and the gas pump pumps fuel directly to the injectors: this is reminiscent of the supply system of diesel engines.
Purpose and device
An electric fuel pump, unlike a mechanical one, is responsible not only for delivering fuel from the tank to the combustion chamber, but also for creating high pressure in the fuel system. Fuel injection in injection systems is carried out using nozzles, and gasoline must be supplied to them under high pressure. Only an electric pump can cope with this task; a mechanical one is not suitable here.
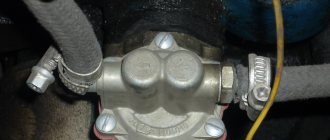
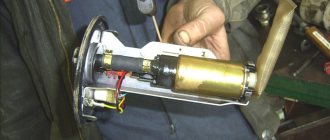
The VAZ 2107 fuel pump injector is designed quite simply and thanks to this it has a long service life. Essentially, it is an electric motor with blades located on the front of the shaft, which pump gasoline into the system. The pump inlet pipe is equipped with a coarse fuel filter in the form of a mesh to retain large dirt particles. The design of the electric pump is complemented by a fuel level sensor, which transmits a signal to the instrument panel.
The operation of the VAZ 2107 fuel pump injector is provided by an electric motor with blades located on the front part of the shaft, which pump gasoline into the system
Operating principle
To better understand the principle of operation of the gas pump, you need to have an idea of the injection system as a whole. Such a system consists of:
- Air intake.
- Air filter.
- Air sleeve.
- Throttle valve.
- Ramps with four nozzles.
- Fuel filter.
- Gasoline pump.
- Gravity valve, thanks to which fuel does not spill out of an overturned car.
- A pressure regulator (bypass valve), which is responsible for maintaining the pressure in the system at the required level.
- Safety valve.
- Fuel tank.
- Adsorber.
The fuel pump VAZ 2107 injector is located in the fuel tank
The VAZ 2107 fuel pump injector starts working after the driver turns the ignition key. At this moment, the electric motor of the pump turns on, and the pressure in the system begins to rise. When the fuel system pressure reaches 2.8–3.2 bar (280–320 kPa), the engine starts. While the engine is running, the gas pump pumps fuel into the system, and the pressure is maintained at the required level. After the engine is turned off, the pressure drops within a few minutes.
Where is
The fuel pump of the VAZ 2107 car, the injector is located inside the fuel tank. If you open the trunk lid, the tank with the pump can be seen on the right. The advantage of this arrangement is the simplification of the fuel system, the disadvantage is difficult access to the fuel pump.
Which fuel pump is better
If we compare an electric and mechanical fuel pump, it should be said that:
- the injection system itself is more reliable due to the fact that it does not have a carburetor, which requires additional maintenance;
- an electric pump is preferable to a mechanical pump, because it: provides direct fuel supply to the injectors;
- can be located inside the fuel tank (i.e., it saves engine compartment space);
- rarely fails due to the simplicity of the design.
Due to its location in the fuel tank, the electric fuel pump does not overheat and saves engine compartment space
Pump fault
It happens that the fuel pump hums, but there is no pressure, and the car will have difficulty starting, run intermittently, and stall. There could be perhaps three reasons:
- the pump is faulty;
- the coarse mesh is clogged;
- The fuel pressure regulator is faulty.
I described checking the pump pressure in the article about replacing the fuel pump. The same article describes how it is removed.
A malfunction of the regulator can only be determined by using a pressure gauge.
Fuel pump drive
The VAZ 2107 mechanical fuel pump is driven by a pusher and an eccentric. Among drivers, it is customary to call the pusher a rod, although the rod is another part of the fuel pump. The eccentric is located on the intermediate shaft, which operates from the gas distribution mechanism.
The fuel pump drive includes (see figure):
- 1 - pusher;
- 2 — heat-insulating spacer;
- 4 — adjusting gasket;
- 5 - sealing gasket;
- roller (cam).
The pusher is driven by an eccentric located on the shaft of the auxiliary mechanisms
Device and principle of operation
The operation of the mechanical fuel pump drive is not based on the fact that:
- the oil pump shaft is driven through a timing chain;
- the cam (or eccentric) begins to press cyclically on the pusher;
- The pusher transmits force to the lever and the fuel pump begins to pump fuel.
Drive faults
Problems with the mechanical fuel pump drive lead to interruptions in the operation of the fuel supply system. Actuator malfunctions are most often associated with deformation or excessive wear of the pushrod or cam.
Fuel pump rod bends
The fuel pump pusher is often made of metal that is not strong enough. There are often cases when, after 2–3 thousand kilometers, such a pusher bends and flattens the constant impact of the cam. The length of the pusher should be 82.5 mm. If your fuel pump tappet does not meet this size and is flattened on the cam side, it will need to be replaced.
If the fuel pump pusher is flattened on the cam side, it needs to be replaced.
Causes
There are several reasons why a VAZ fuel pump may not work:
- no power to the fuel pump;
- motor is faulty;
- pump is faulty.
Let me clarify some points. If the electric motor malfunctions, power is supplied to it, but if the brushes are broken, the rotor or windings are faulty, the motor will not spin and you will not hear a characteristic hum.
If the fuel pump malfunctions, a hum will be heard, but there will not be enough fuel or, in my case, the pump is simply jammed.
Instructions for installing a contactless system
The procedure for replacing a mechanical ignition with an electronic one is divided into the following stages:
- selection and purchase of BSZ;
- preparation of tools;
- removing the old system and installing a new one;
- ignition setting.
If you have not previously had to deal with sparking problems in classic Zhiguli models on your own, then you will have to allocate about 3-4 hours for all the work.
Recommendations for selection
The BSZ factory kit for the VAZ 2107, available for sale, includes the following parts:
- switch with catalog number 36.3734 (also available 3620.3734);
- main ignition distributor, marking - 38.37061;
- high-voltage coil, catalog number - 27.3705;
- wiring harnesses with connectors.
BSZ parts from SOATE company
Note. The marking of the distributor is indicated for cars with engines of 1.5 and 1.6 liters. In modifications of the “Seven” with a 1.3 liter engine, the cylinder block is smaller in height and the ignition distributor shaft is shorter. Its catalog number is 38.3706–01.
There is a similar contactless kit on sale, designed for the Russian SUV VAZ 2121 Niva. In it, the distributor is marked as follows: 3810.3706 or 38.3706–10. You should not buy it for the “classics”, since the element differs in technical parameters, although it looks the same in appearance.
Among the manufacturers producing ready-made electronic ignition kits for older VAZ models, the one that has proven itself to be the best is VAZ, whose production is located in Stary Oskol, Russian Federation. Feedback from owners of “classics” about the company’s products is purely positive.
It is recommended to change the spark plugs and wires along with the ignition.
Advice. When planning to set the BSZ to "seven", at the same time replace the spark plugs (brand - A17DVR) and the high-voltage wires to them. They are not included in the delivery package, but they are very useful for stable and economical operation of the engine with the new spark generation system.
What tools will you need?
To install the electronic unit and other elements of the UPS, you will need simple tools available in the garage of any skilled motorist:
- flathead and Phillips head screwdrivers;
- open-end wrenches sizes 8, 10 and 13 mm;
- ordinary pliers;
- a spark plug wrench equipped with a cardan for convenience;
- hand or electric drill with a drill with a diameter of 3-3.5 mm.
From this set you will need keys, screwdrivers and pliers
Note. Using keys, you unscrew the terminals, distributor fastenings and coils. A drill will be needed to make 2 holes for mounting the switch. In some cars you can find ready-made holes designed for mounting electronics; they are located on the left side member (in the direction of travel of the car).
With a 30 mm wrench you can easily turn the crankshaft
It’s good if you manage to find and borrow a special wrench designed to turn the crankshaft of a VAZ 2107 by grabbing the ratchet nut. Another option is to rotate the crankshaft with a regular 30 mm open-end wrench or by turning the suspended rear wheel with 4th gear engaged.
Work on installing and configuring contactless ignition can be carried out in any convenient place, as long as weather conditions permit. Since you don’t need an inspection hole, a flat and well-lit area will do.
Installation of BSZ on a car
Before installing the electronic ignition, you need to remove the old system from the car, proceeding in this order:
- Lift the hood cover of the "Seven", disconnect the battery from the on-board network and remove the high voltage wires from the spark plugs.
- Remove the spark plugs and turn the crankshaft to bring the piston of cylinder 1 to top dead center (TDC). A long screwdriver inserted into the spark plug well will help you with this. Make sure that the notch on the crankshaft pulley is opposite the first mark on the cylinder block (it is the longest of the three).
- Unlock the metal latches of the ignition distributor cover and remove it along with the wires. To be sure, place a mark on the engine valve cover opposite the moving contact of the slider.
- Disconnect all wires from the distributor and the thin tube that connects it to the fitting on the carburetor. Loosen the nut holding the distributor skirt to the cylinder block and unscrew it. Remove the old distributor, making sure that the gasket is not lost (it is located between it and the block).
- Disconnect the wires from the contacts of the high-voltage coil and remember where they were connected. Unscrew the coil bracket and remove it from the body.
Disconnecting the negative terminal of the battery
Start installing the BSZ by installing an electronic unit equipped with an aluminum mounting plate with holes (it serves as a cooling element for the device). If there are ready-made holes on the left side member, screw the commutator to them with two self-tapping screws. Otherwise, find a free space near the coil, drill holes and secure the control unit.
Spark plug placement
Advice. Do not place the switch under the windshield washer fluid reservoir. If it leaks, it will flood the delicate electronics and the ignition will stop functioning.
To replace the coil, you need to disconnect the wires and remember their pinout
Install the elements of the contactless system in the following sequence:
- Take a new distributor, remove the cover from it and put on the gasket. Install it into the socket on the cylinder block so that the movable contact is opposite the chalk mark drawn on the engine valve cover. Lightly press the distributor skirt with the mounting nut to prevent it from accidentally turning.
- Screw the high voltage coil into the old place (the fastenings are the same). Connect the wires from the ignition switch relay, tachometer and switch to its terminals. The wire coming from contact “1” of the electronic unit is connected to the terminal marked “K” of the coil, and the wire from contact “4” is connected to terminal “B”.
- Having established a gap of 0.8-0.9 mm between the electrodes of the spark plugs, screw them into the holes of the cylinders. Place the cap on the distributor and connect all the high voltage wires, including the central one leading to the coil. Connect the vacuum tube, after which you can start starting the engine and adjusting the timely spark formation.
The notch is placed opposite the long score
Advice. When installing a high-voltage coil, the terminals are swapped, which causes some inconvenience. The issue is solved by loosening the nut of the mounting clamp and turning the coil body 180°, after which it can be put in place.
Stages of ignition installation in photographs
Position of the slider when the marks are aligned
The switch is attached to the spar with 2 self-tapping screws
Before setting the marks, you need to remove the distributor cap
Additional designations
The fuses of the VAZ 2107 car are located as follows:
- taillights and reversing lights;
- electric motor of the heater fan, headlight washer and glass wiper pumps;
- indicator for turning on the rear window heater VAZ 2107;
- direction indicators and hazard warning relays;
- fog lights;
- tachometer, voltmeter;
- control lamps for oil pressure, fluid, fuel level and reserve indicators on the instrument panel, instrument panel lighting;
- cigarette lighter and clock;
- VAZ sound signal;
- interior lighting (up to 2000 there was one lamp on the ceiling, for those manufactured after 2000 there were two lamps on the rear door pillars);
- high beam headlights;
- high beam warning lamp;
- engine compartment lighting and license plate lighting;
- glove compartment lighting;
- right headlight;
- left headlight.
Checking and replacing the relay
A very important role in the proper operation of the system is played by relays, which periodically perform operations to turn on or off the necessary functions in the car.
An electromagnetic relay consists of a coil, which is supplied with power through a circuit and making contacts.
To check its functionality, you should perform a number of sequential operations:
- The ground wire in the car is disconnected from the battery.
- The relay can be easily pulled out by hand.
- A visual inspection of the contacts is carried out, they are cleaned of oxidation, and the reliability of the pin fastenings is checked.
- Functionality testing is performed by applying 12V power to the winding using two pieces of wire.
- When power is supplied, the coil should operate and the contacts should close, which can be checked using a multimeter in vertebrae or resistance measurement mode.
- If it does not work, the relay should be replaced with a new one.
Replacing fuses
If a fuse link fails or a section of the circuit fails, you can find and check the condition and serviceability of the required fuse. To do this you should:
- Open the cover on the power supply and find the serial number of the required protection element.
- If the damage is not visible visually, then you should remove the fuse-link from the board socket and “ring” it with a multimeter, measuring its resistance. This operation should be performed with the vehicle's power turned off and it is additionally required to disconnect the battery terminal.
- A failed fuse should be replaced with a similar one corresponding to the specified current value on the housing or the rated current of the circuit.
- Removing the insert from the board socket and replacing it with a new one from the group of reserve inserts located in the block is done using tweezers attached to the block body. In the absence of tweezers, work is performed with small pliers.