The generator is the main component in the vehicle's electrical power supply system. Sometimes it breaks down, but you shouldn’t throw it away and rush to buy a new one. Often the problem is that the generator brushes are worn out and it is enough to replace them for further uninterrupted operation of this unit. Replacing generator brushes is a fairly simple procedure, but first you should find out what signs may indicate brush wear.
Often, when carrying out a preventive inspection of a car, attention is not paid to various details. Alternator brushes are one of these little things; if they wear out, the generator will stop charging the battery. Experts recommend inspecting the brush assembly once every 45-55 thousand kilometers. Diagnostics of the brushes can be carried out without removing the generator, and in some cases it may even be possible to replace them without removing the main unit.
- The car's electrical appliances suddenly turn off (even while driving);
- Headlights, dimensions and even interior lighting dim and flicker;
- A sharp decrease in the voltage of the vehicle's on-board network;
- A sharp discharge of the battery, which will be very difficult to recharge in the future.
Each of these points may indicate wear on the generator brushes, which are located inside this unit. Many people wonder how to check brushes. In order to check the remaining length of the generator brushes, it is enough to disconnect the generator from the battery and remove the voltage regulator. After this procedure, you can determine by eye how worn out any of the generator brushes are. If the length is less than 0.5 centimeters, the brushes definitely need to be changed. Checking the brushes should be carried out during routine inspection of the generator.
Main symptom of malfunction
The driver is notified of alternator failure only when the charge level drops below battery voltage. The indicator lamp for lack of battery charging lights up on the dashboard. The danger of the situation is that the vehicle’s on-board network is powered by a battery, which has a limited and, in the event of a generator malfunction, irreplaceable capacity.
Extraneous noise
It is very easy to catch a generator creating extraneous noise when the engine is running - just remove the belt that rotates the generator pulley. If the noise disappears, then the source has been identified correctly. Possible malfunctions and their characteristic symptoms:
- whistling (possibly only when cold) - slipping of the alternator belt. In most cases, squeaking can be eliminated by correct belt tension. Sometimes the cause of the squeak is technical fluids getting on the belt, pulley misalignment, or excessive tension;
- metallic creaking, noise – dry friction of generator bearing parts. Ignoring signs of a worn bearing can lead to it jamming and breaking the service belt. The malfunction is eliminated by installing a new bearing;
- noise bordering on rattling - a malfunction of the overrunning clutch. The inertia pulley is designed to absorb shock loads and extend the life of the alternator belt. As practice shows, a faulty overrunning clutch very quickly leads to a break in the alternator belt.
Stator winding
There are only 3 possible malfunctions:
- short to ground or to the stator housing;
- break;
- short circuit between turns.
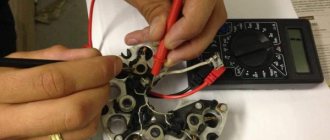
For a quality check, you should use a megger, but since the device has a rather narrow specialization, initial diagnostics can be done with a multimeter in resistance measurement mode. Since quite large currents pass through the winding, the best way to check the unit is to use a 220 V light bulb.
When checking, be sure to follow electrical safety rules!
It is more difficult to check an interturn short circuit, since the resistance of a working winding is very low, which does not allow obtaining reliable results when diagnosing with a conventional multimeter. In the case of an interturn short circuit, the winding resistance will be less compared to a working unit. A short circuit can be identified by calculating the resistance using the formula. To check, you need to use a laboratory power supply to pass current through the winding, measure the voltage and current (the method is shown in the video).
Field winding
The condition of the generator rotor winding is checked in a similar way. When checking for a short to the rotor housing or a break, one of the contacts will be the collector. You can detect a break by applying “-” to one contact ring of the collector, and “+” to the other (if the winding is intact, the lamp will light up). Faults in the stator and rotor windings quite rarely lead to generator breakdown, but in the case of comprehensive diagnostics, checking them should not be neglected.
Diode bridge
Cars are equipped with an alternating current generator, but DC current is needed to power the on-board network. It is the diode bridge that serves to rectify the current. There is only one sign of a malfunction - a drop in charging voltage, but it can manifest itself, for example, only when consumers are turned on. It is noteworthy that the breakdown may be accompanied by a hum that increases with increasing engine speed.
Unfortunately, it is not possible to fully check the diode bridge with a multimeter. Using a universal meter, you can find breakdown of diodes and broken contacts, but floating faults that can affect the operation of the generator can only be found using specialized equipment.
The operating principle of a diode bridge is based on the property of a diode to pass current in only one direction (in the event of a breakdown, the current will flow in both directions). Diagnostics can be done with a multimeter in resistance measurement mode. A simple method for checking a diode bridge is well demonstrated in the video.
Voltage regulator relay
The voltage regulator is one of the parts that most often causes generator malfunction. The unit is designed to maintain the charging voltage within limits that are safe for the battery and on-board network. If the design of the generator did not include a relay-regulator, the charging voltage would increase in proportion to the increase in engine speed. It is precisely this consequence of a breakdown of the voltage regulator that is most detrimental to the battery and control units of the vehicle’s electronic systems.
Characteristic symptoms of failure:
- charging voltage drop. Due to a faulty regulator, the voltage on the brushes turns off at lower voltage, so undercharging occurs;
- recharge. The charging voltage should not exceed 14.5 V. Exceeding this value for a long time can lead to overheating of the battery and boiling off of the electrolyte. Therefore, if you notice liquid leaks on the battery case, be sure to check the charging voltage with a multimeter.
The most convenient way to check the voltage regulator is with a laboratory power supply.
Brush unit
During operation of the generator, the brushes are constantly in contact with the commutator plates, which naturally leads to a decrease in their length (the commutator also wears out, but to a much lesser extent). When wear becomes critical and the spring force is no longer sufficient for good contact, the excitation of the armature winding deteriorates. As a result, brush wear leads to a drop in charging voltage.
It is typical that the decline occurs gradually, so it can manifest itself at the most inopportune moment. Under a certain set of circumstances (a dying battery, severe frosts, a large number of cold starts, short-distance trips with many consumers turned on), the emf of the battery on a frosty morning will not be enough to start the engine. Owners of diesel cars should pay special attention in this regard, since the starter requires more current to start the internal combustion engine of the Diesel cycle.
How to check generator brushes?
The brush assembly is usually combined with a voltage regulator. Contact with the rotor slip rings is carried out due to the force of the springs. A malfunction of the generator brushes can be easily determined by visual inspection (sign: the length of the protruding ends is less than 5 mm). You also need to check the diameter of the slip rings (the norm is 14.2-14.4 mm, the minimum is 12.8 mm). The presence of workings on contact surfaces is not allowed. Worn slip rings need to be replaced.
Problems with the generator can also arise due to increased brush resistance, which should be no more than 0.5 ohms. You will have to replace the brushes if, when checking, the multimeter shows increased resistance.
However, given that in most modern cars the brush assembly is combined with a voltage regulator, generator problems can be associated with a malfunction of the relay regulator, designed for a voltage of 15 V and a current of up to 5 A. For diagnostics, measurements with a multimeter are used. When the engine is running, the voltage at the battery terminals or at the generator outputs should be within 14-14.2 V. The voltage change is allowed by no more than 0.5 V. If the fluctuations are more significant, this is a sign that the relay-regulator is faulty and must be replaced.
It is also useful to check the voltage regulator.
To do this, assemble a circuit that combines, using wires, an adjustable power supply, a light bulb, a voltage regulator with a brush assembly, and a multimeter (voltmeter). The power supply and multimeter are connected with correct polarity to the contacts of the voltage regulator. The light bulb wires are attached to the brushes. By turning on the power supply, voltage is applied (from 3 V), the light comes on. With a gradual increase in voltage and upon reaching 14 V, the light should go out - this indicates normal operation of the regulator.
Popular faults
If the car cannot start, and you hear that the engine compartment begins to hum and howl, or the car periodically stalls with or without load, this may indicate a breakdown of the generator. Removing and disassembling your humming generator is the last thing; first you need to understand the main faults and causes. There may be two types of breakdowns that require repair of generators - mechanical and electrical types.
The main mechanical damage includes breakdown of fasteners, the device body, problems in the operation of bearing devices, pressure springs, and belt drive. In principle, there are very different reasons for the malfunction of a mechanical generator, but one way or another, they are not related to the electrical part. As for electrical breakdowns, these include malfunctions of windings, diode bridges, failure of brushes, short circuits, breakdowns, problems with relay operation, etc.
Diode bridge of a car generator
As practice shows, quite often symptoms indicating a failure of the generator device may appear as a result of other problems. For example, if there is a poor connection in the fuse connector, you may think that the problem is with the device. But the same symptom can appear as a result of burnt out contacts in the ignition switch. In addition, if the device failure lamp is constantly on, this does not mean that there are problems with the generator, since this may indicate a relay failure.
What are the signs of a generator malfunction:
- With the engine running, the low battery light began to blink. It can also burn continuously.
- Do-it-yourself generator repair can be done when the battery boils over.
- When the optics are operating, dimmer illumination is noticed. Also, when the engine is running, rattling noise may occur. In turn, when the driver presses the gas pedal, that is, the engine speed increases, the brightness of the optics increases significantly. As a rule, this manifests itself when re-gassing, but the optics, which began to work brighter, no longer work brighter.
- The generator is humming. If the generator howls or hums, this primarily indicates its malfunction, which must be resolved as quickly as possible.
- Repair of car generators should also be carried out if the car periodically stalls. If the generator howls and the car stalls while driving, this may indicate a lack of voltage. Of course, when the car stalls while driving, the driver will first check the battery, but if the battery is charged, it is necessary to diagnose the generator unit (GU).
Generator Voltage Regulator Relay
In what cases is it necessary to replace a generator or repair and maintain it?
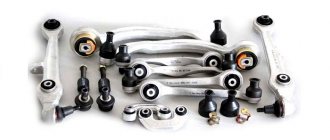
The generator will need to be disassembled for the following faults:
- Mechanical damage or pulley wear. If the damage is quite significant, then the generator pulley is replaced.
- Disassembling the manufacturer's generator in case of wear or damage to the current collection brushes.
- Failure of the generator slip rings (commutator wear). Usually replacing slip rings is done with your own hands without any problems.
- Failure or problems with the regulator.
- Removal of the generator and its repair should also be carried out when the turns of the stator winding are short-circuited.
- Servicing of generators should be carried out when the bearing parts are completely destroyed or worn out.
- Malfunctions of the diode bridge of the generator will also lead to its disassembly and repair. The main signs of a diode bridge malfunction are a weak spark at the spark plugs, as well as reduced battery voltage.
- Various damage to charging network cables.
Causes of generator failure
There are many reasons for generator failure - wear of brushes, damage to bearings, breakdown of windings, etc. As a result of some damage, the device will still work for some time, although it will no longer be able to generate a sufficient amount of energy, and after others, it will fail altogether. In this case, the generator will need to be repaired.
Wear of the brushes is the malfunction after which the generator becomes completely inoperative. But the car is designed in such a way that there is easy access to this device, so there are no problems with replacing the brushes.
On most modern cars, the brushes are made in the same housing with the voltage regulator. This means that if the brushes are worn out greatly or the voltage regulator relay has become unusable, then the entire assembly will have to be replaced. Replacing brushes is necessary in cases where their length is less than five millimeters. If you have at least a little experience in car repairs, then you can replace the brushes yourself. Otherwise, it is recommended to contact a generator and starter service workshop.
Replacing brushes on most generators in modern cars is possible even without removing it from the engine. But, if the device is removed, it will be much more convenient to work; moreover, it is even possible to remove and replace the brushes and regulator separately. When starting work, you should remember that it is better not to unscrew the plastic cover - the visible screws have a completely different function, and if you unscrew them, small washers will get inside the generator, which will cause a lot of unnecessary problems. That is why it is recommended to to replace the generator brushes - specialists know all the intricacies and will do the job quickly and efficiently.
Identifying causes and troubleshooting
What to do if the generator does not start? What if the generator whistles? Disassembling and assembling a generator is, in principle, not a very difficult procedure if you know what to do.
So, how to repair a generator, knowing the main reasons:
- If the battery charge is too low or completely absent, it may be the result that the fuse element has burned out or has simply come off due to mechanical shaking. In addition, the lack of voltage in the on-board network may be a consequence of brush wear. Electrics in this case are very important, since during voltage surges diodes can burn out, and a break or short circuit can occur in the rotor or stator winding.
- To check the functionality of the brushes, a visual inspection is usually sufficient. But if there is a wire break or short circuit in the network, a multimeter may be required for diagnostics. If you do not know how to remove the generator, use the service manual, since restoring a broken diode is carried out only by replacing it or soldering it. If rewinding the generator is also necessary, it will be problematic to do it at home. To do this, it is better to turn to professionals so that you can be sure that everything will be done correctly. As a rule, the rewinding procedure usually costs less, but if its cost is too high, it may make sense to replace it with a new GI.
- As for rotor repairs, you can do it yourself. As a rule, the need to repair the rotor is caused by a break in the electrical circuit near the slip rings or unsoldering of the ends of the windings. In this case, the repair procedure should begin by carefully unwinding one section of the cable. The broken end must be unsoldered, after which, using a soldering iron and consumables, you need to install the finished cable using the unwound coil. As practice shows, it is usually not even necessary to reduce the number of turns, since the pins are soldered. To ensure normal operation of the GU, you can also clean the ring with fine-grained sandpaper. If there are larger damages on the ring, they can be removed using flat needle files. How to remove the generator in this case - again, you need to refer to the service manual, since the dismantling procedure will be different in each case. The generator is disassembled or assembled in the same way. During the process you need to be careful not to mix anything up. Replacement of generator slip rings is usually carried out if they are completely damaged.
- If the unit is making a loud noise, most likely the cause is wear on the rotor bearings. If you notice that the condition of the bearing devices is rather poor, it may be time to replace them. But things may not be so sad. For example, if the play on the bearings is not particularly critical and is practically not felt, you can simply dismantle the parts and wash them yourself. Before installing the elements, it will be necessary to lubricate the bearings.
- Lack of voltage or voltage surges in the on-board network can usually be solved by changing the regulator relay. It should be noted that the primary reason in this case may be problems in the operation of the diode bridge or some of its components. Diagnosing the device using a multimeter will allow you to identify failed diodes.
- If the diode icon on the instrument panel informs the driver about problems with the battery voltage, this may indicate a possible breakdown. In particular, we are talking about one of the diodes in the circuit. If you need to get to this circuit with diode components, you will need to unscrew several nuts from the winding, and then remove the nut that secures the positive terminal. When you do this, you will have access to a circuit that can either be replaced or repaired (the author of the video about self-repairing a GU is Vyacheslav Lyakhov).
Check Features
You need to know how to check the operation of the generator on a car correctly, otherwise you may encounter the fact that a working part will be completely damaged. By following just a few simple rules, you can avoid unexpected breakdowns.
- Checking should be done using a multimeter.
- When diagnosing the condition of the valves, the current should have a voltage of no higher than 12 V.
- If it is necessary to replace the wiring, you need to select wires with an identical cross-section to the original ones.
- Before you start checking the generator, you need to make sure that all fasteners are connected correctly and that the belt tension is correct (read more about the generator belt tension roller). If necessary, the connections are brought to a working condition, and the belt is tightened or loosened.
The main condition under which it is possible to check a generator at home is to maintain its working condition. If the device is disassembled or has received damage that prevents it from functioning, then diagnostics will not allow us to determine the suitability of the device for further operation.
We also recommend reading our expert’s article, which talks about how to remove the generator on a Priora.
You may also be interested in our specialist’s article on how to remove a generator on a VAZ-2114.
We recommend that you additionally read our expert’s article, in which he talks about how to repair a VAZ-2106 generator.
There is a list of actions that absolutely cannot be performed during verification:
- performance testing should not be performed using a short circuit or in other words “spark”;
- connect terminals of different configurations to each other, as well as connect terminal 30 or B+ to ground;
- diagnostics and operation of the generator should not begin without connecting consumers. It is especially important to observe this point when the battery is disconnected;
How to test a generator for performance at home
There are two main verification methods. One of them, although very old, allows us to reliably understand the performance of the device. The second works more subtly and is able to respond to minor system flaws. Using the second method, you can identify the slightest deviations in the operation of each element.
How to check a generator on a car without removing it and without having the necessary tools
There is an ancient way to identify a generator malfunction. It is very simple, but the result can only consist of two points:
- works properly;
- there are malfunctions.
Since anyone can check a car generator at home using this method, its popularity is fully justified. You need to start the engine and turn on the low beam. You need to remove the negative terminal from the working engine. If the headlights are on evenly and the engine is not out of sync, then the generator is working properly. If the internal combustion engine operates uncertainly or the brightness of the headlights changes, it is necessary to perform a more in-depth diagnosis, since the device is in a faulty state.
How to test a generator with a multimeter
Measuring with a special device will reveal even a small failure. There are a number of indicators that are considered optimal for all types of machines. The battery without load has a voltage in the range of 12.5 - 12.7 V. Since a load is placed on the battery when the engine starts, the normal readings are 13.8 - 14.8 V. After receiving the maximum load, the voltage reading should drop to 13 ,8. If this does not happen or the voltage drops even lower, then the generator will need to be checked.
Video “Repairing GU at home”
Visual instructions for repairing a power unit with your own hands are presented in the video below using the example of a Ford Transit car (the author of the video is Ramanych).
The generator is the main component in the vehicle's electrical power supply system. Sometimes it breaks down, but you shouldn’t throw it away and rush to buy a new one. Often the problem is that the generator brushes are worn out and it is enough to replace them for further uninterrupted operation of this unit. Replacing generator brushes is a fairly simple procedure, but first you should find out what signs may indicate brush wear.
Often, when carrying out a preventive inspection of a car, attention is not paid to various details. Alternator brushes are one of these little things; if they wear out, the generator will stop charging the battery. Experts recommend inspecting the brush assembly once every 45-55 thousand kilometers. Diagnostics of the brushes can be carried out without removing the generator, and in some cases it may even be possible to replace them without removing the main unit.
- The car's electrical appliances suddenly turn off (even while driving);
- Headlights, dimensions and even interior lighting dim and flicker;
- A sharp decrease in the voltage of the vehicle's on-board network;
- A sharp discharge of the battery, which will be very difficult to recharge in the future.
Signs of brush wear
You can tell if the brushes are very worn out by the following signs:
- in the dark, the headlights burn dimly and blink frequently;
- interruptions in the voltage supply are felt;
- poor battery charging;
- The radio turns off spontaneously.
It often happens that when carrying out maintenance, in particular when inspecting a car generator, little attention is paid to small details, which is why many car owners are caught by surprise when brushes fail. But even if during operation of the car there are disturbances in the operation of the generator, you should not immediately resort to replacing the brushes - it is first recommended to make sure that they are the cause of the malfunction, and only then get to work.
The electrical system of any car is designed in such a way that various faults are indicated. For example, if there is a malfunction of the generator, the red indicator light on the dashboard immediately lights up. Well, quite often the cause of the problem is wear or sticking of the brushes. In the first case, the situation can be corrected only by replacing them, and in the second, if the brushes are still functional, they can be slightly ground so that they move freely in the seat.
Replacing generator brushes , as a rule, does not cause any difficulties, so any auto repair shop can handle this very quickly.
- Signs of a generator malfunction
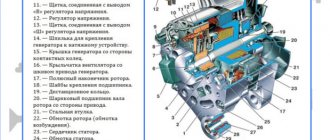
- 1. What is a generator?
- 2. What are the generator malfunctions and how can they be eliminated?
- 3. Self-diagnosis, or how to figure out generator problems
A car's generator is a very significant element of its design, which, together with the car's battery, provides many important components of the vehicle with the necessary electricity. Thus, thanks to the energy received from the generator, the ignition system, lighting devices and various electronic devices, of which there are quite a lot in a modern car, operate. Of course, even the slightest malfunction of the generator will affect the operating efficiency of any electrical appliances on the machine, up to the point of completely blocking their activity.
Therefore, it is advisable for the car owner to have at least a general understanding of the main causes of generator problems, their characteristic symptoms, diagnostic and elimination methods.
What is a generator?
A car generator is a device responsible for converting mechanical energy received from the engine crankshaft into its electrical version.
The first generator “saw” the world in 1832, and its “parents” were the Parisian technical scientists - the Pixie brothers.
Of course, at that time such a design was far from perfect, and it was difficult to use. To operate such a machine, people were forced to rotate a heavy permanent magnet, which created an alternating electric current on two wire coils fixed near its poles. This generator had a device for equalizing the current, and to increase the power of electrical machines, scientists of those times began to increase the number of magnets and coils.
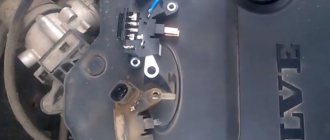
Where are the generator brushes located?
Changing generator brushes is not difficult. They are located in the rear half of the device and are held in place by a single bolt. The brush assembly itself is located next to the slip rings and is connected to the voltage regulator. The brushes are held in place by springs next to the rings. Knowing the circuit diagram of the generator, it is not difficult to find the brushes. To replace, you will need a standard set of tools:
- Several wrenches;
- A pair of screwdrivers;
- New brushes;
- Liquid WD-40 (in order not to strip the threads of the bolts).
The brushes can be replaced in two ways, by removing the generator or without removing it. The design of the car, or rather the location in the engine compartment, will tell you which method is best to use. If there is free space, it is not difficult to repair the generator brushes without removing the unit, and if the engine occupies the entire engine compartment, it is impossible to do without removing the generator.
Methods for replacing brushes
Unit repair is carried out using 2 methods:
- with equipment removal;
- without dismantling.
The method for restoring the unit depends on the layout of the units in the engine compartment and the condition of the threaded connections. If there is a coating of rust and oxides on the steel elements, it is recommended to remove the electrical machine.
The parts are treated with a special liquid, otherwise the edges of the nuts will be licked off or the body of the bolt will break.
Before replacing the brushes on the generator, you need to prepare:
- wrenches or sockets (size and type depend on the car model);
- screwdrivers with flat and Phillips blades;
- a set of new parts (selected from the catalog depending on the modification of the electric machine);
- a bottle of WD-40 liquid, which allows you to unscrew dirty or rusted threaded connections.
On a removed generator
Algorithm for servicing a unit using the example of a VAZ-2113 car with an 8-valve power unit:
- Stop the engine, engage 1st gear and tighten the parking brake lever.
- Open the hood and disconnect the negative cable from the battery housing (it goes to the car body).
- Loosen the bolt in the lower support.
- Disconnect the patch cables.
- Unscrew the drive belt tension adjuster nut, and then use a mounting spudger to carefully move the generator towards the engine block.
- Remove the drive belt, unscrew the bolt securing the tension bracket to the cylinder block.
- Unscrew the bottom bolt holding the electrical machine to the motor.
- Place the equipment on the workbench and remove the plastic cover, which is held in place by latches.
- Remove the voltage regulator housing, which is secured with Phillips head screws. The unit is attached to the windings using a quick-release block.
- Remove the brushes; parts must be replaced if the remaining length of the graphite elements is less than 5 mm.
- Install new parts and reassemble in reverse order. Adjust the belt tension, and then start the power unit and check the operation of electrical devices. If an on-board computer is installed on the car, the device shows the voltage in the on-board network.
How to replace brushes on a removed generator
With the generator removed, work on replacing the brushes will be much easier. Having access from all sides, it is easy to examine the wear of the brushes and replace them. The main problem in this option will be removing the generator from the car. You need to unscrew the generator mounting bolt, loosen the belt tension, remove it and unscrew the mounting bolts connecting the generator to the engine housing. If you can get the generator from above, consider yourself lucky. There are often cases when, to remove the generator, you have to remove not only the air filter and pipes, but even the radiator.
First of all, you need to clean the mounting area of the brush holder from dirt and dust. You can wipe it with solvent and then blow it with compressed air. After this, you need to remove the brushes; to do this, you need to unsolder them. Leaving the generator without brushes, be sure to clean all contacts and check the springs for elasticity. It is advisable to polish the slip ring after this.
The replacement itself consists of unsoldering the old wires from the used brushes and soldering them to a new set. When carrying out this operation, you must be careful, since the material of the brushes is very fragile. After installing the brushes on the seat, you should make sure that they move freely.
Installation of new brushes should be done in the reverse order, after which the generator is assembled and installed on the car. It is recommended to change the generator bearings when replacing the brushes. When installing a generator on a car, the main thing is to correctly adjust the belt tension. If the tension is insufficient, the belt will slip on the rollers.
It happens that the computer in the car begins to show a malfunction of the generator immediately after replacing the brushes. This occurs due to insufficient grinding in of new parts. During operation they will rub in and the error will disappear. If the error persists, the reason is that the case is stuck due to excess dirt. This problem can easily be eliminated by blowing the parts with compressed air. Before checking the operation of the generator, be sure to inspect the brushes for chips and cracks. New parts often have manufacturing defects.
It happens that the brushes are replaced together with the relay and generator regulator. In this case, the replacement process proceeds as follows:
- The negative terminal is disconnected from the battery;
- You need to remove the rubber tip from the positive wire;
- The generator is dismantled (if necessary, the air filter housing must be removed);
- You get a brush block with a relay regulator;
- The fixing springs are removed;
- The brushes are unscrewed;
- All associated wiring is disconnected;
- A new block is being installed.
The generator is connected only after checking the absence of defects on the new brushes. After assembly, we put the generator in place, tighten the belt, connect the battery and start the car.
How to change brushes on a generator?
You can replace it without removing the generator - just remove the voltage regulator along with the brush assembly. Before this, you should disconnect the generator from the power supply (disconnect the negative terminal from the battery). After this, unscrew the clamping nut and remove the voltage regulator with the brush holder. If the wear is critical (the offset is less than 5 mm), the brushes (graphite rods) will need to be replaced. Here's how they do it:
- disconnect the contacts (unsolder the wires) and remove the old brushes, clean the soldering area, check the elasticity of the springs;
- install a new set into the brush holder, solder the contacts;
- check the free movement of the brushes in the brush holder;
- install the brush assembly in place and secure it with a nut.
Sometimes the solution may be simpler: perhaps the contact between the brushes and the rotor rings was broken due to the former sticking. The reason may be mud or graphite deposits, which can be easily removed by blowing contaminated areas with compressed air.
Important: before installing a new part, you should carefully check them for manufacturing defects.
How to remove brushes from a generator located on a car
If the previous owner installed a brush block with a relay regulator in the generator, then the question of how to change the brushes on the generator without removing it from the car is much easier to solve than replacing individual brushes. If there is sufficient space in the engine compartment, it is also possible to replace the brushes separately without having to remove the generator.
All work on the vehicle's electrical equipment should begin by disconnecting the battery.
- The voltage regulator is removed;
- The production of brushes is measured;
- Old brushes are unsoldered;
- Contacts are cleaned;
- New brushes are soldered;
- The free movement of the generator brushes is checked;
- The regulator is installed in place;
- We connect the battery and start the car.
If everything went without errors, you won’t have to worry about how to check the generator brushes for a long time. Now, knowing perfectly the structure of the generator after disassembling it, it will not be difficult for you to fix other generator malfunctions with your own hands.
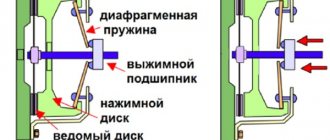
Generator brushes: what function do they perform?
When in contact with the slip rings located on the rotating rotor shaft, the generator brushes transmit current from the battery to the rotor field windings. This is how an electromagnetic field is created.
Under the influence of the alternating magnetic field of the rotating rotor, an electromotive force is induced in the coils of the stator windings and an alternating electric current is created. The current passing through the diode bridge (rectifier block of the generator) is converted into direct current. This is exactly what is needed to recharge the battery and ensure the functionality of the car’s electrical equipment.