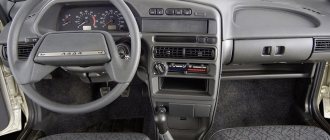
Appearance of a classic torpedo in a VAZ 2114
Torpedo is the modern name for the dashboard. Initially it was used for foreign cars, but today this name is used by motorists in the CIS countries. The dashboard in the VAZ 2114 car is a collapsible metal structure that contains plastic elements. It also uses polymer film and polymer foam to cover some of the controls. The instrument panel includes many monitoring instruments and controls.
Tip: a great way to decorate the interior of a VAZ 2114 is to reupholster the dashboard with genuine leather or eco-leather. The costs of such an update are minimal, but with proper design you can achieve high results. Also in the VAZ 2114 they practice covering the visor and roof. Tuning can be done independently, but if you don’t have time, you can contact a car workshop.
Removing the dashboard may be necessary if the owner of a VAZ 2114 wants to change the heater radiator or even the entire stove. To get to these parts, you will certainly have to disassemble the dashboard. Depending on the purpose, the analysis may or may not be complete. For example, dismantling a heater core requires only partial removal of some elements. For some body work, it is necessary to remove the dashboard, as the structure may be damaged during repairs. Disassembly of the structure is also required when the motorist decides to increase sound insulation in the car interior - for this it is necessary to seal the wheel arches, hood, doors and dashboard.
Step-by-step dismantling of the dashboard
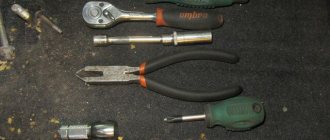
Regardless of the number of dismantled parts, the following tools are required to disassemble the dashboard:
- Several types of screwdrivers (flat and Phillips);
- A set of keys;
- Flashlight;
- An adhesive base, which is required if the panel is planned to be sealed.
Operating procedure
This process is quite difficult and can take a lot of time. Before removing the instrument panel of a VAZ 2114 car, you need to carefully study its structure. Once you have an idea of the design of the dashboard, you can begin to disassemble it.
Factory panel
First of all, you need to remove the console screen on the left side of the dashboard. It is fastened with three self-tapping screws with cross-shaped heads. To unscrew them without problems, use a screwdriver with a short blade.
Next, remove the right screen. The mounting diagram for the VAZ 2114 console screens is slightly different. For example, if you unscrew the three screws on the first screen, you won’t be able to remove it so easily, but you need to carefully pry up its lower edge and remove it from the grooves. Only after this will the top edge be able to detach. And in the case of the right screen, you need to unscrew not three, but five screws, and at the same time, support the part with your hand, since it may simply fall off.
When removing the shields, be extremely careful not to snag the wiring harnesses located underneath them. Just in case, disconnect the battery. Next, you need to disassemble the central panel of the dashboard. To do this, disconnect the radio, cigarette lighter, and ashtray light bulb.
After the wires are disconnected, it is necessary to remove the heater levers. This can be done using a flat-head screwdriver. The diagram of the VAZ 2114 stove handles has a special protrusion through which you can reach the latch. This is what you need to pry off with a screwdriver.
Next, you need to remove the fan handle by simply pulling it. Now, to get to the instrument panel, you need to unscrew the screws securing the dashboard. They are located on the left and right of the central panel.
The next step is to remove the instrument panel trim by unscrewing 4 screws: 2 on top and 2 on the bottom. This way you can release the shield. Next, the disassembly scheme involves removing the plug, which is located behind the instrument panel.
At this point, the diagram for disassembling the VAZ 2114 panel is completed. All that remains is to pull out the shield, and when disconnecting the wires, be sure to mark the connectors.
How to install a Europanel on a VAZ 2109
Task: install a Europanel on a VAZ 2109 carburetor
What is needed for this:
1.Euro-torpedo 2. Instrument panel 3. Wiring under the torpedo 4. Fuse block 2114 (it has 9 relays)
2114-3722010-60, as in the picture
5) Speed sensor (since there used to be a cable)—the sensor needs to be taken “6 pulse turn”
6) Steering column 2114 (with adjustment) 7) Wires that will come from the speed sensor 8) Cables from the VAZ 2114 stove, because old short ones 9) A pair of 4-pin relays 10) Current control 11) Ignition switch with 14k
Disassembly And so you removed the top, first we take out all the rubbish, rubbish, etc. from the car, then we climb under the column, we see the bolts for the column, you can remove it (I removed it because I made a Shumka of the whole muzzle, and there is more room without it)
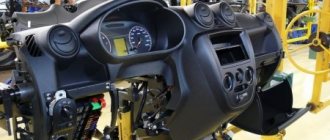
How to disassemble the instrument panel on a VAZ 2114
Before embarking on this complex process, the driver must carefully familiarize himself with the design and arrangement of the instrument panel on his car. When disassembled down to the cogs, it looks like this:
The device of the VAZ 2114 dashboard
Instrument panel and its accessories:
1 - VAZ 2114 torpedo, or - instrument panel, that is, the main part of the entire structure to which the instrument unit, on-board computer, stove control levers, key blocks and other linings and latches are attached;
2 — overlay on the instrument panel, has a decorative function, it also contains air duct outlets for blowing the windshield;
5 — ashtray body;
6 and 11 - right and left crossbars;
7 and 10 - right and left console screens;
8 — instrument panel;
9 — central bracket.
If you carefully study this diagram, it becomes clear how to remove the panel on a VAZ 2114. Having determined the order for yourself, you can begin the process.
Using a Phillips screwdriver, you need to unscrew the three screws holding the left console screen. For convenience, when doing this work, it is better to use a screwdriver with a short handle and blade.
Left screen of the VAZ 2114 console
When removing the screen, carefully remove the lower edge of the trim from the body bracket. The right console screen is secured with five self-tapping screws. Using a Phillips screwdriver, carefully unscrew all the screws while holding the trim with your hand.
Right screen of the VAZ 2114 console
remove the screen without allowing it to get caught in the wiring harnesses that are hidden behind it.
Disconnect the ground from the battery by disconnecting the connectors. If your car has a radio, disconnect it from the main bundle of wires by pulling out the connecting connector. If there is no radio installed on the car, then simply pull the wires out of the panel; they should be closed with a plug. Be sure to turn off the cigarette lighter and remove the socket with the ashtray light bulb.
Remove the handles from the heater damper control levers. To make the process easier, pry them off with a flat-head screwdriver.
Removing handles and levers from the dashboard of a VAZ 2114
Despite the apparent simplicity of this item, removing the handles from the levers can take a lot of time. To do this, a clear example is given of how this should be done on a removed unit.
Removing the handle using a VAZ 2114 screwdriver
Remove the electric heater fan handle by simply pulling it towards you.
Removing the handle of the electric fan VAZ 2114
Unscrew the cross-head screws securing the instrument panel to the brackets on the right and left with a screwdriver.
Self-tapping screws on the dashboard brackets of VAZ 2114
in the window on the instrument panel where the instrument unit is located there are two screws on top and two on the bottom - under the window. It is necessary to turn them out, loosening the cover (2) and the shield (8).
Releasing the lining and shield of the VAZ 2114
pull out the plug and unscrew the screw located behind it.
Self-tapping screw under the plug VAZ 2114
- remove the two screws from the bottom holding the trim and remove it.
- Having marked the wires suitable for the switches, disconnect them.
Disconnecting wires from VAZ 2114 buttons
Unscrew the bolts from the steering wheel bracket.
Bolts on the VAZ 2114 steering bracket
Using the “8” key, unscrew the screws of the lower bracket fastening.
Lower mount on the VAZ 2114 bracket
- Unscrew the self-tapping screw and remove the light guide.
- remove the fasteners of the heating control unit and remove the cartridges from the back of the unit.
Cartridges from the reverse side of the VAZ 2114 block
- remove the decorative insert, removing all external parts.
- Unscrew the nuts with a key to “21”.
- remove the hydraulic corrector illumination.
- Unscrew the top and bottom fastenings of the panel, remove the fastening to the cross member on the left side.
Upper mount on the left side of the VAZ 2114 panel
Now you can remove the VAZ 2114 torpedo.
Removing the instrument panel of VAZ 2114
Installation is in the reverse order.
In order to clearly see the whole process in motion, you can watch a video on how to remove the dashboard on a VAZ 2114.
https://youtube.com/watch?v=F-FEZZiQ31Y
How to remove the instrument panel on a VAZ-2114 yourself
The instrument panel is not only dozens of various measuring instruments and switches, but also the most important decorative element. A damaged shield can seriously ruin the entire appearance of the interior. But sometimes VAZ-2114 owners still have to disassemble it in order to eliminate any problems: replacing light bulbs, wiring, dismantling the heater radiator, etc.
It is important to know that VAZ installs very fragile fasteners on its cars. Therefore, they are very easy to break, which means that when disconnecting the shield from them, you need to be doubly careful
Today we’ll talk about how to remove and disassemble the instrument panel on a VAZ -2114, and what should be taken into account during the work.
How to remove the instrument panel from a VAZ 2115
Since the instrument panels on the thirteenth, fourteenth and fifteenth models are the same, the procedure for dismantling the dashboard will be considered using the example of the VAZ 2115. But before you begin, you should stock up on everything you need.
Sequence of operations when removing the dashboard from a VAZ 2115
- Using a Phillips screwdriver, remove the screws that hold the left side of the console.
- After this, the lower edge of the sidewall is carefully removed from the bracket.
- The right side of the console is held on by five self-tapping screws, which are also unscrewed with a Phillips screwdriver. After this, the sidewall is carefully removed.
- Now the handles installed on the stove damper levers are removed. This is done manually.
- Next, remove the handle from the fan speed control. To remove it, just pull it towards you.
- Use a Phillips screwdriver to unscrew the screws holding the dashboard to the brackets. There are 4 such screws (2 to the left of the panel, 2 to the right).
- Another 4 self-tapping screws are located at the window of the instrument unit (2 under the window and 2 above it). They can also be unscrewed with a Phillips screwdriver.
- Above the instrument panel window, on the right, there is a small plug. It is pryed off with a flat screwdriver and removed. Under it there is another self-tapping screw, which can be unscrewed with a Phillips screwdriver.
- After removing all the screws, the instrument block cover is removed. To do this, just pull it forward a little.
- Behind the cover there are wires that are removed from the sockets manually.
- After disconnecting the wires, use a 13 mm wrench to unscrew the 2 bolts on the steering bracket.
- Next, using a size 8 wrench, unscrew the nuts on the lower bracket mount.
- After this, the control unit is carefully removed from the panel, allowing access to the fastening nuts on the dashboard cross members.
- Next, using a Phillips screwdriver, unscrew the last external screw holding the dashboard to the left cross member.
- After unscrewing the last screw, the dashboard is removed.
Is it allowed to install a dashboard on a VAZ 2115 from another car?
In short, no. The dashboard on the VAZ 2115, 2114 and 2113 has a number of design features that are not found on other cars. Its cross members, mounting brackets and console sides are too long. There is nothing like this even on other VAZ models, not to mention foreign cars. But it should be noted that car owners often practice reverse replacement. In particular, a dashboard from a VAZ 2114 can be successfully installed on a VAZ 2109. But in this case, you have to trim the sides of the console and drill new mounting holes on the brackets.
What's next
After all devices are disconnected from the car, you need to remove the handles from the heater switches. This can be difficult to do, because they are fixed quite firmly. To install the handles, special latches are used, which are installed inside. There is a small protrusion on each handle that will help us remove them. You just need to get into this hole with the tip of a minus screwdriver, then pick up the latch and lift it up.
The further procedure is as follows:
- The handle of the stove motor is removed. It is enough just to slightly pull it towards you;
- The torpedo is fastened to the instrument block using several self-tapping screws. They are removed using a “plus” screwdriver;
- Next, you need to remove the plug. It is fixed with a single self-tapping screw that needs to be removed;
- The cover is held in place by two fasteners. And again the screwdriver comes to our aid;
- Let's move on to the cables that are connected to the switches. They must be carefully removed, having previously marked each of them;
- Next, remove the steering mount bracket bolts;
- remove the fasteners from the bottom of the bracket. The key to 8 will help us here;
- remove the light guide;
- Next in line is the heating system control unit. Unscrew the fasteners and remove the cartridges;
- in front of us is a decorative insert. We also don’t need it, so we temporarily get rid of it;
- remove the hydraulic corrector;
- The last step is to dismantle the upper and lower fasteners.
That's all, actually. Now the torpedo is carefully removed, and you can perform any necessary actions with it. Assembly is carried out in reverse order. The procedure is quite complex and troublesome, filled with various little things, so please spare yourself time and patience. If any points remain unclear to you, you can watch the video on our website.
There is a special offer on our website. You can get a free consultation with our corporate lawyer by simply submitting your question in the form below.
Torpedo is the modern name for the dashboard. Initially it was used for foreign cars, but today this name is used by motorists in the CIS countries. The dashboard in the VAZ 2114 car is a collapsible metal structure that contains plastic elements. It also uses polymer film and polymer foam to cover some of the controls. The instrument panel includes many monitoring instruments and controls.
Removing the dashboard may be necessary if the owner of a VAZ 2114 wants to change the heater radiator or even the entire stove. To get to these parts, you will certainly have to disassemble the dashboard. Depending on the purpose, the analysis may or may not be complete. For example, dismantling a heater core requires only partial removal of some elements. For some body work, it is necessary to remove the dashboard, as the structure may be damaged during repairs. Disassembly of the structure is also required when the motorist decides to increase sound insulation in the car interior - for this it is necessary to seal the wheel arches, hood, doors and dashboard.
Regardless of the number of dismantled parts, the following tools are required to disassemble the dashboard:
- Several types of screwdrivers (flat and Phillips);
- A set of keys;
- Flashlight;
- An adhesive base, which is required if the panel is planned to be sealed.
How to remove?
Let's take a step-by-step look at how to remove the steering wheel. This will allow you to understand the principle of operation and avoid any mistakes in the process. So, withdrawal is carried out in the following order:
- To begin, place the wheels straight. You don’t have to do this, but in general it will be easier to work with the steering wheel positioned straight;
- Using a slotted screwdriver, pry up the horn trim and remove it. In order not to break the part, you should pry it as evenly as possible;
- Using a Phillips screwdriver, unscrew the 2 screws that secure the horn cover;
- The cover is removable, in some cases it needs to be pryed off with a screwdriver;
- The horn contacts are secured with self-tapping screws. Unscrew them;
- The wire is disconnected from the contact and removed;
- Use the socket to unscrew the nut. There is no need to unscrew it completely, just loosen it;
- Grasp the steering wheel with both hands and pull it firmly towards you. This will allow you to remove the part from the splines. A nut that is not fully twisted will prevent the steering wheel from suddenly being torn off the column;
- Unscrew the nut completely and remove the steering wheel.
In some cases, the steering wheel will not budge. In this case, you will need help. Your assistant will hold the steering wheel, and you need to apply strong blows with a hammer through a soft drift. This will allow you to remove the part.
Tuning options
Modifications to the steering wheel on this model usually involve installing a sports version, or installing a part from another model. The optimal option is considered to be a steering wheel from Kalina. But, if desired, you can select other spare parts. Here you need to look at the number and size of splines. If they match, then the steering wheel can be installed on the car. This can significantly improve the appearance of the interior.
conclusions
. As you can see, dismantling this unit is not difficult. But in order to do it without problems, you should clearly know how to remove the steering wheel on a VAZ 2110 and 2112. First of all, it is worth studying the possible complications that often occur. This way you can do this work yourself and in the shortest possible time.
Components of the VAZ 2114 dashboard
Before proceeding to the practical part, it is necessary to understand what the instrument panel of the fourteenth is.
The VAZ 2114 belongs to the second generation Samara line of cars, which the Tolyatti Automobile Plant has been producing since 2004. All cars of this family are equipped with a “torpedo” of the Europanel type, for the development of which foreign designers were involved.
Europanel is distinguished by a high level of ergonomics - all its components are located in a freely accessible area, their use does not make it difficult for the driver to drive a car
Considerable attention is also paid to the comfort of the front passenger.
Dashboard tuning
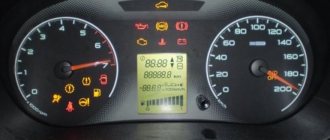
The main information element of the VAZ 2114 “torpedo” is the dashboard of sensors and indicators, which is located directly behind the steering wheel.
This panel includes the following elements:
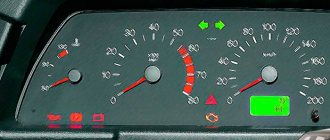
- Pointer instruments – tachometer and speedometer. Through the tachometer, the driver receives information about the engine operating mode - the arrow indicates how many revolutions the power unit produces at a given time. The speedometer displays data on the current speed of the fourteenth. The maximum mark on the speedometer is 200 km;
- Electronic screens are located at the bottom of the tachometer and speedometer needles: the screen under the speedometer displays the total mileage of the car and mileage data from the last control point, which can be set by the driver himself. The screen under the tachometer shows the time and ambient temperature;
- There is a rotation sensor between the dial instruments - when the turn signals are turned on, flashing green arrows are displayed on the dashboard;
- In the center of the dashboard there is a “Check Engine” indicator - which lights up when the on-board computer of the fourteenth detects any malfunction in the engine. Next to it is a brake light indicator;
- On the left side of the instrument panel there is a fluid temperature sensor in the cooling system of the power unit, on the right side of the panel there is a fuel level sensor in the gas tank. When the engine temperature exceeds a critical value or the tank is empty, orange lights above the sensors light up;
- Also on the dashboard there is a series of indicators indicating the following information: oil level. the presence of unlocked doors, unfastened seat belts, the amount of water in the window washer reservoir and worn brake pads.
The VAZ 2114 torpedo also includes the car’s on-board computer screen, which is located in its central part. Using the on-board computer, the driver receives detailed information about the operating modes and problems that arise in the systems and communications of the fourteenth. Also, recommendations on the timing of the next technical inspection are displayed on the BC screen.
In addition to information devices, there are also functional elements on the dashboard: turn signal levers, control buttons for headlights and heater, and window heating system.
The “torpedo” of the fourteenth is not without comfort elements, which are represented by a cigarette lighter, an ashtray, a fairly spacious glove compartment and a niche for storing various small items, located near the gear shift lever.
Features and panel design
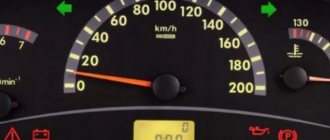
The torpedo, which is installed on the VAZ-2114, is also called the “European panel”. The reason for this lies in the fact that the designers paid special attention to providing a spacious forward view, as well as an attractive appearance, trying to combine ergonomics and information content, satisfying any driver's needs. According to reviews from car owners, basically all these qualities were realized. The instrument panel, located in front of the driver’s eyes, gives him all the necessary information:
- In the center of the VAZ-2114 torpedo you can find the indicators of two devices. On the left is a device that shows the number of engine revolutions, helping the driver determine the current load of the power plant, and also change it, if necessary, by changing speeds. Below the arrow in the window you can see a digital clock and the number of kilometers traveled by the car, and on the right is the speedometer.
- Between the devices at the top of the VAZ-2114 torpedo there is a warning lamp that demonstrates the operation of the turn signals.
- At the bottom center there is a “brake light” indicator, at the bottom of which there is a window indicating serious engine malfunctions.
- In the center on the left you can find a special indicator that constantly shows the current engine temperature (by which it is customary to approximately determine the condition of the coolant), and on top of it there is a light that starts to light if the engine overheats. At the bottom there are icons showing oil pressure, throttle, battery, and handbrake activation.
- In the center on the right there is an indicator showing the remaining fuel. On top of it there is an icon indicating that the tank is full, while below it is an indicator indicating that the minimum allowable balance has been reached, as well as signals indicating the operation of the low and high beams and the lack of brake fluid.
Instrument panel - removal and installation
1. Prepare the car for work and disconnect the terminal from the negative terminal of the battery (see “Preparing the car for maintenance and repair”).
2. Using a Phillips screwdriver, unscrew the three self-tapping screws securing the left trim of the instrument panel console.
3. Remove the trim, removing the protrusion in its lower part from the body bracket.
4. Using a Phillips screwdriver, unscrew the five screws securing the right trim of the instrument panel console.
5. Disconnect the wiring harness block from the cigarette lighter.
6. Disconnect the wire connector from the cigarette lighter lamp.
7. Pushing out from the inside, we take out the niche for small items.
8. Using a Phillips screwdriver, unscrew the two fastening screws and recess the diagnostic connector block inside the panel.
9. By pulling towards yourself or prying it with a screwdriver, remove the handle of the heater electric fan switch.
10. Using a narrow slotted screwdriver inserted between the lever and the handle, remove the handle from the lever.
11. Using a Phillips screwdriver, unscrew the two screws above the instrument panel.
12. We also unscrew the two screws under the instrument panel.
13. Using a screwdriver, remove the plug and unscrew the screw of the upper fastening of the instrument panel trim.
14. Unscrew two self-tapping screws (the second is on the right side of the lining) of the lower fastening of the lining.
15. Move the trim slightly away from the instrument panel.
16. With a marker (or in another way) we mark the order of connecting the wiring harness blocks to the switches.
17. Disconnect the wiring harness connectors from the switches.
Note: If it is necessary to replace the instrument panel trim, remove the switches from it.
19. Unscrew the bolts securing the steering column bracket and lower the column down (see “Steering column - removal and installation”).
20. Using a Phillips screwdriver, unscrew the two self-tapping screws securing the bracket to the panel.
21. 8 mm
Unscrew the two self-tapping screws securing the bracket to the right cross member.
. as well as two self-tapping screws for the lower bracket mounting.
22. We move the bracket with the control unit and the relay and fuse box to the side.
23. Using a Phillips screwdriver, unscrew the self-tapping screw securing the light guide and remove it from the instrument panel.
24. Using a Phillips screwdriver, unscrew the four self-tapping screws securing the heater control unit and recess it into the panel.
25. From the inside of the panel, turning 90°, remove the socket for the backlight lamp of the heater electric fan switch handle.
26. Having released the lock on the right side of the air duct, remove it from the panel.
27. Pull it towards you and remove the headlight hydraulic adjustment handle.
28. In the same way, remove the instrument lighting control knob.
29. Using a screwdriver, remove the decorative insert of the instrument panel.
30. To avoid damaging the light guide, use a Phillips screwdriver to unscrew the screw securing it and remove it from the panel.
Warning! The light guides for the illumination of the heater electric fan switch handles and the headlight hydraulic adjustment are not interchangeable.
21 mm socket wrench
(spark wrench), or using pliers with narrow jaws, unscrew the nut securing the hydraulic corrector (1) and recess it into the instrument panel.
32. In the same way, unscrew the nut securing the instrument backlight control (2) (see photo above).
33. Turn the light bulb socket 90° and remove the hydraulic corrector illumination lamp from the panel.
34. Disconnect the wiring harness connectors for the instrument backlight control.
35. Disconnect the two connectors of the immobilizer sensor wires.
36. Disconnect the wiring harness block from the immobilizer unit.
37. Disconnect the wiring harness connectors for the glove box lighting lamp.
38. Disconnect the wiring harness connectors for the portable lamp socket.
39. Using a Phillips screwdriver, unscrew the two screws for the top fastening of the panel (the second screw is located on the right side).
40. Unscrew the two screws of the lower panel fastening.
41. Using a Phillips screwdriver, unscrew the self-tapping screw securing the panel to the left cross member.
42. Remove the instrument panel.
Install the instrument panel in reverse order.
Instructions for installing a new panel
If you want to replace a low tidy with a more advanced, high one, then in any case you will have to change the entire center console.
Removal and installation instructions look like this:
- First, you need to turn off the power to the on-board network; to do this, disconnect the battery, remove the steering wheel, as well as the steering column switches and the ignition switch. You will also need to disconnect the ignition relay.
- Next, unscrew the two bolts that secure the control panel visor and remove it.
- Now you need to compress the spring and remove the shield itself from the center console. Disconnect all wires and connectors connected to the dash, including the speedometer cable, the econometer hose, and the odometer cable. After this, the tidy can be moved to the side.
- Then remove the regulator from the hydrocorrector of the optics light, the tidy light switch knob, as well as the interior heater and fan regulators. To do this, pull the controls towards you.
- After this, unscrew the two bolts securing the center panel trim on the sides; the trim itself can be moved towards you. Then you need to disconnect the connectors.
- Now the key in the lock should be turned to position “0”, this will disable the anti-theft system. A connector with wires is connected to the lock itself; it must be disconnected. Next, unscrew the two nuts and two bolts, after which you can remove the steering column pipe with the switch.
- Remove the choke handle located under the instrument panel. Pull it towards you so that you can feel the pull. You need to unscrew the two bolts that secure the damper guide rod, after which the choke can be removed.
- Now you can unscrew four more screws that secure the heater control panel in the car. Unscrew the bolts located on the side of the shield on both sides. Also unscrew the lower console mounting bolts with nuts that secure the control panel lighting switch and the optics hydraulic corrector. To do this you will need a 22mm socket wrench, it must be high.
- After completing these steps, you need to unscrew the bolt that secures the center console in the glove compartment. Then all you have to do is unscrew one bolt at a time on each side securing the center console. The console itself can then be dismantled.
- As for installing a new high panel with tidy, this process does not present any particular difficulties. All dimensions at the mounting points on the body are the same, but this procedure also has its own characteristics. To install your new console, you will need the appropriate wiring harness. If you use an existing harness, then you will need to rearrange the terminals in it, taking into account the connection diagram. In addition, it will be necessary to change the cables leading to the heater to longer ones, the same applies to the speedometer cable. If you are installing a new console, you will also need other roof pillar side trims, these must be installed before you install the console. Since the new dashboard will not use a flow meter, the tube from it will need to be plugged. In addition, the signal to the tachometer will need to be supplied from wire K on the coil, which is connected to the speed sensor cable bracket.
- Immediately before installation, you should reassemble the new console, and wrap the connection points of the blowers with electrical tape and, preferably, glue them with foam rubber or anti-creaking agent. It is also necessary to change the foam rubber of the heater, since the old one will no longer be able to perform its functions. Also make sure that the choke can close completely and remember that the cable from the new speedometer should be installed before you install the console. The assembly procedure begins with laying a new wiring harness and connecting all connectors. Before you finally assemble everything, turn on the dashboard and check how all the indicators and gauges work. After this, the console can be put back in place.
The dashboard of the VAZ 2114 is out of order, what should I do?
If on a VAZ-2114 car on the instrument panel none of the indicators installed on it work (speedometer, odometer, tachometer, fuel level and coolant temperature indicators), then the first thing the driver will have to do is check the integrity of fuse F3, which is located in the mounting block. If it has burned out, then before replacing it, you need to find the reason why it burned out, otherwise the newly installed new fuse will have the same fate as the previous one. Most often, fuses burn as a result of a short circuit.
Even if the fuse is intact, then do not be lazy to take it out and check the condition of the contacts. There are cases when the contacts oxidize, and the electrical circuit in this place is interrupted. After making sure that the fuse is intact, the next step is to check the ignition relay, which is located inside the car to the left of the steering column. It is attached to a pin upside down. In the block where this relay is inserted, you can try to short-circuit the power wires using a jumper. If the instrument panel comes to life, the ignition relay will have to be replaced.
If the ignition relay is working properly, there are only two possible reasons for the instrument panel not working: the ignition switch and the mounting block. Before installing the ignition relay on the VAZ-2109 car, the lock contacts burned quite often, and they had to be cleaned by disconnecting the contact group from the lock itself. After changes were made to the principle of supplying voltage to the ignition switch, its contacts began to burn very rarely, but the likelihood of this phenomenon still remained. On the mounting block, in its board, tracks may burn out; in order to see this, the mounting block will have to be removed from the car.
In addition to the reasons listed above, which can lead to failure of the instrument panel, it is also necessary to check the reliability of fastening the ground wire.
What's on the dashboard
Standard tidy 2114 includes the following elements:
- coolant temperature indicator;
- tachometer;
- left turn indicator;
- right turn indicator;
- speedometer;
- fuel level;
- fuel reserve light;
- side light bulb;
- brake system light;
- high beam headlight bulb;
- button to reset current readings;
- odometer;
- hazard warning lamp;
- "check engine" light;
- watch;
- battery charge light;
- parking brake light;
- oil light;
- reserve.
Each of these electronic elements is connected to the corresponding contact on the common panel. Which one, and to which one exactly – we’ll look at it below.
Step-by-step instructions for disassembly
- The first step is to remove the left screen. To do this, you need to unscrew 3 screws, as shown in the photo. Once the fasteners are removed, the left dash screen can be removed.
Removing fasteners in the dashboard of a VAZ 2114
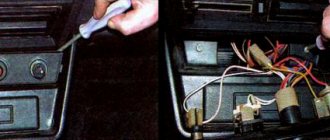
Now you can move to the right screen. Here the motorist will already have 5 self-tapping screws waiting for him. When the screen is removed, you can work on the electronics of the VAZ 2114. To protect yourself and the car’s electronic systems, you need to remove the negative wire terminal from the battery. Next, the radio receiver is dismantled. To do this, you need to disconnect the main block of the wire bundle (this applies to those cars where the receiver is present). If this element is missing, you can immediately remove the plug from the center console panel. Now the motorist can take care of the ashtray, but first you need to get a bunch of wires that comes from the cigarette lighter. It is also necessary to remove the lamp socket installed for illumination. The next step is to disconnect the handle from the heater damper control levers. The operation is performed with a screwdriver. You need to be as careful as possible, as the elements are very fragile. For clarity, you should look at the photo - the blade of a flat-head screwdriver is inserted between the lever and the handle. By lightly pressing, you can separate these elements and then remove the stove fan handle.
It is necessary to pry off the ends of the holder
To remove the center console shield, you need to unscrew two screws - on the left and on the right side of the shield. Next, the plastic cover is removed. Finding fasteners on your own can take a lot of time. There are 2 screws on the speedometers, and under the instrument cluster there are also 2 fastenings that can be unscrewed with a Phillips screwdriver.
Open torpedo - there is access to the necessary elements
Now you need to look at the button to turn off the heated rear windows - there will be a plug next to it, which also needs to be removed. A self-tapping screw is hidden under it. After all the operations have been completed, the instrument panel can be removed. To do this, you need to move it towards the steering wheel, as shown in the photo. In front of the motorist there will be many plugs and bundles of wires - they need to be pulled out, but before that it is recommended to sign them so as not to get confused in the future. When the shield is not holding anything, it can be completely pulled out. The dashboard brackets are attached to the floor of the VAZ 2114 body. They need to be removed - a figure eight key is suitable for this. You need to unscrew the fastenings of the left and right pillars - they are located symmetrically. The intermediate housing should be removed from the dashboard socket. When the ventilation and heating system nozzles are disconnected, you can unscrew the bracket fastenings to the center console. When the fasteners are removed, the bracket can be moved to the side along with the elements that are attached to it: the relay holder and controller, the fuel injection system. These organs need to be unscrewed. All elements should be removed to completely unload the bracket: instrument backlight switch, master cylinder, APS block, all harnesses. This is required if the driver is going to completely remove the structure from the interior of the VAZ 2114. When the panel no longer holds anything, you can remove the measuring instruments. To do this, you need to pry the console with a screwdriver and press forward. There will be a cable coming from the speedometer that must be carefully pulled out. There will also be a lot of bundles of wires here, so it is recommended to label them. When you are done with the electronics, you can dismantle the decorative trims that go onto the windshield - to do this you need to unscrew the three mounting bolts.
Now the console can be completely removed if replacement is planned. When performing other repair work, it is recommended to navigate by access to the parts of interest. For example, to access the heater stove, it is enough to remove only the lower part of the dashboard.
Important points regarding replacement
- When removing the right side of the console, be careful. Behind it are wires that can easily get caught on the side and be damaged. So before removing this cover, you should remove the negative terminal from the battery. You should also turn off the car radio by removing its connector from the common wiring harness located behind the upper instrument panel;
- Removing the plastic handles from the stove levers can cause serious difficulties. The fact is that there are protrusions on the stove levers (top and bottom), and holes on the handles. When you put the handle on, it snaps onto the lever. The only way to remove it is to pry it off with a flat screwdriver as shown in the picture. But when prying up the handle with a screwdriver, you should not bend it too much: the plastic breaks very easily;
What is included in the design?
To make it easier to remove the entire dashboard or its individual elements, you need to know what the structure consists of. In a VAZ 2114 car, the dashboard includes 11 main elements, which are shown below:
Dashboard base. It contains controls for interior systems.
- Overlays. This part is needed to securely fasten the base.
- Bracket.
- The sealing element is a plug.
- Ashtray.
- Crossbar, there are two of them. The number “6” shows the right one.
- Right dashboard screen.
- A shield that blocks access to the wiring.
- Central bracket.
- Left screen of the instrument panel.
- Left cross member.
In VAZ cars, you can improve the appearance of the dashboard. To do this, you need to unload the dashboard from the dials. More stylish and modern information devices are usually installed to replace them. The same applies to the backlight; if you wish, you can update it yourself and install modern original LEDs.
By dismantling these elements one by one, you can completely disassemble the dashboard. Below you will find detailed instructions with which the motorist can completely remove the dashboard elements from the car.