Everyone knows perfectly well how door locks work in Tolyatti Automobile Plant cars, especially in classic models. The sound of the classic doors slamming cannot be confused with anything. Very often, to close the door of a Zhiguli car, you need to make a lot of effort. Long and painstaking adjustments of locks do not lead to the desired result. Even if it is possible to bring the mechanisms into proper operating mode, usually after a short time the settings are lost. What way out is there in such a situation? How can you eliminate this car “disease”? There is a way out - this is the installation of silent locks on the VAZ.
What is a silent lock?
These mechanisms are the development of manufacturers of parts for car tuning, allowing you to once and for all forget about poor closing of doors on VAZ models.
You can install silent locks on classics, as well as on other later produced cars from the Tolyatti plant. There are models for different cars. They are installed on both foreign and domestic cars.
Silent locks on Priora are very popular. The special design of the mechanisms eliminates the resistance when closing the door. A little effort is enough - and it is almost silently transferred to the closed state. The mechanism is a latch that is triggered by the slightest effort. The lock closes securely, without the effect of a half-closed door, so familiar to the owners of this brand of car. Installing a silent lock on a VAZ-2107 is not difficult, and the result can significantly improve the quality of its operation. Door mechanisms on Zhiguli cars are starting to work better than on some foreign cars.
How to adjust the door of a VAZ 2107
The front door of the VAZ 2107 is adjusted more often. This is especially true for the driver's side door. Door adjustment involves two stages:
- adjusting door hinges;
- adjusting door locks.
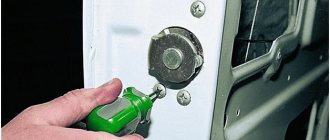
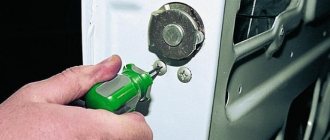
Before making adjustments, it is advisable to lubricate the locks and hinges with silicone grease. This will improve their operation and eliminate possible problems when the lock operates. To adjust the position of the hinges, you must perform the following steps:
- set the impact screwdriver to the unscrewing mode;
- loosen the hinge fastening screws with a sharp blow of a hammer;
- slightly lower or raise the door to even out the gap between it and the car body;
- tighten the fastening screws;
- check the door position;
- repeat the adjustment if necessary.
When the position of the door in the opening is adjusted, you can proceed to adjusting the lock, or rather, to adjusting the position of the latch. This is done like this:
- draw a line around the perimeter of the latch with a marker (this way you can find out its initial position;
- Using a 10mm wrench, loosen the three bolts securing the lock retainer;
- move the latch down or up so that the lock fits freely into it without hitting the top or bottom;
- if the door closes “with one click,” the latch must be moved slightly outward, but if it closes easily but dangles, move it deeper;
- tighten the fastening bolts;
- check the operation of the door lock;
- repeat the adjustment if the door does not close well enough.
This completes the adjustment of the VAZ 2107 door. You can hit the road.
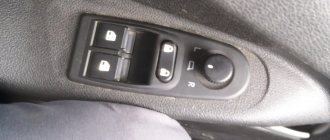
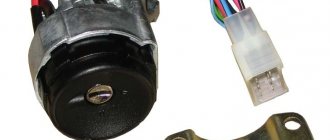
Having bought my VAZ-21074, I almost immediately appreciated the inconvenience of the lack of central locking. I don't think you need to tell anyone. Therefore, the first step was to install a central lock on the car. Internet searches made it clear what exactly I needed. A central locking kit for 4 doors was purchased at the car market.
It contained: two 5-pin actuators for the front doors, two 2-pin actuators for the rear doors, a controller, a set of necessary wires, rods and mounting accessories.
I’ll immediately make a reservation that the wires were of sufficient length and thickness, the power of the actuators was enough for VAZ locks (about possible problems - below), so there was practically nothing to add. I wanted more, namely an electric trunk lock and remote control of the central locking from a key fob, so in addition I bought a simple alarm system and a solenoid for the trunk lock. What do we need for work? A certain amount of wires, 15-20 mm self-tapping screws with a press washer (such a wide flat head, you can use a drill, or better without, because the body iron is quite thin). I also needed rubber tubes (“corrugations”) to pass the wiring into the doors and other little things like wire lugs, electrical tape, heat shrink, etc. Tools: screwdriver with bits and drills, screwdrivers, standard set of power tools, marker. Some wrenches may be needed. Let me remind you that when working with the on-board wiring of a car, you must remove the negative terminal from the battery. It doesn't matter if you're cutting into wires or just moving bundles. Troubles in the form of melted wiring are much sadder than lost car radio settings. So, let's begin. Wiring You need to start by determining the location of the controller. I identified a place for myself on the body partition between the glove compartment and the shelf. Then you need to spread out and lay the wiring. After unwinding the wires from the kit, we determine by the length of the bundles which one to connect to which door. It is convenient to lay the wires to the rear doors under the plastic door sills, then along the middle pillar through the holes to be drilled into the door. We lay the wires on the left side of the car under the dashboard, then follow the same route to the doors. We draw a +12V wire from the battery to power the entire circuit. The same wire will be used to power the alarm. At first I wanted to do the smart thing and get the power somewhere in the wiring block (fuse and relay box) terminals, but after seeing how difficult it was to crawl to them, I decided to run the wire directly to the battery terminal. Again, in the event of any alarm breakdowns, this wire will be easier to disconnect. There must be a fuse on the power cord. Usually it comes already installed in the harness out of the box. There is no need to connect the central locking controller to the wires yet. Rear doors It is better to start installing actuators from the rear doors, so that later it will be more convenient to check the operation of the central locking system when unlocking/locking the door with the key. Remove the door trim and top plastic trim from the door. First, we determine where the wires will go from the stud to the door. We drill a 5 mm hole in the door with a drill, close the door, and use a marker to place a point on the counter through the hole.
Then we drill a hole in the rack. We check the alignment of the holes and drill them to a sufficient diameter. We push the wires through the holes, do not forget to thread the corrugation between the stand and the door. I had corrugations of a fairly large diameter, but I didn’t have such a drill, so in the back door I limited myself to heat-shrink tubing (which I later regretted and ended up converting to corrugation anyway).
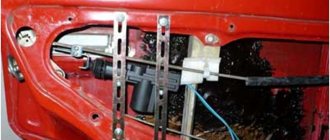
The hardest part was finding a place to mount the actuator. At first I wanted to attach it to the horizontal rod, but experiments showed the futility of this idea, so a place was found in the lower front part of the door, under the vertical rod of the lock lock button.
Although I found a description of the option with horizontal mounting on the Internet:
We put the rod from the kit on the actuator, insert the actuator together with the rod through the technological holes into the installation site (exactly in this sequence, otherwise it will not be possible to insert the rod later). We fix the actuator using a mounting strip, screw the actuator itself to the strip with the screws included in the kit, and screw the strip to the door with the self-tapping screws that I wrote about at the beginning of the article. We check that the actuator does not interfere with lowering the window. We fasten the actuator rod to the lock button rod using the fasteners included in the central locking kit. We are not fixing one of the rods yet. We lift the rod up, and put a mark on the actuator rod with a marker near the fastener. Then we lower both rods down and put another mark. We place the fasteners in the middle between the marks and fix the second rod.
We check the operation of the actuator. To do this, we pull a wire with +12 V from the battery. We connect one end of the actuator to this wire, and the other to the ground, and check the operation of the actuator. Then we change the polarity and check the operation in the other direction. We do this several times. If everything works as it should, then you're in luck. If the lock does not open/close completely the first time, this means that the lock is too tight and the actuator cannot cope with it. There are several possible solutions: a) lubricate the places where the rods are attached to other parts (it helps a lot!); b) adjust the position of the rods relative to each other; c) install a more powerful actuator; d) finish the lock by removing the unnecessary part. More about the latter. We remove the rocker connecting the lock lock button rod with the horizontal rod going to the lock itself. We remove the spring from this rocker. This spring is responsible for blocking the lock when the door is closed with the lock button pressed. After removing the spring, the door will not lock itself. If you have a central lock, especially one associated with an alarm, this function does not make much sense, so I easily parted with it. But you should keep this in mind.
We put the rocking chair in place and attach the rods. We check the operation of the actuator. If everything works well, cut off the excess traction. We check that the rubber corrugated boot on the actuator is in place; if not, we correct it. We connect the ends of the actuator to the wires laid in the door, wrap the connecting terminals with electrical tape for reliability, and put the door back together. We check the operation of the actuator again by applying voltage to the wires running from the door to the controller. If the door no longer locks/unlocks properly, check to see if anything is blocking it after reassembling it. It is possible that if the wires are used too thin, the actuator simply does not have enough voltage. Thicker wires will have to be re-routed. We do the same with the second door, but in a mirror image. Front doors With the front doors, regarding the actuators, everything is much simpler. To be honest, I thought it would be the other way around. Remove the trim from the door. You can leave the plastic cover on. We try on the location for installing the actuator so that the actuator's thrust axis coincides with the thrust axis of the locking button (see photo). We make marks for the holes with a marker, then drill holes with a diameter of 3.5-4 mm according to the marks.
We push the actuator with the rod into place, insert the screws from the kit into the holes, and screw the actuator without any mounting strips. We check how the glass goes down. We install the rod fasteners, make exactly the same marks with a marker as on the back door, and fix the rods.
Let's check. The check must be done behind closed doors, sitting inside. First, let's check for opening and closing. We connect the +12 V wire and ground to the ends of the same color as the two-pin actuators (for me these are blue and green wires). We change the polarity and check again. If everything is fine, connect all ends to the wires from the controller. We also connect the controller itself to the harness connector and supply +12 V to it (through a fuse). Now we check the operation of the key locks. We close the door and use the key to open/close the lock from the outside. In this case, the actuators of all doors should operate. You can also check the operation of the lock button. If the central locking does not work in any direction, you need to try to move the rods relative to each other. Once everything is checked, you can lay the wires. Just in case, we do not cut off the excess rod, but wrap its end to another rod with electrical tape so that it does not rattle. At the same time, this will increase rigidity. If you already have acoustics installed, then you probably already have the necessary holes and a tube for connecting the wires from the body to the door. If not, you will have to make them, just like at the back door. If the tube is thin, you may have to replace it if all the wires do not fit through it. I got a decent bundle: 5 actuator wires, 2 acoustic wires, 1 heated mirror wire, 1 ground wire (there is no reliable ground in the doors). I used a rubber tube with an outer diameter of 14 mm. In such a tube there was a reserve for the wires of the future electric window. On one side the tube is thinner, this side should be on the outside of the bend (sorry for the taftology) so that there are no kinks.
By the way, laying wires into the left door will be a little difficult - the steering wheel gets in the way. After installation, we connect everything, wrap the connections with electrical tape, and assemble the door. We check the operation of the central locking system with the door assembled. We do the same with the second door. Final steps We connect the controller to the block with wires. We connect the battery. Locks at this moment may work in either direction, so keep the door keys with you, or do not close the doors. We check the operation of the locks by unlocking and locking both front doors both from the outside with the key and from the inside using the lock buttons. If any of the locks works “out of phase,” it means that the polarity of its connection is reversed. The wires need to be swapped. The door lock buttons can be removed, or better yet left on. There is only one argument for “remove”: it is supposedly safer, the door cannot be opened with a hook through the slightly open glass. This argument disappears if you install safe buttons (without caps). There are three arguments for “leave”: 1) aesthetics are not violated; 2) you can see from the buttons whether the doors are locked or not (if the front door is not tightly closed, the central locking system may bounce back to unlock); 3) it is possible to lock and unlock the doors from the inside without installing any additional buttons in the cabin.
We recommend: Secrets of the masters - all the ways to straighten a dent without painting
Durability of silent locks
Operating experience of these mechanisms shows that their service life without any special maintenance is at least seven years.
With careful use of the car, the locks can last until the end of the life of driving this car. Their design features allow them to be used for a long period of time. The lock parts do not break over time, and their wear is completely insignificant. In standard locks, there is constant mechanical contact between the metal parts of the system. In silent mechanisms, the impact is carried out between nodes coated with high-strength plastic, which significantly reduces wear. Also an important factor is the strength of physical contact between the parts of the constipation. Silent locks-2107 have much less impact between nodes than in standard mechanisms. By installing such locks on your car, you can forget about the constant problems associated with closing the doors.
Maintenance of silent locks
Silent locking mechanisms do not require any special service. They must be lubricated before installation for best performance. It is advisable to carry out the treatment with special compounds for locks, of which there are now a great variety. Subsequently, it is advisable to periodically lubricate the mechanism.
Over time, you may need to make minor adjustments to the locks. Adjusting the door closing is not a complicated process. The progress of its implementation is described later in the article. The operation of the locks is so precise that there is no need to waste time and effort on servicing and repairing them during operation. Installing silent locking mechanisms on a car allows you to get wonderful results and not have to think about carrying out any work related to the service throughout the entire period of their use.
Disadvantages of silent locks VAZ 2107
Special “silent” locks, unlike standard locks on VAZ 2108 or foreign cars that can be installed on “classics”, include plastic parts instead of metal ones. Plastic does not knock when the mechanism operates, but its strength and wear resistance are much lower than that of metal.
Some silent VAZ 2107 locks, made in a homemade way, have design flaws, for example, reduced thickness of the latch or other elements of the locking mechanism.
Using low-quality locks is dangerous - a weakened mechanism may not hold the door under load, for example, if a passenger leans on it during a sharp turn. Therefore, when choosing locks, you need to realistically evaluate their quality and, in the absence of special skills, install standard “eight” locks, which make little noise but have a fair margin of safety.
If you decide to install silent locks with plastic elements, you should understand the consequences of a possible malfunction.
Cleaning and lubricating standard locks gives an acceptable result, making the operation of the doors not completely silent, but quite comfortable.
How difficult is it to install a silent lock?
Silent locks are undoubtedly useful. How to make them yourself? To solve the problem of closing the doors on their cars, many Zhiguli owners resorted to installing locking mechanisms from foreign models and more modern domestic counterparts. As a rule, such an operation leads to significant alteration of both the installed lock itself and the elements that operate it. This way of solving the problem is too labor-intensive and does not always lead to the desired result. Installing silent locks on a VAZ allows you to improve the performance of door locking in a simpler way.
For all models of Zhiguli VAZ-2101-2107, as well as Niva, the design of the silent closing mechanism is the same. To install it on a car, you do not need to resort to operations such as drilling, welding, cutting holes or other actions leading to structural changes to parts of the car. Simple manipulations that most car enthusiasts can perform will allow you to install silent locks. 2106-2101 are those models that, in addition to the described “seven,” are most in need of such modification.
| Please tell your friends on social networks |
Silent locks are designed on the latch principle. They do not create resistance during operation, which is an advantage compared to the standard 2101 or 2105. By installing silent locks of a modern design on the classics, the doors close extremely easily. It is enough to press the door to the body with your little finger, and it closes with two quiet clicks. As practice has shown, silent locks do not require maintenance. Silent locks have proven themselves well. Silent locks are installed on modern cars of domestic and foreign production. Recently they have been installed on the Volga. With such locks, doors close just as well, even after 7 or more years. So, by installing a set of silent locks, you can solve the problem with “tight” doors once and for all today. Once adjusted, silent locks work properly for years without maintenance or additional adjustments. Do you already want to close the doors with your little finger and not with your feet? :-))))
My friend's partner has a VAZ 2106. The doors did not close well. The adjustment did not give the desired result. He was about to buy new locks, when a friend recommended silent locks for a VAZ 2106. After installing the silent locks, the doors began to close silently and very easily. The owner was in seventh heaven. The problem has disappeared, the doors close like a refrigerator in the literal sense of the word. It really makes me happy!
Having boasted about the latest modernization to his friend, he has a Lada Priora, how silent locks work on classics, and showed how, with just one little finger, pressing the door to the body, it closes with two clicks. Most recently he drove a VAZ 2106 and knows how the doors close on a classic car. He was so surprised that he didn’t even believe what he saw. He personally tried opening and closing the door with different forces, after which he said: “On a penny, the doors close easier and quieter than those of the Priora. That’s why they don’t install similar ones from the factory?”
One day I heard two people talking in the parking lot. One said to the other: “Take a set of silent locks, right now you will forget about the fact that the doors do not close well. Stop thinking, it’s worth it, once and for all!”
Silent door locks of modern design work flawlessly for decades. Many people already say: “If you have a Zhiguli, then get silent locks!” And indeed, with these locks you close the doors as if it were another car. The doors of your car close as easily as a feather. The force of your little finger is enough to completely close the door with two clicks.
Silent locks on a VAZ car
The lock is installed in the left front door |
| The lock is installed in the right front door |
| The image on the left shows the front right door. The mounting of the electric lock drive remains unchanged. The lock rods remain original. Additionally, another rod is installed, because The new lock is controlled from the outside door handle directly by the rod. The traction is adjustable, everything is exactly as recommended by the manufacturer. The rods are fixed to the lock and pusher with special rod clamps VAZ 2101 and 2108. When installing silent locks according to our scheme, only factory spare parts are used. The use of cables, wires, twists, drilling of the body pillar, all this is excluded! Silent locks are fixed to the doors. All lock drive rods are adjustable and quick-release. |
| The lock opening rod from the outer door handle is fixed using a special clamp. It is enough to press the rod against the clamp with pliers and the rod is securely fixed to the rod pusher. A reliable connection allows you to both secure the rod in a matter of seconds and dismantle it if necessary. |
| The lock opening rod from the outer door handle can be adjusted. This allows you to adjust the required pull length to adjust the sensitivity of the lock opening. The rod is secured to the lock using a factory rod lock. This ensures a reliable and simple connection of the rods to the lock, as provided by the manufacturer. |
| The lock is installed in the rear left door. |
Rear right door lock |
| Silent locks for VAZ 2106. Doors can be closed with one finger. See what it looks like in practice |
| Look how the doors on the Niva should close. The operation of a set of silent locks on a Niva car is demonstrated. |
A set of silent locks and accessories for installation without drilling the body pillar, with the ability to quickly adjust the lock, long-lasting operation on the car, silent closing of doors...
| Set of silent locks on VAZ 2101, 2102, 2103, 2106 |
Set of silent locks on VAZ 2104, 2105, 2107 |
Set of silent locks for Niva |
| Lock installation instructions |
Exclusive instructions for installing a set of silent locks with many illustrations describing the action performed.
In this manual you will learn step by step how to install a set of silent locks.
Instruction format: PDF file
Number of pages: 53
File size: 8.57 MB
Printable: yes
The instructions are delivered in a box with a set of silent locks on the disk!
What is the benefit of purchasing a ready-made set of silent locks?
A set of silent locks for VAZ 2101-07, Niva, this
the surest way to professionally solve the problem
once and for all without violating the factory parameters
A set of silent locks, all related components for the VAZ 2101-07, Niva, will allow anyone to begin independently installing a set of silent locks, which will be adjustable, the ability to quickly remove and install when replacing a door or when painting, etc. Do you want to professionally carry out a modernization that doesn’t even have a hint of homemade?
Cost of a set of Silent Locks, How is Payment / Delivery of Products made?
A set of silent locks and all related components that ensure the operation of silent locks in accordance with the given standards and regulatory data by the manufacturer costs:
For VAZ 2101, 2102, 2103, 2106 - 1870 UAH. (price in other currencies may vary!)
For VAZ 2104, 2105, 2107 - 1870 UAH. (price in other currencies may vary!)
For a Niva 3 door . — 990 UAH. (price in other currencies may vary!)
For a Niva 5 door car. — 1890 UAH. (price in other currencies may vary!)
Yes, the price is not small, but... You pay once, and the results will please you for years! No more adjustments, slamming doors, lubricating locks and wasting precious nerves. Now you will forget what it is like to slam your car door!
Click here to select a kit model and place an order
Payment via bank. To pay for an order from other countries. Using interbank fast money transfer systems MoneyGram, Anelik, Allur, Migom, Contact, WesternUnion, Unistream , you can pay for your order instantly at the cash desk of the nearest bank. A commission of 1% is charged for transferring funds. At the moment, this method is the highest priority among residents of Russia, Belarus, Kazakhstan, etc. |
| You can pay for your order at a PrivatBank branch, self-service terminals and via Internet banking Privat24. |
| Using this system, you can pay for your order with a Visa or MasterCard plastic card online without leaving your home. To do this, place an order, select the Liqpay section on the payment page and go through the payment procedure |
| Unified Wallet is a multifunctional service for accepting payments. Here you can pay for your order either by bank transfer from Russia and Ukraine, or using payment terminals, electronic money, Visa cards, etc. |
| Interkassa is a multifunctional payment acceptance service. Here you can pay for your order using: Visa, Mastercard USD, UAH, RUR, EUR, WebMoney WMZ, WMU, WMR, WME, WMG, WMB, LiqPay USD, UAH, RUR, EUR, Single Wallet RUR, USD, UAH, EUR, Privat24 USD, UAH, EUR, NSMEP UAH, MoneyMail RUR,USD, EUR, RBK Money , RUR Unikarta USD, Liberty Reserve USD, EUR, PerfectMoney USD, EUR, WebCreds RUR, Z-payment RUB, Ukash USD, WMnote WMZ , WME, LVL, MoneXy UAH, PIN-CODE USD, Ukrainian Bank UAH, Sberbank of the Russian Federation RUR, Russian Bank RUR, Russian Post RUR, Wire Transfer USD, Alfabank (Alfaklik) RUR, VTB24 (Telebank) RUR, Russian Terminals RUR, Terminals Ukraine UAH. |
| You can pay for your order using the Yandex.Money system. To do this, place an order, select the Yandex.Money section on the payment page and go through the payment procedure. Payment using this method can only be made from a Yandex.Money wallet. |
| You can pay for your order using the Webmoney system. To do this, place an order, select the Webmoney section on the payment page and go through the payment procedure. A very convenient service for an experienced user. |
| Payment upon receipt. If you do not have experience shopping online, or you are wary of paying for your order in advance, then it is possible to place an order with payment upon delivery. Before paying for your order, you will be given the opportunity to inspect and touch it. After inspection, making sure that the goods are suitable, you can pay for it. To apply for this method, on the payment page, select the “Ukrposhta” section (CASH ON PAYMENT) and go through the ordering procedure. When placing an order, be sure to include your mobile phone number. A representative will contact you to confirm the order and clarify the delivery service. |
| For Ukraine Delivery of your order within Ukraine takes 1-2 days (depending on the destination city). The order is delivered to the Novaya Poshta warehouse in your city. After sending the order, the manager will inform you of the delivery note number and the date of arrival of the order in your city. Using the bill of lading number, you can track the arrival of your parcel on the official website of the carrier company here. Nova Poshta uses SMS to inform customers about the delivery and receipt of parcels. An SMS message from Novaya Pochta will be sent to your mobile phone. The letter will indicate the address of the representative office where you can pick up your order. We recommend delivery. Nova Poshta - fast, convenient, modern, reliable and high quality! |
| Delivery of your order within Ukraine takes 1-2 days (depending on the destination city). The order is delivered to the Intime warehouse in your city. After sending the order, the manager will inform you of the delivery note number and the date of arrival of the order in your city. Using the bill of lading number, you can track the arrival of your parcel on the official website of the transport company here. In the upper right corner “track cargo” enter the number that the manager will tell you. The transport company Intime does not use SMS notifications. The arrival of the order must be controlled independently... To receive your order, have your passport and |
| Delivery time by UkrPoshta is 2-7 working days from the date of dispatch. After submitting the order, the manager will provide you with all the relevant information to receive your order. When the parcel arrives at your post office, a notification will be sent to your mailbox (delivery of notifications is the responsibility of UkrPoshta employees). This delivery option is more suitable for overseas delivery. |
| For Russia and other countries. Sending your order is possible to any country in the world. It is preferable to use the government postal service. Orders to Russia and other countries are sent by Ukrposhta. The parcel with the order arrives at the specified post office, for example for Russia it is Russian Post. Delivery time depends on the remoteness of the final destination and ranges from 7-14 days from the date of dispatch. Due to the fact that the State Post does not provide for parcels sent from Ukraine to other countries, we are forced to send your order only after 100% prepayment. The prepayment includes the specified amount of the goods and the cost of shipping to you. Delivery costs vary depending on the distance of the final destination. Delivery costs are calculated automatically when placing an order. After sending the parcel with the order, we will notify you of the parcel number to your email (E-mail), and also send a skin of the payment receipt for the parcel. Using the parcel number you can track the arrival of your parcel in your city. |
Click here to select a kit model and place an order
Guarantee
I am Nosko Alexey Alexandrovich, I guarantee a 100% refund in the event that you are unable to install a set of silent locks on your car. Moreover, I reserve the right to return the goods within 14 days, without any justification. When returning a set of silent locks, it must be in salable condition.
I guarantee the quality of parts for 6 months! After placing your order you will have an order number. This number will be your warranty number. You must retain this number for the duration of the warranty period. In the event of a malfunction, you provide us with the warranty number. By the number we will be able to identify your order, when it was purchased, model, etc. We undertake to replace the faulty part provided that you provide photo or video evidence of the breakdown.
| order a set of silent locks now |
“Click here to choose a kit that matches your car model right now” |
As soon as you place an order, the site system will send a letter to the E-mail you specified with the order number, product name, and selected payment method. If you have chosen cash on delivery, you will be contacted to confirm the order and delivery method (only for residents of Ukraine). In case of a prepaid payment method, you pay for your order according to the selected payment method. As soon as the funds are credited (from one minute to three days, depending on the payment method), the site system will transfer your order number to the “paid” status and inform you about payment for the order. Your order will be sent as soon as possible (1-2 days). After sending the parcel, a letter with the parcel number will be sent to your email. Using this number you will be able to track the arrival of your parcel at its final destination and pick up your order. In the case of cash on delivery - the number of the transport invoice. Using the number, you can track the arrival of your order (upon receipt, be sure to have a passport or driver’s license with you and know the bill of lading number)
Even if you don’t place an order, still look on the Internet for ways to adequately correct this factory defect. The silently and easily closing doors of the VAZ 2101-07 and Niva are like an indicator of the technical condition of the car. Can a car be considered to be in good technical condition if the doors need to be slammed? Just imagine, the car looks great in appearance, the engine whispers, the music pumps, and the doors...a disaster! Just one modernization and you will end the door with banging doors. Weigh it for yourself: do you need it or not?
| Reviews from those who have already installed the kit |
| Hello Alexey! A machine for work. The doors close terribly. This causes some inconvenience. With the original locks I had to slam the doors hard. Sometimes I couldn’t close the left door completely; I only managed one click. The driver's door is a different story. You had to slam it really hard to close it. It was not always possible to close the door completely. I went to auto mechanics several times. Adjustments and settings did not last long. The doors still had to be slammed hard. The doors closed in different ways. In other words, money down the drain! I decided to install other locks after seeing your suggestion. At first I thought that it was somehow unrealistic to close the doors with one finger! But if you guarantee, then why not. It was not difficult to install; according to work at school there were five. I installed the locks in two days and was amazed at the results. The doors close like a feather! Press a little and it closes with two clicks. Now closing the doors is a pleasure! I am incredibly happy with this result. Thank you! Sincerely, Dmitry Anatolyevich. |
| Good afternoon, Alexey! I have a VAZ 2106. Sometimes the passenger cannot close the rear right door. The door is always half closed. I tried to regulate it. It got a little better, but the result is still not comforting. The mechanics advised me to buy a new lock, as the old one was completely worn out. I put a new one and the same result!!!! I gave it to the technicians for adjustment, they also changed the mating part, still not the same. I saw your proposal. I immediately wanted the doors on my six to be closed with one finger. In principle, it was not difficult to install. I did it in two days. The doors began to close just wonderfully! Thanks a lot! Sergey! |
| Hello Alexey! Your proposal with modern locks immediately interested me. When I saw the video, I didn’t immediately believe that the door of a classic Zhiguli car could be closed with one finger. I decided to treat my Zhigulik. I did it for three days. Thank you for constantly giving me advice and spending a lot of time. The way things turned out simply surprised me to the core! Closing the door requires minimal effort. The doors obediently close with two clicks. My efforts were worth it. Now it feels good to close the doors. Thank you! Anatoly. Hello Alexey! After installing silent locks, you can compete with foreign cars in terms of noiselessness and ease of closing doors. My father gave me a VAZ 2106 because... he switched to Mazda. The doors of the six did not close very well, but not badly either. For the sake of experimentation, I decided to install silent locks. I installed it on the driver's door all day, and did the rest of the doors the next day. Already at the first closing and adjustment everything became clear. I was quite surprised how easily the door closed, even with loose adjustments. After installation, I showed my father how to monitor the condition of the car. He was very surprised and said that his 3 year old Mazda was doing push-ups. Thank you, Alexey! |
PS Maybe stop banging doors already! It makes sense to install ready-made locks so that the doors can be closed with your little finger! What's the point of saving and cutting out something, it's great when the doors close super easily and quietly!!! Just one modernization and you will end up with doors banging!!!
Please tell your friends on social networks
What is needed to install locks on a car?
In order to install a silent lock on a VAZ-2107, you must first purchase them. No high-tech operations should be performed to install them. Accordingly, the installation toolset will not contain a long list. You will need a Phillips and straight screwdriver and several wrenches. The main thing is to have the desire and put in a little effort - and the result will not take long to arrive. The result will be the transformation of the process of closing the doors on your pet from annoying and sometimes difficult to pleasant and almost silent.
We adjust the locks on a VAZ
There are several options for modifying and adjusting silent locks; let’s look at the most popular ones.
The first method is a sealant
In order to proceed to the adjustment stage, it is necessary to prepare the material needed for the work: a screwdriver, glue, lithol, seals and a knife.
Required material for adjustment
We take our silent lock and unscrew the spring from it. Next we glue the seal. We select the smallest spring and glue the seal again. Don't forget to remove any excess sealant. And finally, we lubricate everything with lithol.
The second method is a heat insulator
In the second option, we add alcohol, cotton swabs, and a piece of heat insulator to our previous set of tools. Using alcohol, degrease the entire surface. Next, cut off the required amount of heat insulation, insert it inside, glue it and cut off the excess.
Adjusting the silent lock
This method will help you soften the first click of the latch as it hits the lock.
After such an adjustment, the sound from closing your doors will not be any different from the sound that we hear when closing the doors in a foreign car.
Preparing for installation
Installing silent locks with your own hands is not that difficult. The most important thing is to perform operations in a certain sequence. First of all, you need to provide access to carry out this operation. To do this you will have to dismantle some elements.
- The first step is to unscrew the inner door armrest. It is attached with three bolts, under a cross bit.
- Then the window lifter handle unlatches. To do this, immediately use a flat screwdriver or a metal hook to remove the fixing ring, and then pull the part towards you.
- The next step is to remove the decorative rim from the inner handle of the lock.
- After this, you can remove the door card. It is held on by plastic clips; very often they break during this operation. When installing the panel back, you need to replace the damaged latches with new ones.
Having completed the above points, the preparatory stage can be considered complete. Next, you need to remove the old locks.
We purchase the necessary materials
To ensure that the doors of your car no longer close with a roar and grinding noise, we will install silent locks on it. To do this, we purchase the necessary kit in the amount of two pieces. Each box has two locks.
Set of silent locks
Well, the second set that we need is a central locking kit. The universal kit traditionally includes four motors, a control unit, all the necessary wires and several strips.
central locking
After purchasing the main components of the upcoming work, we prepare the necessary tools:
- Drill and various drills;
- Hammer;
- Screwdrivers, Phillips and hexagonal, screwdriver;
- Additional wires;
- Protective tubes for wiring;
- Well, and some other little things: a knife, glue, alcohol, etc.
We install silent locks
The first stage of the work is the installation of new and dismantling of old locks. To ensure that you do not have to remove the door trim, this process must be performed carefully and carefully.
To begin, unscrew the bolts one at a time so as not to drop the internal lock. In the same way, screw on the new silent ones in reverse order.
Installation of silent locks
The second point is to replace the old bolt that holds your lock with a new one.
We apply this scheme to all remaining doors. Having completed the installation, we perform a check. If any problems arise, for example, the door does not close well, then try to push the lock deeper. Although, by choosing the option of silent locks without a “flag”, such situations should not arise.
Removing old locks
To remove the old lock, you need to unscrew the five bolts located at the end of the door. They hold the lock itself and the window lifter guide. After this, we remove them, freeing the locking mechanism from the latches of the lock drive rods. The plastic fasteners for the rods and pushrods can be snapped off using a flat-head screwdriver. Exposure to them must be carried out with extreme caution so as not to damage them. The last step before installation is to remove the external opening handle. It is removed by unscrewing the two nuts holding it on the inside of the door. It is more convenient to unscrew them using a socket wrench. After this, the handle can be freely removed from the outside. Now everything is ready to install new locks.
What tools and components need to be prepared
Of course, you can install such locks in a car service center, but you will have to pay a lot for the service, and independent work will require a minimum of cash investments and very few tools and additional components:
- A set with external euro handles, it is best to give preference to a well-known manufacturer.
- Locking mechanism with latch.
- The part of the lock that is inserted inside the device is often called the “chocolate bar”.
- Two fixing bolts that fit VAZ-2114 or VAZ-2115 car locks. It is worth noting that such clamps can have both short and long sizes. Experts recommend choosing the longest fasteners.
- A connecting bolt for the rack and a tap with which you can cut the thread.
- A small cable, the diameter of which will be approximately 1.5-1.6 mm and drills measuring 8.5, as well as 9 and 10.
In addition, a drill and a hammer, as well as a set of screwdrivers and medium-sized sandpaper can be useful in the work.
Installation of new mechanisms
You can install a silent lock on a VAZ-2107 in the reverse order of the disassembly process with some changes. The new mechanism is connected to the drive system in the same way, with the exception of one part. The rod pusher is added to the rod of the outer door opening handle. Before installing it, the rod itself is disconnected, this part is attached to it, then everything is mounted in place. The handle is placed in its original position and secured with two nuts. Having snapped all the rods of its drive onto the new lock, install the mechanism in its place. Then it is fixed with bolts. The window lifter guide is also screwed on.
Algorithm for adjusting lock 2107
It is hardly possible to systematize all possible problems with locks on the seven, but to eliminate malfunctions, first of all, they carry out a thorough inspection of the mechanism, lubricating the bolts, checking the rods and hinges. The procedure for solving incorrect lock operation looks something like this:
- without removing the clamp on the body pillar, outline its outline;
- if the door closes too tightly or only with one click, unscrew the latch and move it the required distance outside the body;
- in cases where the door slams two clicks, but the gap remains, the planes of the door and the wing do not coincide, the latch is weakened and shifted inside the body;
- When the door is closed and the locking mechanism is activated, the door must remain vertically stable, that is, in the case when the door rises when closing, the latch is lowered, otherwise, the opposite is done.
There are often cases when the lock does not work well when unlocked from the inside, although it opens satisfactorily from the outside.
This problem is solved by adjusting the position of the door opening handle - the fastening screws are loosened and the handle is set to the optimal position, after which the screws are tightened.
Door assembly
All previously performed disassembly operations are performed in reverse order.
- The door card is installed in place using plastic latches; if any were damaged during dismantling, they are replaced.
- The decorative ring of the inner door lock opening lever is fastened into place.
- The window lifter handle is put into place and secured with a locking ring.
- The final stage is to install the armrest in its position using three bolts.
A silent lock is installed on the VAZ-2107. Now all that remains is to configure it correctly.
Adjusting the gap and hinges
Adjusting door locks is within the capabilities of anyone who is able to hold a socket and open-end wrench in their hands, although this procedure requires some time. To begin with, they diagnose the operation of the lock mechanism and inspect the condition of the gaps between body panels, front fenders, pillars and door frames. Unfortunately, those three millimeters of gap, which should be evenly distributed along the entire perimeter of the door, on the VAZ 2107 exist only in the drawings at the design bureau in Tolyatti. In fact, the gap can be from three to seven or more millimeters. Regardless of its size, the main thing is uniformity. If even with the lock removed it is not possible to establish a stable gap, you will have to adjust the hinges.
This will make the task even more difficult, but there is no other way out. In some cases it is necessary to adjust the loops in pairs, and in some only one, it all depends on the direction of the skew. When adjusting the gap, you should pay attention to the condition of the seals, since they, as a rule, can greatly influence the location of the door in the opening. When the gaps are set, you need to pay attention to the door contact planes. In this case, you will also have to play with both the hinges and the seals. Only after this, after lubricating the hinges and eliminating the backlash, can you begin to adjust the lock mechanism itself.
Adjusting the mechanism
Having installed silent locks-2107 on a car, in order to fully use all the advantages of the mechanisms, you need to configure them correctly. Adjustment is carried out by moving the latch fixing bolt. First you need to let him go a little and close the door. It should fall into place. Then carefully open the door, being careful not to move the bolt. Next, you need to check the quality of the door latch. If it is not completely satisfactory, then you need to continue tuning. By releasing the bolt and moving it, it is necessary to achieve smooth operation of the mechanism. The door should close with minimal physical impact on it. By repeating the adjustment operation on all doors, you can enjoy the perfect operation of your car's locks.
Users' opinions
Not only classics are the object of using these mechanisms. Silent locks are now being installed on Priora, Nines, Tens and even foreign cars. You can often hear admiring reviews from owners who have installed silent locks on classics. First of all, it is surprising that even on the oldest Zhiguli cars the doors begin to close, like on cool foreign cars.
Silent locks 2109, 2110 and other models evoke genuine admiration among car enthusiasts. Instead of slamming the door with all your might, now a light press on it with just one finger is enough, and after making two light clicks it is brought into the closed state. Previously, by the loud sounds that filled the surrounding area, one could immediately guess what brand of car had arrived. Now you can close the door on any car with a similar modification almost silently and effortlessly.
The use of silent locks on all cars that can be modified in this way leads to an improvement in the quality of operation of the car. The consequence of this is an improvement in the level of comfort and positive emotions that the vehicle owner experiences after installing such mechanisms. Many drivers remember with horror the times when using door locks only brought irritation. Silent locks are a good choice for your car.