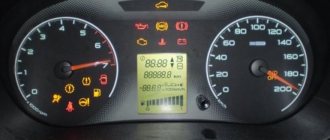
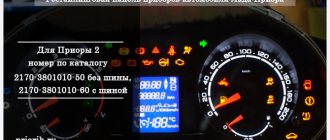
As you know, AVTOVAZ removed the internal combustion engine temperature scale from the panel on the new Grants and Kalinas and left only the overheating light, but if it lights up, then this is already the beginning of the end. Therefore, in luxury trim levels, the coolant temperature display was added to the on-board computer readings, and for all others, only a collective farm is assumed in the form of installing additional screens in place of button covers or external On-board computers.
To fix this problem, you can update the dashboard firmware of Lada Granta and Kalina 2 cars.
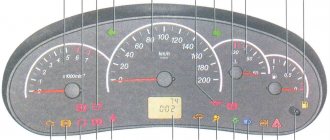
First, we find out what version of the firmware is embedded in the instrument panel.
- With the ignition off, press the daily mileage reset button on the panel and, without releasing it, turn on the ignition, the service mode of the panel is activated, in which all the indicators light up and the arrows begin to move
- release the button and press again. Numbers will appear on the display, this is the software version
Now let's decipher them
The first numbers (2190 or 2192) indicate the car model (Granta or Kalina 2). This is followed by the numbers 00, 20 or 40, which stand for “standard”, “norm” or “lux”, respectively.
Now, using the table below, you can see if it is possible to flash your panel so that it displays the temperature.
FIRMWARE VERSIONS OF INSTRUMENT PANELS LADA GRANT AND KALINA 2
| Equipment | Firmware version | DTNV | DTOZH | What is needed for firmware | Note |
| Granta Standard | 015 | No | No | Changing the display and working with a soldering iron | Old board |
| 029-040 | No | No | Changing the display and working with a soldering iron | Updated board | |
| Granta Norma | 053, 060, 076, 087 | No | No | Work with a soldering iron or use modified firmware 2190-20_092_for_076 | |
| 090, 091 | Yes | No | Suitable 092 and 009 or 012 from Kalina | ||
| 092-095 | Yes | Yes | |||
| Granta Lux | 032, 038, 042 | Yes | No | Firmware 046 is suitable | |
| 046 | Yes | Yes | Shows the transmission number | ||
| 047 | Yes | Yes | |||
| Kalina Norma | 007 | Yes | No | Suitable firmware 009 or 012 | |
| 014 | Yes | Yes | Added on/off gear shift sound | ||
| Kalina Lux | 009 | Yes | Yes | Firmware 012 is suitable | |
| 012 | Yes | Yes | Shows the transmission number | ||
| 014 | Yes | Yes |
Removing the dashboard (panel) of the Lada Granta
If you decide to soundproof the engine shield, or cover the dashboard with carbon film, then carefully study the instructions on how to remove the Lada Granta panel with your own hands.
We remove the Lada Granta dashboard with our own hands
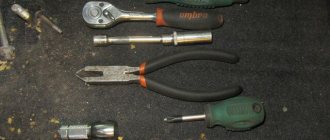
– flat and Phillips screwdrivers.
– socket head “13” and “24”.
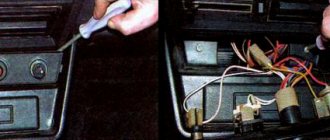
1. Disconnect the negative cable from the battery.
2. Remove the cigarette lighter (squeeze the lock and remove the cigarette lighter socket, disconnect the connector with wires).
3. Remove the head unit of the audio system (radio tape recorder) and disconnect the block with wires from it.
4. Remove the central panel trim (dashboard).
5. Remove the glove compartment cover and remove the screws securing the inner panel.
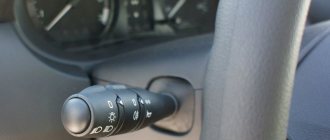
6. Remove the pillar trim. Then remove the central tunnel. Then remove the steering wheel. Remove the steering column cover and steering column switches.
7. Remove the external lighting control unit (first remove the fuse box cover, then unscrew one screw and disconnect the block).
8. Remove the headlight hydrocorrector regulator (remove the handle, unscrew the fastening nut, remove the hydraulic corrector regulator).
9. Remove the instrument cluster.
10. Then remove the 4 screws securing the air duct damper control unit to the instrument panel.
11. Remove the 18 screws securing the decorative panel to the frame (Figure 11.13).
12. Move the decorative panel away from the frame as far as the air ducts attached to its inside allow.
13. Place your hand under the panel and use a long Phillips screwdriver to remove two screws No. 1 (Fig. 11.14) (one on each side) securing the front side glass air ducts to the decorative panel. Remove the ends of the air ducts from the nozzle pipes No. 2, and then remove the inner ends of the air ducts from the pipes of the heater body.
14. Pull the panel towards you, and bending air duct No. 4 of the windshield, transfer it through box No. 2 (Fig. 12.1) for supplying air to the central deflectors on the heater body. Remove the decorative instrument panel.
15. To make it easier to reinstall the panel in the future, remove two screws No. 3 (Figure 11.14).
– Remove air duct No. 4 (Fig. 11.14) of the windshield.
– Remove the two bracket nuts from the panel brackets.
– And move them to the air duct brackets - this will allow you to install the decorative panel in place without the air duct, and secure the air duct to the panel after its installation by screwing in the screws from the interior side.
Figure 11.13.
Location of Lada Granta panel screws.
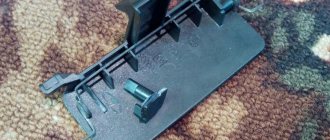
Figure 11.14.
Decorative instrument panel (view from the inside):
Installation of Lada Granta panel
Installation of the dashboard is carried out in the reverse order, but a number of points should be taken into account:
Before installing the panel, install the windshield duct over the heater housing window.
1. After installing the panel, put the air duct brackets in place (shown on the removed panel for clarity)
2. Screw in the mounting screws on the interior side.
Features of choosing thresholds for a car
A careful study of the market allows you to understand which product option is best to choose.
The functional purpose and design features should be taken into account
Attention! If thresholds are required only for practical purposes, a wide model must be selected. The main goal is to create additional opportunities for human weight to be supported
Such accessories ensure that getting into the car is easier. People of short stature, children and teenagers will experience the greatest relief. It is noted that the thresholds can increase the door opening of the car and reduce the ground clearance by 0.5–1 centimeter. An additional benefit is that dirt that accumulates on the platform is washed away and can be successfully removed to keep the vehicle clean.
High-quality plastic covers for Lada Largus are ideal for protecting the car from impacts on a bad road or from unwanted stones. They cannot withstand significant loads, but at the same time they look quite neat. By choosing classic plastic trims, you can prevent serious changes to the appearance of the vehicle. In addition, plastic linings are pleasingly affordable and do not require regular polishing.
This is interesting: Review of Mercedes E-Class W212
Another option is metal thresholds, which are made from chrome-plated steel or polished aluminum. Such products are highly expensive. Metal thresholds should guarantee protection of the body from any type of damage, but periodic maintenance is required. Over time, metal thresholds become covered with scratches, so polishing is required.
How to remove the instrument panel (dashboard) of Lada Granta
Removing the instrument panel (torpedo) on a Lada Granta car is carried out to replace it with a new one in case of severe damage or replacement of component elements, as well as when carrying out various work in which the presence of a torpedo will interfere. To perform the repair, you will need socket heads “13” and “24”, as well as two screwdrivers with a flat blade and a Phillips blade.
In the process of dismantling the panel frame, you will have to disconnect a significant number of electrical connectors, which only a qualified technician can do. Therefore, if you are not sure, it is better to contact a specialized workshop.
Do the following sequence of actions:
- First of all, you need to de-energize the car; to do this, disconnect the minus terminal from the battery.
- We remove the cigarette lighter socket from its mounting socket and disconnect the block with wires from it.
- We remove the head unit and disconnect the antenna cable tip and connectors with wires from it.
- Remove the central trim of the instrument panel console.
- Next, remove the glove box cover.
- Remove the inner panel of the glove box by unscrewing the screws that secure it.
- Remove the lining of the front pillars.
- We remove the floor tunnel lining, after which we dismantle the steering wheel (the steering wheel must first be set to a position corresponding to the straight-line movement of the car)
Purpose of additional lighting
Additional dashboard lighting is intended for:
ensuring a more original appearance of the instrument panel; better lighting of the main components of the PCB; providing additional lighting for the car interior; increasing safety while driving - if the backlight of the instrument panel effectively illuminates the dashboard, this will allow the driver to pay attention to the main parameters in a timely manner.
Installing a diode light bulb in the tidy
If you want your instrument lighting to be as efficient as possible, then the best option would be to install LEDs; in this case, you have several options:
- The dashboard lighting can be arranged using individual LED elements, so you can provide effective decorative lighting. It is necessary to take into account that the diodes themselves may have different colors; accordingly, such lighting can become part of the tuning.
- Also, the backlight of the instrument panel can be organized using a diode strip, which is often used in everyday life. If you get tired of the color of the glow, the diode strip can be completely replaced. The installation procedure will not take much time, since the tape has a self-adhesive backing.
Removing the Lada Granta instrument panel
Tools:
- Open-end wrench 10 mm
- Ratchet wrench
- Extension
- 8 mm head
- 10 mm high head
- 13 mm head
- 21 mm head
- Torx T20 socket
- Medium Phillips screwdriver
- Large flat screwdriver
Parts and consumables:
- Technical capacity
- Coolant
Notes:
Carry out work if it is necessary to replace the instrument panel, panel wiring harness and elements of the heating and ventilation system.
1. Disconnect the wire terminal from the negative terminal of the battery.
2. Drain the engine cooling system as described in this article.
3. In the engine compartment, remove the heating and ventilation system filter as described here.
4. Using a Phillips screwdriver, unscrew the four self-tapping screws securing the heating and ventilation system filter casing to the instrument panel and remove the casing.
5. Loosen the clamps securing the heater inlet and outlet hoses and remove the hoses from pipes 2 of the heater radiator. Using a 10 mm high socket with an extension, unscrew nut 1 of the stud securing the flange of the heater radiator pipes to the front panel.
6. Inside the car, remove the mounting block cover as described in this article.
7. Remove the instrument cluster as described here.
8. Remove the floor tunnel lining as described in this article.
9. Disconnect the steering column from the instrument panel frame and lower it to the floor or remove the button completely, as described in this article.
10. Remove the instrument panel center trim as described here.
11. Remove the seals for the right and left door openings at the installation locations of the instrument panel and the A-pillar upholstery.
12. After overcoming the resistance of the clamps, remove the left side trim of the instrument panel.
13. Similarly, remove the right side trim of the instrument panel.
14. Use a screwdriver to pry up the upholstery of the left front pillar and, overcoming the resistance of the pistons, remove the upholstery.
15. Similarly, remove the right front pillar trim.
16. Remove the headlight beam adjustment knob by pulling it towards you.
17. Using a 21 mm socket, unscrew the nut securing the regulator to the instrument panel and remove the nut.
18. Remove the headlight beam adjustment control from the instrument panel hole.
19. Using a screwdriver, press out the two latches on the glove box and remove the top edge of the box from the instrument panel.
20. Open the glove box to a large angle and, applying the necessary force, pull the four split hinges of the box from their axes.
21. Near the opening of the left door, use a 10 mm socket to unscrew nut 1 securing the tip of the “mass” wire and remove it from the stud.
22. Using a 10 mm socket, unscrew the two nuts securing the ground wire lugs to the right bracket of the instrument panel console and remove the wire lugs from the studs.
23. Using a 13 mm socket, unscrew the bolt securing the right bracket of the instrument panel console to the body bracket.
24. Similarly, unscrew the bolt securing the left bracket of the instrument panel console to the body bracket.
25. Squeeze the two clips and disconnect the wiring harness connector from the brake light switch.
26. By pressing the latch, disconnect the wiring harness block from the gas pedal module.
27. Disconnect the instrument panel wiring harness connector from the clutch pedal position sensor wiring harness connector.
28. On the right side of the instrument panel, pressing the latch, disconnect one block of the wiring harness from the controller.
29. Using a screwdriver, use a screwdriver to slide the block clamps and disconnect the two wiring harness blocks from the fuse and relay mounting block.
How to change the speedometer sensor
The speed sensor (DS) is designed to obtain information about the number of revolutions transmitted from the gearbox to the drive wheels of the vehicle, followed by its conversion into an electronic signal and transmission to the electronic control unit (ECU). Only fuel-injected cars are equipped with DS. The predecessor of the speed sensor was a mechanical speedometer drive, which was equipped with all carburetor engines.
VAZ 2110 cars, depending on the year of manufacture, are equipped with different types of speed sensors. Older models are equipped with a mechanically driven sensor (rod and gear), new ones (after 2006) have a fully electronic design.
How to remove the instrument panel on a Lada Granta
Using a 13mm head, unscrew the bolt securing the right instrument panel bracket to the body bracket.
Also unscrew the bolt of the left bracket
Squeeze the two clips and disconnect the wire block from the brake light switch
Press the latch and disconnect the wiring block from the gas pedal module
Disconnect the instrument panel wiring harness from the clutch pedal position wiring harness.
On the right side of the panel, by pressing the latch, disconnect the harness block from the controller
Use a screwdriver to move the pad clamps
Disconnect the two wire blocks from the fuse mounting block
Disconnect the two connectors of the front wiring harness of the engine compartment
Using a 13mm socket, unscrew the two bolts securing the instrument panel frame to the front panel bracket
The figure shows with arrows the bolts securing the instrument panel frame to the front panel bracket
Using a 13mm socket, unscrew the two bolts securing the left fastening of the panel frame to the side panel bracket.
We also unscrew the two bolts of the right fastening of the instrument panel frame to the side panel bracket
We remove the instrument panel assembly with the heater through the doorway
To remove the instrument panel trim, use a Phillips screwdriver to unscrew the two screws under the instrument cluster
Under the mounting block cover, use a Phillips screwdriver to unscrew the three screws on the left side
Unscrew one screw on the right side
Using a screwdriver, unscrew the five screws on the right side of the instrument panel
Instrument panel assembled with frame and heater in Figure 34
The front panel of the car in Figure 35
Under the central panel trim, unscrew the two screws in the center
Unscrew one screw from the top
Using a Phillips screwdriver, unscrew the four self-tapping screws securing the heating control unit to the instrument panel trim.
Disconnect the wiring harness from the cigarette lighter
Unscrew the two screws of the lower fastening of the instrument panel trim to the frame
Main modifications of Renault Logan dashboards
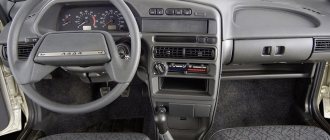
Today, Renault Logan manufacturers equip their cars with various models of instrument panels. Externally, they are very different, but, in general, they display the same information. As an example, below I will provide photos of the main and most common modifications.
The classic and most common dashboard of Renault Logan. It is on this that we will learn how to change the backlight and display lamps, and then we will even try to tune it.
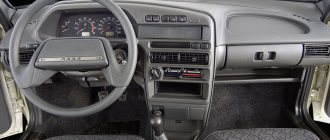
This panel, made in a modern style with chrome retro echoes, is more often found in modifications of the Renault Logan II car.
The next panel has a rather original design, but in terms of functionality it is in no way inferior to previous developments.
And this panel, for ease of reading information, duplicates the readings of pointer instruments in digital form. It will surely appeal to digital technology lovers.
And the latest modification for today is perhaps the most sophisticated, since it not only displays information, but also allows you to fine-tune its appearance using the built-in multilingual menu. On this panel you can even set the cost of fuel (it’s not entirely clear why, though). Installed on cars of the latest models.
Specialist in repair and maintenance of electrical equipment and industrial electronics.
All of the above modifications of Renault dashboards have the same geometric shape, dimensions, as well as the algorithm for dismantling and replacing backlight and display bulbs.