In order to do torpedo tuning with your own hands, you can think about the following directions:
- replacement of standard dials and hands;
surface flocking;
1200 rub. for the photo report
We pay for photo reports on car repairs. Earnings from 10,000 rubles/month.
Write:
Removing the dashboard of the VAZ 2107 injection model is quite simple. It is attached to only one bolt (located near the stove control knobs). For details of the procedure for removing the VAZ 21074 dashboard, see the video.
After the bolt securing the tidy has been unscrewed, you need to lightly pull it towards you and sequentially disconnect the plug, the speedometer sensor, reset the speed, and disconnect the air duct. In general, there is nothing complicated, the main thing is to remember where which plug was connected. If you need to repair the instrument panel, then proceed to further disassembly (as shown in the video), but if you need to replace the VAZ 2107 dashboard, then install a new panel and connect everything in the reverse order.
Vinyl wrapping of VAZ 2101, 2106, 2107 dashboard
A few weeks ago I started covering a torpedo with vinyl leather. To be honest, after reading reviews on the Internet, I thought it would be easier. Today is the third day of work directly covering the torpedo. It turns out very bad, but for now it’s tolerable. I even doubt whether the game was worth the candle. Well, oh well, there’s simply no turning back now. Today I realized one simple truth: this work is second in complexity only to complete soundproofing of the car. Sound insulation is more difficult in the sense that there is several times more work, in much worse conditions and very exhausting. The only difficulties here are the complexity of the shape of the seven-dimensional panel, as well as the very large limitations of vinyl leather.
All the work was started due to the fact that since the purchase of the car there were a lot of jambs on the dashboard, the main one of which was a crack on the top, which I once covered with a silicone mat for the phone. In principle, today I no longer consider such a decision to be so unfortunate. In general, it would be better not to touch her. The first thing I did before I started covering the dashboard was to seal up the crack on the dashboard and the hole on the glove compartment lid with a lock. There will be no more lock on it. Later I will write why and how to continue living.
The most common reasons for dismantling
There are a lot of reasons for removing the tidy on a VAZ 2107, and some of them can be called banal, but nothing can be done. The most common reason when you need to remove the instrument panel is a burnt-out backlight bulb. Replacing light bulbs in the dashboard of a VAZ 2107 is carried out only when dismantling the device, and this procedure is simply impossible to perform otherwise.
The dashboard on the VAZ 2107 must also be removed for a number of the following reasons:
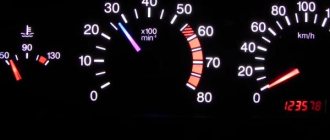
- Malfunction of pointer indicators.
- Failure of the instrument lighting, as well as lack of functionality of the arrow indicators.
- Replacing the device with a new one, for example, if a digital panel is installed instead of the factory instrument panel.
- Tuning or upgrading the device.
As practice shows, most often the need to dismantle the dashboard arises precisely because the backlight bulb burns out. If the device is dismantled for this reason, it is recommended to immediately replace conventional light bulbs with LED ones.
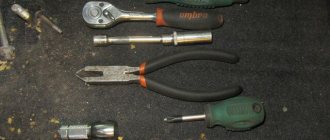
Required Tools
Before starting work, you will need to prepare the necessary tools so that you do not have to be distracted during the process. Despite the fact that the work of removing the device in question is quite labor-intensive, to implement it you will need a small set of tools, including:
- Phillips and slotted screwdriver.
- Electrical tape to indicate chips that are disconnected from the device.
- Work gloves for unscrewing the speedometer cable.
When all the tools are prepared, it remains to make sure that the parts and elements that are planned to be installed or replaced on the dismantled device are available. After this, we proceed to perform the main part of the work.
How to remove the dashboard on a VAZ 2107
You can hear a complaint from many car enthusiasts that the “native” design of the dashboard (or in common parlance, “torpedo”) on the VAZ 2107 is extremely laconic, stingy, even boring. Others claim that yes, the pad is simple, but nothing distracts the driver.
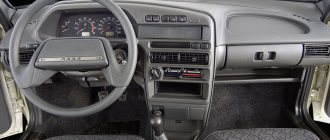
The instrument panel, or trim, is a broader concept, “all” the plastic that is located in the front part of the car’s interior. It is with the desire to change the appearance of the instrument panel with your own hands that professional tuning of not only the interior, but the entire car, often begins.
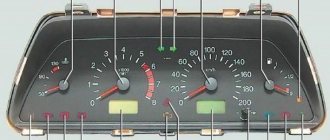
Let us remind you what the factory trim on the VAZ 2107 is:
And here’s how you can do the tuning yourself, change the instrument panel and embed a screen into the trim (not to mention the steering wheel):
But here is an almost professional tuning of the VAZ 2107 interior:
I can’t even believe that this tuning was done by hand!
To properly change the appearance of the front part of the cabin, change the instrument cluster, or install a new audio system, you often cannot do without removing the dashboard.
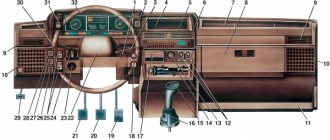
The torpedo consists of almost two dozen parts. Below is a schematic view of the torpedo.
In fact, it is very simple to remove and install the torpedo with your own hands. You will need a flat-head and Phillips-head screwdriver and a 10 mm open-end wrench.
Sequence of actions when removing a VAZ 2107 torpedo.
Attention! First, remove the negative terminal from the battery.
- Remove the negative terminal from the battery.
- Now you need to remove the shelf located in front of the passenger. To do this: unscrew the screws (2) on the right and one on the left;
- the last, fourth screw is fixed in the depth of the shelf, now it can be removed.
- using a flat-head screwdriver, pry up the additional central panel from either side, release the latches from the grooves, and pull it out along with the filling, then disconnect the connector going to the light switch:
- Using a flat-head screwdriver, carefully press out the switches, release them from the connectors and remove:
- first you need to separate the front and rear halves of the casing: unscrew the screws (4 pcs.), and one unpaired screw securing the lower half and separate it with both hands:
- Using the same screwdriver, we remove the tips of the heater levers and the deflectors through which air is supplied:
- after that, we “push” the meter into the dashboard, then unscrew the right screw of the shield and lift the shield on the right side. In the gap between it and the torpedo, unscrew the nut of the cable going to the speedometer, then lift the left edge of the shield and remove the economizer hose going to the fitting (on the VAZ 2107 on the left):
- Using small pliers, unscrew the nut securing the main cylinder of the corrector and also push it inside the panel:
How to dismantle the instrument panel: step-by-step instructions
First of all, you need to open the hood of the car and remove the negative terminal from the battery in order to de-energize our dashboard. After this, the work is performed in the following sequence:
- unscrew the dashboard shelf and the glove compartment body using a special screwdriver;
- turn off the power to the light bulbs that illuminate the interior of the glove compartment in your car;
- We very carefully remove the additional dashboard along with the clock and other devices. To do this, you will need to pry the part with a screwdriver and pull it out of the special grooves;
- turn off the cigarette lighter and warning lamps by removing the corresponding wires located behind the additional panel;
- we remove the switches located in the immediate vicinity of the gearbox lever and disconnect them from the on-board network;
- We unscrew the screws that you will immediately see under the switches and the bolts intended for fixing the main console of the torpedo. After this, you can freely remove it without fear of damaging the wires;
- remove the steering column cover;
- remove the heating system cover together with the air duct deflectors;
- dismantle the heater control unit;
- unscrew the last nuts holding the torpedo. For this purpose you need to use a key of 10.
After this, you can dismantle the instrument panel in the car without any problems. Using this approach, you do not have to worry about accidentally breaking any parts or breaking wires, since they are all removed before unscrewing the fixing nuts. Assembling the torpedo is carried out in the reverse order and can be done even without experience. The most important thing is to carry out all the work as carefully as possible and not skip any of the steps described above.
How to remove a torpedo on a VAZ 2107 video
Tuning enthusiasts make their own beard to place on this panel:
- watch;
- multimedia devices (radio, radio, etc.);
- knobs for adjusting the level of illumination of the dashboard;
- switch block for fan, fog lights, external lighting;
- pocket for small items;
- USB sockets for charging gadgets
- part of a car's control devices.
Before taking measurements for the manufacture of the center console, it is necessary to remove decorative trims from the existing part and anything that will interfere with the installation of the new part. In order not to be mistaken with the dimensions, you must first make blanks from cardboard and try them on.
Materials and tools
Console tuning usually consists of making a new VAZ 2107 beard, on which mounting locations for switches, indicators, control devices and other equipment are pre-provisioned. The most affordable material for making your own beard is plywood. The thickness must be at least 6 mm, otherwise it will not be possible to achieve the required rigidity of the product. For finishing, artificial leather is most often used, matched to the color of the interior elements, or, more recently, carbon fiber of a suitable color.
Sometimes tuning the beard of a VAZ 2107 is accompanied by a comprehensive redesign of the interior design with the replacement of finishing materials for the door trim and trim of the front panel with carbon fiber or leatherette. To make a tuned VAZ 2107 beard, in addition to finishing materials, the following devices and tools are needed:
- jigsaw;
- electric drill or cordless screwdriver;
- “grinder” (angle grinder);
- locksmith corner;
- pencil;
- ruler (roulette);
- glue gun (tube of glue);
- furniture stapler (for fastening leatherette).
The new console (beard) is installed in place of the standard one, which should be dismantled to free up space and take the measurements necessary to create the workpiece drawings.
Making your own beard
A beard is a complex structure; it is made of flat parts. To make them you need to make patterns; it is best to make them from cardboard. It is necessary to achieve high precision of the console parts; rigid cardboard is quite suitable for this. If you are not confident in your skills, first make a mock-up of the console from cardboard. This will allow you to make sure that the drawings are made correctly and to estimate how the new beard will fit into the installation site.
After making the pattern, mark the details of the beard and cut them out of plywood with a jigsaw. All parts are connected using glue and screws. The latter will allow you to fix the console elements until the glue sets. This is the most reliable and easiest way to connect beard parts.
Recommendations to avoid problems during the process of removing the torpedo
If you intend to remove the dashboard in a VAZ-2107 car for the first time, be sure to follow the following rules:
- When removing the upper part of the steering column protective cover, be careful not to damage the ignition switch O-ring. This part is made of rather flimsy rubber that cannot withstand strong mechanical stress;
- Mark all connectors, wires and switches that you remove to gain easy access to the dashboard. They will avoid confusion during the installation process;
- When removing the additional dashboard, do not try to use force, as there is a fairly high risk of breaking the plastic clips. Finding a replacement for them will not be so easy.
To remove the torpedo, it is better to use special tools, so we recommend preparing in advance a regular and medium-sized Phillips screwdriver, pliers and a set of open-end wrenches. This will help you remove all the necessary parts, as well as unscrew the nuts and bolts that hold the dashboard in place. In order not to make any mistakes during the work process, we suggest watching a video that describes in detail each stage of removing the torpedo.
What is a console table
A miniature narrow table that is used to store small items or decor is called a console table. This is quite a convenient thing: it can be placed in any room of the house. In the hallway, the console is useful for storing keys, in the bedroom - for accessories, cosmetics, in the living room - for interior decoration. You can put souvenirs and even a TV on it.
The console in the interior is used both as part of a set of many elements, and independently.
Sometimes such tables are turned into minibars.
Self-production: frame
Creating a VAZ beard entirely with your own hands may seem like a difficult task, but in reality this is not entirely true. It is enough to select special drawings on the Internet, stock up on materials for work and read the tuning instructions. Initially, the driver must work on the frame, choosing the optimal model as a template. Practice shows that birch plywood is the most popular. Its thickness should be seven millimeters. It has won positive feedback from owners largely due to its quality and increased level of strength as part of the tuning parts.
To do the work yourself, you will also need vinyl leather, wooden blocks with a cross-section of 2x2.5 centimeters and one tube of epoxy glue. Before you start processing plywood, you must first create a cardboard template. For this, cardboard material with good strength is used. Each mark must be transferred to the plywood. You can make adjustments before cutting the holes and shaping them into the desired shape. The phrase “measure twice, cut once” perfectly fits the description of this stage. After perfectly copying the applied dimensions, you can pick up a jigsaw and begin to carefully cut out the console structure along the contours.
Expansion of functionality
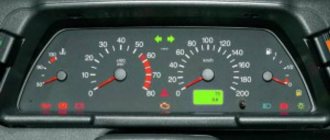
The VAZ-2107 is equipped with a minimum of instruments, and therefore installing new ones will significantly increase the information content of the panel. Most often they add:
- light and temperature sensors;
- fuel consumption indicator per kilometer;
- ECU;
- TV, etc.
Additional holes are cut for them. It is also necessary to install wiring and make changes to the design of the machine (in particular, to provide it with missing sensors).
Did you like the article? Share with friends:You may also like Tuning
Steering wheel tuning
A comfortable and beautiful steering wheel contributes to comfortable driving. To achieve this, in the “six” you need to update the steering wheel in the following ways:
- install a steering wheel from another VAZ model;
- replace with sports one;
- retighten the steering wheel.
Installing a steering wheel from another VAZ model
The simplicity of the Zhiguli allows you to replace the steering wheel with a steering wheel from other VAZ models. Many car owners believe that it is not worth the work and effort that needs to be put in.
The steering shaft of the chisel is thinner than the classic one, and not by much, that is, it is not very easy to make an adapter for the hub. Plus the steering wheel is higher, normally it won’t engage the turn signal bump stop. In a word, you need to suffer a lot to install it properly. As for me, it’s not worth it, if you really want a normal steering wheel, then you need to go and buy it, the choice is very rich right now, but you need to look at them carefully, there are so many leftists that it’s just terrible.
Kot_01
https://autolada.ru/viewtopic.php?t=26289
Replacing with a sports steering wheel
A sports steering wheel will give the car a beautiful and aggressive look. You just need to know that the “six” is not intended for sudden maneuvers. The sports steering wheel has a smaller diameter and is more difficult to make turns with, so you need to get used to it.
Steering wheel reupholstery
In an auto store you can find braiding on the steering wheel for re-upholstering with your own hands. Such kits include the braid itself made of genuine leather, strong threads for sewing and a special needle.
conclusions
The beard of VAZ cars makes it possible to significantly simplify driving comfort. Both the driver and the passenger will not have to reach for the radio. Depending on the design, you can also place additional cells here to store parts or small personal items. It usually takes several days to create a part. You need to be prepared for this right away. Under no circumstances should you start by cutting plywood, as there is a high chance that you will not be able to install it. A cardboard blank will allow you to modernize the design taking into account individual needs. Of course, in addition to creating a beard with your own hands, you can also seek help from a specialized car service. But why, if this method will save a lot of money? Therefore, feel free to take on interior tuning, starting with the console!
Types of consoles
Console tables differ mainly in design. They can be either classic design with ornate decor, or minimalistic. Some models are based on 4 legs, others have only two or three supports.
With it, the design of the space becomes sophisticated, elegant, and completely thought out.
An interesting option is a console table with two legs, attached to the wall.
Most often, furniture is made with balusters - curly legs. This is a reference to the era of console tables.
Compact and refined
From scrap materials you can make a console with your own hands, which will look harmonious in any interior. To work you will need an old dining table, two blocks and wood paint. All actions correspond to the standard scheme, but there are some differences:
- It is necessary to shorten the legs quite a bit, since the bedside console is not high.
- The table should be cut crosswise rather than lengthwise.
- Those products that are painted in a bright, solid color look more aesthetically pleasing.
- The console is attached to the wall not with corners, but with a pair of wooden blocks. They are fastened together in advance and screwed to the wall. The prepared bedside table is simply “put on” on top of the bars.
Product for a narrow room
If you have an old table that has lost its former appearance, then it can be used as the main raw material. This option attracts many craftsmen because the work requires a minimum of tools and financial investments:
- Pieces of beautiful fabric 130 cm wide.
- Rectangular table (IKEA or ISALA are ideal).
- Screwdriver, pencil, jigsaw, aerosol glue, sandpaper, sharp scissors, one metal corner, two self-tapping screws.
The prepared table must be cut lengthwise into two even parts. All edges should be cleaned with sandpaper. If the table has removable legs, then you need to securely fix two of them. On the back side of the console you need to secure a corner (in the center). The edges of the table are covered with regular masking tape to prevent glue from getting in. A piece of fabric prepared in advance is sprayed with an aerosol product. There should be no bubbles on the surface. Excess fabric on the sides of the tabletop is cut off with scissors. After the glue has dried, you can carefully remove the tape. The free part of the metal corner is screwed to the wall as firmly as possible so that there are no gaps.
conclusions
The beard of VAZ cars makes it possible to significantly simplify driving comfort. Both the driver and the passenger will not have to reach for the radio. Depending on the design, you can also place additional cells here to store parts or small personal items. It usually takes several days to create a part. You need to be prepared for this right away. Under no circumstances should you start by cutting plywood, as there is a high chance that you will not be able to install it. A cardboard blank will allow you to modernize the design taking into account individual needs. Of course, in addition to creating a beard with your own hands, you can also seek help from a specialized car service. But why, if this method will save a lot of money? Therefore, feel free to take on interior tuning, starting with the console!
Self-production: frame
Creating a VAZ beard entirely with your own hands may seem like a difficult task, but in reality this is not entirely true. It is enough to select special drawings on the Internet, stock up on materials for work and read the tuning instructions. Initially, the driver must work on the frame, choosing the optimal model as a template. Practice shows that birch plywood is the most popular. Its thickness should be seven millimeters. It has won positive feedback from owners largely due to its quality and increased level of strength as part of the tuning parts.
To do the work yourself, you will also need vinyl leather, wooden blocks with a cross-section of 2x2.5 centimeters and one tube of epoxy glue. Before you start processing plywood, you must first create a cardboard template. For this, cardboard material with good strength is used. Each mark must be transferred to the plywood. You can make adjustments before cutting the holes and shaping them into the desired shape. The phrase “measure twice, cut once” perfectly fits the description of this stage. After perfectly copying the applied dimensions, you can pick up a jigsaw and begin to carefully cut out the console structure along the contours.
Hollywood beard as a full variation
There is a softened version of the Russian one - the Hollywood beard (also known as “bretta”). It was very popular among Hollywood actors of the 1930s, which is where it got its name. This beard style, just like the full one, requires abundant hair on your face. But the Hollywood beard requires more care.
It differs from the Russian in its modest size (maximum a couple of centimeters) and the absence of sideburns. If you decide to choose a similar style, just use the instructions for cutting a full beard. But in this case, use a trimmer to lower the hairline on your cheeks to the level of your chin.
Important points
- Before removing wires and connectors, it is recommended to mark them to make reassembly easier. It is convenient to apply these marks with a black marker or felt-tip pen (because most of the connectors under the dashboard are white).
- You need to carefully remove the upper part of the steering column protective cover, as you can damage the rubber ring on the ignition switch (it gets caught on the edge of the cover and breaks easily).
- When removing the additional panel, do not tilt the screwdriver too much: the clamps that hold this panel are plastic and break very easily.
As can be seen from this article, removing the dashboard on a VAZ 2107 is a labor-intensive task, but it is doable. The main thing is to adhere to the instructions outlined above and not to use too much effort when removing: the panel material, despite its apparent strength, breaks quite easily.
If you find an error, please select a piece of text and press Ctrl+Enter.
We recommend reading:
Similar articles
Similar articles
Privacy Overview
This website uses cookies to improve your experience while you navigate through the website. Out of these cookies, the cookies that are categorized as necessary are stored on your browser as they are as essential for the working of basic functionalities of the website. We also use third-party cookies that help us analyze and understand how you use this website. These cookies will be stored in your browser only with your consent. You also have the option to opt-out of these cookies. But opting out of some of these cookies may have an effect on your browsing experience.
Necessary cookies are absolutely essential for the website to function properly. This category only includes cookies that ensures basic functionalities and security features of the website. These cookies do not store any personal information.
Radio tape recorder
No upgrade of the “six” is complete without installing a speaker system or at least a simple radio. A standard place for a radio receiver in the beard of a small-sized “six”. It should be trimmed to standard 1DIN. This can be done with a metal file. Then sand the edges with sandpaper.
Installing a radio
The radio tape recorder is attached to the beard using a metal case. Radio installation steps:
- Having bent all the tabs, use special spatulas to remove the radio from the case.
- The metal base is inserted into the prepared hole.
- We fix it using special tongues.
Cables are included to connect the player. The most commonly used are:
- black - “earth”;
- red and yellow (often wound together) - ignition “+”;
- blue - power for the active antenna;
- white - front left (FL) speaker;
- gray - front right (FR) speaker;
- green - rear left (RL) speaker;
- purple - right rear (RR) speaker.
Transforming old drawers
Long cracked and shabby chests of drawers are considered an excellent material from which you can make stylish furniture for your home. For a clear example, you should study numerous photos of consoles. You can build unique products with your own hands from standard wooden boxes. To make furniture you will need:
- Boards for the frame.
- Two plywood boxes.
- Screws.
- Primer.
- Screwdriver and drill.
- Sturdy board.
- Dye.
- Circular.
- Wood glue.
- Furniture clamps.
First of all, the craftsman needs to sand the drawers and coat them with paint. Using a circular saw, you need to make the necessary parts and frame. The blanks are fastened with screws and glue. All irregularities are carefully filled with putty. After complete drying, the product is coated with primer and paint. Boxes are placed on top of the frame and secured with glue and self-tapping screws.