What car enthusiasts don’t do to make their car more convenient and unusual. Some car owners spend a lot of money on professional dashboard tuning. And some craftsmen prefer to do it themselves. This kind of tuning is quite easy to do. In order to replace conventional light bulbs with light-emitting diodes (LEDs), you do not need to have special knowledge or skills. We’ll tell you how to make LED backlighting for the instrument panel in a car with your own hands.
A well-lit dashboard is not only more informative at night, but also has a better view
How to make dashboard arrows backlit
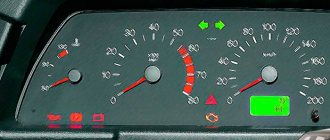
The color of the speedometer and tachometer needles is important.
If they are white, then you can leave them as is. But if not, then you need to use a knife to remove the old paint and treat them with alcohol, then paint them with white varnish or regular paint.
The color of the arrow should be white, because only it conveys the entire gamut of LEDs.
You can try and highlight the arrows separately. This requires LEDs with a diameter of 3 mm at 12 V.
Important! In the car network, the voltage is 12 V; if the LEDs are designed for a lower value, then they cannot be connected directly. They should be connected via a stabilizer
If the diameter of the LEDs is larger, you will have to make additional holes for them.
It is recommended to place LEDs either along the entire scale or opposite those values near which the arrow is most often located.
Schemes for smooth switching on of the backlight
To smoothly turn on the backlight of the scale and arrows, you need to spend a little effort, and more specifically, re-solder the circuit.
Below are two diagrams, in the first case - the dashboard, and then - the arrows. The circuits can be implemented on small pieces of a circuit board, which are sold in radio parts stores.
Consider one important factor: if the LEDs differ in power, they will not light up at the same time, some ahead of time, others late, but in general the backlight will turn on smoothly. This also applies to the LEDs on the scale.
Why LED lighting is preferable
At the moment, there are a variety of products on the lighting market that can be used to illuminate any brand of car.
Industrial dashboard lighting
But in most vehicles such additional lighting is absent or incomplete. This situation is especially relevant for older models that were manufactured at a time when LED backlighting had not yet been heard of. When choosing an LED type of lighting, car owners are guided by the following positive aspects of such lighting:
- diodes of this type have small dimensions, which allows them to be installed anywhere on the dashboard. At the same time, they are easily massaged;
- simple soldering of LEDs for different connections between them. Moreover, if the LED strip is re-soldered, then this procedure is carried out according to certain rules, which are also typical for working with individual diodes;
- even a small number of diodes installed on the panel can create a full-fledged type of lighting, sufficient for comfortable driving;
We collect
When everything is ready, we begin to slowly assemble the console. First of all, we install the substrate. Apply sealant to the back side and glue it to the panel.
Then we put the arrows and protective glass in place. After modernization, the instrument panel looks bright and unusual.
LED lighting not only looks unusual and bright, but is also a good addition to the car in terms of economy, which helps save battery power, since LEDs consume 80% less energy than a regular light bulb.
Advantages of LED lighting
The modern automotive market offers users a huge number of different types of lighting sources that can be used for car tuning. It must be taken into account that not every car needs this, since most manufacturers today equip cars with diode lighting during production.
Photo gallery “Different dashboards”
1. Tidy with LED lighting
2. Tidy with conventional backlight However, in many cars, the backlight of the speedometer and other elements of the tidy is not as effective as we would like, so car owners decide to change it. In particular, this is especially true for older vehicles produced when LED lighting was not as common. Why many car enthusiasts choose LEDs:
- Due to the small size of the light sources themselves. This makes it possible to install a light bulb anywhere on the control panel.
- Easy to solder diode components together for their further connection. But you need to take into account that if you are dealing specifically with a diode strip, then to perform this task you should follow some rules.
- The ability to achieve full illumination even with the use of a limited number of diode elements.
- One of the main advantages is that the car owner can organize both regular white and colored lighting. You can use yellow, red, green, blue light sources. In addition, if one of the components fails, it can be easily replaced if necessary.
- Diode lamps consume significantly less electricity. This is especially true for cars with anti-theft systems that operate on a battery (the author of the video is the MrMacyuk channel).
Why do you need additional lighting?
Today, car tuning is carried out not only outside, but also inside its interior, and there is no better place than the dashboard. Diodes built into the panel will allow you to achieve the following positive aspects:
- give the dashboard a new unusual look;
- High-quality illumination of important elements of the dashboard;
- make additional lighting for the vehicle interior;
- make your car ride more comfortable;
- improve road safety. When the instrument panel is well lit, all the indicators are clearly visible on it, which allows you to correctly assess the position of the car on the road and not violate the rules of the road with your driving.
The easiest way to illuminate such an element of a car as the dashboard is to install diodes in it. The following types of LED products can be used here:
separate diodes. Using them as backlight, you can create full or decorative lighting for the dashboard. It is worth noting that LEDs can glow in different colors. Therefore, such LED lighting can beautifully complement external tuning, glowing with it in the same color scheme;
Note! Additional lighting of the dashboard created with the help of such diodes allows them to be built into almost any part of the board. As a result, the lighting will fully meet the car owner’s requirements and provide illumination where it is really needed.
Diodes
LED Strip Light. This tape is very often used as decorative lighting not only for a car, but also for home premises or street elements. It can be easily replaced with another, which will allow you to change the boring color scheme to a new one. The LED strip has a self-adhesive base, with the help of which its installation by hand is quite easy and quite quick.
LED Strip Light
Despite the ease of working with LED strip, diodes are most often used to illuminate a car dashboard. This choice is associated with certain advantages of using this type of lighting.
Organization of backlighting of stove control buttons
The second most popular situation in organizing the lighting of the dashboard in a car is the illumination of the stove control buttons.
Stove control buttons
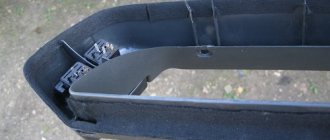
Foil reflector
The organization of the backlight of the console buttons intended for controlling the stove is carried out as follows:
- First, remove the handles, as well as the glass from the control unit;
- We make a reflector out of foil. It will need to be secured under the removed glass;
- then carefully unscrew the lower part of the console. Under it there will be a cartridge with an old light source, which must be replaced;
- replace the old light bulb with an LED;
Note! You can install an LED strip under the bottom of the console. Thanks to its self-adhesive base, it will easily take the required position. In this situation, it will be connected with its wires through the cartridge. The main thing here is to maintain the polarity of the wires, otherwise the LED strip will not light up.
- After installing the LED, return all parts of the console to their original place in the reverse order.
Ready-made console lighting
The simplest way to create backlighting involves the following manipulations:
- take the button out of the console;
- we disassemble it into its component elements;
- inside such a button there should be a light bulb that changes to an LED;
- if necessary, you can remove the light filter from the button or combine it with a new diode glow. As a result, you can get a new beautiful and unique shade.
As you can see, illuminating the console designed to control the stove in a car is quite easy.
Why LED lighting is preferable
At the moment, there are a variety of products on the lighting market that can be used to illuminate any brand of car.
Industrial dashboard lighting
But in most vehicles such additional lighting is absent or incomplete. This situation is especially relevant for older models that were manufactured at a time when LED backlighting had not yet been heard of. When choosing an LED type of lighting, car owners are guided by the following positive aspects of such lighting:
- diodes of this type have small dimensions, which allows them to be installed anywhere on the dashboard. At the same time, they are easily massaged;
- simple soldering of LEDs for different connections between them. Moreover, if the LED strip is re-soldered, then this procedure is carried out according to certain rules, which are also typical for working with individual diodes;
- even a small number of diodes installed on the panel can create a full-fledged type of lighting, sufficient for comfortable driving;
LED glow
This type of lighting consumes a minimal amount of electricity, which is very important for a battery-powered car and its alarm system. At the same time, installing diodes is not very difficult
Here you only need to correctly connect the elements of the lighting system to each other. Almost anyone can do this kind of work with their own hands.
At the same time, installing diodes is not very difficult. Here you only need to correctly connect the elements of the lighting system to each other. Almost anyone can do this kind of work with their own hands.
Operating procedure
Replacing the backlight on a VAZ 2114 begins with purchasing a set of LED lamps in the color you need. On the instrument panel, there are several sensors and indicators that require a certain number of diodes to ensure their normal visibility for the driver, especially at night. Therefore, before buying a set of lamps, calculate the required number of LEDs for each device. For example, a brake sensor requires 3 bulbs.
Location of light bulbs on the dash
It is advisable to buy with a reserve, at least 5 - 10 lamps more. Since, during installation, you can damage one of the circuits and the LEDs will not work. This often happens to those who are doing this work for the first time.
You need to start work by removing the instrument panel, as well as turning off the resistance. Next, carefully remove the old backlight bulbs from the factory sockets. On the reverse side of the VAZ 2114 panel, there are special sockets designed for installing LED backlight bulbs.
After the old backlight is removed, carefully grind off the heads of the LED lamps to the required size. If this is the first time this work is being done, then you will most likely need spare diodes. Next, when the heads are prepared, they need to be installed on the instrument panel. Replacement of light bulbs must be carried out strictly according to the same polarity as in the standard version. After the diodes are in place, they need to be secured. Do not under any circumstances use screws for this. Scotch tape is also not suitable for this type of thing. When choosing a fastening element, you need to assume that it will heat up a little. Silicone glue is ideal for this. It will not damage the surface of the panel, thanks to its soft consistency, and will securely secure the light bulbs in the sockets.
Now, you need to check the quality of the work done. To do this, without putting the panel in place, turn on the ignition and look at the result. If everything works as it should, then the replacement was made correctly. If there are any inconsistencies, then you most likely have violated the polarity of connecting the backlight bulbs on the VAZ 2114. To fix the problem, you will need to find the connection diagram and double-check whether all the bulbs are in their places. If, after turning on the ignition, the backlight does not light up at all, then you need to check the integrity of the wires. The wires installed on diode lamps are quite thin and can easily break under the insulation or even break completely. So, be careful when handling them.
When you have made sure that all the light bulbs on the VAZ 2114 are working correctly, you can begin assembling the panel. To do this, all the backlight wires are brought out onto the board and carefully attached using a soldering iron. They should also be attached to the board in a certain sequence, otherwise the backlight may not work. If the wires are too long, they should be shortened so that they do not bend and do not fall into the grooves of the latches between the dashboard and the dashboard during installation. Otherwise, the wires will easily get damaged.
When connecting the pointer drive, also make sure that they are not deformed. Now, the instrument panel can be inserted back into the grooves and fixed with screws. The indicator arrows must be set with the ignition off, at the zero mark. Next, the last check: turn the ignition key, and if everything works, then the replacement procedure was completed correctly, and the new backlight will please the eye. Well, if something doesn’t work, then most likely you damaged the wires when installing the panel on the dashboard. In this case, disassemble everything again and check the integrity of the wires.
Instrument panel tuning price
The cost of parts may depend on what you want to get as a result. For example, an LED strip 10-15 cm long will cost about $1-2, but if you take color film, then the costs are less, or you can even find something similar at home in the garage.
As for the display instead of the instrument panel, for the same VAZ 2114 it will cost $300-400. But still, again it all depends on the modification, the installed software and the set of additional functions of such an instrument panel. On average, replacing the entire panel takes a couple of hours.
Video interactive display on VAZ 2114:
Instructions for replacing the backlight
So, if you decide to change the color of the control panel lighting, then first of all you need to go to the store and buy diodes or LED strip.
- First of all, disconnect the terminals from the battery.
- Sit behind the wheel of a car, move the seat back, if possible, lower the steering wheel.
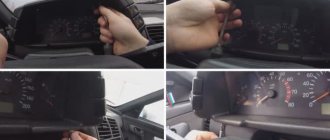
- The next step will be to remove the tidy itself. The dismantling process will be individual for each car, so at this stage we recommend using the service book for setting up and operating your car. It should describe in detail all the nuances of this process. But in general, this procedure usually does not cause difficulties for car enthusiasts - you just need to unscrew the bolts or disconnect the clamps, and then disconnect all the wires connected to the device.
- Then the glass is detached or peeled off. If it is fixed with glue, then a hairdryer may be required to unstick it; you should treat the tidy around the perimeter with hot air.
- When the glass is disconnected, you can check the functionality of existing lighting sources using a tester. Of course, this is necessary if you are just replacing burnt out bulbs and not all LEDs. Now we change the lamp itself - for this, first of all, the base is dismantled - it can be unscrewed by hand or with pliers, counterclockwise. This procedure is repeated in a similar way with all other light sources.
- If the light bulbs themselves are soldered to the device, then you will need a soldering iron to remove them. Unsolder all light sources one by one. In this case, you need to be very careful, since when changing the backlight and replacing lamps, you can accidentally damage the tracks on the panel.
- When all light sources are sealed off, the procedure for installing new diodes is performed. Now you just need to solder them into the seats and check their functionality.
Price issue
The cost of diode light bulbs today averages from 20 to 150 rubles per piece, depending on the type and manufacturer. As for the tape, its average price is about 100-200 rubles per meter.
Replacement instructions
The procedure for replacing dashboard lamps is not particularly difficult. The only problem may be disassembly, which allows you to remove the backlight panel and get to the light bulbs. The difficulty is that the fastening screws are located at different points, and you need to know their location. Let's consider the process in order:
Required Tools
To replace the light bulbs in the dashboard you will need:
- a screwdriver with a cross blade;
- a flat-head screwdriver, preferably with a thin blade for unsnapping plugs and fasteners;
- pliers for dismantling cartridges;
- set of replacement lamps.
A small number of necessary tools makes the work convenient and fast. If you plan to make a small tuning - changing the color or brightness of the backlight, then additional devices will be required to remove the factory paint, dismantle the plastic filters and a solvent to clean the remaining paint layer on the back of the instrument panel.
Replacing the backlight
To obtain an even backlight, it is recommended, if possible, to change all the dashboard bulbs at once. Replacing one lamp can create a situation where after a week you will have to repeat the entire procedure in order to change another burnt out lamp. Therefore, experts recommend updating all the lighting at once. It is also advisable to replace incandescent lamps with LEDs - they are economical, have a wide range and provide a large selection of shade and brightness.
How to disassemble the dashboard
First of all, you need to remove the decorative trim from the radio. On the VAZ 2114, the dashboard is mechanically connected to this part, so you need to immediately disconnect it. After this, perform the following steps:
- Using a flathead and Phillips screwdriver, the decorative casing is disconnected. The steering column should be lowered as much as possible so that it does not interfere with the work. You will have to carefully snap off the decorative plugs and unscrew the 5 screws securing the casing. You also need to remove the handles from the sliders and the heater switch;
- After disconnecting the screws, the casing must be pulled towards you. You should act carefully; perhaps not all elements have been removed yet and they can be broken. You don’t have to completely remove the casing; there’s enough room to unscrew the mounting screws;
- To disconnect the dashboard you need a long Phillips screwdriver. Unscrew the screws, tilt the shield towards you and pull out the terminal blocks with connecting wires.
Replacing backlight bulbs
To dismantle the cartridges, it is convenient to use small pliers. They grip the flat back. It is carefully turned half a turn counterclockwise, after which the assembly can be removed from the socket. In a similar way, all elements to be replaced are extracted. Then the lamps are removed and new copies are installed in their place. Insert the cartridges into the sockets and turn them half a turn clockwise to secure them. After this, it is recommended to connect the terminal blocks, apply operating voltage and check the functionality of the light bulbs until the casing is assembled. The vehicle systems are checked:
- turn on the ignition and check the operation of the oil pressure, generator and check indicators. Raise the handbrake lever and see if the lamp lights up;
- trigger an alarm to check;
- switch the high and low beam of the headlights and determine whether the indication works;
- include dimensions.
If all elements of the lighting system are operating normally, reassemble the dashboard in the reverse order. This completes the process of replacing the VAZ 2114 dashboard bulbs.
Recommendations
- As a rule, when replacing instrument backlight bulbs, many owners want to obtain high clarity and brightness. Please note that if the lights on the dashboard are too bright, this brightness is sufficient on a sunny day. However, at night the panel may glow too brightly, making it uncomfortable to look at the instruments. The result is high eye fatigue and difficulty reading information in the dark.
- To get maximum comfort, it is better to immediately install an additional brightness control in parallel with the diode lamps. This will make it possible to adjust the brightness of the instrument panel illumination. To change the brightness, you need to connect the backlight through a variable rheostat. This solution will allow you to adjust the intensity of the glow taking into account different conditions. Typically, such regulators are on sale in the same place where the diode backlight bulbs themselves are sold. It is important to determine in advance where these regulators will be installed.
Let us also add that if it is necessary to replace the lighting of other elements (for example, on the center console, in the climate control area, etc.), the procedure for replacing lamps is practically no different. The main thing is to disassemble the panels and gain access to the old lamps to dismantle and replace them.We also recommend reading the article on how to make car soundproofing yourself. From this article you will learn which “Shumka” is better to choose for a car, how to apply sound insulation, etc.
- The price of diode light bulbs today is quite low, and the choice is quite large. The same can be said about diode strip. At the same time, you should not save much; it is better to opt for medium or more expensive options from well-known manufacturers. As a rule, the service life and operating efficiency of high-quality products are much higher than their cheap counterparts.
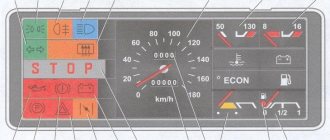
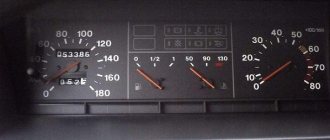
Dashboard lamps
The dashboard provides the driver with a lot of useful information that allows him to monitor the condition of the car, the driving process, diagnose breakdowns in a timely manner and correct them. So, the panel light comes on for the following reasons:
- The battery is not charging.
- For one reason or another, the handbrake is stuck.
- Not enough fuel in the tank.
- The oil pressure has decreased (which indicates the need to urgently stop the engine to avoid more serious consequences).
- Excess water in the filter. To prevent water from entering the pump, which could lead to damage, you need to drain excess water from the filter.
- The fuel system is malfunctioning.
- There was a failure in the propulsion system and much more.
We recommend: What are the main reasons for engine overheating on a VAZ-2109
As you can see, the panel lamps allow you to determine what is wrong in the car; if the lamps themselves fail, then you can miss a very important breakdown, which can even lead to an accident
This is why it is so important not to delay replacement (lamps cannot be repaired)
Today, the car market offers a wide range of lamps for the control panel, ranging from the standard version, which is cheaper but also has average characteristics, to modernized versions that give the panel, and therefore the entire atmosphere of the car, a different, more expressive atmosphere.
Professionals also advise replacing standard lamps with LEDs, which largely decorate the panel.
So, we list several of the currently most popular options suitable for the VAZ 2114.
- LED lamps Sho-Me SM-T5 (blue, white and red). Country of origin: Korea, price: 80 rubles. for a couple.
- High-brightness SMD LED module – 20 rubles.
- LED Sho-me SM-T5-cap-super (white) – 50 rub.
- Halogen lamps from Osram and Philips cost approximately 40-80 rubles apiece.
As you can see, prices for lamps are not high. It is worth noting that replacement takes very little time, which we will talk about later.
We change the dashboard lighting in a VAZ to any color
The new dashboard lighting in the classic folk car VAZ adds sophistication and a sense of comfort to the interior. Installing neon or even LED illumination on a car requires a lot of money for such an expensive pleasure. The best way to solve the problem is to replace the dashboard backlight yourself. The process of replacing the lighting in your garage, firstly, is not complicated, and secondly, it requires less money. One of the options for tuning your car is a special overlay for the dashboard, but this will cost a lot. It will be better if you do the tuning of the instrument panel yourself.
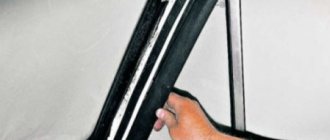
To complete the job you need to be patient, as well as the tools and necessary materials. The first step in creating perfection is disassembling the dashboard. To do this, you need to remove the protective glass of the devices. The next step is to remove the arrows from the instruments. To avoid damaging the arrows made of fragile material, before removing the arrow with a screwdriver, place several layers of cardboard under the opposite end of the plastic. Using a little force, gently remove the arrow from the axis. Similar actions need to be done with the remaining arrows.
The dashboard backing is also very easy to remove. To remove it, you need any stationery knife. The edge of a knife is inserted between the panel and the substrate, and then we cut a layer of sealant around the perimeter of the substrate. After removing the protective glass backing, we proceed to further work on tuning the panel.
A light filter is placed on the surface of the dashboard under the backing, which evenly distributes lighting over the entire area of the panel. This light filter must be removed using a utility knife, carefully scraping off the light-conducting layer.
A light filter is a special paint that is applied to the back side of the dashboard substrate and provides color illumination for numbers and other information indicators. After rough processing of the substrate, the places where the light filter was applied must be treated with acetone or alcohol. The reagent will remove any remaining paint, as well as degrease the surface and prepare it for the next treatment process.
At the next stage of work, you will need to change the dashboard lighting. First you need to “get your teeth into it,” so to speak, and change the odometer backlight. An odometer is an indicator of the distance traveled by a car, measured in kilometers or miles. In order to install a new odometer backlight, you must first remove the odometer screen, remove the blue protective film, remove the old backlight bulb and replace it with a new LED. For the new dashboard lighting, you can use a multi-color LED, which has the ability to change colors at the user’s request. The LED is connected to the standard light bulb socket, then we put the odometer screen in its place.
The next step is to completely replace the dashboard lighting. We attach new LEDs to the instrument panel frame. The multicolor LEDs that we are installing in this case are sold complete with a color switch. If your budget is limited, you can avoid using multi-color LEDs in favor of regular ones. We install the LEDs on the seats and connect them with the standard contact of the previous dashboard lighting.
The speedometer and tachometer arrows must be able to change the backlight. Carrying out such an operation will require removing the old paint from the arrow. In order for the paint to be easily removed, you must first remove it from the surface with a stationery knife, and then go over the surface with acetone or industrial alcohol. When the arrow is clear of paint, you can paint it with white nail polish or something else. The main thing in this process is that the arrow is exactly white, since only white color can convey the entire range of LEDs.
If you have installed multi-color LED lighting on the dashboard of your VAZ car, you need to install a color switch to be able to select the color of the dashboard lighting. It is recommended to install the switch in the lower right corner of the dashboard. When all the work has already been done, you can begin the final assembly of the finished panel.
The first step is to start by installing the underlay. We apply a layer of sealant to the back side of the substrate so that it adheres firmly to the base. Next, we install the instrument arrows in their places and cover the structure with protective glass.
Thus, without much expense, we made an elegant dashboard for a VAZ car on our own. And you can choose the color of the glow yourself...
Disassembling the console
Initially, you need to disassemble the dashboard: remove the protective glass, then the arrows, but keep in mind that they are very fragile, and in order not to damage them, it is better to slip thick paper under the screwdriver; it does not require much effort.
And to remove the dashboard backing you will need a knife, with its help you need to cut through the layer of sealant around the entire perimeter.
After removing the “cover”, use a knife to carefully scratch the filter; it is a special paint. Then degrease this area with acetone or alcohol.
Why do you need additional lighting?
Today, car tuning is carried out not only outside, but also inside its interior, and there is no better place than the dashboard. Diodes built into the panel will allow you to achieve the following positive aspects:
- give the dashboard a new unusual look;
- High-quality illumination of important elements of the dashboard;
- make additional lighting for the vehicle interior;
- make your car ride more comfortable;
- improve road safety. When the instrument panel is well lit, all the indicators are clearly visible on it, which allows you to correctly assess the position of the car on the road and not violate the rules of the road with your driving.
The easiest way to illuminate such an element of a car as the dashboard is to install diodes in it. The following types of LED products can be used here:
separate diodes. Using them as backlight, you can create full or decorative lighting for the dashboard. It is worth noting that LEDs can glow in different colors. Therefore, such LED lighting can beautifully complement external tuning, glowing with it in the same color scheme;
Diodes
LED Strip Light. This tape is very often used as decorative lighting not only for a car, but also for home premises or street elements. It can be easily replaced with another, which will allow you to change the boring color scheme to a new one. The LED strip has a self-adhesive base, with the help of which its installation by hand is quite easy and quite quick.
LED Strip Light
Despite the ease of working with LED strip, diodes are most often used to illuminate a car dashboard. This choice is associated with certain advantages of using this type of lighting.
Replacing the instrument panel with a new one
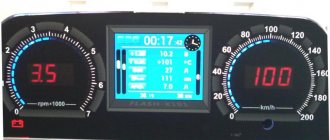
As we previously recalled, in addition to the suggested methods, there is also the most expensive, but also the highest quality option, which is a complete replacement of the instrument panel. Nowadays, instrument panels that are based on a large display instead of analog instruments are in fashion.
Even on domestic cars you can install such a miracle and the panel will take on a modern look. When choosing, it is worth remembering all the parameters of your car, since even different engines can play a role in the choice. Such a panel allows you to completely customize the devices to your taste, their location, lighting and other parameters. In a word, do everything to the driver’s taste. Below we have provided a video example of the operation of such an instrument panel on a VAZ 2114 car.
This technology is based on a large display covering the entire instrument panel, a minicomputer based on Android and a set of devices, Wi-Fi, Bluetooth.
Such a replacement is usually short-lived, but expensive, so first you should think about whether you need it or just for beauty.
How the arrows are illuminated
Very often, a car needs backlighting of the dashboard arrows.
Instrument needle illumination
In a situation where it is necessary to install diode lighting of the arrows on the dashboard, the following manipulations must be performed:
- We clean the paint of the arrow on three sides. The paint is stripped from the bottom of the arrow and on its sides;
- After this, the cleaned surfaces should be painted over with a white clerical touch or white nail polish. You can also use regular white paint, but it will be a little more fiddly;
Filled speedometer needles
- after that we take three LEDs. They need to be soldered together in series;
- The soldered LEDs should be placed in the dashboard. You first need to drill holes in it for installing diodes and masking wires.
After that, they are connected to the power source and your arrow glows in the shade of what color the LEDs were selected. Some craftsmen backlight the needle in such a way that it can change color depending on changes in the speedometer readings. To organize such illumination, you need to use diodes of three different colors:
- green;
- red;
- blue.
These colors are standard. Remember that for each arrow you need to use three diodes in the sequence in which you want to get the glow. Thus, the luminous flux will be sufficient for high-quality illumination of the metric part of the device.
Finished arrow illumination
Typically, green is used for minimum indicators, and red for maximum indicators. Diodes should be placed under each arrow in its circle of movement.
Do-it-yourself overexposure of buttons on a VAZ 2114
Replacing the standard button backlighting on a VAZ 2114 will require the preparation of certain tools, materials, as well as some time. To work you will need the following list of necessary things:
- soldering iron with a thin tip;
- solder;
- tweezers;
- small knife or flat screwdriver;
- LED elements of the desired color.
Which LEDs and in what quantities should I buy?
The buttons installed on the dashboard of the model in question come in old and new styles. In the first case, small light bulbs or LEDs are used as a backlight element, and in the second, boards with sealed SMD LEDs are used.
Bulbs, LEDs and SMD elements can be used as backlighting elements in buttons.
Each button is equipped with two LED elements: one is responsible for illuminating the button itself, and the second indicates the activation of a particular function. The exception is the low beam headlight button - it does not have a power indicator LED. Therefore, if you plan to replace the LEDs on all five buttons, you will need to purchase 9 backlight elements. The type of the latter can be determined only after disassembling the button. The old model requires 12 V LEDs with a diameter of 3 mm. The new sample uses elements marked 0805. When using standard LEDs, it is recommended to additionally install a resistor with a resistance of 500 Ohms to 1 kOhm along the power circuit (directly in the button), which will prevent the element from burning out.
To prevent the LED from burning out, it is recommended to install a resistor in series
How to remove buttons
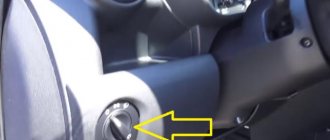
To remove the buttons on the front console, do the following:
- Remove the negative terminal from the battery.
- We take out the plug of the on-board computer or the BC itself, if it is installed. To do this, just hook it with your finger and pull it towards you.
- We put our hand into the hole formed and feel the back of the buttons.
- Carefully press the buttons out.
- We remove the blocks with wires.
- Having completed the necessary actions with the buttons, install them in the reverse order.
Replacing the backlight of the front panel buttons
Since replacing LEDs on old and new button versions is somewhat different, each process should be considered separately.
Overexposure of old-style buttons
After removing the buttons from the instrument panel, perform the following sequence of actions:
- Pull the top of the button and remove the lid that is pressed.
- Insert a flathead screwdriver into the button and remove the inner part. You need to remove it carefully so as not to lose the springs.
- Use a multimeter to determine the polarity of the LEDs.
- We bend the leads and dismantle the LED element.
- We bend the leads of the new LEDs and insert them into the button body, observing the polarity, after which we shorten the leads with side cutters to the required length.
- Reassemble the button in reverse order.
Overexposure of new buttons
On modern buttons we change the LEDs this way:
- We disassemble the button, as in the previous paragraph.
- After opening we find a board with installed LEDs. We determine the polarity of the elements and solder them with a soldering iron with a thin tip.
- In their place, we carefully install new SMD LEDs of the desired glow color.
- We reassemble the button.
Installation should be carried out in a bright room
To remove the panel, you need to lower the steering wheel to the “down” position, unscrew two self-tapping screws holding the decorative insert, which is then removed. After unscrewing the 3 panel screws, it is also disconnected after disconnecting the two cables. Now the instructions will be described step by step:
- The protective panel, secured with latches, is removable.
- After removing the decorative panel, the arrows must be taken beyond the limiters. This is done before the stopper of the internal motors. Then the position of the arrows is noted - and you can begin to remove them.
- The arrows are removed with tweezers, applying force to lift them up.
- The graphics are removed with smooth pulling movements from both angles. To avoid damaging it, remove it carefully and slowly.
- After lifting the display, the light-guide plastic underneath will be exposed. It is necessary to remove the sputtering, the clamping light guides themselves, and the temporary pimps. The pimps must be pulled out by pulling them towards you and keeping the spring connecting them.
- The following circuit board has two easy-to-open clamps. Below it is the desired object of the entire work.
- Sprayed graphing must be carefully cleaned with a knife, as it is not washed off with thinners.
- Now it’s time to mark the base for the LEDs and drill holes in the transparent light guide glass.
Please remember the polarity of “+” and “-”. The fact is that a resistance of 270 Ohms is perfectly suitable for 3 diodes - this is how the panel is assembled and soldered.
Preparing the LEDs and the dismantled dashboard
- Now you should solder the negative wire, and transfer the positive wire through the potentiometer, respectively, welding it to “+”.
- In order not to separately solder diodes to the caps of turning and fog lights, you can purchase diodes and mark them in the right places. The issue with the air conditioner is solved in a similar way, but only after preliminary drilling the plastic and immersing the resistor and diode into it.