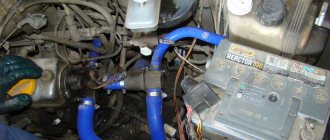
Hello to all subscribers! One of the common situations that happens, usually unexpectedly, is that the usual buzzing of the electric fuel pump in the rear of the car is absent when the ignition is turned on. As a result, the car engine refuses to start. I present an algorithm of actions if such a disaster suddenly happens. To begin with: photo 1 shows a fragment of the electrical circuit of the fuel pump.
Attention, working with electrical equipment is dangerous. If you are unsure, seek the help of a qualified professional.
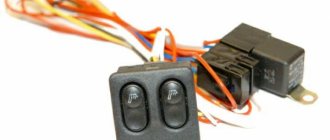
First of all, the driver should first remove the side console on the passenger side (there are 3 relays with fuses there). Our electric fuel pump relay is the lower one. (Some cars from 2007 have 2 relays, but the fuel pump relay is the top one - see the repair manual). Directly above the bottom relay is our fuse. The first step is to make sure that this fuse is working properly (photo stage 1).
If the fuse is working and its contacts and its connector are not oxidized, then you need to make sure that the relay is working properly. You can immediately install a known-good relay and turn on the ignition. If the situation is corrected, then install the side console and have a good trip. If nothing has changed, then it is necessary to determine where the problem arose. To do this, you need to have a voltmeter or multimeter or a probe. But we will not determine the voltage value with a probe, and in this situation you need to know the voltage value - I’ll tell you why later. The second step (photo step 2) is to determine whether there is control voltage at the fuel pump relay. We connect the multimeter, turn on the ignition and determine the voltage value. If there is no voltage, then there is an open circuit coming from the main relay or from the ECU. If there is tension, then move on.
Stage 3 (photo stage 3) is to determine whether the power goes further directly to the fuel pump itself. If the power does not come out, the culprit is most likely the relay due to possibly burnt contacts. If the voltage goes away, but its value is 10 volts, then most likely the relay contacts are also burnt. At this voltage, the pump motor will not start. We change the relay and check. If the power goes further and its value is 12 Volts, then the culprit is the wires going to the electric motor of the pump or the pump itself.
Checking the fuel pump Lada Kalina/Granta
If after turning the ignition key there is no buzzing sound from the fuel pump, then the first thing to check is the fuel pump fuse and relay. In the Lada Kalina and Lada Granta mounting block, the fuel pump fuse is F21 (15A), and the fuel pump relay is K12. If the fuse is good, do the following:
- Turn on the ignition
- Remove the fuel pump relay
- Apply +12V to pin No. 11 of the diagnostic block, or place a jumper between 87 and 30 relay pins
- Check by ear that the fuel pump is turned on
If the fuel pump does not turn off, then check:
- Wiring and contacts between the fuel pump and the diagnostic block/fuel pump relay. To do this, check the voltage at the fuel pump chip using a test lamp or multimeter.
- There is no connection between the fuel pump and the vehicle ground. Apply the mixture to the fuel pump (located under the rear seat).
- The fuel pump is faulty. To check it, apply +12V directly to the contacts of the fuel pump (Attention! Remaining gasoline may ignite from a spark!).
In rare cases, the fuel pump does not work due to:
- ECU (controller) malfunction
- alarm malfunctions
General diagram of electrical equipment of Kalina
On the electrical circuit of the Lada Kalina model, the pinout of connectors is carried out in several stages. According to the factory drawings, the general position of the elements is initially revealed, then each node is deciphered separately.
- Right front headlight assembly.
- Sensor indicating the position of the hood lock.
- Powering the horn.
- Starter terminal block.
- Battery power cables.
- Generator working unit.
- Voltage supply terminal for the wiper drive.
- Left head optics contact block.
- Right door lift chip.
- Likewise for the glass lift gearbox.
- Output to driver's door speaker.
- Driver's door lock drive.
- Windshield washer reservoir motor.
- Overboard temperature meter sensor output.
- Standard ECM connection connector.
- Same as 12 for the front passenger.
- Indicator of the remaining brake fluid in the expansion tank of the system.
- Same as 11 for the front passenger.
- The front passenger door power window switch, located in the driver's control unit.
- Driver's door window lift key.
- Lock button.
- Power supply for the lift gearbox for the front passenger door.
- Input of the mounting assembly.
- Anti-theft control unit.
- Likewise for signaling.
- Pinout on the dashboard.
- Right turn.
- Glove compartment lighting.
- Glove box light switch.
- Stop key switch.
- Anti-theft ignition switch terminal.
- Headlight design.
- Supply current to the steering column lever connector.
- Left turn signal.
- Right rear speaker block.
- Rear right door electric lock drive.
- Window window heating unit.
- Reverse blocking.
- Hazard breaker.
- Adjusting the stove fan.
- Auxiliary resistor for the stove.
- Stove motor.
- Power supply for rear left speaker.
- Rear left door lock terminal.
- Power supply for fuel pump and float.
- White reverse lamp switch.
- Stop button.
- Cigarette lighter power supply.
- ZX blocking – solenoid power supply.
- Chips for a tape recorder or speaker system.
- Illumination of used ventilation and stove.
- Supplying voltage and signals to the EUR.
- Interior lighting lamps.
- Rear right lampshade.
- Power to the trunk lid lock.
- Cargo compartment lighting drive.
- State license plate illumination.
- Auxiliary stop lamp.
- Directly heated windshield.
- Cargo compartment illumination lamp.
- Left stern light.
The following is the pinout of the first generation Kalina wires for each section individually. This was done due to the increased complexity of the main circuit, where all elements of the on-board circuits are indicated at once. An inexperienced user will not be able to navigate the generalized instructions.
Checking the fuel pump Lada Priora
On the Lada Priora, the fuel pump relay and its fuse are located in an additional mounting block near the left foot of the front passenger. The fuse is marked F3 (15A), and the relay is K2.
First of all, we check the fuel pump fuse, and if necessary, replace it with a similar new one. We check the wiring and the fuel pump itself in the same way as on Lada Kalina and Lada Granta cars (see above).
As a reminder, don't forget to change your fuel filter regularly.
- Why the fuel pump on the VAZ-2114 does not pump, and what to do
Keywords: power system Lada Granta | power supply system for Lada Kalina | Lada Priora power supply system
Share on social networks:
Found an error? Select it and press Ctrl+Enter..
Ignition system diagram Lada Kalina Lux
1 – oil pressure warning lamp sensor; 2 – coolant temperature indicator sensor; 3 – additional fuse block; 4 – fuses for the electric fan of the engine cooling system; 5 – electric fuel pump relay; 6 – relay for the electric fan of the engine cooling system; 7 – ignition relay; 8 – relay 2 of the electric fan of the engine cooling system; 9 – relay 3 of the electric fan of the engine cooling system; 10 – electric fan of the engine cooling system; 11 – throttle position sensor; 12 – idle speed regulator; 13 – coolant temperature sensor; 14 – diagnostic block; 15 – ignition system harness block to the instrument panel harness block; 16 – solenoid valve for purge of the adsorber; 17 – speed sensor; 18 – ignition system harness block to instrument panel harness block 2; 19 – mass air flow sensor; 20 – crankshaft position sensor; 21 – oxygen sensor; 22 – controller; 23 – rough road sensor; 24 – diagnostic oxygen sensor; 25 – ignition coil harness block to the ignition system harness block; 26 – ignition coils: 27 – ignition system harness block to the ignition coil harness block; 28 – spark plugs; 29 – nozzles; 30 – resistor; 31 – air conditioning system pressure sensor; 32 – blocks of the ignition system harness and injector wiring harness; 33 – phase sensor; 34 – knock sensor.
Ignition system wiring harness -11184-3724026-10. Ignition coil wiring harness -1118-3724148-00. Injector wiring harness -11184-3724036. A – to the “plus” terminal of the battery.
Kalina fuel pump connector pinout
Hello to all subscribers! One of the common situations that happens, usually unexpectedly, is that the usual buzzing of the electric fuel pump in the rear of the car is absent when the ignition is turned on. As a result, the car engine refuses to start. I present an algorithm of actions if such a disaster suddenly happens. To begin with: photo 1 shows a fragment of the electrical circuit of the fuel pump.
Attention, working with electrical equipment is dangerous. If you are unsure, seek the help of a qualified professional.
First of all, the driver should first remove the side console on the passenger side (there are 3 relays with fuses there). Our electric fuel pump relay is the lower one. (Some cars from 2007 have 2 relays, but the fuel pump relay is the top one - see the repair manual). Directly above the bottom relay is our fuse. The first step is to make sure that this fuse is working properly (photo stage 1).
If the fuse is working and its contacts and its connector are not oxidized, then you need to make sure that the relay is working properly. You can immediately install a known-good relay and turn on the ignition. If the situation is corrected, then install the side console and have a good trip. If nothing has changed, then it is necessary to determine where the problem arose. To do this, you need to have a voltmeter or multimeter or a probe. But we will not determine the voltage value with a probe, and in this situation you need to know the voltage value - I’ll tell you why later. The second step (photo step 2) is to determine whether there is control voltage at the fuel pump relay. We connect the multimeter, turn on the ignition and determine the voltage value. If there is no voltage, then there is an open circuit coming from the main relay or from the ECU. If there is tension, then move on.
Stage 3 (photo stage 3) is to determine whether the power goes further directly to the fuel pump itself. If the power does not come out, the culprit is most likely the relay due to possibly burnt contacts. If the voltage goes away, but its value is 10 volts, then most likely the relay contacts are also burnt. At this voltage, the pump motor will not start. We change the relay and check. If the power goes further and its value is 12 Volts, then the culprit is the wires going to the electric motor of the pump or the pump itself.
How I looked for the reason for the failure of the VAZ 2110 fuel pump
In the evening I drove into the garage, but in the morning I couldn’t start it.
Usually I turn on the ignition and hear the relay click and the pump hum, and after about 3-5 seconds the relay click is heard again and the pump goes silent and I turn the key all the way, the starter works but the engine does not start because there is no pressure in the power system, the pump does not pump . I'm looking for the cause of the fuel pump failure by checking the fuse, which is located
Under the side panel in the depths there is a fuse box, relay and ECU.
Relay and fuse box enlarged
First, I checked fuse number 3, took it out of the socket, inspected the condition of the contacts and checked the integrity with a device, the fuse turned out to be intact (by the way, 15 amperes)
this did not help, then I checked relay number 4. To do this, I unscrewed the nuts indicated by the arrows to remove the relay and install a known good one. Where can I get a working relay? You can remove the “high beam” relay in the mounting block for the duration of the check; it is exactly the same as the fuel pump relay. This did not help, I removed the rear seat under which there is a gas tank with a submersible pump.
Further opens before us
Before performing the above actions, I checked the power circuit (+)(-), i.e. The ground of the fuel pump at connector number 5 can be checked using the test lamp and the result is positive, I checked the continuity of the circuit on the pigtail at connectors numbers 4.6
It may happen that there is no power circuit (+) or (-) on connector number 5. If (-) i.e. ground does not reach the connector, you need to check the connection to the body. My power supply circuits are ringing.
The ground connection point is difficult to access; to get there you need to dismantle the upper and lower lining of the floor tunnel.
I checked the power circuits coming to connector number 4, and the fuel pump does not work, then I performed the above steps as shown in the figure, took out the fuel module with the fuel pump from the fuel tank. Removed the pressure ring and gasket
Carefully pulled the fuel module out of the tank a little, tilting it towards the right door of the passenger compartment so as not to bend the float arm of the fuel gauge sensor (FLS)
I disassembled the fuel module. Separately, I checked the pump directly from the battery. The pump is running. I checked the connectors and found the cause of the failure; it turned out that the positive contact of the connector (in the form of a pin) at the bottom under the casing was slightly burnt. I cleaned the contact (in the form of a pin) of the connector, but I couldn’t clean the other side of the connector.
I bought it complete with float.
I assembled the fuel module without installing it in the gas tank, checked it, it works. The pump must be installed with the arrow pointing towards the trunk. Installed and drove the fuel pump works fine.
Join the group and you will be able to view images in full size
Comments
Guests cannot leave comments on the site, please log in.
Products for LADA at the best price
A selection of accessories for LADA from AliExpress
Car : Lada Kalina. Asks : Igor MMM. The essence of the question : the fuel pump is not buzzing, what should I do?
Good afternoon. When I turn the key in the ignition, the fuel pump stops humming . The starter turns. But the car won't start. I raised the backrest, reached to the pump wires, there is no voltage there when turned on. Where to start diagnostics?
Why is there no power to the fuel pump?
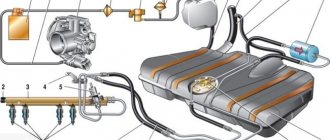
A gasoline pump is necessary to supply fuel from the gas tank to the fuel rail, creating the necessary pressure.
Electrical circuit for controlling a fuel pump.
The fuel pump is an electromechanical device, so its breakdown can be due to both insufficient power supply and mechanical damage. It is not difficult to detect a lack of tension.
- To do this, turn on the ignition and listen.
- When you turn the key, the fuel pump starts, which creates a slight hum . If you don’t hear a buzz, then most likely the device is de-energized . You have already found out that there is no voltage supplied to it.
How to check the functionality of the pump?
If the engine is absolutely “dead”, follow this algorithm:
- Turn on the ignition without turning the starter. A working electric fuel pump should respond with a quiet but distinct buzzing sound coming from the rear row of seats. If there is no sound, go to the next step.
- Using the car's operating instructions, find the number of the fuse that protects the pump's power circuit. Try replacing it; if unsuccessful, check the wiring and clean the contacts from oxides.
- If previous manipulations did not produce results, you need to measure the fuel pressure in the fuel rail.
Algorithm for checking a fuel pump using a tester:
Stage 1 – checking the fuse and relay. Stage 2 – checking the voltage at the relay input. Stage 3 – checking the voltage at the relay output. Stage 4 – checking the voltage on the fuel pump block.
The Lada-Kalina submersible fuel pump, as in other cars, is necessary to supply gasoline to the combustion chamber of the internal combustion engine. The pump is activated immediately when the ignition is turned on and maintains operating pressure until the car is turned off or the fuel runs out. The fuel pump is part of a module that includes a fuel pressure regulator, which changes the supply parameters when the driver operates the accelerator pedal. The module also contains a sensor that sends data to the dashboard, to the fuel level indicator. In addition, the design of the fuel filter includes a fine-mesh mesh for coarse fuel cleaning.
The manufacturer declared the resource of the fuel pump on Lada Kalina to be 160 thousand kilometers. The most common model of the unit is a Bosch submersible rotary fuel pump. This is available in online stores for approximately 2,500 rubles.
Connector block for fuel pump 2110 new. (thick)
Leave your review of the product: Connector block for fuel pump 2110 new. (thick)
Delivery to regions
- Delivery of goods is paid upon receipt of the goods in your city.
- Delivery to the transport company is FREE
- The timing, cost and method of delivery by region depend on the weight, dimensions and cost of the ordered product.
Attention: Orders are processed every day, seven days a week, from 09-00 to 21-00 inclusive
Order of shipment to regions of the Russian Federation.
- Place an order through the website or by phone.
- You pay the bill through the bank, after the money arrives in our bank account (usually 1-3 days after payment for the goods), when paying through electronic money systems (funds are credited within a day), we deliver the goods to the transport company.
You can make a preliminary calculation of the cost and delivery time of the goods you have chosen to your city by choosing one of the companies recommended by us.
Russian PostPhone: 8-800-2005-888 Website: https://www.russianpost.ru Coverage: delivery is possible to any location in Russia Opening hours: Mon-Fri from 10 to 19, Sat from 11 to 16, Sun – closed Calculate delivery cost Track the cargo
Business linesPhoneSite: https://www.dellin.ruCoverage: 500 cities of RussiaOperating hours: Mon-Fri from 10 to 19, Sat from 11 to 16, Sun - closedCalculate delivery costTrack the cargo
Attention - This delivery method is ordered from a consultant! Phone Website: https://www.emspost.ru Coverage: delivery is possible to any location in Russia Opening hours: Mon-Fri from 10 to 19, Sat from 11 to 16, Sun – closed Calculate delivery cost Track the cargo
PECTphoneSite: https://www.pecom.ru Opening hours: Mon-Fri from 8 to 20 Sat from 10 to 16, Sun – closed Calculate delivery cost Track cargo
SDEKTelephoneWebsite: https://www.edostavka.ru/Opening hours: Mon-Fri from 8:30 to 19, Sat from 10 to 16, Sun – closed Calculate delivery cost Track cargo
Hermes. You can pick up your parcel yourself at one of the Hermes delivery points in 196 cities of Russia. Hermes points are located within walking distance from the metro and public transport stops. Website: www.hermesrussia.ru Opening hours: Mon-Fri from 9-00 to 19, Sat from 10 to 16, Sun – closed
If you cannot decide on the choice of transport company or do not know which transport companies deliver goods to your city, we will be happy to advise you.
If you cooperate with a transport company not represented in this list, then write to us and we will deliver your cargo to any transport center within the city of Tolyatti.
Design and operation of fuel supply
The system that provides the engine with the required amount of gasoline operates according to the following algorithm:
- After turning on the ignition, the electric fuel pump starts, raising the pressure in the line after itself to a certain level. The electrical power supply circuit of the unit is protected by a fuse.
- The fuel pressure regulator (common abbreviation - RDT) is located on the line after the pump and limits the upper pressure threshold, dumping excess fuel back into the tank through a separate pipeline.
- When the crankshaft is rotated by the starter and the engine continues to operate, fuel enters the fuel rail, mixes with air and is directed to the injectors built into each cylinder. The amount of mixture supplied to the combustion chambers is controlled by an electronic unit.
- On the way to the fuel rail, gasoline goes through 2 stages of filtration. The first is a mesh installed in the tank on the suction pipe of the pump, the second is a fine filter on the gas supply line.
Reference. In various car models, 2 schemes are used for installing the RTD and laying the return pipeline - in the engine compartment or directly in the gas tank. In the first case, the standard fuel pressure in the system is 2.7...3.0 Bar, in the second - 3.8...4 Bar.
A common mistake made by ignorant car enthusiasts: if the combustible mixture does not enter the cylinders, then the fuel pump is definitely not working. Knowing the design of the fuel supply, we can assume other problems:
- the protective fuse in the electrical circuit has blown, the pump is in good working order, but does not receive power;
- the primary or secondary filter is clogged (sometimes both at once), fuel flows in small quantities or does not flow at all;
- the pressure regulator has become unusable, dumping the lion's share of the fuel back into the tank, the engine gets nothing;
- One or more injectors have failed.
To accurately determine the source of the problem, you need to check the operation of the electric fuel pump and other elements. It is not necessary to go to a service station - diagnostic work can be carried out in your own garage.
VAZ 2110 fuel pump connector number
Dear visitors of the “Cars” website! We will be very grateful for your comments on the video clip “VAZ 2110 fuel pump connector number”; registration is not required for this. We also ask you to let us know if you have any problems playing the video.
a question. and always after the engine is turned off. When the pressure gauge is connected, the pressure in the rail should be maintained. that is, the arrow should not fall even a little. and what does it mean if it falls?
07/25/2017 – 06:49 Oleg 1974
Good afternoon, I’ll ask you a question as I’ve already asked others, but I don’t know a specific answer. The question is that I have an injection branded pickup truck with an engine capacity of 1. 3, the same one is installed on a ZAZ Sens. I decided to measure the pressure on the fuel rail 1 turn of the key without starting the engine 2. 9 kgcm. after 15 seconds it drops sharply to 2.0kgcm. 2starting the engine 2. 3kgcm. I sharply give the speed 2.9 kgcm. 4 I compress the return line 6. 0kgcm. After stopping the engine, the pressure remains for several hours. The fuel pressure regulator changed the readings to the same as described above. The fuel pressure regulator from the factory is 2112, the same as on VAZs, only on VAZs for some reason the pressure is 3.0 kgcm. constantly and this is considered the norm, maybe it’s the volume of 1.5 and 1.3 engines that makes such a difference. Or maybe the old R.D.T. failed and the new one was defective. I really hope for a clear answer from a specialist.
07/02/2017 – 03:37 VLADISLAV OLEGOVICH
if your car service wants to shoot normal videos, then first get a normal camera
06.24.2017 – 18:45 dushaa
Good afternoon, 2110 without return, pressure 4, when running it jumps 3 to 4, gradually drops. Problem when changing gear from 3 to 4 choking. Is there a problem with the fuel pump? kkvv 0.92
Can't see anything in the car service, no portable lamp? black screen. you speak to the blind. failure.
06/03/2017 – 17:39 Joe Joker
When the ignition is turned on, the pump pumps and pumps 3 bar, only the pump stops and the pressure drops to 0. When the internal combustion engine is running, it shows 2.5-8 bar. When the hose is removed from the turbocharger, the fuel pressure regulator increases to 3 bar. I put it on and it drops to 2.5-8 bar. The engine runs for about 10 minutes, the check light comes on, the engine starts to titrate, the pressure in the ramp at idle increases to 2.9 sometimes up to 3 bar. When I turn off the engine, the pressure immediately drops to zero and as a result the engine does not pull and develops power poorly. but when you start it, it pulls and tears out from under itself, about 10 minutes pass, the check light comes on and it’s like they’re holding it by the ass, you turn it off and start it right away again it tears everything fine. car vaz 2110. tell me what is the reason?
05/11/2017 – 19:16 Dmitry Demidov
Hello. Everything is about the same for me, but the pressure is a little lower. And the needle is not like yours - it stands rooted to the spot, but shakes within 0.1 atm. Could you please comment? Here is the video of the measurement
05/06/2017 – 22:15 Sergey Vladimirovich
I have 2.2-2 with the engine running and idling. 3 atm. I remove the hose from the RTD and it rises to 3 atm. Put it back and it drops to 2.2 atm. mesh and filter are replaceable. At idle I pinch the return hose and it rises to 6.5 atm. Why doesn’t it even rise to 2.5 atm at idle? engine 8 cl 1.5 with return.
04/23/2017 – 08:04 VAZIK BASHIN
a friend tell me, I'm already tired of the car at the bottom, kickdown, you're pushing the engine into a choke, I changed everything until I got to the fuel system, I measured the pressure = with it turned off, 1.5 atmosf. When I start 2.5, when I accelerate, the hose drops a little, but the hose does not rise, I pull off any changes, should I change the pump in conjunction with the RTD?? 2115 8klp
Signs of trouble
There are several signs by which you can determine that the Kalina fuel pump is not working:
- the car does not start or stalls almost immediately;
- “Kalina” twitches when moving;
- the car does not develop maximum speed;
- extraneous noise or grinding noise coming from the fuel tank.
Similar symptoms are also observed when the fuel filter is clogged. Therefore, before removing the fuel pump on the viburnum, first replace the filter element. If the “symptoms” do not disappear, repair or replace the fuel module.
Replacing the fuel pump Kalina
Before replacement, read the operating manual to learn the location of the fuel system element, the specifics of the adjacent fuel lines and the types of fasteners. When working, it is important to follow the outlined algorithm so as not to disrupt the functioning of the fuel supply system. Damage to the fuel line or improper assembly of the fuel module can lead to engine damage and even a car fire.
To carry out the work, the car owner will need:
- pliers;
- hammer;
- screwdrivers for flat and Phillips slots.
Sequence of replacing the fuel pump Lada Kalina
Before starting work, you need to “de-energize” the Kalina by disconnecting the battery terminals. Repair procedures should be carried out away from fire and places where sparks could be generated.
- We dismantle the rear seat and floor trim;
- Under the seat there is a fuel tank cap secured with 4 “cross” bolts. Unscrew;
- Now the car owner has access to the top cover of the fuel pump;
- Now you need to “unhook” all the plugs and fittings from the pump. To remove the power plug, press the latch upward and pull the plug to the side. The power plug itself is located on the left side of the fuel pump cover;
- To remove the fittings, you must use pliers. The locking clamp is pressed out by hand, after which the fitting itself is removed using pliers. The main thing is not to confuse the fittings: the lock on the top is green, the lock on the bottom is metal;
- After dismantling the fittings, clean the fuel pump cover as much as possible - dirt will not get into the gas tank;
- Removing the fuel pump cover retaining ring: take a flat-head screwdriver, place it against the outline of the ring and lightly tap it with a hammer so that the ring moves clockwise. The latch should pop out and the cover will be accessible;
- Open the cover and carefully pull the pump up so as not to damage the adjacent elements. Additionally, make sure that no sand gets into the tank;
- We take the new pump and carefully immerse it in the technological hole. We attach the lid. Next, assembly is carried out in reverse order.
After the repair, you need to start the Kalina and drive for a few minutes. During operation, it is necessary to check the operation of the internal combustion engine in different speed ranges, at idle speed; You also need to be attentive to various noises in the fuel tank.
The Kalina fuel pump relay is an important element for ensuring stable operation of the car. The internal combustion engine is the main unit for the movement of road transport. With the advent of electric vehicles, the share of cars with internal combustion engines is decreasing, but the vast majority will be provided with cars powered by hydrocarbon raw materials for the coming decades.
For stable operation of the flaming engine of any car, including the Lada Kalina, a stable supply of a sufficient amount of fuel is necessary.
The main element of the fuel system on Kalina is the fuel pump. The fuel tank on the Lada Kalina is located in the rear of the body, therefore, the delivery of gasoline through the supply pipes to the injector sprinklers must be constant and forced.
Other elements of the car's fuel system, in addition to the tank and fuel pump, are a fine filter and fuel supply pipes.
Troubleshooting the Kalina fuel pump
If the electrics are working correctly, the fuel pump remains the object of close study. Replacing the fuel pump assembly is an extreme, and not at all mandatory, measure.
Electrical diagram for connecting a fuel pump
If the fuel pump does not turn on during normal electrical operation, remove the device to check the fuel pump. To check the functionality of the fuel pump, you need to remove the cover, which is located in the rear of the car, and remove the unit itself.
If the pump does not pump or pumps intermittently, it may be necessary to replace the Kalina fuel pump mesh. We remove the cover, disconnect the hoses and wires, use screwdrivers to press out the retaining ring and gain access to the pump. The device itself is located in the gas tank and takes gasoline directly from the tank.
Routine work, which would include replacing the mesh, is not specified in the operating instructions for the Lada Kalina. Repairing the fuel pump in order to replace the mesh should usually be carried out after 50 thousand kilometers, since the fuel at Russian gas stations is generally of low quality.
During dismantling, this can be assessed visually; the mesh turns from white to dirty brown interspersed with mechanical residues of metal, dirt and oil. At the bottom of the glass, when dismantled, you can see solid particles of unknown origin, which could only get into the tank when refueling.
There is also the opinion of some experts about the possibility of washing the mesh without replacing it. But taking into account the cost of this part, which does not exceed 100 rubles, the feasibility of flushing during the rather complex procedure of removing and installing the fuel pump is highly questionable.
Separately, it is worth pointing out the culture of repair work: after disassembly, all parts must be cleaned of dirt and foreign impurities, thoroughly washed and installed in their original place without the use of excessive force. When replacing the mesh, it is advisable to replace the fine filter, which is located in the rear right wheel arch near the jack cup. Routine work to replace the filter is provided for during maintenance every 30 thousand km.
When pumping gasoline to the nozzle, 2 more grids are installed along the way to clean the fuel. One is located in front of the fuel pressure regulator, and the last cleaning line is installed before the injector inlet. But before these filters, gasoline arrives in a dirt-free state and fault diagnosis based on these barriers is practically not carried out, due to the low probability of the need for replacement.
The fuel system of the Lada Kalina car is a reliable and well-functioning combination of units that can ensure uninterrupted operation of the car for a long period of time with timely and correct maintenance. They include a mandatory replacement of the fine filter every 30 thousand km and, highly desirable, replacement of the fuel pump mesh after approximately 50 thousand km.
No work on modifying the electrical system or connecting additional electrical equipment can be carried out without electrical circuits. Next you will find a set of electrical diagrams for VAZ 1117, 1118 and 1119.
Replacing the fuel pump on Kalina
Welcome! Fuel pump - is responsible for supplying fuel from the tank to the car engine; if it fails, fuel stops being supplied to the engine and therefore the car will not start, or over time it may simply start to work worse and in this case the car will twitch when driving and it will lose dynamics (the fuel pump in such a situation will still pump fuel into the engine, but it will do it very much), besides this, the fuel pump no longer serves anything, although if you think about it, it goes first together with the Fuel Level Sensor , secondly, there is still a mesh on it that cleans gasoline from dirt, so we can say, thanks to the gas pump, we also find out how much fuel is left in the tank and even before this fuel goes into the engine, it is cleared of small particles of dirt, by the way, we will give advice, If you don’t want to change the fuel pump very often, then try never to bring the gasoline in the tank to the very minimum and especially do not drive the car until it runs out of gas (Only do this in rare cases or because of the situation), otherwise such trains will not lead to anything good and soon the fuel pump (this is its second name) will become unusable.
Note! To replace this pump on a car, you will need a set of tools in which: Screwdrivers will be lying around, a hammer and a drift, but in principle, the help of screwdrivers will be enough (But this is only if you don’t have a hammer with a drift, if you do, be sure to take them)!
- Replacing the fuel pump
- Additional video clip
Where is the fuel pump located? It is installed inside the tank and through fuel pipes it pumps fuel from the tank to the car's engine, but not all people know where the tank is located on front-wheel drive cars, let's explain briefly, on classics many people even saw it when the trunk was opened (It's just that on classics it's in installed in the most visible place and if the trunk is not covered with a trim, as for example on a VAZ 2101 car this is done, there is no trim unlike the same 2107, for example, then the gas tank can be easily seen), but with regards to front-wheel drive, the gas tank is located under the bottom , and the fuel pump is inserted into it from above, so in order to get to the pump it will be enough to remove the rear seat cushion and then, by folding back the standard carpet and unscrewing the fuel pump flap (Indicated by a red arrow), you will immediately see the pump itself, for clarity it is indicated by a blue arrow in the photo below:
How I looked for the reason for the failure of the VAZ 2110 fuel pump
In the evening I drove into the garage, but in the morning I couldn’t start it. Usually I turn on the ignition and hear the relay click and the pump hum, and after about 3-5 seconds the relay click is heard again and the pump goes silent and I turn the key all the way, the starter works but the engine does not start because there is no pressure in the power system, the pump does not pump .I am looking for the cause of the fuel pump failure by
check the fuse, which is located
Under the side panel in the depths there is a fuse box, relay and ECU.
Relay and fuse box enlarged
First, I checked the fuse number 3, took it out of the socket, inspected the condition of the contacts and checked the integrity with a device, the fuse turned out to be intact (by the way, 15 amperes), this did not help, then I checked the relay number 4. To do this, I unscrewed the nuts indicated by the arrows to remove the relay and install known to be correct. Where can I get a working relay?
You can remove the “high beam” relay in the mounting block for the duration of the check; it is exactly the same as the fuel pump relay. This did not help, I removed the rear seat under which there is a gas tank with a submersible pump.
Next, a hatch opens in front of us and underneath is a fuel pump.
Before performing the above actions, I checked the power circuit (+)(-), that is, the mass of the fuel pump at connector number 5 can be obtained with a test lamp and the result is positive, I checked the integrity of the circuit on the pigtail on connectors numbered 4,6
It may happen that there is no power circuit (+) or (-) at connector number 5. If (-), that is, ground does not come to the connector, you need to check the connection point with the body. My power supply circuits are ringing.
The ground connection point is difficult to access; to get there you need to dismantle the upper and lower lining of the floor tunnel.
I checked the power circuits coming to connector number 4, and the fuel pump does not work, then I performed the above steps as shown in the figure, took out the fuel module with the fuel pump from the fuel tank. Removed the pressure ring and gasket
Carefully pulled the fuel module out of the tank a little, tilting it towards the right door of the passenger compartment so as not to bend the float arm of the fuel gauge sensor (FLS)
I disassembled the fuel module. Separately, I checked the pump directly from the battery. The pump is running. I checked the connectors and found the cause of the failure; it turned out that the positive contact of the connector (in the form of a pin) at the bottom under the casing was slightly burnt. I cleaned the contact (in the form of a pin) of the connector, but I couldn’t clean the other side of the connector.
I bought it complete with float.
I assembled the fuel module without installing it in the gas tank, checked it, it works. The pump must be installed with the arrow pointing towards the trunk. Installed and drove the fuel pump works fine.
Possible causes of fuel supply system failure
The fuel pump on Kalina is electric. The use of this design and operating principle is justified by a number of advantages. These are simplicity and reliability, compliance with the required characteristics in terms of fuel supply volumes and a high level of safety ensured by turning off the system when the engine stops running.
On the other hand, for high-quality work you need excellent gasoline and cooling of the fuel pump, and the process is also accompanied by an increased noise level.
- As a rule, poor quality gasoline and dirty filters lead to incorrect operation of the gasoline pump or its failure.
- If there is no response from the engine when you turn the ignition key, the problem may be due to a broken fuel pump.
- Since the main unit of the fuel system is powered by current, to troubleshoot it is necessary to check the electrical circuit going to the fuel pump.
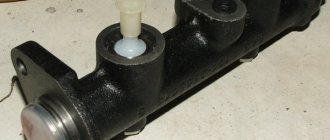
Replacing the fuel pump relay
The Kalina fuel pump relay is located in the cabin just below the dashboard near the air duct grille. To access the fuel pump relay, you need to remove the cover by prying it off with a regular flat-head screwdriver.
How to remove the fuel pump relay? Before replacing the relay, you should check the fuse box, which is located next to the gear lever and the ashtray. By opening the cover, you can visually evaluate the fuel pump fuse based on the integrity of the jumper. To remove parts, it is convenient to use tweezers, which can firmly and accurately fix the fuse.
While maintaining the integrity of the jumper, for final confirmation of operability, the part must be tested with an ohmmeter, since the point of contact of the wire with the legs may be open. If the fuel pump fuse is good, then the relay is not working. There are some nuances here. The fuel pump relay is removed using a socket wrench.
Having verified the integrity and operability of the electrical network and made the necessary replacements of parts, the Kalina fuel pump should start working again. If the fuel system still does not work, then the car owner will have to become more familiar with the components of the Kalina fuel supply system.