A special sensor is responsible for measuring the speed of the car. It is he who transmits information to the ECU and thanks to this sensor we see the speed of our car. If you suddenly notice that the speed on the speedometer is lower than that of your car, the sensor may have failed and needs to be replaced.
You can replace the speed sensor on Kalina yourself, without the help of specialists, and we will describe how to do this below.
Speed sensor, photo
Which one is installed and where to find the speed sensor on Kalina
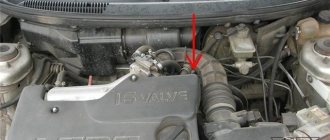
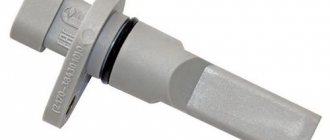
Lada Kalina cars are equipped with a speed sensor 1118-3843010 . It is located on the top of the gearbox, and to get to it, you need to unscrew the air pipe running from the filter housing to the throttle body.
How much does a speed sensor cost for Kalina?
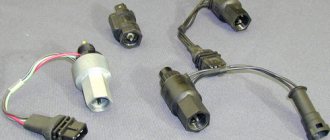
Today there are several types of sensor 1118-3843010 from different manufacturers.
- Sensor 1118-3843010 without ring (Pskov) price from 350 rub.
- Sensor 1118-3843010 without ring (StartVolt) price from 300 rub.
- Sensor 1118-3843010 with ring (Pskov) price from 500 rub.
- Sensor 1118-3843010-04 (JSC Account Mash) price from 300 rub.
In order to accurately determine which sensor you have installed, you need to remove your old one and look at the markings on it.
The principle of operation of the speed meter for the VAZ 2110 injection engine
So, why is the device in question located vertically if the axis of rotation of the manual transmission drive shaft is precisely horizontal? The fact is that the rotating element of the device is connected to the gearbox shaft not directly, but through a transition rotation transformer. Using a worm gear, horizontal rotation with a certain gear ratio is transformed to the mechanical part of the speed sensor.
The shaft end of the electronic part of the sensor, which we can see from the outside of the gearbox, is inserted into the adapter receiving sleeve.
The system operates according to the Hall principle. The moving parts of the Hall elements are located on the shaft inside the housing. When rotating, the counter part (in the form of an inductor) generates pulses synchronous with the rotation of the wheel. Since the circumference of the tire is known, the electronic module converts each revolution into a distance traveled. This is how mileage is calculated. It remains to divide this figure by a unit of time, and we get the speed of the car at any time.
Important! Information for those who like to change their shoes to non-standard tires. By installing tuning wheels and tires with a dimension difference of more than 3%, you do not just create additional load on the suspension elements
The algorithm for calculating the speed of movement is disrupted: the crankshaft, camshaft and speed sensors become desynchronized. As a result, the ECU incorrectly forms the composition of the fuel mixture and makes errors in setting the ignition timing. That is, the sensor does not operate normally (but there is no damage).
How to determine if the sensor is faulty
There are a number of signs by which you can determine that the speed sensor is faulty and requires replacement.
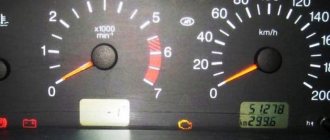
- Odometer doesn't count mileage
- The speedometer needle moves chaotically regardless of the vehicle speed
- Check Engine Light comes on while driving
These are the main signs that indicate that you cannot avoid replacing the speed sensor on Kalina.
After removing the sensor, you can inspect it and clean it, sometimes this “reanimates” it. Moisture or dirt may get into it, which leads to its unstable operation. The sensor terminal contact may also oxidize.
List of main faults
Signs of failure of the sensor we are considering are quite easy to determine. Even a novice owner of Kalina can cope with such a “task”.
Symptoms include the following:
- the arrow on the speedometer scale does not function (it is at rest despite the fact that the car is moving);
- the speed indicator is accompanied by sharp jumps in the needle;
- the needle hangs at a certain speed even when the car is stopped;
- The electric power steering symbol lights up on the instrument panel.
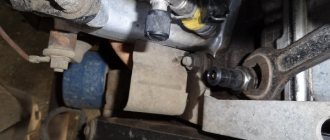
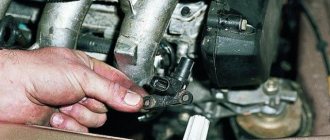
If these signs are present, the owner of the Lada Kalina should take preventive measures or replace the reader. The element itself is fixed to the gearbox housing with one screw. Three cables fit into its connector. You can get to the element after preliminary dismantling the adjacent elements of the engine compartment. If we have a 16-valve version of the engine in front of us, then to provide access we should move the reservoir with the washer fluid. When the owner has a Lada Kalina with an 8-valve engine, the speed sensor will be accessible if you remove the corrugated pipe of the air intake system, which fits into the housing of the filter component.
To purchase a similar sensor, you will need to read the number printed on the surface of the product. Here you need to show restraint and not run to the store for a new element just yet. We recommend checking your contacts. Sometimes they can oxidize or there is a break in the supply wiring. A fairly common cause of sensor failures is the ingress of metal shavings, which are present in any well-worn transmission unit.
Experts have noted that the occurrence of a malfunction of this element may be associated with breakdowns present in the electric power steering unit.
Some owners of LADA Kalina, having replaced the sensor, discover that it does not function. Here, the fault may be a defect present in the new product or the sensor simply does not fit this modification of the car. This indicates the need to select a product only by the number present on the case.
Instructions for replacing speed sensor 1118-3843010 Lada Kalina
So, we open the hood and see a rubber corrugated pipe running from the air filter to the throttle. To make it easier to replace the sensor, we will have to remove this pipe.
After removing the pipe, we see on the gearbox housing a sensor to which a block with a wire fits.
Carefully remove it from the sensor and unscrew it using a socket on the “10” bolt securing the sensor. For convenience, you can use either a small ratchet or an extension cord.
We check the sensor block and clean it if necessary. We take the new sensor, install it in place and reassemble it in the reverse order.
This completes the replacement process; no other actions are required.
Diagnostics
Checking the controller can be done in several ways; we recommend that you familiarize yourself with each of them in more detail. For the first two methods you will need a voltmeter.
- First, the sensor must be removed. Find its installation location, disconnect the connected connector, unscrew the fixing nut and remove the device from the mounting location.
- Then take a voltmeter and figure out the pinout of the connector. The connector has three contacts, the first of which is usually a positive contact, the second is an output signal, and the third is a negative contact. One of the tester probes should be connected to contact number 2, and the second probe should be grounded - connected to the engine body or car body.
- Afterwards, you need to rotate the controller to determine whether there are pulses in the operating cycle and measure the output voltage. To do this, you need to install a piece of pipe on the sensor axis and rotate the device at a speed of approximately 3-5 km/h. The voltage and frequency in the tester depend on the rotation speed of the controller (the author of the video is Artem Kulzhanov).
The second diagnostic option is performed without dismantling the sensor:
- You need to put the car on a jack. You need to jack up the front of the car so that one of the wheels is hanging out and not in contact with the ground.
- After this, the tester probes must again be connected to the contacts on the device connector.
- The hanging wheel must be rotated and at the same time monitor the readings on the tester display. If, as a result of rotation, voltage and frequency appear, measured in hertz, then this indicates the operability of the device.
There is another checking option; to perform it you will need a light bulb or control.
Diagnostics is performed as follows:
- First of all, you should disconnect the plug and wiring from the sensor.
- Using the control, you will need to find the plus and minus, before that you need to turn on the ignition.
- Next, as in the previous method, you need to put the front of the car body on a jack and hang one wheel.
- Now you should connect the control pin to the pulse contact of the sensor (usually it is the middle one) and rotate the wheel by hand. If at the same time the minus lights up on the control panel, this indicates that the device is working. Alternatively, instead of a control, you can use a light bulb with a connected wire, one of which is connected to the battery, and the second to the signal connector. If the light begins to blink when the wheel rotates, then the controller is working (video shot by Alex Kov).
Recommendations for replacing the speed sensor on Kalina
Do not rush to change the sensor immediately; it is quite possible that the contacts have oxidized or dirt has gotten into the block. You can also clean the sensor itself and reinstall it. Different versions of Kalina may have excellent sensors:
- 1118-3843010
- 1118-3843010-02
- 1118-3843010-04
All the above sensors are interchangeable! They are suitable for Kalina 1117, 1118 and 1119 cars with 1.4 and 1.6 liter 8 valve engines. The speed sensor from Priora is physically suitable, but it cannot be installed, as it shows incorrect values.
Now you know what to do if the speedometer on Kalina stops working, what is the reason and how to solve this problem yourself.
Crankshaft position sensor operation
The function of the crankshaft position sensor is to synchronize the operation of the injection and ignition systems. It transmits information about the position (angle of rotation) of the crankshaft at a specific moment in time to the electronic engine control unit (ECU), which in turn gives commands to ignite the fuel mixture in the engine. Accordingly, if the sensor fails, the engine will simply stop working, that is, it will stall or not start. However, in most cases, a malfunction of the crankshaft position sensor is expressed in the separation or instability of the power and signal wires.
Principle of operation
The job of the DPKV sensor, regardless of the type it operates on, is to monitor the missing tooth on the crankshaft crown (or two teeth, depending on the design of the particular engine). For this purpose, there is a so-called synchronizing disk, along the perimeter of which the indicated metal teeth are located. Accordingly, the sensor detects them using a magnetic field. However, it also “feels” the skipping of two of them, accordingly, an electrical signal is not formed in it, a skip occurs, which is a signal to the ECU about the position of the crankshaft in a certain position and synchronization of the ignition system among the cylinders.
So, if this is a magnetic induction sensor, then it works in a magnetic field (magnetized core with a winding of copper wire) and when the metal teeth of the synchronization disk pass past it, an electric current (signal) appears in it, which is transmitted to the ECU, signaling a certain position of the crankshaft (corresponds to the position of the missing teeth).
Hall sensors operate on the so-called Hall effect, which consists in the fact that a signal is generated when an alternating magnetic field crosses the synchronization disk, that is, the constant field of the crankshaft position sensor. At the same time, its voltage changes, which is the signal transmitted to the electronic control unit.
Less commonly found on cars are so-called optical sensors. They work on the principle of a light source and receiver through the teeth of a synchronizing disk. Accordingly, if the light-receiving element notes that the light has gone out for longer than expected, this becomes a signal to the electronic control unit about a certain crankshaft position with the same consequences as for other types of sensors.
In addition, the DPKV not only records the position of the crankshaft at a specific point in time, but also determines the frequency of its rotation.