| The interior of the LADA Priora does not warm up in cold weather, and the windshield and side windows freeze? There is only one reason - the stove does not heat well . The LADA Priora interior heating system performs a number of functions (heats, cools, ventilates the interior); in this article we will look at the heater design separately. |
The car is equipped with a heating and ventilation system, which serves to create the most comfortable conditions for the driver and passengers, regardless of weather conditions. The heating and ventilation system includes:
- heater
- heater fan.
- cabin air temperature sensor.
- air distributor housing.
- air ducts
- deflectors.
The air from the heater enters the air distributor housing and then into the air ducts. Through them, air is supplied to the windshield and side window vents, to the central and side deflectors on the instrument panel, as well as to the feet of the driver and passengers.
Elements of the heating system LADA Priora
1 — filter cover; 2 — heating and ventilation system filter; 3 — heater housing; 4 — micromotor-reducer of the heater damper; 5 — heater radiator; 6 — additional heater fan resistor; 7 - heater fan
Heater parts: 1 - screw 1/76691/01; 2 — heater radiator 2110-8101060; 3 — left heater casing 2111-8101025; 4 — heater control damper 2110-8101538; 5 — right heater casing 2111-8101024; 6 — air duct housing 2111-8119124 intermediate; 7 — screw 1/76692/01; 8 — lower air intake housing 2111-8119026; 9 — bracket 2108-8101110; 10 — bracket 2111-8119102 right; 11 — screw 2114-5325388; 12 — air filter 2111-8122020; 13 — upper air intake housing 2111-8119025; 14 — filter cover 2111-8119116; 15 — screw 1/76702/01; 16 — screw 1/76691/01; 17 — additional resistor 2123-8118022; 18 — screw 2123-6302332; 19 — screw 2114-5325388; 20 — air supply pipe 2123-8118096; 21 — electric fan 2111-8118020 of the heater; 22 — bracket 2108-8101110; 23 — gear motor 2110-8127200 for the heater damper; 24 - screw 1/76691/01
Fan doesn't work
But sometimes another problem occurs with the Priora stove. The driver turns the heater switch, and in response there is silence. The electric motor is not working. What is the reason. There may be several of them:
- The fan motor burned out.
- The heater control unit has failed.
- The fan speed resistor has burned out.
- Broken electrical wiring.
The easiest way to determine if a resistor is broken. In this case, only the maximum speed is turned on, and the stove does not respond to other positions of the handle.
The control unit is checked either by computer diagnostics or by a simple replacement. There are no other options.
The condition of the electric motor can be determined by checking with a test lamp. It is enough to remove the top frill and gain access to the motor connector. Disconnect this connector and insert a test lamp instead of the chip going to the fan. When you turn on the stove handle, the light should light up if the unit and wiring are working properly. If there is no signal, start checking the wires sequentially. If the lamp lights up, replace the electric motor.
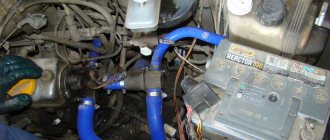
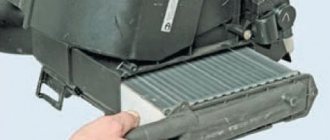
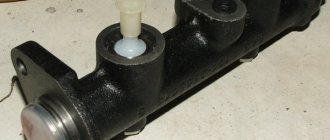
Heater radiator
| The heater radiator is connected by hoses to the engine cooling system. Coolant constantly circulates through the heater radiator. The heater control damper directs outside air to or bypass the heater core. In intermediate positions of the damper, part of the air passes through the radiator, and the rest bypasses the radiator. In the extreme positions of the damper, all air passes through the radiator or bypasses it. |
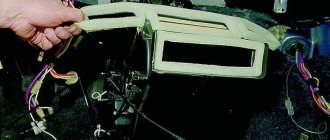
Replacement: how to remove (change) the stove on a Priora with and without air conditioning
Replacing a stove completely is rarely done; components are mostly changed. Often the main reason for disassembling the heater on a Priora car is replacing the heater radiator. When it ceases to be airtight and no longer works as efficiently, it is necessary to begin repairs. In order to remove the heater on a Priora car without air conditioning, you will need a set of wrenches (socket and socket wrenches) and a Phillips screwdriver. As the system is disassembled, it is worth inspecting all parts and replacing worn ones. Perform the work according to the instructions:
- Remove the negative from the battery.
- Remove the lower windshield seals and engine sound insulation.
- Loosen the clamps that hold the pipes adjacent to the heater core, and then disconnect them. First place a basin under the pipes to drain the coolant. After the liquid has poured out, cover the pipes with a rag.
- Start wiring. Unclip the latch and disconnect the motor wires. Then de-energize the additional resistor.
- The wires that go to the damper drive motor are secured with a clamp. You need to bite it and then disconnect the wire.
- Next, we proceed to dismantling the heater itself. Take a “ten” socket wrench, remove three screws with it, and remove another screw with an “8” wrench.
- Next, move the wiring harness from the heater to the side (attached to a small bracket).
- Now, from the passenger compartment under the dashboard, unscrew the third nuts securing the brake pedal with the “13” key, and then move it to the side.
- Pull the block towards you.
- Install a new heater instead of the old one if necessary.
- When you are concerned that the heating is not blowing correctly - not in the required mode - you will have to check everything again during dismantling.
- To remove the heater on a car with air conditioning, follow these steps:
- Also remove the negative terminal, then the lower windshield seal, and the engine sound insulation.
- Unscrew the screws covering the heater radiator.
- Also carefully remove the pipes: the coolant must be drained into a prepared basin.
- Slowly and smoothly pull the radiator up until it comes out of the mounts.
- Install the new radiator in the reverse order.
Lada Priora has Panasonic or Halla air conditioners. They differ only in the fastening, so there will be no difficulties when replacing the heater radiator.
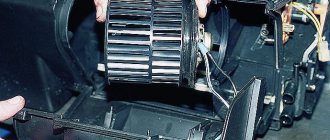
Heater assembly
1 — micromotor-reducer of the heater damper; 2 — heater control damper; 3 — additional heater fan resistor; 4 — blowing hose for the fan motor; 5 — heater fan; 6 — filter cover of the heating and ventilation system
The heater is installed in the engine compartment under the right windshield trim and is attached to the front panel. A filter is installed at the heater inlet to clean the air entering the heating and ventilation system.
Device principle
Using the Panasonic air conditioner as an example, you can see that it consists of the following components:
- Compressor - it has three blades, with its help the required pressure is created, it is located under the generator.
- Condenser - it cools the air.
- Evaporator – dries the air before it enters the cabin.
- Receiver – with its help the air is purified.
- Pipelines.
These are the features of the Lada Priora air conditioner. Having familiarized yourself with this information, eliminating breakdowns that will occur in the future will not be difficult, and the Priora’s heating system will work normally again.
How to remove the center console in a Lada Priora car
Priora low beam lamps: how to select and replace
Quick heating of the interior
To quickly warm up the air in the cabin, do the following.
1. Install the air flow distribution regulator 1 as shown in the photo.
2. Turn control knob 2 clockwise to the extreme right position until it stops.
3. Turn the handle of the switch for 3 operating modes of the electric heater fan to position “4”.
| Rice. 1.8. Air flow distribution organs |
4. Open the side 2 (see
rice. 1.8
) and central 5 nozzles.
Ensuring a comfortable air temperature in the cabin
If the windows in the cabin are clear, but the temperature in the cabin has not reached the desired temperature, do the following.
1. Set the desired temperature using regulator 2.
2. Set regulator 1 to the vertical position.
3. Select the required intensity of warm air supply into the cabin using the 3-mode switch for the heater fan.
Useful tips
Regularly clear the fresh air intake openings located in front of the windshield of snow and leaves.
Do not allow the exhaust vents located in the side trim of the trunk to become dirty.
Keep your car windows clean: Dirty windows retain more moisture than clean windows, and therefore take longer to defrost.
Replacement steps
This task is not difficult, but painstaking and difficult for absolute beginners. To avoid any difficulties, you must strictly follow the work plan described below.
- Disconnecting the “−” terminal of the battery and the wire.
- Dismantling the frill.
- Disconnecting the block with wires from the connector on the additional rheostat.
- Removing the fasteners on the resistor using a Phillips screwdriver of the appropriate size.
- Removing a faulty mechanism on the heater.
- Installing a working mechanism according to the same scheme, but in reverse order.
Problems with the damper gear motor or fan motor
A common malfunction on a Lada Priora car is that the heater does not work. No air blowing at all.
First, you should make sure that the heater motor is working - at least cold air should be blowing from the deflectors. If not, then you need to check the integrity of fuse F9.
If it is intact, it means the stove fan is not working. "Priora" is equipped with a "ten" fan. Therefore, removing it exactly repeats the procedure on the “ten”. In some cases, the fan does not spin because leaves or other foreign objects have gotten between the impeller and its housing, which can block rotation. In this case, you can hear a characteristic hum.
Cold air can also come out of the deflectors because the gear motor that controls the damper that blocks the flow of hot air is not working. It is also accessible from under the hood.
Often the cause of gearmotor failure is oxidation of conductive contacts. They need to be cleaned with sandpaper by disassembling the body. You should also pay attention to the strength of the air flow. If even at maximum speed the air is blowing weakly, it may be a clogged cabin filter. It is located under the hood in the heater housing and creates additional interference.
Important points
There are a couple of nuances, without mentioning which this article would be incomplete:
- The old gearbox should be removed very carefully. A long shank sticks out of it. If you remove the gearbox at an angle, you can damage the edge of the hole for the shank. If this happens, installing a new gearbox will not be so easy. Therefore, advice: when removing the gearbox, it should be pulled in a plane parallel to the floor;
- When buying a new gearbox at a car dealership, you should only buy the original VAZ one. Yes, its quality leaves much to be desired. But this is still better than buying a fake gearmotor, which the spare parts market is literally flooded with now. You can spot a fake by price. A normal gearmotor on a Priora costs 700 rubles and more. And a fake rarely costs more than 300 rubles.
So, replacing a heating gear motor is not a very difficult task and even a novice driver can do it. If a person has held a screwdriver in his hands at least once, he can handle it. All you need to do is follow the above recommendations exactly.
Types of breakdowns
Failure of the distributor to take the desired position may be due to:
- with loosening of its fastenings and the gear motor drive;
- its deformation from hot air or breakage;
- adhesion to sealant residues.
In these cases, the Priora stove damper is blocked in one position. At the same time, clicks of the rotating mechanism are heard inside the car (the gearmotor that controls its position is knocking).
Lada Priora heater damper: how to remove and check. To repair, check and replace it, you will have to remove the plastic panel - the torpedo.
How to get to this mechanism without such difficulties? You can try to change the position of the regulator with a long screwdriver through the air duct grilles.
Some car enthusiasts, in order to avoid deformation, replace the standard one with a metal or wooden one.
In one of the issues of the automobile magazine "Behind the Wheel" it was proposed to replace the electronic control of the damper position with a simpler one - mechanical. As in old VAZ car models, its rotation can be adjusted using a system of levers and cables. It's not as convenient, but it's much more reliable.
Interior ventilation
To ventilate the interior, set the controls and switch of the ventilation and heating control unit to the following positions.
1. Turn the handle of the supply air temperature regulator 2 clockwise until it stops.
| 2. Install the air flow distribution regulator and the heater fan mode switch as shown in the photo. | 3. Open the nozzles by turning the adjustment wheels up. |
4. Set regulator 3 to the desired air supply speed of the electric heater fan.
5. If the windshield fogs up, install the controls for the heating and ventilation system control unit as shown in the photo.
Helpful Hint: If the car is equipped with air conditioning, set the supply air temperature control to the extreme left position. This method is most effective in summer in rainy weather.
Cleaning windows from snow and ice
To quickly clear snow and ice from the windshield and front door windows, do the following.
1. Turn the regulator handle 1 counterclockwise to the extreme left position, and the regulator handle 2 clockwise to the extreme right position until it stops, as shown in the photo.
New Lada: ᐅ Fuse and relay diagram Lada Niva (VAZ 2121, 4x4 Urban) | Fuse and relay box