After strong heating of the VAZ-2115 engine, the likelihood of its complete combustion increases. To prevent this from happening, it is necessary to constantly monitor the cooling system. Beginners believe that the injection mechanism does not require regulation, but this is not so - for the VAZ-2115 engine, the injector does not change anything.
Being able to independently maintain the cooling system, correct defects and breakdowns means saving a certain amount of money and time. What factors does the VAZ-2115 cooling system require to control?
- All components work properly.
- Degree of tightness.
If at least one of the problems listed above exists, it’s time to start repairing. There is no point in delaying repair work - the engine is too expensive to conduct experiments with it, much less wait for it to burn out.
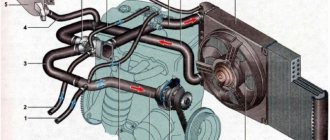
VAZ-2115 cooling system diagram
After strong heating of the VAZ-2115 engine, the likelihood of its complete combustion increases. To prevent this from happening, it is necessary to constantly monitor the cooling system. Beginners believe that the injection mechanism does not require regulation, but this is not so - for the VAZ-2115 engine, the injector does not change anything. Being able to independently maintain the cooling system, correct defects and breakdowns means saving a certain amount of money and time. What factors does the VAZ-2115 cooling system require to control?
- All components work properly.
- Degree of tightness.
If at least one of the problems listed above exists, it’s time to start repairing. There is no point in delaying repair work - the engine is too expensive to conduct experiments with it, much less wait for it to burn out.
How does the VAZ-2115 cooling system work?
The VAZ-2115 has the same cooling system built into it as other injection-type cars. The principle of operation is based on heat exchange that occurs with the help of liquid. The latter can be antifreeze, cooling antifreeze, or, in extreme cases, water, although experts do not recommend using the latter option.
The cooling system circuit built into the VAZ-2115 consists of the following key components indicated in the photo:
- electric motor;
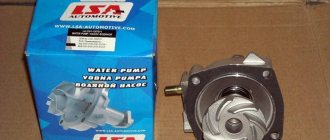
- pump – ensures the movement of the filled liquid throughout the system;
- radiator;
- thermostat - regulates the activity of all components of the structure.
Circulation through the coolant pipes is ensured by a centrifugal pumping device. Enabling and disabling the sensor depends on the values shown by the sensor.
The temperature regime available in the VAZ-2115 is also important. If the readings exceed the established 87 degrees, the following happens:
- the thermostat valve comes into action and opens;
- the cooling liquid enters a large circulation circle, which involves passing through pipes through the engine and cooling the latter;
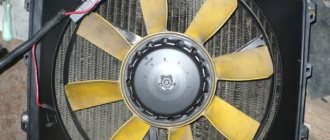
- the fan comes into operation, it begins to supply air flow to the radiator grille, and this helps to reduce the temperature.
Among all the components of the cooling system, experts call the most important one, without which the entire mechanism could not work properly - this is the valve coming from the thermostat. The part consists of technical wax, which is deformed under certain temperatures. This is how the volume of coolant supply is ensured and the cooling intensity is regulated.
Changing the coolant strictly according to the maintenance regulations
It is important to change the coolant frequently to prevent engine damage, because Over time, it loses its properties and is subject to heating.
To carry out work on changing antifreeze or antifreeze, you need to know the important components:
- Know the period during which you can use cooling liquid, antifreeze for 2 years, antifreeze for 5 years.
- Monitor the mileage for fluid changes, usually from 20,000 to 40,000.
- Check the condition of the fluid, paying attention to the color; if the color has changed after use, the fluid must be replaced.
Of course, the best choice would be antifreeze as a coolant, because... It has a longer shelf life, unlike antifreeze, and the system wears out less. But the price indicator for antifreeze is much cheaper.
When flushing the cooling system, you must:
- Drain all coolant from the system, tighten the plugs tightly and fill with distilled water to the maximum mark.
- Start the engine and warm up until operating temperature is reached.
- Let it run at about 3000 rpm. Be sure to monitor the movement of the engine temperature scale to avoid overheating.
- Then turn it off and leave it for 7 minutes, after which we pour the water out of the system. In case of water contamination, repeat the procedure until the effect of clean water is achieved.
Causes of breakdowns of the VAZ-2115 cooling system
Nothing lasts forever, so the cooling system can also break down.
Every car enthusiast can cope with the malfunction; it’s not difficult to do it yourself, especially since you now know what the VAZ-2115 cooling device circuit looks like and works. First you need to accurately determine the problem that has arisen, it could be:
- Incorrect thermostat operation. We check the thermostat for serviceability: start the VAZ-2115 engine and wait until the engine temperature reaches 97 degrees. Now feel the lower pipe located under the thermostat: if it is cold, the thermostat valve is broken.
- The coolant level is not enough or the old used substance needs to be replaced with a new one. Antifreeze is easy to replace without the help of professionals: place a container under the car, drain the old antifreeze, then go through the cooling system thoroughly, cleaning it of dirt with special detergents, which can be purchased at a car store. All that remains is to fill in new fluid. The VAZ-2115 injector is easier to maintain than a car with a radiator. To drain the radiator fluid, use the following instructions:
- remove the engine protection;
- move the stove heater temperature regulator to the left, moving it to the highest temperature;
- open the expansion tank cap;
- place a container under the radiator, leave the drain plug in the open position and drain the old antifreeze (when handling the drain plug, do it carefully, otherwise there is a possibility of flooding the generator);
- 10 minutes and the antifreeze is drained, you can fill in new antifreeze.
- Violation of the tightness of the VAZ-2115 cooling system. In a confined space, the boiling temperature reaches 130 degrees, and under normal conditions it is 108 degrees. As you can see, insufficient tightness provokes poor performance of the cooling system.
Why is the cooling system malfunctioning?
The main malfunction of the cooling system occurs as a result of incorrect operation of the thermostat. In a particular case, the only solution will be to replace it.
Before you begin work on replacing the thermostat valve, it must be checked for serviceability by starting the engine while it is cool. When the engine warms up to about 90 degrees, touch the pipe at the bottom of the radiator, it should be warm, this indicates the serviceability of the valve; if the pipe is cold, the valve must be replaced.
VAZ 2114 car models have an aluminum radiator; it is equipped with two additional tanks; the left one has a partition.
The cooling system is quite simple, so you can carry out repairs yourself. The radiator is the main component of the car’s cooling system, its main function is to prevent engine overheating by removing warm air from the engine to the outside.
- The radiator itself.
- Bottom tank with pipes.
- Top tank with pipes.
How to change the cooling system pipes of a VAZ 2115
Disconnect the wiring from the pump.
Using a Phillips screwdriver, remove the screws, and then remove the hatch cover located above the tank. The second ends of the orange wires are brought together to a point connected to plug “3” of the “X4” block of the mounting block. Their price is small, but their help and impact are significant. Wiring VAZ 2115. Part 2.
"Check engine" indicator lamp. Table 7. For added safety, the model was supplemented with a brake signal and rear lighting. Thanks to different engines, the VAZ engine compartment wiring has its own design differences: the VAZ model has larger wiring harnesses due to the installation of additional sensors and electronic devices; The connectors of some electrical circuits have also changed; The layout of some of the wires has changed. In addition, the layout of some of the electrical components as a whole was changed. On cars with an injection engine there is an additional unit located in the front passenger's feet. When the lock socket illumination is on and the engine is running, the anti-theft locking device blocks the VAZ starter from re-engaging. The luggage compartment has become more spacious and convenient due to the increase in the trunk lid. relays and fuses for the computer, Carlson and fuel pump
Checking the main relay in a Lada Samara car
The prices for such devices in car dealerships are minimal, but their importance cannot be denied, since they largely affect the performance of electrical equipment. F8 7.5 A.
The cost of these elements in stores is minimal, but they play a very important role and must always be in working order. The box is designed for three relays and three 15A fuses, and is covered with a plastic shield on top.
The exterior decoration was decorated with plastic elements, since metal ones were corroded by corrosion. In the instrument panel wiring harness, the second ends of the white wires are brought together into one point, which is connected to the instrument lighting switch except for the white wire, from plug “4” of block “X2” of the mounting block 28 to the display block 83 of the on-board control system. However, in general, the VAZ model remains the same - it is equipped with front-wheel drive and five doors. Give preference to new models. Despite the modernization, many car enthusiasts who are far from the domestic automobile industry are still confused and the fuses do not protect only: the ignition circuit; electrical circuit for powering the generator and starter. How to check the ignition module, ignition coil and armored wires?!
Radiator replacement
If there is a need to replace the radiator, remember the first golden rule - the engine must be cold before dismantling the device. Therefore, if you just arrived at the garage, let the car sit for a couple of hours. Better yet, leave the car and come back tomorrow.
The replacement procedure itself is as follows.
- Unscrew the plug from the expansion tank and the cylinder and radiator plugs.
- Drain the coolant into a large container.
- Disconnect the radiator ventilation system from the battery.
- Remove the silicone pipes of the VAZ 2114 cooling system by disconnecting them from the radiator and tank.
- Remove the mounting bolts from the casing.
- Hold the radiator and remove the skin and fan together.
- This will completely free the radiator, so you can easily replace it with a new one.
- Assembly of the unit is carried out in reverse order. After replacing the radiator, start the engine and check the efficiency of the new unit.
Disadvantages in the cooling system
The VAZ 2114 engine cooling system has a big drawback, because... requires constant monitoring, frequent maintenance and necessary repairs.
VAZ 2114 cooling system diagram
Cooling diagram for VAZ 2114 : 1 – element in the form of a plug for the expansion tank; 2 – expansion tank; 3 – hose for draining liquid from the pipe; 4 – hose passing between the radiator and the expansion tank; 5 – hose leading from the radiator; 6 – tank to the left of the radiator; 7 – aluminum tube; 8 – plug systems; 9 – tank to the right of the radiator; 10 – drain plug; 11 – middle of the radiator; 12 – casing for electric fan; 13 – plastic wings of the electric fan; 14 – electric motor; 15 – toothed pump pulley; 16 – pump impeller; 17 – camshaft drive belt; 18 – engine block; 19 – pump pipe; 20 – radiator hose with supply function; 21 – heater radiator hose with drain function; 22 – hose supplying coolant to the throttle pipe; 23 – exhaust pipe; 24 – hose for refilling; 25 – heater radiator hose with supply function; 26 – thermostat; 27 – coolant temperature sensor; 28 – coolant level indicator sensor.
Features of the VAZ-2115 configuration
Then release the pressure, turn off the power to the fuel pump and turn on the ignition.
Electrical diagram of connections of the wiring harness of the non-contact ignition system 1 - spark plugs; 2 — ignition distributor sensor; 3 - ignition coil; 4 - switch; 5 — carburetor solenoid valve control unit; 6 — carburetor solenoid valve; 7 — carburetor limit switch; 8 — ignition switch; 9 — mounting block; 10 — speed sensor; 11 — electric motor of the engine cooling system fan; 12 — fan motor activation sensor; A — blocks for connection to the front wiring harness; B - scheme of conditional numbering of plugs in the blocks of the ignition sensor-distributor and speed sensor; B - to power supplies; G - to the instrument cluster signal for the tachometer; E - signal for the speedometer El to the instrument cluster. Electric motors for headlight cleaners at the moment of switching on. Even if the relay legs are intact, but the equipment does not work, the device must be dismantled and disassembled - perhaps the contacts are burnt inside.
How the OS works
The cooling system of the VAZ 2114 operates on the basis of internal heat exchange, which is carried out under the influence of coolant. It moves forcibly thanks to a pump, which is activated by a drive belt. The mixture enters the OS through the expansion tank.
The electric fan is located on the electric motor shaft. Depending on the indicators of the sensor, it is turned on or off. One of the main elements of the OS is a thermostat valve with a storage tank, which senses changes in air temperature.
If the fluid temperature is around 87 degrees, the main valve turns on and sends fluid through the large circuit. At a temperature of 102 degrees, the valve stops at 8 mm.
DIY engine radiator repair
The main problem as a result of which the radiator needs to be replaced or repaired is leakage of the cooling mixture, as a result of the presence of a hole or defects in the system.
Liquid usually leaks at the joints of plastic and metal parts. If the leak is small, just pour a special mixture into the radiator along with the cooling liquid, and under its influence the leak will disappear on its own.
If the leak is large enough, the radiator will have to be replaced.
Before proceeding with replacement, check the radiator for leaks; to do this, you must:
- Fill the bathtub with water.
- Plug the holes in the pipes tightly.
- The radiator is released into the water approximately 30-40 cm and a pressure of 0.2 MPa is applied.
- See if bubbles appear or not.
The radiator must be replaced after an accident in the event of a frontal or side impact.
Cooling system VAZ 2115
The cooling system is of great interest to motorists. Model 2115 machines have a hidden cooling system based on the use of a special cooling mixture. The movement of the cooling mixture occurs under the influence of a mechanical pump.
The assembly principle of many Russian cars is carried out rather poorly, so the performance of many mechanisms, including the cooling system, leaves much to be desired.
To identify and carry out the necessary repair work, you need to have an understanding of the condition and method of operation of the cooling system.
Airlock
If you have a 1.6 liter engine, then the first step is to remove the plastic cover on the engine - unscrew the cover on the engine to fill the oil, and then pull out the entire cover. It is seated on rubber seals. After removing this plastic screen, screw the oil cap back on to prevent dirt from getting into the crankcase.
— We find the heating pipes for the throttle assembly (there are 2 of them), see the picture. Pick up any phone
— Next, unscrew the cap of the expansion tank (coolant tank) and cover the neck of the tank with a clean rag.
— We begin to blow into the tank with liquid. We blow until all the air comes out of the hose and antifreeze flows out.
— Quickly put the tube back on and tighten it with a clamp so that no air gets in there.
(It is worth noting that depending on the tube that you removed, antifreeze may leak from both the tube and the fitting from which the tube was removed)
The second method of removing air from the cooling system is less perverted. There is no need to blow anything here:
— Warm up the engine to operating temperature
— The expansion tank cap does NOT need to be unscrewed.
— As in the first method, unscrew the clamp of the coolant pipe on the throttle assembly.
— Having removed the heating pipe of the throttle assembly, release the air, and after the antifreeze begins to flow out, immediately put it back on the fitting and secure it well with a clamp.
But be careful and careful! Don't forget that the coolant temperature is approximately 90 degrees.
There is also a simpler, but less effective way to eliminate an air lock:
1) We drive up a steep hill so that the radiator cap becomes the highest point of the cooling system.
2) Unscrew the cap of the expansion tank and the radiator cap.
3) Let the car warm up to operating temperature
4) Then we accelerate several times and at the same time add coolant into the barrel.
Do this until bubbles stop appearing.
Thermostat repair
The thermostat sensor also serves to maintain the set temperature norm. It blocks the movement of the cooling mixture into the radiator until the engine heats up to the desired temperature of approximately 90 degrees. Liquid begins to flow through the thermostat when Celsius reaches 95 degrees. Using a thermostat, the engine takes minimal time to warm up. The thermostat is located between the engine and the cooling radiator.
Common problems:
- The valve is closed - the engine, when not warmed up, holds speed very poorly and may stall.
- With the valve open, you can drive during frosts, or turn on the heater to maximum mode, otherwise the engine will overheat.
When carrying out repair work on the thermostat, it is allowed to lightly tap the housing with a screwdriver to move the valve.
If it is necessary to completely disassemble the thermostat, it is important to tightly close the pipes to avoid antifreeze leakage, only then disassemble the thermostat. At the end of the repair, it is better to replace the antifreeze.